Saving pumpkin seeds is a great way to preserve the genetic diversity of your favorite variety and ensure you have plenty of healthy seedlings for next year’s garden. But before you can enjoy that, you need to know how to save them correctly. It’s surprising how many people let their precious pumpkin seeds go to waste, simply because they don’t know where to start.
In this article, we’ll walk you through the simple process of preparing, cleaning, drying, and storing your pumpkin seeds for successful seed preservation. You’ll learn the best methods for extracting seeds from your pumpkins, how to dry them evenly to prevent mold, and which storage containers will keep them fresh for months to come. With our expert guide, you’ll be well on your way to harvesting a bountiful crop of healthy, homegrown plants in no time!
Preparing Your Pumpkin for Seed Saving
Now that you’ve harvested your pumpkins, it’s time to prepare them for seed saving. This step is crucial for collecting viable seeds for next year’s crop.
Choosing the Right Pumpkin Variety
When it comes to saving pumpkin seeds, choosing the right variety is crucial for several reasons. Firstly, not all pumpkins are bred specifically for their seed quality or quantity, which can affect the viability and germination rate of the saved seeds. Secondly, some varieties may have desirable traits such as resistance to certain diseases or improved flavor that you want to preserve.
To ensure success with your pumpkin seed saving endeavors, consider the following popular options: ‘Jarrahdale’, ‘Cinderella’, and ‘Long Island Cheese’. These heirloom varieties are prized for their unique characteristics, disease resistance, and high-quality seeds. ‘Jarrahdale’ boasts dark blue skin and sweet, nutty flavor, while ‘Cinderella’ is renowned for its symmetrical shape and tender flesh. Meanwhile, ‘Long Island Cheese’ offers a rich, creamy texture and rich aroma.
When selecting a pumpkin variety, keep an eye out for the words “open-pollinated” or “heirloom” on seed packets or labels, as these types are more likely to produce high-quality seeds suitable for saving.
Removing Seeds from the Pumpkin
Scooping out seeds and pulp from the pumpkin is an essential step in preparing it for seed saving. To do this safely and efficiently, you’ll need a few simple tools: a large spoon, a scoop or spatula specifically designed for scraping out pumpkin guts, and a bowl to collect the seeds.
Hold the pumpkin over a sink or a large container to catch any stray seeds that might fall during the process. Start by inserting the scoop into the opening of the pumpkin and carefully breaking apart the stringy pulp and fibers. Continue to work your way around the inside of the pumpkin, removing as much of the pulp and fibers as possible.
As you scrape out the pumpkin, try to avoid damaging the seeds themselves. You can use a gentle touch or run the scoop under warm water to loosen any remaining pulp before transferring the seeds to a bowl for cleaning. It’s also helpful to remove any tough or moldy spots that may be hiding seeds or affecting their quality.
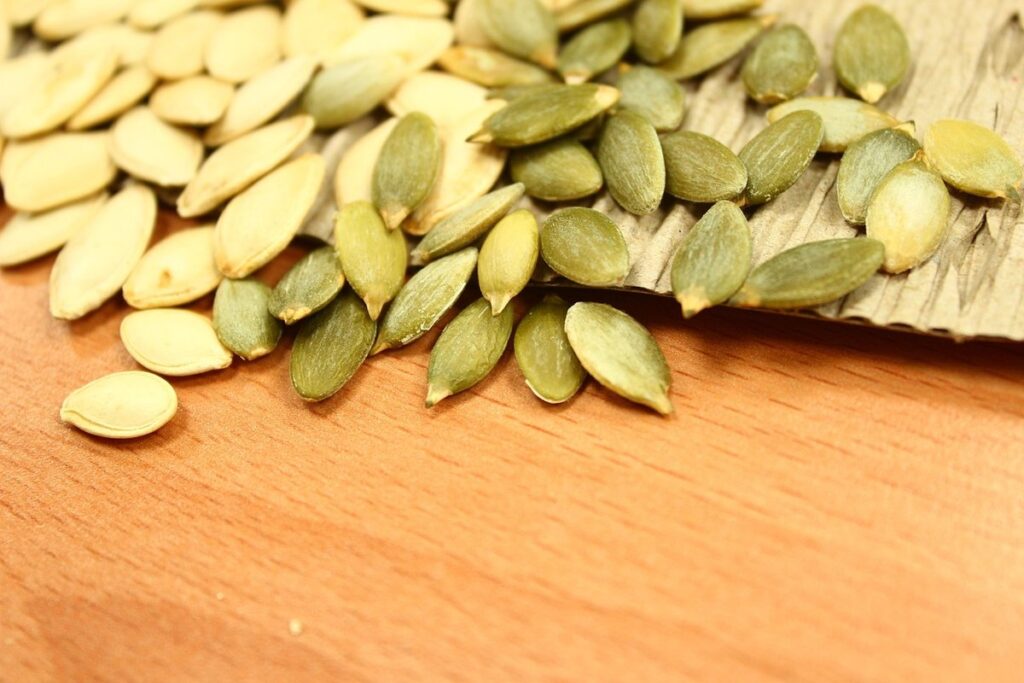
Cleaning and Drying the Seeds
Now that you’ve collected your pumpkin seeds, it’s time to clean and dry them thoroughly to ensure they’re ready for storage. This process is crucial for their longevity and viability.
Rinsing and Cleaning the Seeds
Properly rinsing and cleaning your pumpkin seeds is an essential step in preserving them for future use. Any remaining pulp can cause mold to grow on the seeds, reducing their viability and germination rate. To avoid this, it’s crucial to remove as much excess moisture as possible.
Start by gently rinsing the seeds under cold running water, using a fine-mesh strainer or sieve to separate them from any debris. Be careful not to rub or scrub the seeds too vigorously, as this can damage their delicate skin. Continue rinsing until the water runs clear, indicating that most of the pulp has been removed.
Next, fill a bowl with clean water and submerge the seeds. Allow them to soak for about 30 minutes to an hour. This will help loosen any remaining pulp and excess moisture. After soaking, drain the water and repeat the rinsing process until the water runs clear once more. You can also use a solution of 1 tablespoon of white vinegar per cup of water as a final rinse to help kill any bacteria or fungi that may be present.
Air-Drying vs. Oven-Drying Methods
When it comes to drying pumpkin seeds, you have two main options: air-drying and oven-drying. Both methods can produce great results, but they have their own pros and cons.
Air-drying is a simple and low-maintenance method that allows the seeds to dry naturally in a warm, dry place. This can be a good option if you have a lot of space available or prefer not to use any equipment. To air-dry your pumpkin seeds, spread them out in a single layer on a paper bag or parchment paper, making sure they don’t overlap. It may take several days for the seeds to dry completely, depending on the temperature and humidity.
On the other hand, oven-drying is a faster method that involves placing the seeds in a low-temperature oven (150°F – 200°F) for several hours. This method can be more efficient, but it requires careful monitoring to prevent overheating. Some benefits of oven-drying include reduced drying time and less risk of mold or mildew development. However, you’ll need to check on the seeds regularly to ensure they don’t dry out too quickly.
Ultimately, both air-drying and oven-drying can produce excellent results, so it’s up to you to decide which method works best for your specific needs. If you’re short on time or want a more controlled environment, oven-drying might be the way to go. But if you prefer a low-fuss approach that still yields great results, air-drying is definitely worth considering.
Storing Seeds for Long-Term Preservation
Now that you’ve harvested and cleaned your pumpkin seeds, it’s time to store them properly to ensure they remain viable for future planting. In this next step, we’ll cover how to store your seeds long-term.
Seed Storage Containers and Materials
When it comes to storing dried pumpkin seeds for long-term preservation, the right container and materials can make all the difference. You see, moisture is a major enemy of seed viability, so you’ll want to use containers that keep air out and prevent moisture from seeping in.
For this purpose, airtight containers made of plastic or glass are ideal. Look for ones with tight-fitting lids that will seal out any excess air and moisture. Some popular options include vacuum-sealed bags, Mason jars, or even small Tupperware containers. When choosing your container, make sure it’s specifically designed for storing seeds to ensure airtightness.
Breathable materials like paper towels, cloth, or silica gel can also be useful in maintaining humidity levels within the container. These materials absorb excess moisture and help keep the environment stable. Consider placing a small packet of silica gel inside the container to maintain optimal humidity levels. By choosing the right storage containers and materials, you’ll be able to preserve your pumpkin seeds for years to come.
Labeling and Organizing Your Seeds
Labeling and organizing your stored seeds is crucial for effective long-term preservation. When it comes to pumpkin seeds, accurately tracking varieties and germination rates can be the difference between a successful harvest and disappointment.
To label your seeds, start by using a permanent marker or label maker to write the date, variety name, and any relevant notes on the envelope or container. Consider color-coding labels for different varieties or categories (e.g., heirloom vs. hybrid). This will make it easier to quickly identify specific seed batches later.
For tracking germination rates, maintain a seed log or spreadsheet with columns for date, variety, number of seeds planted, and germination success rate. Regularly update this record as you test different batches to ensure accuracy. You can also use stickers or labels on the envelope to note any notable characteristics, such as unusual growth patterns or pest resistance.
Keep your labeled containers in a cool, dry place away from direct sunlight, ensuring that your seeds remain viable for years to come. This organized system will save you time and stress when it’s time to plant next season.
Tips for Successful Seed Germination
Now that you’ve harvested and prepared your pumpkin seeds, let’s dive into some essential tips to ensure successful germination and a healthy start for your new plants. Proper care will make all the difference!
Factors Affecting Seed Germination
When saving pumpkin seeds for replanting next season, understanding the key factors that influence seed germination is crucial. Temperature plays a significant role in this process, with most pumpkin varieties requiring a minimum of 70°F (21°C) to germinate. However, optimal temperatures vary between 80°F (27°C) and 90°F (32°C), depending on the specific variety.
Light is another essential factor affecting seed germination. Pumpkin seeds typically require indirect light or complete darkness during the germination period, which usually lasts around 7-10 days. Avoid direct sunlight as it can cause the soil to dry out too quickly.
Moisture levels are also critical for successful seed germination. Keep the soil consistently moist but not waterlogged. A well-draining potting mix and adequate irrigation will help maintain an optimal moisture level, ensuring healthy seedling growth.
Common Challenges and Solutions
One of the most frustrating things that can happen during seed germination is encountering fungal infections. These pesky microorganisms can quickly spread and destroy an entire crop, leaving you feeling defeated. But don’t worry, there are some simple steps you can take to prevent fungal infections from occurring in the first place.
Firstly, make sure your seeds are properly dried before storing them away for later use. Excess moisture is a breeding ground for fungi, so it’s essential to remove as much water content as possible. To do this, simply spread the seeds out on a paper towel and let them air dry for a few days.
Another common challenge during seed germination is slow germination rates. This can be caused by a variety of factors, including old or low-quality seeds. To combat this issue, try soaking your pumpkin seeds in water for 24 hours before planting. This will help to rehydrate the seeds and encourage them to sprout more quickly.
If you do encounter fungal infections, don’t panic! Simply remove the affected area and treat the remaining seedlings with a fungicide spray. By taking these precautions, you’ll be well on your way to achieving high germination rates and growing healthy, thriving pumpkin plants.
Seed Saving Best Practices
To ensure a successful seed saving experience, follow these essential best practices for harvesting and storing pumpkin seeds for next year’s garden. Proper technique is crucial.
Importance of Record-Keeping
Keeping accurate records is a crucial aspect of seed saving that’s often overlooked. As you store and experiment with different pumpkin varieties, it’s easy to lose track of which seeds came from where, how they were stored, and what their germination rates are. However, having a clear record-keeping system in place will make all the difference when you’re ready to plant again.
Start by creating a spreadsheet or notebook that tracks key details for each seed variety, such as the date harvested, storage conditions, and any notable characteristics. Include columns or pages for notes on germination rates, successful planting methods, and yields. You can also use stickers or color-coding to label your entries and make them easier to scan.
For example, you might create a database of pumpkin varieties with columns for seed type, growth habits, disease resistance, and storage instructions. This way, when you’re ready to plant again, you can refer back to your records and plan accordingly. By keeping accurate records, you’ll not only ensure the health and viability of your seeds but also preserve the unique characteristics of each variety.
Sharing Your Seeds with Others
Sharing saved pumpkin seeds with others can be a great way to spread new varieties and connect with fellow gardeners. Not only does it help you diversify your own harvests by trying out new types of pumpkins, but it also gives you the opportunity to share your expertise and passion for gardening.
When sharing seeds with other gardeners or online communities, consider the following: make sure the seeds are thoroughly cleaned and dried before packaging them, include information about the variety’s characteristics, growth habits, and any notable traits. This can be as simple as including a label with the seed type and your contact information.
You can also share seeds through seed swaps or by participating in online forums where gardeners exchange seeds. Some websites even offer seed banks that allow you to store and share your own seeds with others. By sharing your saved pumpkin seeds, you’re contributing to the preservation of heirloom varieties and fostering a sense of community among gardeners. Just be sure to ask for permission before sharing seeds from other people’s gardens!
Conclusion
Now that you’ve successfully saved your pumpkin seeds, it’s essential to store them properly to ensure they remain viable for future planting. Store the seeds in an airtight container, such as a glass jar or plastic bag, and label them with the variety name and date harvested. Place the container in a cool, dry location, away from direct sunlight. It’s also crucial to keep the seeds away from moisture, which can cause mold and spoilage.
By following these simple steps and storing your pumpkin seeds correctly, you’ll be able to enjoy fresh pumpkins for years to come. Don’t forget to save your favorite varieties to share with friends and family or to try new recipes in the future. With a little planning and care, saving pumpkin seeds can become a fun and rewarding experience that brings you closer to nature and sustainable gardening practices.
Frequently Asked Questions
How do I know if my pumpkin seeds are suitable for saving?
The best way to determine if your pumpkin seeds are suitable for saving is to check the variety’s characteristics, such as disease resistance and flavor profile. If you’re unsure about the seed quality or quantity of a particular variety, consider consulting with local gardening experts or checking online resources.
Can I store my pumpkin seeds in an airtight container without drying them first?
No, it’s essential to dry your pumpkin seeds before storing them to prevent mold growth and ensure long-term preservation. Properly dried seeds will have a brittle texture and be free from moisture. If stored damp or wet, seeds may become infested with pests or develop fungal infections.
How do I handle seed viability when saving multiple varieties?
To maintain seed viability when saving multiple varieties, make sure to store each variety in separate containers labeled with their specific characteristics and growing conditions. This will prevent cross-contamination and ensure you have accurate records for future reference.
What’s the ideal temperature and humidity level for storing pumpkin seeds long-term?
For optimal storage, keep your pumpkin seeds in a cool, dry place with temperatures between 40°F (4°C) to 50°F (10°C). Maintain low relative humidity levels (around 30-50%) to prevent moisture accumulation. Avoid areas prone to extreme temperature fluctuations or high humidity.
Can I reuse last year’s seed storage containers for this season’s pumpkin seeds?
It’s recommended to use fresh, clean storage containers each time you save seeds. Reusing old containers may lead to contamination from previous seed varieties, pests, or diseases. Clean and sterilize your containers before using them again to ensure the health and purity of your seeds.