Growing your own watermelons can be a truly rewarding experience, but one crucial step often gets overlooked: knowing exactly when to harvest them. Harvesting at the wrong time can mean missing out on a deliciously sweet and refreshing treat, or worse, ending up with a bland and unripe melon. Understanding the perfect timing for harvesting watermelons is key to reaping the full benefits of your labor.
In this article, we’ll break down the essential signs to look out for when determining if your watermelon is ready to be picked. We’ll also cover some common mistakes to avoid, ensuring you harvest your melons at their optimal freshness and quality. By following our expert advice, you’ll learn how to grow, store, and enjoy your watermelons to the fullest – perfectly ripe and bursting with flavor.
Understanding Watermelon Maturity
To ensure you harvest perfectly ripe watermelons, it’s crucial to understand what maturity looks and feels like for these sweet summer treats. Let’s dive into the key signs of watermelon maturity.
Checking for Ripeness by Visual Inspection
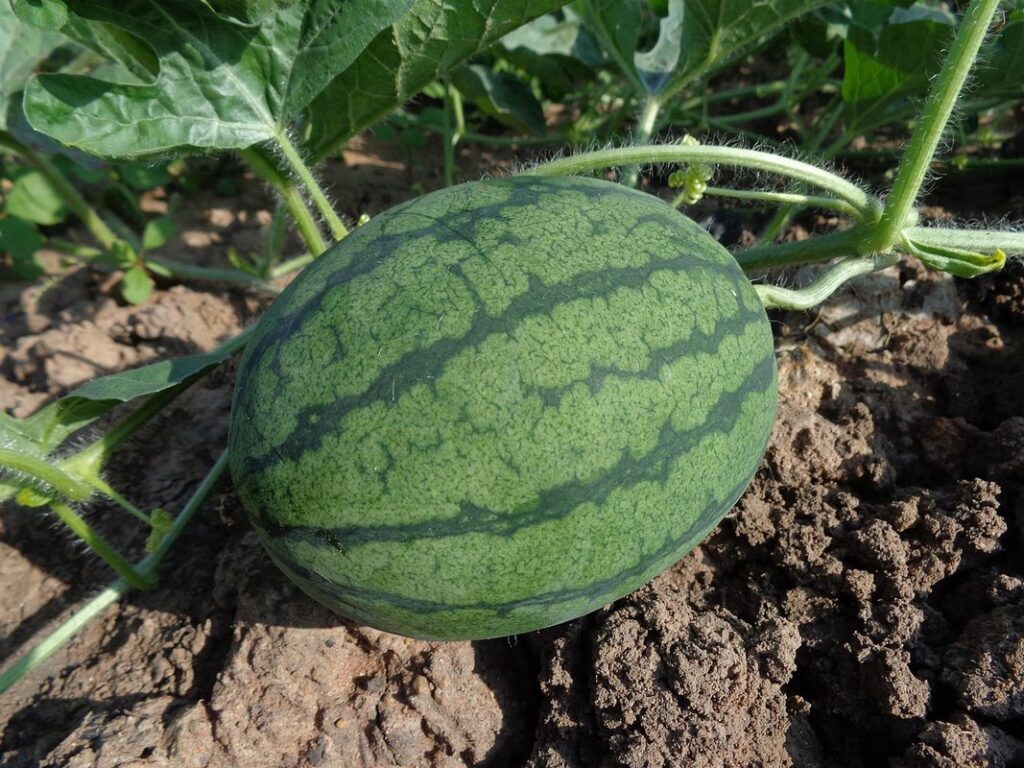
Checking for ripeness by visual inspection is a crucial step in determining when to harvest watermelon. One of the most reliable signs of maturity is the appearance of yellow spots on the underside of the fruit. These spots, often mistaken for bruises or damage, are actually a natural indicator of sugar production and watermelon development.
As watermelon continues to ripen, it will eventually develop a creamy yellow spot on the area where it rested during its final stages of growth. This is because the stem end of the fruit remains in contact with the ground, absorbing moisture and sugars that contribute to the sweetening process.
A good way to check for ripeness is to gently lift the watermelon and sniff the underside. A mature watermelon will give off a strong, sweet, fruity aroma. If it doesn’t have this characteristic scent or if the spots are not present, it may still be too green and unripe. By paying attention to these physical signs, you can accurately determine when your watermelon is ready for harvest, ensuring optimal flavor and texture.
Using a Thump Test for Maturity
Using a thump test is a simple yet effective way to determine if a watermelon is ripe and ready for harvest. To perform this test, gently tap the underside of the melon with your fingers. The correct location to tap is on the area where the stem meets the fruit. This is usually a slight indentation or a soft spot.
When the watermelon is mature and ready to be picked, it will produce a deep hollow sound when tapped. This is due to the breakdown of the starches inside the melon as it ripens. If you’re new to using this method, it may take some practice to develop your ear for the correct sound. However, with experience, you’ll become more confident in your ability to identify a ripe watermelon.
It’s essential to tap different areas of the melon to ensure that the hollow sound is consistent throughout. A ripe watermelon will typically produce this distinctive sound on all sides, while an unripe one may still produce a metallic or tinny sound when tapped.
Factors Affecting Watermelon Maturity
Factors affecting watermelon maturity can be a bit tricky, but understanding them is crucial to harvesting your melons at just the right time. Weather conditions and plant health play a significant role in determining when your watermelons are ripe and ready to pick.
Weather Conditions
As you care for your watermelon crop, it’s essential to consider the impact of weather conditions on its maturity. Temperature plays a significant role, with optimal growth occurring between 65°F and 85°F (18°C and 30°C). Watermelons grown in temperatures above 90°F (32°C) may become overripe or develop brown spots.
Sunlight is also crucial, with watermelons needing at least six hours of direct sunlight per day to ripen properly. If your crop is experiencing shade, consider providing supplemental lighting using row covers or other techniques. On the flip side, excessive heat can lead to sunscald, a condition characterized by white or yellow patches on the fruit’s surface.
Rainfall is another critical factor, with watermelons requiring about one inch of water per week during their growth stage. However, overwatering can be detrimental, leading to fungal diseases and reduced sugar content. To balance these factors, monitor soil moisture levels closely and adjust your irrigation schedule accordingly. Keep in mind that consistent moisture promotes even ripening, whereas fluctuations may lead to uneven maturation.
Variety Selection
Choosing the right watermelon variety is crucial for a successful harvest. This decision is often overlooked but it can significantly impact the quality and timing of your harvest. The ideal variety should be suitable for your region’s climate and growing season.
Consider factors such as heat tolerance, disease resistance, and days to maturity when selecting a variety. For example, if you live in an area with scorching summers, choose a variety bred specifically for high-temperature regions like ‘Atlantic Giant’. On the other hand, varieties like ‘Sugar Baby’ are perfect for cooler climates or container gardens.
Check the seed packet or consult with local nurseries to determine which varieties thrive in your region. Also, consider the days to maturity when selecting a variety – some mature as early as 60 days while others take up to 100 days. This ensures you’re harvesting at peak ripeness and avoiding overripe or underripe watermelons.
Some popular varieties suitable for different climates include ‘Charleston Grey’ for cooler summers and ‘Crimson Sweet’ for warmer regions.
Timing of Watermelon Harvest
So you’ve grown a juicy watermelon, but when is it ready to be picked? In this section, we’ll walk you through the timing of a successful harvest.
Determining the Correct Time for Harvest
Determining the correct time for harvesting watermelons is crucial to ensure optimal flavor, texture, and yield. A combination of visual inspection, thump test, and other methods can help you determine when your watermelon is ripe and ready for harvest.
Start by checking the color of the rind, which should be a creamy yellow or pale green. Avoid watermelons with white or pale yellow spots, as these may indicate over-ripeness. Next, perform the thump test: gently tap the underside of the watermelon with your fingers. A ripe watermelon will produce a deep, hollow sound.
You can also check the weight of the watermelon by lifting it. Ripe watermelons are typically heavy for their size. Another method is to check the stem end; a ripe watermelon will have a dry, brown stem, while an unripe one will have a green or moist stem.
It’s essential to harvest your watermelon in the morning, when the fruit is cool and the sugars are at their highest level. Avoid harvesting during hot weather, as this can cause the fruit to spoil quickly. By using these methods together, you’ll be able to determine the correct time for harvesting your watermelons and enjoy a bountiful harvest.
Factors Affecting Harvest Timing
When deciding on the perfect time to harvest watermelon, several factors come into play. One crucial consideration is weather forecasts. Check the temperature and precipitation predictions for the next few days to ensure that you’re harvesting during a dry spell or when temperatures are not too high, which can cause the fruit to crack or become unripe.
Soil moisture levels also impact harvest timing. Watermelons need consistent soil moisture, especially during the first 10-14 days after flowering. If the soil is too dry for an extended period, the growth of the watermelon may slow down, affecting its size and sweetness. Conversely, excessive moisture can lead to fungal diseases.
Another factor to consider is pest and disease pressure. If you’ve been battling pests like aphids or powdery mildew, it’s essential to harvest your watermelons before these issues worsen. This will prevent further damage and ensure a higher quality crop. Monitor your plants regularly for signs of infestation or infection, and take action promptly if necessary.
By taking these factors into account, you’ll be able to optimize the timing of your watermelon harvest, resulting in better yields and a more enjoyable growing experience.
Post-Harvest Handling and Storage
Now that you’ve harvested your watermelon, it’s essential to handle and store it carefully to maintain its freshness and quality until serving time. Proper storage techniques will help keep your harvest fresh for longer.
Proper Handling Techniques
Handling watermelons with care is crucial during harvesting, storage, and transportation to prevent damage and maintain quality. When harvesting, use a sharp knife or pruning shears to cut the fruit from the vine, leaving about an inch of stem attached. This helps reduce moisture loss and prevents bruising.
To minimize damage during handling, place watermelons in a single layer on a clean surface or pallets. Avoid stacking them, as this can cause pressure points that lead to bruises and soft spots. If you must stack, use straw or paper to cushion the weight and prevent direct contact between fruits.
When transporting watermelons, keep them upright and shielded from direct sunlight and heat sources. Covering the fruit with a breathable cloth or plastic sheet helps maintain humidity and prevents over-ripening. Aim for transportation within 24 hours of harvesting to reduce spoilage risk.
Regularly inspect your watermelons during storage and transportation for any signs of damage, including soft spots, wrinkles, and mold. Remove damaged fruits promptly to prevent the spread of decay and maintain overall quality.
Storage Options for Freshness Preservation
Proper storage of harvested watermelons is crucial to maintaining their freshness and extending shelf life. Refrigeration is an ideal option for short-term storage. Store the fruit at a consistent temperature between 32°F and 40°F (0°C and 4°C). This will slow down the ripening process, allowing you to enjoy your watermelon for up to two weeks.
If you have access to a cold storage facility with temperatures below 30°F (-1°C), this is even better. Cold storage can preserve the fruit for several months. However, it’s essential to use proper packaging materials and techniques to prevent moisture accumulation and maintain air circulation around the fruit.
Other storage options include using a dry, well-ventilated area or a cold cellar with temperatures between 32°F (0°C) and 50°F (10°C). Keep watermelons away from direct sunlight, heat sources, and other fruits that release ethylene gas, which can accelerate ripening. Monitor the fruit regularly for signs of spoilage, and use your senses to determine when it’s past its prime.
Common Mistakes to Avoid
Don’t let your watermelon go bad! In this crucial part of our guide, we’ll identify common mistakes that can ruin your harvest and show you how to avoid them.
Over-Harvesting
Over-harvesting watermelons too early or late in the season can lead to significant losses due to under-ripe or over-ripe melons. If picked too soon, watermelons may not have developed enough sugar and flavor, resulting in a disappointing taste experience for consumers. On the other hand, if left on the vine for too long, watermelons can become over-ripe, developing off-flavors and textures that are unappealing to eat.
To avoid these pitfalls, it’s essential to monitor your watermelon crop closely and harvest at the optimal stage. Generally, this is when the underside of the melon turns from white to yellow or creamy, and the rind sounds hollow when tapped with a finger. Harvesting too late can also lead to increased risk of disease and pests, which can further compromise the quality of the fruit.
In commercial settings, over-harvesting watermelons can result in substantial financial losses due to spoilage and reduced market value. For example, according to a study by the University of California, over-ripe watermelons are often discarded at the packing house stage, resulting in an estimated 10-15% loss in revenue. By paying attention to timing and carefully monitoring your crop, you can minimize these risks and enjoy a bountiful harvest.
Underestimating Weather Factors
Neglecting weather factors is one of the most critical mistakes growers make when it comes to harvesting watermelon. Weather conditions can significantly impact the maturity and quality of the fruit. For instance, extreme temperatures, either too high or too low, can affect the sugar content and texture of the watermelon. Inconsistent moisture levels can lead to uneven ripening, resulting in poor flavor and a higher risk of spoilage.
To mitigate these effects, growers should closely monitor weather forecasts and adjust their harvesting schedules accordingly. For example, if a heatwave is predicted, it’s best to harvest the watermelons earlier than usual to prevent over-ripening. Conversely, if there’s a prolonged period of cooler temperatures, the harvesting schedule may need to be delayed.
To ensure optimal quality, growers should also keep an eye on soil moisture levels and adjust their irrigation schedules as needed. By considering these weather factors and making adjustments accordingly, growers can enjoy a bountiful harvest of high-quality watermelons.
Best Practices for Watermelon Harvesting
To ensure a bountiful harvest, it’s essential to follow some best practices when picking watermelons to prevent damage and maximize sweetness. Learn how to handle your ripe melons like a pro!
Record Keeping and Planning
Maintaining accurate records of planting dates, weather conditions, and harvesting schedules is crucial to improving future harvests. By tracking these factors, you can identify patterns and make data-driven decisions to optimize your watermelon growing process. Start by creating a spreadsheet or logbook that includes key information such as planting dates, crop rotation, soil temperature, rainfall, and pest/disease management.
Record every significant event, from sowing the seeds to harvesting the fruit. Note any notable weather events, including frost warnings, heatwaves, or excessive rain. This detailed record-keeping will allow you to analyze your data and make informed decisions for future harvests. For instance, if your records show that watermelons harvested in late summer consistently have higher sugar content, you can adjust your planting schedule accordingly.
By implementing a robust record-keeping system, you’ll be better equipped to predict and prepare for potential challenges, ultimately leading to more successful and bountiful watermelon harvests.
Continuous Improvement
As you’ve successfully harvested your watermelon crop, it’s essential to remember that this is just the beginning of a new chapter in your farming journey. Continuous improvement is key to optimizing yields and quality, and this is where monitoring your crop’s progress comes into play.
Regularly inspect your watermelons for signs of ripeness, such as a yellow spot on the underside, a deep green rind, and a sweet aroma. Note that even a day or two can make a significant difference in sweetness and texture. By keeping an eye on your crop, you’ll be able to identify potential issues early on, allowing you to take corrective action.
Consider implementing a schedule to track your watermelon’s development, from sowing to harvesting. Take note of weather patterns, temperature fluctuations, and other environmental factors that may impact your yield. This information will help you refine your strategies for future harvests.
Frequently Asked Questions
What’s the best way to store watermelon after harvesting to maintain its freshness?
To ensure your freshly harvested watermelons stay fresh for a longer period, it’s essential to store them properly. Watermelons can be stored at room temperature for up to three days or in the refrigerator to prolong their shelf life. Remove any stickers or labels and wash the melons gently before storing them in an airtight container.
Can I harvest watermelon during cloudy or rainy weather?
Yes, you can harvest watermelon even on cloudy or rainy days. In fact, these conditions often don’t affect the ripening process as much as direct sunlight does. However, ensure you check for any signs of mold or rot before harvesting, as excess moisture can cause damage to the fruit.
How long do I need to wait after spotting yellow spots under my watermelon for it to be fully ripe?
After spotting yellow spots on your watermelon’s underside, it may take a few more days for the melon to reach its full ripeness. The exact time frame depends on factors like weather conditions and the specific variety of your watermelon. Continue checking for other signs of maturity, such as a deep green color and a sweet, earthy aroma.
What if I notice my watermelon is ripe but has bruises or blemishes? Can I still eat it?
While minor bruising or blemishes may not affect the taste or quality of your watermelon, severe damage can compromise its safety for consumption. If you’re unsure about the extent of the damage, it’s best to err on the side of caution and discard the affected melon.
How often should I check my watermelons for signs of ripeness?
Regular checks are crucial when determining if your watermelons are ready for harvest. Check them daily during peak ripening periods (usually around 7-10 days before expected maturity) to ensure you catch them at their optimal freshness and quality.