Pumpkin carving is an art form that brings people together, fostering creativity and fun during the Halloween season. Whether you’re a seasoned pro or a beginner, mastering various techniques can elevate your designs from simple to stunning. But with so many types of pumpkin carving out there, it’s easy to get overwhelmed by the possibilities.
In this article, we’ll delve into the world of classic designs, intricate patterns, and even multi-pumpkin displays. You’ll learn about the different tools and materials needed for each technique, as well as safety tips to ensure a fun experience for all ages. From simple jack-o-lanterns to elaborate masterpieces, we’ll cover it all, so you can choose the perfect approach for your next pumpkin-carving project. With these tips and tricks, you’ll be well on your way to creating memorable designs that will shine in any yard or gathering space.
History of Pumpkin Carving
Pumpkin carving has a rich history dating back thousands of years, and its evolution is closely tied to ancient Celtic traditions and harvest festivals. Let’s take a step back in time to explore how it all began.
Origins and Evolution
Pumpkin carving has its roots in ancient Celtic festivals, particularly in Ireland and Scotland. The tradition is believed to have originated from the festival of Samhain, which marked the end of the harvest season and the beginning of winter. During this time, people would carve turnips and other root vegetables to make lanterns, known as “souling candles,” to ward off spirits and ghosts.
As European settlers arrived in North America, they found that pumpkins were a more abundant and easier to carve than turnips. The tradition of pumpkin carving evolved over time, influenced by the Irish and Scottish immigrants who brought their customs with them. Today, pumpkin carving has become a beloved Halloween tradition around the world. In recent years, creative variations on traditional designs have emerged, such as 3D carvings and intricate patterns. Whether you’re a seasoned pro or a beginner, pumpkin carving is a fun and accessible way to get into the holiday spirit.
Traditional Methods vs. Modern Techniques
When it comes to pumpkin carving, there are two main approaches: traditional methods and modern techniques. Traditional methods involve freehand carving, using a knife or gouge to create intricate designs and patterns on the pumpkin’s surface. This approach requires skill, patience, and practice to achieve professional-looking results.
On the other hand, modern techniques have made it easier than ever to carve pumpkins with ease. One popular method is using stencils, which provide a pre-designed template for carving. Stencils can be found in various shapes, sizes, and designs, making it simple to create complex patterns without needing extensive experience.
Additionally, templates and power tools have also become popular modern techniques. Templates offer a more precise way of creating intricate designs, while power tools like rotary carvers and saws make quick work of even the most detailed carvings. With these modern methods, anyone can achieve professional-looking results with minimal effort. By combining traditional skills with modern tools, you can take your pumpkin carving to the next level.
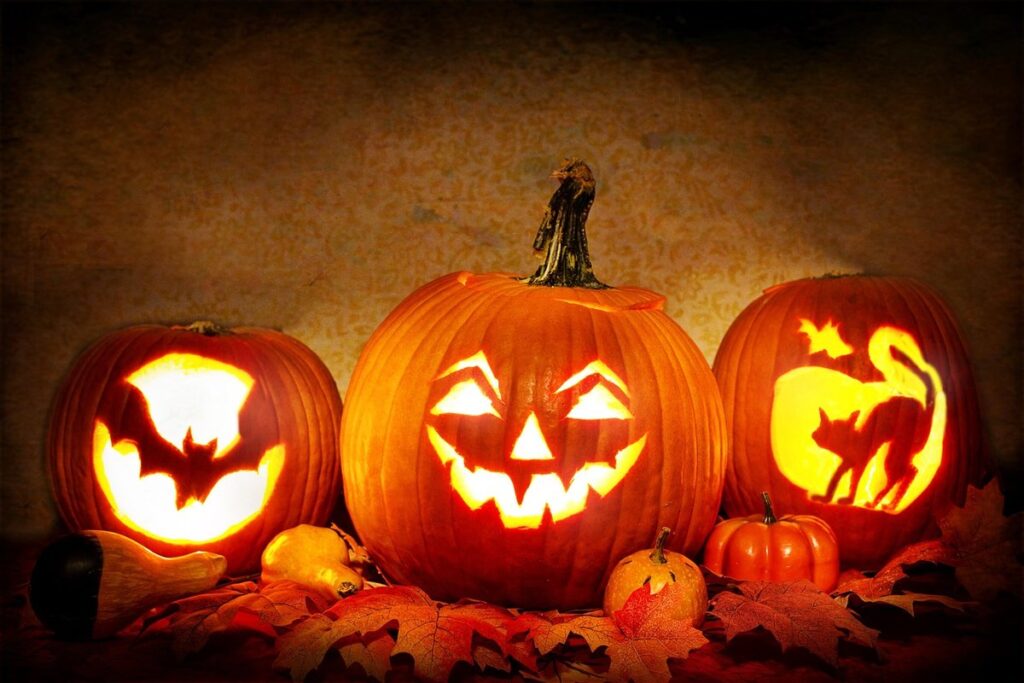
Jack-o’-Lantern Designs
Get creative with these classic jack-o’-lantern designs, perfect for beginners and seasoned carvers alike, from simple to intricate patterns.
Classic Carvings
When it comes to classic pumpkin carvings, simplicity is often the key to creating a timeless design. One of the most iconic and enduring designs is the simple face, which can be achieved with just a few gentle cuts. By focusing on the curves of the eyes, nose, and mouth, you can create a warm and inviting smile that’s sure to bring a touch of autumnal charm to your doorstep.
For those looking for something a bit more geometric, pumpkin carvings featuring shapes like triangles, circles, or squares are also a great option. These designs require a bit more precision but offer a clean and modern aesthetic that’s perfect for any home decor. And let’s not forget the “pumpkin smile,” which has become an integral part of Halloween tradition. This playful design features a curved line running across the top of the pumpkin, creating a sense of joy and friendliness.
Remember to keep your design simple, especially if you’re new to pumpkin carving. Start with basic shapes and gradually add more details as you gain confidence in your skills. With a little practice, you can create classic carvings that will be cherished for years to come.
Themed Carvings
If you’re looking to create a truly unique and eye-catching pumpkin design, consider incorporating themed carvings inspired by popular culture. From movie characters to superheroes, the possibilities are endless. You can carve out iconic figures like Jack Skellington from The Nightmare Before Christmas or even recreate your favorite superhero logos.
For holiday-themed designs, try carving jack-o’-lanterns shaped like festive symbols such as ghosts, bats, or spiders for Halloween, or create a Thanksgiving pumpkin with a pilgrim hat or turkey design. These fun and creative designs are perfect for families to work on together and can add an extra layer of excitement to your home’s decorations.
When it comes to creating themed carvings, the key is to keep it simple yet bold. Focus on clean lines, basic shapes, and iconic features that will make your pumpkin instantly recognizable as your chosen character or theme. With a little creativity and patience, you can create a stunningly original design that’s sure to impress trick-or-treaters and party guests alike.
Complex Pumpkin Designs
For more experienced carvers, intricate and complex pumpkin designs can be a fun and rewarding challenge. These designs often feature multiple layers and patterns to create a visually stunning effect.
Intricate Patterns and Details
Intricate patterns and details can elevate pumpkin carving from simple designs to breathtaking works of art. Mosaics are a great way to achieve this level of complexity, requiring the arrangement of small, colorful pieces to form an image or pattern. To create a mosaic, start by planning your design and selecting corresponding colors for each piece. Cut out the individual pieces using a small, sharp tool, and arrange them on the pumpkin.
Mandalas are another intricate design that can be achieved with pumpkin carving. These geometric patterns involve repeating shapes to form a larger image or symbol. To carve a mandala, begin by sketching your design onto the pumpkin with a fine-tip marker. Then, use a small, pointed tool to carefully cut out each shape and pattern.
To add 3D effects to your pumpkin carving, experiment with layering or relief techniques. This can involve carving shallow recesses to create raised patterns or textures. With practice, you can achieve stunning, multi-dimensional designs that add an extra layer of visual interest to your pumpkin carvings.
Multi-Pumpkin Displays
If you’re looking to take your pumpkin carving skills to the next level, consider creating a multi-pumpkin display. This involves carving multiple pumpkins and arranging them to form a cohesive design or scene. For instance, you can carve a series of interconnected jack-o’-lanterns that resemble a winding road, or arrange five pumpkins in the shape of a five-pointed star.
To create a multi-pumpkin display, start by planning out your design on paper. Consider the size and number of pumpkins you have available, as well as the space where the display will be located. You’ll also want to decide on a theme or style that ties all the pumpkins together. Some popular themes include autumnal landscapes, spooky scenes, or even cartoon characters.
Once you have your design finalized, begin carving each pumpkin individually using a variety of techniques and stencils as needed. Don’t forget to leave space between each pumpkin for easy arrangement and display. Finally, arrange your carved pumpkins according to your design plan, and voilà! You’ll have a stunning multi-pumpkin display that’s sure to impress friends and family alike.
Remember, the key to creating a successful multi-pumpkin display is to plan ahead and be patient. With some creativity and practice, you can create a truly unforgettable Halloween centerpiece or porch decoration.
Pumpkin Carving Techniques
Now that you’ve mastered various pumpkin carving designs, it’s time to take your skills to the next level by learning expert-level techniques for creating intricate and stunning carvings. From precision cutting to stenciling, we’ll cover them all here.
Basic Tools and Materials
When it comes to pumpkin carving, having the right tools and materials can make all the difference between a beautiful design and a hazardous mess. To get started, you’ll need some basic supplies that are easily available at most craft stores or online.
First and foremost, you’ll need a few good quality knives specifically designed for pumpkin carving. These should be sharp, comfortable to hold, and have a curved blade that allows for smooth cuts. Look for serrated blades as they will help prevent the knife from slipping off the surface of the pumpkin. A set of small, flat tools such as gouges and chisels can also come in handy for more intricate designs.
Scoops are another essential tool for removing excess pumpkin flesh and creating uniform surfaces. You can choose between plastic or metal scoops; metal ones tend to be more durable but may scratch the surface of your design. Don’t forget stencils – they’re a great way to add intricate details without having to draw them freehand.
In addition to these tools, you’ll need a flat, stable work surface for carving and a bowl or container for collecting excess pumpkin scraps. Make sure to have some newspaper or paper towels handy as well to clean up any spills.
Tips and Tricks for Smooth Carving
When it comes to pumpkin carving, smooth and precise cuts are essential for creating intricate designs. To achieve this, start by choosing the right pumpkin. Look for one that is symmetrical, has a flat area on top, and is heavy for its size. This will indicate a dense, well-formed gourd.
Next, prepare your design by sketching it out or using a stencil to help guide your knife. A well-planned design will make carving much easier and less prone to mistakes. When carving, use a serrated knife specifically designed for pumpkin carving, as it will reduce the risk of accidents.
To prevent accidents, carve in a stable, well-lit environment and keep your fingers curled under to avoid getting them caught in the blade. Additionally, use gentle, smooth strokes when cutting, and don’t apply too much pressure, which can cause the knife to slip.
To further enhance your carving experience, consider using a pumpkin carving mat or other protective gear to prevent accidents and make cleanup easier. By following these tips, you’ll be able to create intricate designs with ease and enjoy a fun and safe pumpkin carving experience.
Pumpkin Carving Safety
Before you grab a knife and get creative, let’s cover some essential safety tips to avoid accidents while carving your pumpkin. We’ll explore the basics of staying safe during this fun fall activity.
Hazards and Precautions
When engaging in pumpkin carving, it’s easy to get carried away with creativity and forget about safety. However, this can lead to accidents and injuries, especially when using sharp tools like knives and saws.
Some of the potential hazards associated with pumpkin carving include cuts and slips, which can be caused by a variety of factors such as dull or uneven cutting surfaces, lack of proper lighting, or simply being in a rush. To minimize these risks, it’s essential to take some basic precautions.
Before you start carving, make sure your workspace is well-lit and clear of any obstacles that could cause tripping or slipping. Wear protective gear like gloves to prevent cuts and scrapes on your hands. Use a stable, flat surface for carving, and consider using a pumpkin stabilizer to keep it in place. Also, keep an eye on children while they’re participating in the activity to ensure their safety.
Additionally, always use sharp, well-maintained tools, and make sure you have plenty of clean water nearby to rinse any cuts or injuries that may occur.
Best Practices for a Safe and Fun Experience
When it comes to enjoying pumpkin carving with family and friends, safety should always be top of mind. To ensure a safe and fun experience, follow these best practices.
First and foremost, adult supervision is crucial when kids are involved in pumpkin carving. Assign one or two adults to oversee the activity and make sure children understand the importance of handling tools carefully. This means keeping an eye on the sharp edges of knives and other cutting tools at all times.
Proper storage of tools is also essential. Keep them out of reach of children, and store them safely in a designated area when not in use. A caddy or container specifically designed for pumpkin-carving tools can be very helpful in keeping everything organized.
In case of an emergency, know what to do. If someone gets cut, apply gentle pressure to the wound with clean gauze and seek medical attention if necessary. Keep a first-aid kit nearby as a precautionary measure. By following these guidelines, you’ll be well-equipped to handle any situation that may arise during your pumpkin-carving session.
Frequently Asked Questions
What are the essential tools I need to get started with pumpkin carving?
You’ll want to have a few basic tools at your disposal, including a serrated knife for cutting, a scoop or spoon for removing seeds and pulp, a marker or stencil for designing, and a tea light or votive candle for illuminating. You can also consider investing in specialized tools like a gouge or an engraving tool for more intricate designs.
How do I ensure my pumpkin carving is safe for children to participate in?
Yes, with some basic precautions, you can make pumpkin carving a fun and accessible activity for kids of all ages. Make sure to use kid-friendly tools, supervise closely when handling sharp objects, and choose designs that are less complicated and easier to carve.
Can I use regular knives or should I invest in specialized pumpkin-carving tools?
No, it’s highly recommended to use specialized tools designed specifically for pumpkin carving. These tools are typically made with a rounded edge that’s gentler on the pumpkin and allows for more precise control. Regular knives can be too sharp and may cause accidents.
How do I prevent my pumpkins from rotting or developing mold after carving?
To extend the life of your carved pumpkin, make sure to dry it completely before displaying it, avoid exposing it to direct sunlight or heat, and regularly clean it with a mixture of baking soda and water. You can also consider using a preservative spray or coating.
What’s the best way to store leftover pumpkin pulp and seeds for future use?
You can store leftover pumpkin pulp in an airtight container in the fridge for up to 3 days, or freeze it for later use. For seeds, simply dry them thoroughly and store them in an airtight container. Both pulp and seeds are rich in nutrients and can be used in various recipes throughout the year.