Are you fascinated by the beautiful blooms of the Transvaal Daisy? With its delicate white petals and golden centers, this stunning flower has captured the hearts of many garden enthusiasts. But beyond its striking appearance, the Transvaal Daisy holds a special significance in various cultures, symbolizing purity, innocence, and new beginnings. As we delve into the world of these captivating flowers, you’ll discover not only their unique characteristics but also how to care for them and propagate them successfully. In this comprehensive guide, we’ll cover everything from botanical descriptions and meanings to propagation and reproduction methods. Whether you’re a seasoned gardener or just starting out, this article will equip you with the knowledge you need to grow and appreciate these lovely flowers.
What is a Transvaal Daisy?
The transvaal daisy, a beautiful and unique flower native to South Africa, has gained popularity worldwide for its stunning appearance. In this section, we’ll delve into its characteristics and origins.
Botanical Description
The transvaal daisy (Gerbera jamesonii) is a visually stunning flowering plant that thrives in its native South Africa. One of the most distinctive features of this plant is its growth habit, which can range from 1 to 3 feet in height and width, making it a versatile addition to any garden or indoor space.
The leaves of the transvaal daisy are dark green, glossy, and serrated, typically measuring between 2 to 4 inches in length. They grow alternately on the stem, providing a nice contrast to the bright flowers that bloom above them.
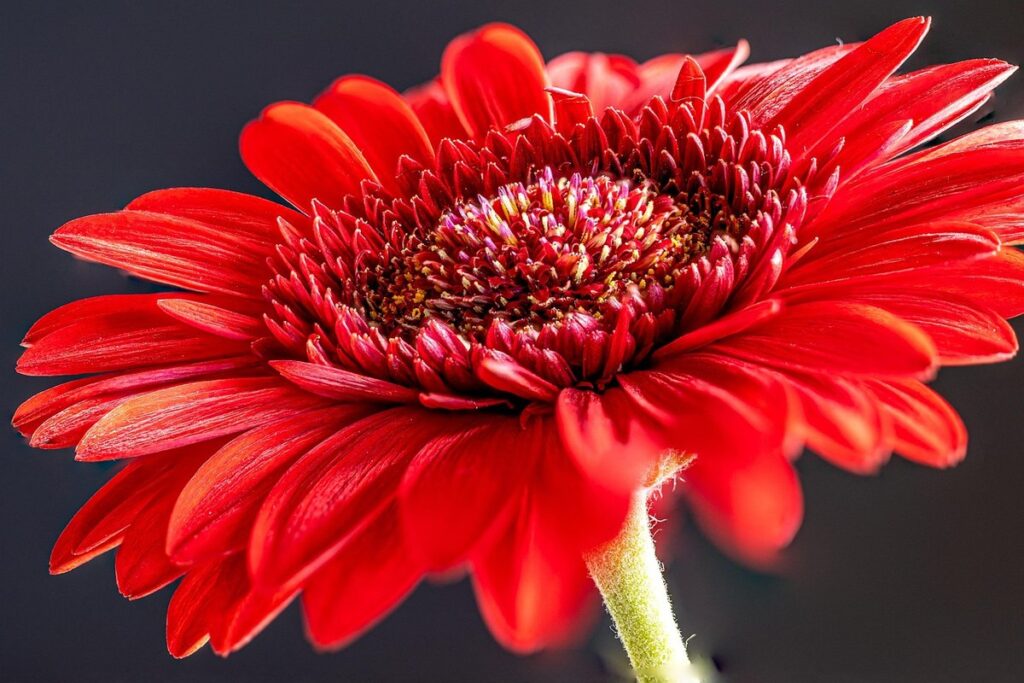
The flower heads of the transvaal daisy are one of its most striking features, comprising multiple small blooms arranged around a central disc. Each individual bloom is typically between 1 to 2 inches in diameter and has a prominent yellow or white center surrounded by vibrant petals in shades of pink, red, orange, or purple.
When it comes to growing transvaal daisies, be sure to provide them with well-draining soil and full sun to partial shade. This will help ensure that your plants receive the necessary nutrients and moisture to produce an abundance of beautiful blooms.
Origins and Distribution
The transvaal daisy is native to the savannas and grasslands of southern Africa, specifically in the regions of South Africa, Namibia, and Botswana. Its natural habitats are characterized by warm temperatures, well-drained soil, and ample sunlight. In its native range, the transvaal daisy can be found growing in areas with low rainfall, making it an adaptable plant.
Over time, the transvaal daisy has been cultivated and introduced to other parts of the world, including Australia, California, and the Mediterranean region. Its popularity as a ornamental plant has led to its widespread distribution in gardens and landscapes. Gardeners and botanists appreciate the transvaal daisy for its vibrant yellow flowers, silvery-gray foliage, and low-maintenance requirements.
If you’re interested in growing your own transvaal daisy, choose a location with full sun and well-drained soil. Water sparingly, as this plant is drought-tolerant but will thrive with occasional watering. Transplant seedlings in the spring or fall to avoid extreme temperatures. With proper care, the transvaal daisy can provide a stunning display of color and texture in your garden.
Symbolism and Meaning of Transvaal Daisies
Now that you’ve learned about these beautiful flowers, let’s delve into the rich symbolism and meaning behind the transvaal daisy in different cultures and traditions.
Cultural Significance
Transvaal daisies have woven themselves into the fabric of various cultures around the world, carrying with them a multitude of symbolic meanings. In South Africa, where they are native, these vibrant flowers are often associated with new beginnings and hope for a brighter future.
In many societies, transvaal daisies are also seen as a symbol of love and affection. Their delicate petals and bright yellow centers evoke feelings of warmth and joy, making them a popular choice for expressing romantic sentiments. In fact, transvaal daisies are often used in wedding bouquets and arrangements to represent the beauty and purity of love.
Transvaal daisies also have a special place in the realm of friendship. Their bright colors and cheerful demeanor make them an excellent gift for friends who need a pick-me-up or a reminder that they’re not alone. By gifting a transvaal daisy, you can show your friend that you care about their well-being and are there to support them through life’s ups and downs.
Whether it’s expressing love, celebrating new beginnings, or simply brightening up a friend’s day, the symbolism of transvaal daisies is undeniable.
In Flower Language
In the language of flowers, also known as floriography, transvaal daisies have a rich history and symbolism. Traditionally, they are associated with innocence, purity, and new beginnings. This is likely due to their delicate white petals and bright yellow centers, which evoke a sense of freshness and optimism.
When used in bouquets and arrangements, transvaal daisies can convey a range of emotions and messages. For instance, giving a bouquet of transvaal daisies to someone who’s just starting a new chapter in life, such as a wedding or a move, is a thoughtful way to wish them good luck and happiness.
If you’re looking to incorporate the symbolism of transvaal daisies into your floral arrangements, consider pairing them with other flowers that convey similar messages. For example, combining transvaal daisies with roses (which symbolize love) or baby’s breath (which represents everlasting friendship) can create a beautiful and meaningful arrangement.
When giving transvaal daisies as a gift, remember to consider the context and relationship. A bouquet of fresh transvaal daisies is an excellent way to brighten up someone’s day, but if you’re looking to convey something more specific, such as gratitude or apologies, choose flowers that resonate with those emotions instead.
Care and Maintenance of Transvaal Daisies
To keep your beautiful transvaal daisies thriving, it’s essential to follow some simple care and maintenance tips that will help them grow strong and vibrant. We’ll walk you through these must-knows next.
Soil Requirements
Transvaal daisies are relatively adaptable plants when it comes to soil conditions, but they still have specific requirements to thrive. First and foremost, these flowers prefer well-draining soil that is rich in organic matter. A pH range of 6.0-7.5 is ideal for transvaal daisies, making them tolerant of a slightly acidic to neutral soil environment.
When it comes to moisture content, transvaal daisies require regular watering but can be sensitive to overwatering. Aim to provide about 1 inch of water per week, either from rainfall or irrigation. This will help maintain a moist but not soggy soil condition that promotes healthy root growth and flower development.
In terms of nutrient needs, transvaal daisies benefit from a balanced fertilizer application during the growing season. You can use a 10-10-10 NPK formula to provide essential nutrients for plant growth. Be sure to follow the recommended dosage instructions on the fertilizer packaging to avoid overfertilizing your plants.
To create an optimal soil environment for transvaal daisies, you can mix in a 2-inch layer of compost or well-rotted manure into the top 6-8 inches of soil. This will provide a nutrient-rich base that supports plant growth while also improving drainage and aeration in the soil.
Lighting and Temperature Conditions
When it comes to providing optimal care for your Transvaal Daisies, lighting and temperature conditions play a crucial role. These delicate flowers are sensitive to extreme temperatures and light exposure, which can impact their growth and overall health.
In terms of temperature, Transvaal Daisies prefer cooler temperatures between 60°F (15°C) and 70°F (21°C). Avoid placing them in areas with direct sunlight or near heating vents, as this can cause them to become scorched or wilted. If you live in a warmer climate, consider moving your plants to a shaded area during the hottest part of the day.
When it comes to lighting, Transvaal Daisies require bright indirect light but not direct sunlight. Placing them near an east- or west-facing window is ideal, as this provides gentle, filtered light. Avoid placing them in areas with low light, as this can cause them to become leggy and weak.
To ensure your Transvaal Daisies receive the right amount of light and heat, check their leaves for signs of stress. If they appear pale or wilted, it may be a sign that they need more indirect light or cooler temperatures.
Common Issues and Pests Affecting Transvaal Daisies
If you’re experiencing problems with your transvaal daisy, you’ll want to be aware of common issues like aphids, whiteflies, and root rot that can affect its health. Learn how to identify and prevent these pests here.
Fungal Diseases
Transvaal daisies are indeed prone to various fungal diseases that can have an impact on their growth and overall appearance. Some of the most common fungal issues affecting these lovely flowers include powdery mildew, root rot, and leaf spot.
Powdery mildew is a common problem caused by fungi in the Erysiphe and Oidium genera. It appears as a white or grayish coating on the leaves, which can cause them to become distorted and eventually drop off. To prevent this issue, make sure your transvaal daisies receive adequate air circulation and are not overcrowded.
Root rot is another major concern caused by fungi in the Phytophthora and Pythium genera. This problem arises when the roots of the plant begin to decay due to excess moisture. To treat root rot, gently remove the affected plant from its pot, trim off any dead roots, and repot it with fresh soil.
Leaf spot is another fungal disease that affects transvaal daisies. It appears as small, circular spots on the leaves, which can eventually merge to form larger blotches. To prevent leaf spot, ensure your plants are receiving enough light and water carefully, avoiding overwatering.
Insect Pests
Transvaal daisies can be susceptible to various insect pests that can cause damage and spread diseases. One of the most common pests affecting these flowers is whiteflies. These tiny insects feed on plant sap, causing yellowing leaves, stunted growth, and reduced blooms.
Another pest you may encounter is mealybugs, which are small, cottony-looking insects that secrete a sticky substance called honeydew, attracting ants and promoting the growth of sooty mold. Mealybugs can also transmit plant viruses.
Spider mites, on the other hand, are microscopic arachnids that feed on plant sap, causing fine webbing to appear on the leaves. Infested plants may exhibit yellowing or bronzing of the leaves, reduced growth, and premature dropping of flowers.
To control these pests, inspect your transvaal daisies regularly for signs of infestation. Use neem oil or insecticidal soap to kill the insects on contact. For organic pest management, introduce beneficial insects like ladybugs or lacewings, which prey on whiteflies and mealybugs. Isolate infested plants to prevent the pests from spreading to other flowers in your garden. Regularly water your transvaal daisies properly, as dry conditions can exacerbate pest issues.
Propagation and Reproduction of Transvaal Daisies
To successfully grow these beautiful flowers, you’ll want to learn how to propagate and reproduce transvaal daisies, which is where this next part comes in.
Seed Germination
When it comes to propagating Transvaal daisies through seeds, understanding the process of seed germination is crucial for successful growth. Transvaal daisy seeds require specific conditions to germinate, and proper sowing techniques can make all the difference.
To begin with, select fresh and viable seeds that have been properly stored. Sow them about 1/8 inch deep in a well-draining seed starting mix, making sure not to overcrowd the tray. Keep the soil consistently moist but not waterlogged, as this can lead to rot and poor germination rates.
It’s essential to provide the right temperature for germination, which typically ranges from 65°F to 75°F (18°C to 24°C). Avoid placing the seed trays near heating vents or drafty areas that can cause uneven growth. After 1-2 weeks, you should start seeing tiny white roots emerge, followed by a small green shoot. Keep the soil moist and provide adequate light for the young seedlings.
Proper aftercare is also vital for successful germination. Transvaal daisy seedlings are sensitive to overwatering, so be cautious not to waterlog the soil.
Division and Grafting
Division and grafting are two effective methods for propagating Transvaal daisies, allowing you to create new plants from existing ones. Division involves separating a mature plant into smaller sections, each with its own root system, while grafting combines a stem or branch from one plant onto the root system of another.
Timing is crucial when it comes to division and grafting. For division, wait until the plant has finished blooming and the new growth has started to emerge. This usually occurs in late spring or early summer, depending on your location. Use a sharp, sterile knife or pruning tool to carefully separate the sections, making sure each one has at least one growing point (where leaves meet the stem). Plant the divisions immediately, watering well to settle the soil.
When it comes to grafting, you’ll need a rootstock plant with a vigorous root system and a scion from the Transvaal daisy variety you want to propagate. Use a grafting tape or wax to join the two plants together, ensuring a secure bond. This method is often used for species that are difficult to divide or have weak roots.
Keep in mind that division and grafting can be more time-consuming than other propagation methods, but they offer excellent results when done correctly. With practice and patience, you’ll be able to multiply your favorite Transvaal daisy varieties with ease.
Conclusion: Tips for Growing Healthy Transvaal Daisies
Now that you’ve learned how to care for your transvaal daisies, here are some final tips to help them thrive and bring joy to your garden. Follow these easy-to-implement suggestions.
Final Thoughts on Cultivation
As you’ve reached the end of our journey on growing healthy Transvaal daisies, it’s essential to reflect on the key takeaways that will help you achieve success with these vibrant flowers. By incorporating the tips and best practices discussed throughout this article, you’ll be well-equipped to tackle various environments and cultivate thriving plants.
One crucial aspect to remember is adaptability. As we’ve explored, Transvaal daisies can thrive in a range of conditions, from full sun to partial shade, and in diverse soil types. To replicate this versatility in your garden, ensure you provide your plants with the right amount of sunlight for their specific environment. For instance, if you’re growing them in a shadier area, consider supplementing with grow lights to compensate for the lack of natural light.
Another critical factor is water management. Overwatering can be detrimental to Transvaal daisies, leading to root rot and other issues. Conversely, under watering may cause stress and impact blooming potential. To strike the perfect balance, check the soil regularly by inserting a finger into the top 1-2 inches of soil. If it feels dry, it’s time for a gentle soaking.
Additionally, don’t underestimate the importance of deadheading. Regularly removing spent blooms encourages healthy growth, promotes bushy development, and – most importantly – stimulates an abundance of new flowers. To make this process more efficient, consider using a pair of clippers specifically designed for flower removal, which will minimize damage to delicate petals.
Lastly, don’t forget that every garden is unique, with its own set of microclimates and challenges. Stay attentive to your plants’ needs, and be prepared to adjust your care routine accordingly. By embracing this flexible approach, you’ll unlock the full potential of your Transvaal daisies and enjoy the rewards of a thriving, vibrant display of color in your garden or indoor space.
Frequently Asked Questions
Can I grow Transvaal Daisies indoors, or do they require full sun?
Yes, you can grow Transvaal Daisies indoors, but make sure to provide them with bright indirect light. East- or west-facing windows are ideal for indoor cultivation. If you don’t have access to natural light, consider using LED grow lights to supplement the lack of sunlight.
How long do Transvaal Daisies take to bloom after planting?
The blooming period of a newly planted Transvaal Daisy can vary depending on factors like temperature, soil quality, and lighting conditions. Generally, it may take 6-12 months for your plant to produce its first blooms after being planted from seed or division.
Are there any specific pests that target Transvaal Daisies?
Yes, aphids, whiteflies, and mealybugs are common pests that can infest Transvaal Daisies. Regularly inspect your plants for these insects, and use organic pest control methods whenever possible to maintain a healthy balance in your garden ecosystem.
Can I propagate Transvaal Daisies using stem cuttings, or is division the only way?
Yes, you can propagate Transvaal Daisies using stem cuttings. Take 3-4 inch stem sections with at least two sets of leaves from mature plants during the spring or summer months when they are actively growing. Remove lower leaves and roots will develop within a few weeks.
How do I prevent fungal diseases in my Transvaal Daisy collection?
To prevent fungal diseases, ensure good air circulation around your plants, avoid overwatering, and maintain a balanced fertilization schedule. Regularly inspect your plants for signs of disease, and treat affected areas promptly with organic fungicides or remove the infected plant material to prevent further spread.