If you’re a beekeeper or gardener, you know how crucial it is to maintain healthy garden hives. However, one common issue many beekeepers face is wax moth infestations. These pesky moths can cause significant damage to your beehive and even lead to colony collapse if left untreated. But don’t worry – with the right knowledge, you can prevent and control these unwanted visitors.
In this article, we’ll delve into the causes of wax moth infestations in garden hives, including the key factors that contribute to their development. We’ll also discuss the telltale symptoms to look out for, so you can catch the problem early on. Plus, we’ll explore effective treatment methods and prevention strategies to keep your beehive thriving and healthy. By the end of this article, you’ll know exactly how to protect your garden hives from wax moth infestations and keep your bees happy and healthy.
Understanding Wax Moths and Their Life Cycle
Wax moths can be a significant problem for beekeepers, but understanding their life cycle is key to prevention. Let’s take a closer look at how these pests develop in your garden hives.
What are Wax Moths?
Wax moths are a type of moth species that feed on wax, honeycomb, and other components found within beehives. These pests can cause significant damage to garden hives, weakening their structure and compromising the health of the bees. Wax moths play a detrimental role in garden hives, as they consume honeycomb cells, disrupt brood development, and even introduce diseases into the hive.
In ideal conditions, wax moth larvae are capable of consuming entire honeycombs within weeks. This can be particularly devastating for beekeepers who rely on healthy hives for pollination services or honey production. Identifying signs of wax moth infestation early is crucial to prevent extensive damage. Look out for torn honeycomb cells, cocoons, and frass (insect waste) in the hive. Regular inspections will help you catch issues before they spiral out of control.
Maintaining a healthy and balanced bee population through proper management practices can also deter wax moths from taking hold. This includes ensuring adequate ventilation, controlling humidity levels, and monitoring for signs of pests or disease regularly.
Wax Moth Life Cycle
Wax moths undergo a complete metamorphosis, consisting of four distinct stages: eggs, larvae, pupae, and adults. The female wax moth lays her eggs on the hive’s surface, typically near areas with abundant nectar or pollen stores. After 3-4 days, the eggs hatch into larvae, which feed voraciously on bee brood, honeycomb, and propolis.
As the larvae grow, they molt several times to accommodate their increasing size. A single larva can consume up to its own body weight in wax daily. Pupation occurs after 2-3 weeks of feeding, and the pupae will eventually emerge as adult moths. Adult wax moths are nocturnal and typically live for only a few days.
It’s essential to understand that each stage of the life cycle presents opportunities for control measures. For instance, removing infested honeycombs or treating them with insecticidal soap can disrupt the egg-laying process. By recognizing these stages and taking proactive steps, you can reduce the wax moth population and safeguard your garden hive’s health.
Attracted to Honeybees or Beewax?
When it comes to understanding wax moths and their life cycle, one of the most important aspects is knowing why they’re attracted to honeybee colonies and beewax stores. Wax moths are drawn to these areas for two main reasons: food and shelter.
On one hand, wax moths are primarily attracted to the abundance of wax that’s present in honeybee colonies. Bees produce wax from their bodies and use it to create the intricate structures within their hives, such as comb cells and brood boxes. Wax moths feast on this wax, which is rich in nutrients like proteins, carbohydrates, and fats.
On the other hand, beewax stores offer an ideal shelter for female wax moths during the larval stage of their life cycle. They spin cocoons around themselves within the warm, humid environment of the hive, where they can feed on the surrounding wax and develop into adult moths. To discourage wax moths from being attracted to your honeybee colonies, make sure to maintain a clean and well-ventilated hive with minimal stored wax reserves. Regular inspections and prompt removal of debris will also help deter these pests from infesting your beehives.
Causes of Wax Moth Infestation in Garden Hives
Let’s take a closer look at why wax moths infest garden hives, from poor ventilation to damaged combs, and what can be done about it.
Poor Hive Maintenance
Poor hive maintenance is one of the most significant contributors to wax moth infestations. When hives are not regularly cleaned and inspected, debris and waste accumulate, creating an ideal environment for wax moths to thrive. Dirty hives can be particularly problematic, as they provide a cozy shelter for adult wax moths to lay eggs.
Old equipment is another common issue that can attract wax moths. Wooden frames and supers can harbor larvae and eggs, which can then spread to other areas of the hive. Regularly inspecting your equipment and replacing any worn or damaged items can help prevent infestations.
In addition to dirty hives and old equipment, insufficient inspection can also lead to undetected wax moth infestations. Regular inspections should be performed at least every 1-2 weeks during peak brood seasons. Look for signs of wax moths, such as white cocoons or silk threads, and remove any affected combs or frames immediately.
By maintaining a clean and well-inspected hive, you can significantly reduce the risk of attracting wax moths. Remember to always clean your equipment thoroughly before reusing it, and make sure to inspect every aspect of your hive regularly to catch any potential problems early on.
Seasonal Proliferation
As the seasons change, garden hives become more susceptible to wax moth infestations. Warmer temperatures and increased humidity create an ideal breeding ground for these pests. With a few key factors coming together, wax moths can rapidly proliferate within a hive.
One of the primary contributors to seasonal proliferation is temperature fluctuations. Wax moths thrive in temperatures between 60°F to 80°F (15°C to 27°C), which coincidentally falls within the average summer range in many regions. As temperatures rise, so does the wax moth population. Furthermore, increased humidity allows larvae to feed and grow more efficiently, further exacerbating the infestation.
To mitigate this issue, beekeepers must remain vigilant during warmer months. Regular inspections of hives should be conducted to identify early signs of infestation. Removing any debris or excess honeycomb can also help deter wax moths from taking hold. By staying attuned to seasonal changes and implementing preventative measures, garden hive owners can better protect their bees against these pesky pests.
Nearby Pest Attraction
When it comes to attracting wax moths into garden hives, nearby pest infestations play a significant role. If your beehive is located near areas with high pest activity, such as wasp nests, rodent burrows, or ant colonies, you may inadvertently be creating an environment that attracts wax moths.
Wax moths are drawn to the same food sources as other pests, including honey, pollen, and brood. If a nearby infestation is causing your bees to expend excessive energy defending their hive, it can weaken their immune system and make them more susceptible to wax moth infestations. For instance, if you have a wasp nest near your beehive, the constant struggle for dominance between the two species can lead to a weakened beehive.
To mitigate this issue, consider relocating your beehive to an area with minimal pest activity. Regularly inspect nearby areas and remove any sources of food that may attract pests. By taking proactive steps to manage nearby infestations, you can reduce the likelihood of wax moth invasions and maintain a healthy, thriving beehive.
Symptoms and Identification of Wax Moth Infestation
When you notice signs of wax moth infestation, it’s essential to identify the symptoms early on to prevent further damage to your garden hives. Look out for these telltale signs and learn what they mean.
Damage to Hive Structures
When you notice signs of a wax moth infestation in your garden hive, one of the most noticeable and disturbing aspects is the physical damage caused by these pests. Wax moths are notorious for their ability to tunnel through and destroy the intricate structures within the hive. The tunnels they create can be extensive, often extending several inches deep into the hive’s components.
The damage is not limited to just tunnels; wax moths also create holes in honeycomb cells, leaving behind a maze of empty cavities that were once filled with nutritious nectar and pollen. You might find that entire sections of the hive have been gutted, including frames, comb, and even the delicate propolis holding everything together.
As you inspect the damaged areas, look for signs of moth eggs, larvae, or adult moths to determine the extent of the infestation. If left unchecked, wax moth damage can spread quickly throughout the hive, compromising its structural integrity and threatening the colony’s survival.
Presence of Pupae or Larvae
Identifying pupae or larvae within the hive can be a crucial step in diagnosing a wax moth infestation. When inspecting the hive, look for signs of webbing, cocoons, or silken threads, which are indicative of the presence of these life stages. Webs and cocoons are often found near the comb’s edges or corners, where the insects tend to congregate.
To confirm the presence of pupae or larvae, gently scrape off any debris or wax from the surface. If you find silken threads or a sticky substance on your tool or hands, it may be a sign that the moths are present. Be cautious not to damage the comb while inspecting for these signs. In some cases, you might even spot the moths themselves, particularly if they’re emerging from their cocoons.
If you suspect an infestation, carefully remove any affected frames and quarantine them to prevent further spread of the pests. Regular inspections will help you catch any issues early on, reducing the risk of a full-blown infestation. Keep in mind that even small numbers of pupae or larvae can cause significant damage over time, so it’s essential to address these issues promptly.
Behavioral Changes in Bees
When you notice changes in the behavior of bees in your garden hive, it can be a telltale sign that something is amiss. One common symptom of an infestation is altered foraging patterns. Bees that are struggling to defend their colony against wax moths may change their usual routine, often heading out at night instead of during the day. This increased nocturnal activity can be a giveaway that your bees are under stress.
Another behavior you might observe is a decrease in foraging frequency or quantity. With wax moth larvae feeding on the wax and honeycomb, bees have less resources to gather and store. As a result, they may venture out fewer times or collect less nectar, pollen, and water than usual.
Keep an eye out for changes in your bees’ communication patterns as well. Wax moths can disrupt the complex language system that bees use to communicate with each other about food sources, threats, and other important issues. If you notice an unusual increase in alarm pheromones or a decrease in recruitment signals, it could indicate that your bees are struggling to defend their colony against wax moth infestation.
By paying attention to these behavioral changes, you can take proactive steps to identify the issue and develop a plan to mitigate its impact on your bees.
Prevention and Control Measures
Now that you know how to spot a wax moth infestation, let’s focus on preventing and controlling these pesky insects from causing more damage to your garden hive.
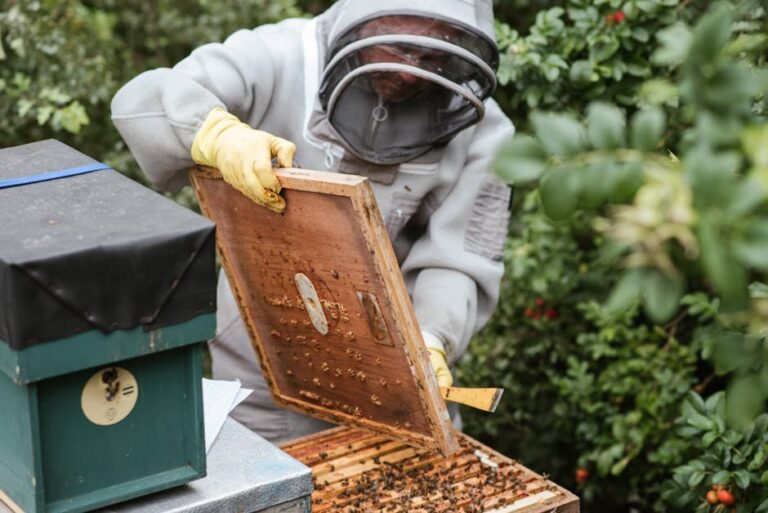
Regular Hive Inspections
Regular inspections are crucial when it comes to catching wax moth infestations early on. If you’re not diligent about monitoring your garden hives, the damage can be extensive before you even notice a problem. Start by checking for signs of wax moth activity at least once a week during peak breeding seasons.
Look for damaged or discolored comb, as well as any unusual debris or webbing in and around the hive. Check for the presence of wax moth larvae, which are white and legless, often appearing like tiny worms. Be sure to inspect all areas of the hive, including corners and crevices where eggs may be laid.
Regular inspections can help you catch infestations before they spread, reducing the amount of damage caused by the moths. Keep in mind that wax moth eggs are incredibly resilient, able to withstand temperatures between 32°F and 100°F. This means even small infestations can quickly become major problems if left unchecked. Stay vigilant and take action promptly if you notice any signs of a wax moth problem.
Cleaning the Hive
Cleaning the hive is an essential task to prevent wax moth infestations. When done correctly, it not only helps control wax moths but also promotes a healthy environment for your bees. To start cleaning, remove any debris or dead flowers from around the hive entrance to prevent wax moths from entering.
Next, inspect the hive and remove old honeycomb that’s no longer in use. This includes any darkened or discolored frames, which are likely infested with wax moths. Gently pry off these frames and replace them with fresh ones. Be sure to crush the old combs before disposing of them to prevent wax moth eggs from surviving.
Check your equipment for damage, such as cracks in the hive body or torn mesh. Replace any damaged parts immediately. Keep in mind that even minor damage can provide an entry point for wax moths. After removing debris and old equipment, disinfect the hive with a solution of water and baking soda to prevent the spread of diseases.
Finally, inspect your bees’ stores for signs of moisture. Wax moths thrive in humid environments, so ensuring dry conditions is crucial to controlling infestations. Regular cleaning not only prevents wax moth outbreaks but also helps maintain a thriving bee colony.
Integrated Pest Management (IPM)
When it comes to managing wax moths in garden hives, adopting an Integrated Pest Management (IPM) approach is essential. This strategy involves a multi-faceted approach that incorporates various techniques to prevent and control infestations.
One effective IPM method for controlling wax moths is introducing beneficial insects into the hive. These natural predators feed on wax moth larvae, helping to regulate their population. For example, you can introduce trichogramma wasps or parasitic nematodes, which specifically target wax moth eggs and larvae.
Another key aspect of IPM is applying targeted treatments. This may involve using essential oils, such as peppermint or lemongrass, to repel adult moths from the hive. You can also use diatomaceous earth, a natural, non-toxic powder that dehydrates and kills wax moth larvae. When using chemical treatments, be sure to follow the manufacturer’s instructions carefully.
Regular inspections of your garden hives are crucial for early detection and prevention of wax moth infestations. By combining these IPM strategies, you can effectively manage wax moths in your garden hives and maintain a healthy, thriving colony.
Successful Treatment and Recovery Strategies
Now that you’ve identified the cause of your hive’s problems, let’s dive into some effective strategies for treating and recovering from a wax moth infestation.
Timing and Frequency
When it comes to treating wax moth infestations, timing and frequency are crucial factors that can make all the difference. You see, wax moths go through different life stages, from eggs to larvae to pupae, and each stage requires a specific approach.
Initially, when you notice the first signs of an infestation – typically small holes or tears in the honeycomb – it’s essential to act quickly. This is because the larvae are most vulnerable during this early stage, and a timely treatment can prevent the infestation from spreading. We recommend treating the hive every 7-10 days for three consecutive treatments.
As the infestation progresses, you may need to adjust your treatment schedule. For instance, if you notice that the moths are still present after the initial treatments, you may want to increase the frequency of applications or use a more robust treatment method. Keep in mind that it’s always better to err on the side of caution and treat the hive too frequently rather than not enough.
Remember, patience is key when treating wax moth infestations. It can take several weeks for the treatments to be fully effective, so don’t get discouraged if you don’t see immediate results. With persistence and the right approach, you can successfully manage the infestation and restore your hive’s health.
Treatment Methods
When it comes to treating wax moth infestations in garden hives, there are various methods to consider. Chemical control is one option, but it’s essential to exercise caution when using pesticides. Always follow the manufacturer’s instructions and take necessary precautions to avoid exposure.
A more natural approach involves using essential oils, such as tea tree oil or lavender oil, which have been shown to repel wax moths. Mix a few drops of the oil with water and spray it directly onto the affected areas. This method is not only environmentally friendly but also safe for bees.
Another effective way to control wax moth populations is by using pheromone traps. These specialized traps mimic the scent of female wax moths, attracting males which then get trapped inside. Place these traps near the infested area to monitor and manage the population.
It’s crucial to combine treatment methods with good hive management practices, such as maintaining clean hives, monitoring for signs of infestation regularly, and ensuring proper ventilation.
Post-Treatment Care
After treating your garden hive for wax moths, it’s essential to focus on post-treatment care to ensure a smooth recovery for both the bees and the hive. This phase is just as crucial as treatment itself, as it allows you to assess the effectiveness of the treatment and make adjustments to prevent future infestations.
Re-inspect your hive regularly during this period, checking for any signs of wax moth activity or damage. Look for damaged combs, torn honeycomb, or powdery debris on the hive’s exterior. If you notice any issues, consider re-treating the affected areas with a gentle soap solution to prevent further damage.
Adjusting management practices is also vital during this phase. Consider increasing ventilation in your hive by removing some of the inner cover or adding more entrance relief to reduce moisture buildup, which can attract wax moths. Be sure to maintain good hygiene practices, such as regularly cleaning and disinfecting tools, to prevent re-infestation.
By prioritizing post-treatment care, you’ll be better equipped to monitor your hive’s progress and make informed decisions about its management, ultimately ensuring a healthy and thriving colony.
Best Practices for Preventing Future Infestations
To avoid costly repairs and future infestations, it’s crucial to implement strategies that minimize the risk of wax moths invading your garden hives. We’ll share essential tips for prevention right here.
Seasonal Preparation
When it comes to preventing wax moth infestations, seasonal preparation is crucial. As the seasons change, so do the needs of your garden hives. In areas with harsh winters, for instance, you’ll want to prepare your hives for cold temperatures and potential moisture issues.
In spring, after a long winter, inspect your hives carefully for signs of wax moth damage or infestation. Remove any debris, damaged comb, or dead bees that may have accumulated over the winter months. This will help prevent wax moths from finding food and shelter in your hive.
Summer is a time for maintenance, when you should ensure your hives are well-ventilated to prevent moisture buildup. Regularly inspect frames for signs of wax moth infestation, and perform repairs or replacements as needed. Also, ensure that your bees have enough space to move around comfortably, reducing the likelihood of overcrowding-related issues.
As autumn approaches, prepare your hives for colder temperatures by adding insulation or wrapping them in protective coverings. This will help regulate temperature fluctuations and reduce the risk of wax moth infestation. Finally, inspect your hives regularly throughout the year, even during the coldest months, to catch any potential problems before they become major issues.
Sustainable Beekeeping Methods
When it comes to preventing future infestations of wax moths in your garden hive, adopting sustainable beekeeping methods is crucial. One of the most effective ways to minimize the risk of attracting these pests is through careful hive placement.
Consider placing your beehive in an area that receives full sun and has good air circulation – this will help regulate the temperature and humidity levels within the hive, making it less appealing to wax moths. You should also position your hive at least 10-15 feet away from any nearby structures or plants, as wax moths can easily infest neighboring areas.
Proper hive management is equally important in preventing wax moth infestations. Regularly inspect your hive for signs of pest activity and remove any debris or excess propolis that can attract these pests. Keep your hive well-maintained, with clean frames and a strong, healthy colony – this will help prevent the buildup of damp conditions that are ideal for wax moths to thrive in.
Regular inspections of your beehive should also include monitoring for signs of wax moth damage, such as holes in honeycomb or shredded debris around the hive. By implementing these sustainable beekeeping practices and staying vigilant, you can significantly reduce the risk of a wax moth infestation occurring in the first place.
Frequently Asked Questions
What if I’ve already had a wax moth infestation? Can I still use the hives after treatment?
Yes, it’s possible to reuse hives that have been treated for wax moths, but it’s essential to take extra precautions. Clean and disinfect the hive thoroughly, and consider replacing any severely damaged honeycomb cells. Regular inspections will help you catch any potential issues early on.
How often should I inspect my garden hives for signs of wax moth infestations?
Regular inspections are crucial in identifying and addressing wax moth problems promptly. Check your hives every 1-2 weeks, especially during peak wax moth season (spring and summer). Look for symptoms like damaged honeycomb cells, pupae or larvae, and behavioral changes in the bees.
Can I prevent wax moths using Integrated Pest Management (IPM) methods alone?
Yes, IPM is a comprehensive approach to managing pests like wax moths. By combining techniques such as regular inspections, cleaning, and removing food sources, you can reduce the risk of infestations significantly. However, be prepared to implement treatment strategies if an issue arises.
What are some common mistakes beekeepers make when trying to control wax moth populations?
One common mistake is underestimating the severity of the problem or delaying treatment until it’s too late. Another error is relying solely on chemical treatments, which can harm the bees and the environment. Instead, focus on integrated approaches that combine prevention, removal of attractants, and targeted treatments.
How do I know if my garden hive maintenance is effective in preventing wax moth infestations?
Effective garden hive maintenance involves a combination of regular inspections, proper cleaning, and IPM strategies. Look for signs like reduced damage to honeycomb cells, fewer pupae or larvae sightings, and healthier bee populations. Continuously adapt your approach based on the specific needs of your hives.