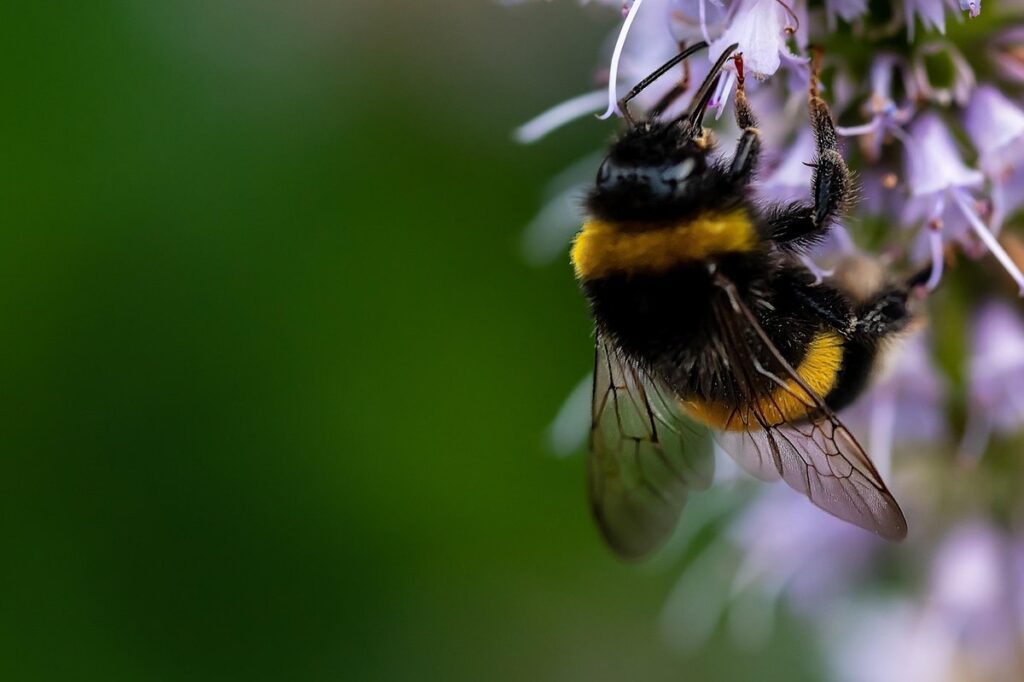
Are you ready to create a haven for bees, butterflies, and other beneficial pollinators in your own backyard? A pollinator garden is more than just a beautiful addition to your outdoor space – it’s also crucial for supporting local ecosystems and helping these vital creatures thrive. But where do you start? Planning a pollinator garden can seem daunting, especially if you’re new to gardening or unsure of what plants will attract the most visitors.
In this step-by-step guide, we’ll walk you through every stage of creating your very own pollinator garden oasis. From planning and preparation to planting and maintenance, we’ll cover everything you need to know to get started – and keep your garden thriving all season long. Whether you have a small balcony or a sprawling yard, our comprehensive guide will show you how to create a welcoming space for these busy visitors.
Planning Your Pollinator Garden
To create a thriving pollinator garden, you’ll need to plan carefully, considering factors like sunlight, soil quality, and the types of plants that will attract local pollinators. Let’s get started with planning your garden!
Choosing the Right Location
When it comes to creating a thriving pollinator garden, selecting the right location is crucial. You’ll want to choose a spot that provides optimal conditions for plants and pollinators alike.
First, consider sunlight: most flowers need at least 6 hours of direct sunlight per day. However, some plants like impatiens or coleus can tolerate partial shade. Take note of your yard’s natural light patterns and identify areas that receive the right amount of sun.
Next, examine your soil quality. Pollinators prefer well-draining soil rich in organic matter. Test your soil type to determine its pH level and nutrient content. If necessary, amend your soil with compost or other fertilizers to create an inviting environment for pollinators.
Proximity to water sources is also essential. Ensure that your garden is within a reasonable distance from a reliable water source, but not so close that it becomes prone to flooding. This will allow you to provide the right amount of moisture without compromising plant health.
Ultimately, choose a location that balances sunlight, soil quality, and accessibility for both plants and pollinators.
Selecting the Right Plants
When selecting plants for your pollinator garden, it’s essential to choose species that are native to your region and provide a rich source of nectar and pollen. Native plants have co-evolved with local pollinators over thousands of years, making them the most effective attractors of bees, butterflies, and other beneficial insects.
Consider incorporating a mix of herbaceous perennials, such as coneflowers, black-eyed Susans, and bee balm, which provide a continuous source of nectar and pollen throughout the growing season. Annuals like sunflowers, zinnias, and cosmos are also excellent choices, offering a burst of color and pollinator-friendly blooms in the spring and summer.
When selecting plants, be mindful of their mature size and growth habits to ensure they don’t overcrowd your garden or compete with other plants for resources. Also, choose plants that are free from pesticides and herbicides, as these can harm or even kill the very pollinators you’re trying to attract. By carefully selecting a diverse array of native plants, you’ll create a haven for pollinators in your own backyard.
Considering Biodiversity
When considering biodiversity in your pollinator garden, it’s essential to think about providing a constant source of nectar for our busy friends throughout the growing season. A single-bloom flower might be lovely, but it’ll only attract pollinators during its brief blooming period. By choosing a variety of flowers that bloom at different times, you’ll create a haven that buzzes with life all summer long.
For example, plant early-spring bloomers like crocus or grape hyacinth, which provide nectar for hungry bees and butterflies just as the garden is waking up from its winter slumber. As spring gives way to summer, add mid-season blooms like coneflowers or black-eyed Susans, which offer a rich source of energy for pollinators during their busiest time.
To maximize biodiversity in your pollinator garden, aim for a mix of at least three different bloom times: early, mid, and late season. This will create a ‘nectar buffet’ that attracts a wide range of pollinators all summer long. Consider plants with varying heights, shapes, and colors to add visual interest and provide sheltered spots for pollinators to rest and recharge.
Remember, it’s not just about quantity – choose a mix of annuals and perennials to ensure year-after-year blooms. With this approach, your garden will be a haven for pollinators, providing the nectar they need to thrive throughout the growing season.
Preparing Your Soil
Before planting a pollinator garden, it’s essential to prepare your soil for success. This means testing and amending the pH level if necessary.
Testing Your Soil pH
Testing your soil pH is an essential step before planting a pollinator garden. You can use a DIY kit or send a sample to a lab for analysis. If you’re new to gardening, consider starting with a DIY kit that’s affordable and easy to use.
To collect the sample, dig a small hole about 6-8 inches deep in your garden bed. Scoop out a handful of soil from the bottom of the hole, avoiding any rocks or debris. Fill a container or bag with the collected soil, making sure to get it to the top without compacting it. If you’re using a DIY kit, follow the instructions for mixing and applying the testing solution.
Most plants prefer a slightly acidic to neutral soil pH between 6.0-7.0. If your results show that your soil needs adjusting, don’t worry – there are many natural and chemical methods to make the necessary adjustments. Adding organic matter like compost or well-rotted manure can help lower high pH levels, while elemental sulfur or aluminum sulfate can be used to decrease it further.
If you’re unsure about how to interpret your results or which amendments to use, consult with a local nursery or gardening expert for guidance. They’ll be able to provide advice tailored to your specific climate and soil type.
Adding Organic Matter
When it comes to creating a thriving pollinator garden, one of the most essential steps is adding organic matter to your soil. This might seem like a simple task, but it plays a crucial role in providing the nutrients and structure that your plants need to grow strong and healthy.
Incorporating compost into your soil can be particularly beneficial for several reasons. For starters, it’s rich in nitrogen, phosphorus, and potassium – the three key nutrients essential for plant growth. Compost also improves soil structure, making it easier for roots to breathe and water to penetrate, which is especially important for pollinator-friendly plants like lavender and coneflower.
You can add organic matter in various forms, including compost, manure, or even leaf mold. Aim to incorporate at least 2-3 inches of material into the top 6-8 inches of soil before planting. This will not only enrich your soil but also create a habitat for beneficial microorganisms that help break down nutrients and fight off pests.
Removing Weeds and Debris
When it comes to creating a pollinator garden, it’s essential to prepare the soil properly. One crucial step in this process is removing weeds and debris from the area where you’ll be planting. Weeds can be particularly problematic for pollinators, as they compete with flowers for space, water, and nutrients.
Not only do weeds crowd out the very plants that pollinators rely on for food, but some species of weeds can also harbor pests or diseases that harm bees and butterflies. For example, dandelions and clover are popular weeds in many gardens, but they can be invasive and push out native flowers.
To remove weeds effectively, start by pulling them up from the roots when they’re young. Use a tool like a hoe or a weeding fork to loosen the soil around mature weeds before yanking them out. Make sure to dispose of removed weeds properly, either by composting them or bagging them for disposal. Regularly removing debris like dead leaves and branches will also help prevent weeds from taking hold in the first place.
Planting Your Pollinator Garden
Now that you’ve chosen the perfect location for your pollinator garden, let’s dive into the fun part: planting! This step-by-step guide will walk you through what to plant and how.
Preparing Planting Beds
Preparing individual planting beds is a crucial step before planting your pollinator garden. To create a healthy and thriving environment for your flowers and beneficial insects, start by loosening the soil to a depth of about 12-18 inches. This will allow roots to grow deep and strong, and also make it easier to remove any debris or weeds that may be present.
As you loosen the soil, keep an eye out for any obstacles such as rocks, twigs, or other debris that could interfere with plant growth. Remove these items carefully, making sure not to damage the surrounding soil structure. You can use a fork or spade to gently lift and remove any large objects, or a rake to clear smaller debris.
It’s also essential to check for any weeds or invasive species in your planting bed. Weeds can compete with your plants for water and nutrients, while invasive species can spread quickly and outcompete native flowers. Remove any weeds by hand or with an herbicide specifically designed for the area you’re working on.
Planting Vegetation
When it comes to planting vegetation in your pollinator garden, there are several best practices to keep in mind. First and foremost, choose plants that are native to your region, as these will be more attractive to local pollinators. Consider a mix of annuals and perennials, which will provide a constant source of nectar and pollen throughout the growing season.
When selecting specific flowers, shrubs, and trees, look for those with long, tube-shaped blooms, such as coneflowers, bee balm, and lavender. These types of plants are particularly appealing to pollinators because they’re rich in nectar and easy to access. Consider planting a mix of early-blooming flowers that provide a source of food for pollinators at the beginning of the growing season.
In terms of plant placement, make sure to group similar plants together to create a visually appealing landscape. Also, consider the mature size of each plant to ensure they won’t overcrowd or compete with one another for resources like sunlight and water. By following these guidelines, you’ll be well on your way to creating a thriving pollinator garden that will attract all sorts of beneficial insects and animals.
Watering and Mulching
When it comes to watering and mulching in your pollinator garden, efficiency is key. Over-watering can be detrimental to plants, especially those that thrive in dry conditions like many pollinators prefer. To avoid this common mistake, water your plants deeply but infrequently. For example, if you’re planting native wildflowers or grasses, aim to provide about 1-2 inches of moisture per week. This allows the roots to grow deep and develop a robust network that can tolerate drought periods.
Mulching is another crucial step in maintaining optimal moisture levels and suppressing weeds. Organic mulches like wood chips, bark, or straw are ideal as they retain moisture, regulate soil temperature, and provide nutrients as they break down. Spread 2-3 inches of mulch around each plant, keeping it a few inches away from the stem to prevent rot. As the mulch degrades, add fresh layers to maintain its effectiveness.
By incorporating these watering and mulching strategies into your pollinator garden care routine, you’ll be well on your way to creating a thriving habitat for bees, butterflies, and other beneficial insects.
Maintaining Your Pollinator Garden
Now that you’ve planted and established your pollinator garden, it’s essential to maintain it so it continues to thrive and support these vital creatures. Regular care will ensure your plants stay healthy and strong.
Monitoring for Pests and Diseases
As you tend to your pollinator garden, it’s essential to keep an eye out for pests and diseases that can harm your plants and their beneficial visitors. Common pests like aphids, whiteflies, and spider mites can drain the sap from leaves, while caterpillars, beetles, and grasshoppers can chew through stems and flowers. To identify these pests, look for physical signs such as sticky honeydew droplets, yellowing or stunted growth, or actual insects on the plants.
Diseases like powdery mildew, leaf spot, and root rot can also affect pollinator gardens. These often manifest as white or gray powdery patches on leaves, black spots, or soft, mushy stems. To manage pests and diseases, adopt integrated pest management (IPM) techniques that minimize harm to beneficial insects. Use neem oil, insecticidal soap, or horticultural oil to control mild infestations, and introduce natural predators like ladybugs or lacewings to your garden.
Regularly inspect your plants for signs of stress or damage, and take action promptly to prevent the problem from spreading. For example, prune infected areas to contain diseases, or hand-pick pests when they’re most active, usually during early morning or evening hours. By monitoring your garden regularly and using targeted control methods, you can keep your pollinator garden healthy and thriving throughout the growing season.
Deadheading and Pruning
Removing spent flowers and pruning plants are two essential tasks that will keep your pollinator garden thriving. Deadheading involves removing faded blooms to encourage new growth and prevent seed production, which can be taxing on the plant. This simple process not only maintains the aesthetic appeal of your garden but also boosts its productivity.
When deadheading, make sure to remove the entire flower stem, cutting it back to a leaf node or just above a bud. Leave a few spent flowers intact, especially if they’re producing berries or seed pods that will attract birds and other wildlife.
Pruning is another critical maintenance task that promotes healthy growth, increases blooming, and maintains the garden’s structure. Prune overgrown plants by removing weak or dead branches, thinning out dense foliage, and cutting back leggy stems to encourage bushy growth. This should be done regularly throughout the growing season, with more extensive pruning in late winter or early spring.
Timing is everything when it comes to pruning. For example, prune rose bushes immediately after their blooming period ends, as this encourages new growth and a second flush of flowers.
Recording Your Garden’s Progress
To truly appreciate the beauty and bounty of your pollinator garden, it’s essential to record its progress over time. This will help you identify what plants are attracting pollinators, when they bloom, and which ones are most popular with these beneficial visitors.
Start by keeping a garden journal where you can note observations about plant growth, flower color, and any notable visits from pollinators like bees, butterflies, or hummingbirds. Include sketches of your garden’s layout and photographs to help visualize its evolution.
When tracking bloom times, consider the ‘phenology’ method: record when specific plants begin to bloom, as well as their peak flowering periods. This will allow you to adjust plantings for future seasons to ensure a constant pollinator draw. Additionally, note which plants attract which types of pollinators – this can inform your planting decisions and help you create an ideal habitat for these creatures.
By monitoring and recording your garden’s progress, you’ll gain valuable insights into how it functions as a pollinator haven and be better equipped to make adjustments for optimal performance.
Supporting Local Pollinators
To create a thriving pollinator garden, it’s essential to provide the right resources for our local pollinators to thrive. This section offers tips on how to choose and plant native flowers that will attract bees, butterflies, and hummingbirds to your garden.
Creating a Bee Hotel
Creating a bee hotel is an excellent way to provide a habitat for solitary bees and other beneficial insects. By offering a safe place for them to nest, you’ll be supporting the local pollinator population and contributing to their survival.
To build a bee hotel using natural materials, start by collecting various types of wood, such as bamboo, willow, or hazel branches. Cut the pieces into different lengths, ranging from 10-20 cm, to create diverse nesting sites for solitary bees. You can also add some insect-friendly plants like lavender or mint nearby to provide food and shelter.
Next, use a drill to make small holes of about 2-5 mm in diameter on the cut wood pieces. This will allow the bees to enter and exit their nests easily. Assemble the hotel by placing the wood pieces into a larger wooden frame or a hollow log, leaving some space between each piece for air circulation.
By creating a bee hotel, you’ll be providing a haven for these vital pollinators, which are essential for our ecosystem’s health. With proper placement and maintenance, your bee hotel can become a thriving habitat for solitary bees and other beneficial insects in no time!
Providing a Source of Water
Providing a source of water for pollinators is just as crucial as providing them with nectar-rich flowers and a safe haven to nest. Without access to clean drinking water, these vital creatures will quickly become dehydrated and weakened, making it harder for them to collect pollen and nectar.
When creating a watering station for your pollinator garden, consider using a shallow dish or birdbath as a makeshift “pond.” This type of setup allows pollinators to land safely while accessing the water. Add rocks or twigs to create stepping stones for landing sites – this will also provide them with a place to perch while drinking.
It’s essential to change the water frequently, especially during hot summer days when it can quickly become stagnant and contaminated. Use a mixture of fresh water and a small amount of apple cider vinegar (1 part ACV to 4 parts water) to help prevent bacterial growth and keep the water clean.
Avoiding Pesticides and Herbicides
When it comes to creating a pollinator garden, one of the most crucial steps is to avoid using pesticides and herbicides. These chemicals can have devastating effects on local pollinators, including bees, butterflies, and hummingbirds.
Firstly, let’s talk about why these chemicals are so problematic. Pesticides can kill or repel pollinators, while herbicides can harm the very plants that pollinators rely on for food and shelter. For example, neonicotinoids, a common pesticide, have been shown to impair bees’ ability to navigate and communicate.
To avoid using these chemicals in your garden, consider adopting an integrated pest management (IPM) approach instead. This involves monitoring your garden regularly to catch any potential problems early on, using physical barriers to prevent pests from entering the garden, and introducing beneficial insects like ladybugs or lacewings to prey on pests.
Some simple yet effective ways to avoid pesticides and herbicides include:
* Using natural pest repellents like garlic or hot pepper spray
* Hand-picking weeds instead of relying on herbicides
* Planting a diverse range of flowers that attract pollinators and support healthy ecosystems
Frequently Asked Questions
How can I ensure my pollinator garden is thriving during extreme weather conditions?
Yes, even with proper planning, extreme weather conditions like droughts or heavy rainfall can impact your pollinator garden’s success. To mitigate these effects, consider incorporating plants that are more resilient to such conditions, and make sure to provide adequate support structures for tall plants to prevent damage from strong winds.
Can I use store-bought potting mixes for my pollinator garden?
While store-bought potting mixes can be convenient, it’s recommended to create your own mix using a combination of organic matter like compost or well-rotted manure. This approach allows you to tailor the pH and nutrient levels to suit the specific needs of your plants.
How often should I water my pollinator garden during its first year?
Watering is crucial for establishing a healthy pollinator garden, especially in the first year after planting. As a general rule, water your garden deeply once or twice a week, depending on weather conditions. However, be cautious not to overwater, which can lead to root rot and other problems.
What are some common signs of pests or diseases in my pollinator garden?
Keep an eye out for unusual damage patterns, yellowing leaves, or white powdery patches on leaves – these could indicate the presence of pests like aphids or spider mites, or diseases such as powdery mildew. Regularly inspect your plants and take action promptly to prevent infestations from spreading.
Can I grow a pollinator garden in containers, even with limited space?
Yes, you can create a thriving pollinator garden in containers, even on small balconies or patios. Choose compact plant varieties and use large enough containers (at least 5-gallon capacity) with good drainage to provide your plants with the necessary root space and support.