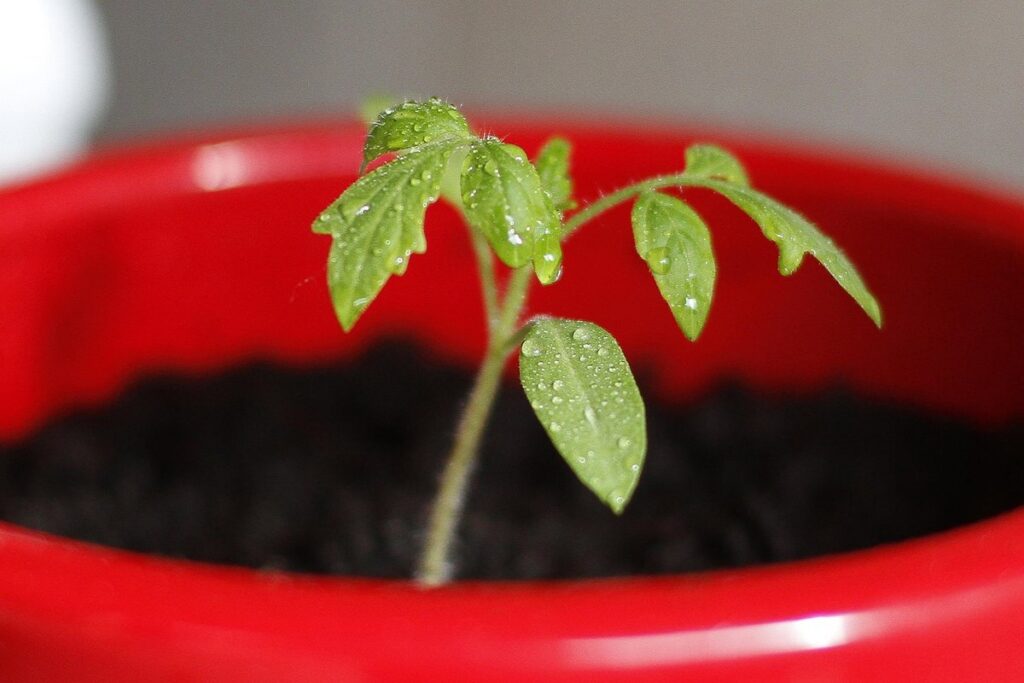
Starting tomato seeds indoors can give you a significant head start on your garden’s growing season. But when exactly should you begin this process? The timing is crucial to ensure healthy seedlings and a bountiful harvest. As an avid gardener, you know that getting a jumpstart on the growing season can make all the difference in your tomato crop’s success. In this article, we’ll cover everything you need to know about starting tomato seeds indoors, from selecting the right seeds to creating optimal growth conditions. We’ll also delve into the art of transplanting seedlings outside when the time is right. With these expert tips and a bit of planning, you can enjoy a thriving and productive tomato harvest all summer long.
Understanding Tomato Seed Starting Basics
Before you begin starting those tomato seeds, let’s dive into some essential basics that’ll help you succeed and give your seedlings a strong start. We’ll cover the key concepts to keep in mind when starting tomatoes indoors.
Why Indoor Seed Starting Matters
Starting tomato seeds indoors offers numerous benefits that can elevate your gardening experience. For one, indoor seed starting significantly improves germination rates compared to direct sowing outside. This is because indoor conditions are more controlled, allowing for optimal temperature and humidity levels that stimulate healthy growth.
Furthermore, starting seeds indoors enables you to get a head start on the growing season. By transplanting seedlings 4-6 weeks before the last frost date in your area, you can enjoy an earlier harvest of delicious tomatoes. This is particularly advantageous for gardeners who live in regions with short growing seasons or have limited outdoor space.
Moreover, indoor seed starting provides better control over seedling quality. You can meticulously tend to each seedling’s needs, ensuring they receive the right amount of light, water, and nutrients to develop robustly. This care translates into healthier plants that are more resilient to pests and diseases, ultimately leading to a bountiful harvest.
Factors Influencing Seed Starting Success
To achieve success with indoor seed starting, it’s essential to understand the key factors that influence tomato seed growth. Temperature is one of the most critical components, as tomato seeds require a consistent and optimal temperature range between 70-80°F (21-27°C) for germination. If the temperature drops below 60°F (16°C), seed germination will be significantly reduced.
Light requirements also play a crucial role in indoor seed starting. Tomato seeds need adequate light to undergo photosynthesis, but too much direct sunlight can cause overheating and stress. Most growers use LED grow lights or fluorescent lights with a balanced spectrum of blue and red hues to provide the necessary illumination.
Humidity levels are another vital factor to consider when starting tomato seeds indoors. A humidity level between 50-60% is ideal for seed germination, but it’s essential to ensure good air circulation around the seedlings to prevent fungal diseases.
Inadequate temperature, light, or humidity can lead to stunted growth, poor germination rates, and even plant death. By understanding these factors and providing optimal conditions, you’ll be well on your way to successfully starting your tomato seeds indoors.
Choosing the Right Variety for Indoor Seed Starting
When starting tomato seeds indoors, you’ll want to choose a variety that thrives in indoor conditions and has a shorter maturation period. This is especially true for beginners who may not have much experience with seed starting.
Selecting Tomato Varieties Suitable for Early Start
Selecting tomato varieties suitable for early start is crucial when planning indoor seed starting. Not all tomatoes are created equal, and some are bred specifically for their ability to mature quickly. Look for varieties that are labeled as “early” or “determinate,” as these tend to produce fruit faster than indeterminate varieties.
Some popular early-producing tomato varieties include ‘Early Girl,’ ‘Patio,’ and ‘Tiny Tim.’ These compact plants grow relatively small, making them ideal for indoor seed starting where space is limited. They also tend to mature in about 50-60 days, perfect for getting a head start on the growing season.
When selecting a variety, also consider factors like disease resistance and temperature tolerance. Some tomato varieties are bred specifically for cooler temperatures or have built-in resistance to common diseases like verticillium wilt. These characteristics can be especially valuable when starting seeds indoors where conditions may not be ideal. By choosing a variety that suits your needs, you’ll set yourself up for success with indoor seed starting and get the most out of your tomato harvest.
Considerations for Determinate vs. Indeterminate Tomatoes
When choosing tomato varieties for indoor seed starting, it’s essential to consider their growth habits. Determinate and indeterminate tomatoes are two distinct categories that require different care approaches.
Determinate tomatoes grow to a set height and produce fruit all at once, making them ideal for containers or smaller spaces. They don’t require staking or pruning and can be harvested within 60-90 days of sowing. However, their compact growth habit means they may not thrive in large pots or require frequent watering.
Indeterminate tomatoes, on the other hand, grow continuously throughout the season, producing fruit repeatedly. These varieties need support and regular pruning to maintain a healthy plant structure. They can become quite large, requiring at least 3-gallon containers for optimal growth. If you plan to transplant your seedlings outdoors, indeterminate tomatoes are a better choice as they’ll continue to produce fruit throughout the growing season.
When starting seeds indoors, it’s crucial to consider these factors to ensure healthy and productive plants.
Preparing the Seed Starting Medium
Before you can start sowing your tomato seeds, you’ll need a well-prepared seed starting medium that will give them a healthy head start in life. Here’s how to mix it up and get ready for germination!
Soil Mixes for Tomato Seeds
When it comes to starting tomato seeds indoors, using a well-draining potting mix specifically designed for seed starting is crucial. A good quality potting mix will help prevent waterlogged soil, which can lead to root rot and other problems that can be detrimental to the health of your seedlings.
Look for mixes that contain ingredients like peat moss or coconut coir, which provide excellent drainage and moisture retention properties. Some examples of suitable mixes include Miracle-Gro Seed Starting Mix, Pro-Mix Seed Starting Mix, and E.B. Stone Organics Tomato & Vegetable Planting Mix. These mixes are designed to promote healthy root growth and support the development of strong seedlings.
When selecting a potting mix, make sure to read the label carefully and look for ingredients that will provide optimal growing conditions for your tomato seeds. Avoid using regular garden soil or potting mixes that contain fertilizer, as these can be too dense and may inhibit seed germination. By choosing the right potting mix, you’ll give your tomato seeds a strong start and set them up for success when they’re transplanted outside.
Sterilizing Tools and Equipment
Proper sterilization of tools and equipment is crucial when preparing seed starting medium to prevent contamination and ensure healthy seedlings. Before touching your seeds or the medium, make sure all your equipment is clean and sanitized.
Start by washing your hands thoroughly with soap and water. Next, wash any metal or plastic tools in warm soapy water, and then sanitize them with a solution of 1 part bleach to 9 parts water. For non-porous items like scissors or tweezers, soak them for 10 minutes before rinsing and drying.
For equipment that can’t be sterilized in this way, such as small pots or seed trays, use a disinfectant spray specifically designed for gardening. Spray the entire surface of the equipment, making sure to follow the manufacturer’s instructions. Allow the equipment to air dry completely before using it with your seeds.
Remember, even if you’re starting with clean seeds and medium, contamination can occur through human contact or equipment that hasn’t been properly sterilized. By following these simple steps, you’ll be able to create a sterile environment for your seedlings to thrive in.
Planting Seedlings in a Propagation Tray or Cell Pack
Once you’ve germinated your tomato seeds, it’s time to transplant them into individual cells or a propagation tray for further growth and development. This section covers the best practices for handling delicate seedlings in these types of containers.
Transplanting into Cells or Individual Containers
Transplanting tomato seedlings from their initial starting medium into cells or individual containers requires careful attention to detail. Begin by gently removing the seedling from its current cell or container, taking care not to damage the roots. To minimize root disturbance, use a fork to loosen the surrounding soil rather than pulling the seedling out.
Once freed, carefully place the seedling into its new home, making sure the soil level is the same as it was in the previous container. If using cells, gently firm the soil around the stem to secure the seedling in place. For individual containers, fill with a good quality potting mix and plant the seedling at the same depth as before.
When transplanting into cells or individual containers, avoid compacting the soil too much, which can lead to poor drainage and root rot. Instead, use a gentle touch to settle the soil around the roots, ensuring they have enough room to grow.
In general, you want to handle seedlings as little as possible to prevent shock, but when transplanting, it’s essential to give them some extra care. By following these steps and taking your time, you’ll be able to successfully transplant your tomato seedlings into their new containers.
Providing Adequate Light for Seedlings
Providing adequate light for seedlings is crucial during the germination and early growth stages. When starting tomato seeds indoors, it’s essential to ensure they receive sufficient light to develop strong roots and stems.
A propagation tray or cell pack can be placed under a variety of lighting options, including LED grow lights. These energy-efficient lights are ideal for indoor seed starting as they provide the specific spectrum tomatoes need to thrive. Aim for at least 20-40 watts per square foot to support seedling growth.
When selecting an LED grow light, consider the color temperature (measured in Kelvin). Tomatoes prefer a balanced spectrum with a color temperature between 3,000K and 4,000K. This will promote healthy leaf growth and development without promoting excessive stem elongation.
In addition to LED grow lights, you can also use natural light from a sunny windowsill or under a skylight. Place the propagation tray or cell pack at least 6-8 inches away from direct sunlight to prevent scorching the delicate seedlings. By providing sufficient light, you’ll set your tomato seedlings up for success and ensure they’re ready to be transplanted outside when the weather permits.
Hardening Off Tomato Seedlings Before Transplanting
Before transplanting your tomato seedlings outside, you’ll need to harden them off gradually to prevent shock and promote healthy growth in their new environment. This process is crucial for success.
Gradual Exposure to Outdoor Conditions
Hardening off is a crucial process that involves gradually exposing tomato seedlings to outdoor conditions before transplanting them into the garden. This step is essential for acclimating the seedlings to the harsher environment outside, which can cause shock and potentially lead to the death of the plants.
As you begin to harden off your seedlings, start by placing them in a shaded area outdoors for 1-2 hours a day. Gradually increase the duration over the next few days, eventually moving them into full sun. It’s also essential to introduce wind and temperature fluctuations to simulate real-world conditions. A good rule of thumb is to harden off seedlings over the course of 7-10 days.
During this period, monitor your seedlings closely for signs of stress or damage. If you notice any significant decline in health, slow down the hardening-off process. The goal is to acclimate the seedlings gradually, not to shock them into submission. By doing so, you’ll ensure a smoother transition and set your tomato plants up for success in their new outdoor home.
Timing for Harden-Off Process
Determining when to start the hardening-off process for your tomato seedlings is crucial for their transition from indoor to outdoor conditions. The ideal time to begin this process depends on several factors, including temperature and weather.
As a general rule of thumb, you should start hardening off your seedlings 7-10 days before the last frost date in your area. This allows them to gradually acclimate to outdoor temperatures and light conditions. If you’re unsure about the last frost date for your region, consult with local nurseries or check online resources such as the National Weather Service.
Weather considerations also play a significant role in determining when to start hardening off. Avoid exposing seedlings to extreme weather conditions like intense heat, cold snaps, or heavy rainfall. Start by placing them in a shaded area outdoors for 1-2 hours a day, gradually increasing the duration over several days. This will help prevent shock and ensure a smooth transition.
Monitor your seedlings’ responses to outdoor conditions and adjust the hardening-off schedule accordingly. If you notice signs of stress or damage, it’s better to delay the process until more favorable weather sets in.
Common Challenges and Solutions for Indoor Seed Starting
Starting tomato seeds indoors can be a bit tricky, and you may encounter some common challenges that can affect their success. We’ll explore these obstacles and provide practical solutions to overcome them.
Troubleshooting Common Issues
Poor germination rates and weak seedlings are common issues that can be frustrating for indoor seed starters. To troubleshoot these problems, let’s examine some possible causes. One common reason for poor germination is inadequate moisture levels. Seeds need consistent moisture to sprout, but overwatering can prevent them from germinating at all.
To resolve this issue, ensure your starting mix is well-draining and maintain a humidity level of 70-80%. Avoid getting water on the leaves or crown of the seedlings, as this can lead to rot. You can also try using a propagation tray with built-in water reservoirs to maintain consistent moisture levels.
Weak seedlings may be due to inadequate light or insufficient fertilization. Make sure your seedlings are receiving at least 12-14 hours of indirect light per day. Fertilize your seedlings with a balanced, water-soluble fertilizer (diluted to half the recommended strength) once they have two sets of leaves.
Monitor your seedlings closely for signs of nutrient deficiency, such as pale or spindly growth. Addressing these common issues early on can help prevent them from becoming more severe problems later on. By paying attention to moisture levels, light, and fertilization, you can enjoy healthier, more robust tomato seedlings that are ready to transplant outside when the time is right.
Optimizing Conditions for Healthy Growth
To optimize conditions for healthy growth and optimal fruit production from tomato plants started indoors, you’ll want to pay close attention to temperature, light, watering, and soil quality. Firstly, ensure the seedlings receive sufficient light, but not too much – most growers use LED grow lights or place them under south-facing windows. Aim for 12-14 hours of light per day, as tomatoes need a photoperiod to produce fruit.
Next, maintain temperatures between 65°F to 70°F (18°C to 21°C) during the day and around 55°F (13°C) at night. This will promote healthy root development and prevent fungal diseases. When it comes to watering, use a balanced fertilizer and water when the top inch of soil feels dry to the touch. Overwatering is common in indoor seed starting, so avoid this by checking the moisture level regularly.
A well-draining potting mix with a slightly acidic pH (around 6.0) will also help prevent root rot and promote nutrient uptake. Keep the area humid, but not too humid – aim for around 50-60% relative humidity to prevent fungal growth.
Frequently Asked Questions
What if I forget to label my seed trays or cells, can I still identify which variety is which?
No, it’s crucial to label your seed trays or cells as soon as possible after sowing to avoid confusion during the growth process. Labeling helps you track progress, identify potential issues specific to certain varieties, and make informed decisions about transplanting.
How do I know when my seedlings have reached a suitable size for transplanting?
Check for the following signs: seedlings should have at least two sets of true leaves, be around 2-3 inches tall, and show no signs of stress or disease. This is usually around 4-6 weeks after sowing indoors.
Can I use regular potting soil instead of a dedicated seed starting mix?
Yes, but keep in mind that regular potting soil may not provide the optimal nutrient balance for young tomato seedlings. Seed starting mixes are specifically designed to promote healthy growth and root development during this critical stage.
What if my seedlings develop yellow or pale leaves while indoors? Does this indicate a problem with light exposure?
Yellow or pale leaves can be caused by inadequate light, but also other factors such as temperature fluctuations, overwatering, or nutrient deficiencies. Inspect your growing conditions, adjust as needed, and monitor the health of your seedlings to prevent potential issues.
How long should I harden off my tomato seedlings before transplanting them outside?
Harden-off times vary depending on weather conditions. Typically, start with 1-2 days of acclimation, then gradually increase exposure to outdoor conditions over the course of 7-10 days, checking for signs of stress and adjusting as necessary.