Spring is in the air, and with it comes the perfect opportunity to plant those beautiful spring bulbs that will bloom into vibrant flowers come springtime. As you start thinking about what to plant, have you ever wondered how to choose the right bulbs for your garden? Or perhaps you’re new to gardening altogether and want some expert advice on getting started.
Choosing the right spring bulbs can be a bit overwhelming, especially with so many varieties to choose from. Not only do you need to consider factors like hardiness zones and soil preparation, but also potential common problems that might arise. But don’t worry, this guide is here to walk you through everything you need to know about planting and caring for spring bulbs. We’ll cover it all, from selecting the perfect bulbs for your climate to troubleshooting common issues that may come up along the way.
Choosing the Right Spring Bulbs
With so many gorgeous spring bulbs to choose from, selecting the right ones for your garden can be a bit overwhelming. Let’s break down some essential factors to consider when making your selection.
Understanding Your Hardiness Zone
When it comes to planting spring bulbs, one crucial factor to consider is your hardiness zone. Hardiness zones are a way to measure the average minimum temperature of an area during winter, with Zone 1 being the coldest and Zone 10 being the warmest. Understanding your hardiness zone will help you choose the right spring bulbs for your garden.
Your hardiness zone significantly impacts what types of spring bulbs will thrive in your garden. For example, if you live in a warmer climate (Zones 8-10), you can grow bulbs like tulips and daffodils year-round, but in colder climates (Zones 3-5), these same bulbs may not survive the winter.
Here are some common spring bulbs that thrive in different zones:
* Tulips: Zones 3-9
* Daffodils: Zones 3-8
* Hyacinths: Zones 4-9
* Crocuses: Zones 3-8
* Grape hyacinth (Muscari): Zones 5-9
When selecting spring bulbs, make sure to choose varieties that are suitable for your hardiness zone. This will ensure they bloom well and survive the winter in your area.
Selecting Bulbs for Year-Round Interest
When selecting spring bulbs for year-round interest, it’s essential to think beyond the initial bloom period. While tulips, daffodils, and hyacinths are popular choices for their vibrant spring colors, they can often fade or drop their foliage soon after blooming. To maintain a dynamic display of color throughout the growing season, opt for bulbs that offer repeat blooms or have attractive foliage.
For example, consider planting alliums, which produce showy flowers in late spring but retain their sturdy stems and ornamental seed heads well into summer. Ornamental garlic, such as ‘Rosenort’ or ‘Mediterranean’, also offers a prolonged flowering period, providing a delicate bloom in late spring followed by attractive foliage that persists until autumn.
In addition to these alternatives, some species of daffodils and tulips can provide continued interest throughout the growing season. Look for varieties like ‘Fortune’ or ‘Queen of Night’, which retain their leaves well into summer, creating a beautiful backdrop for other perennials and ornamental grasses. By incorporating these bulbs into your spring garden design, you’ll enjoy an extended display of color and texture that will keep your landscape looking vibrant all season long.
Preparing the Soil
Before planting spring bulbs, it’s essential to prepare your soil properly to ensure healthy growth and vibrant blooms. This involves loosening and aerating the soil to a depth of about 8-10 inches.
Testing and Amending Your Soil
Before planting spring bulbs, it’s essential to test and amend your soil. Soil testing may seem like an extra step, but it ensures that your bulbs have the right conditions to thrive. A simple soil test can reveal common deficiencies such as low pH levels, nutrient shortages, or even heavy metal contaminants.
Most spring bulbs prefer well-draining, fertile soil with a slightly acidic pH (around 6.0-7.0). If your test reveals low nitrogen levels, consider adding compost or manure to enrich the soil. If the pH is too high, mix in some elemental sulfur to lower it gradually. Don’t worry if you’re unsure about how to interpret your results – most nurseries and gardening stores offer free or low-cost testing services.
Common amendments for spring bulbs include bone meal (a natural fertilizer rich in phosphorus), Epsom salt (to balance magnesium levels), and compost tea (a liquid solution of microorganisms that promotes soil health). Apply these amendments according to the manufacturer’s instructions, usually in late winter or early spring before planting. By taking this crucial step, you’ll give your bulbs a head start on a healthy growing season.
Creating a Bulb-Friendly Soil Mix
When it comes to creating a bulb-friendly soil mix, one of the most crucial elements is incorporating organic matter. This can be achieved by mixing in compost or well-rotted manure into the existing soil. Not only will this enrich the soil with vital nutrients, but it will also improve its structure and drainage.
To start, choose an organic matter that’s rich in nitrogen, phosphorus, and potassium (NPK). Compost is an excellent choice as it’s teeming with beneficial microbes that help break down complex compounds into a form that bulbs can easily absorb. A general rule of thumb is to mix 2-4 inches of compost into the top 6-8 inches of soil.
When using well-rotted manure, make sure it’s fully broken down and has no sharp particles or debris left behind. Aim for a ratio of 10% organic matter to 90% existing soil. By incorporating these amendments, you’ll create a fertile environment that will allow your spring bulbs to thrive.
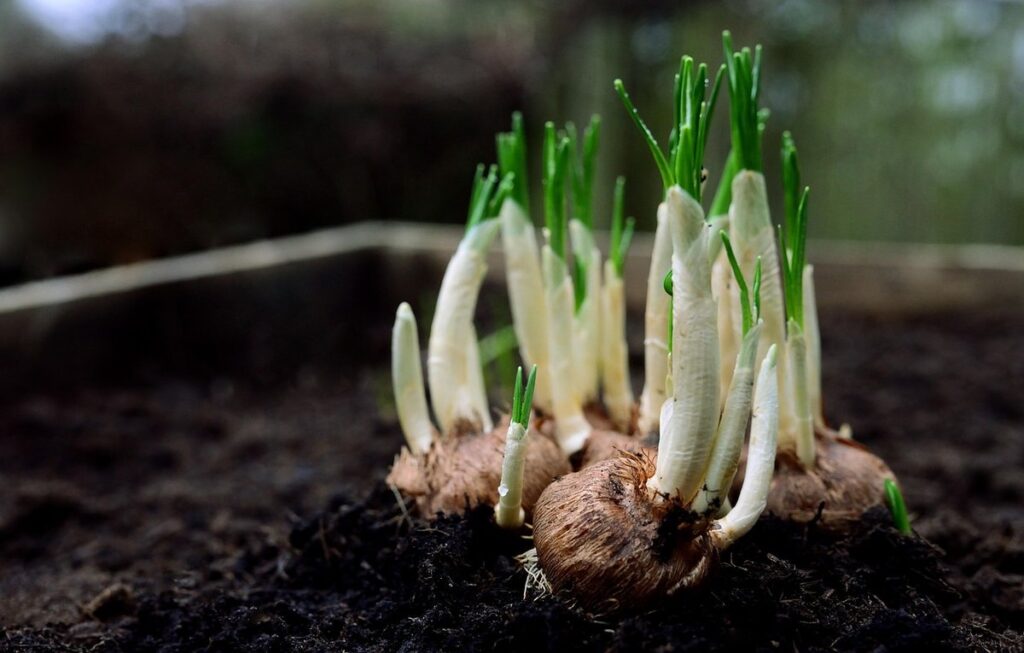
Planting Techniques
When it comes to spring bulb planting, proper techniques are crucial for a successful bloom. Let’s dive into some essential tips and tricks for getting your bulbs off to a great start.
Planting at the Right Depth
When it comes to planting spring bulbs, getting the depth right is crucial for optimal growth and blooming. The general rule of thumb is to plant bulbs 2-3 times their height below the surface of the soil. For example, if you’re planting a daffodil that’s 10 inches tall, plant it 20-30 inches deep.
But how do you determine the correct planting depth? One way is to look at the bulb itself. The base of the bulb should be facing downwards and the pointed tip upwards. Plant the bulb so that the base is buried in the soil and the tip is exposed above ground level. Another way is to check the packaging or label on the bulbs for specific planting instructions.
For example, tulips typically need to be planted 2-3 times their height below the surface of the soil. So if you’re planting a 6-inch tall tulip, plant it 12-18 inches deep. By following these simple guidelines and taking into account the specific needs of your bulbs, you’ll be well on your way to enjoying beautiful blooms in the spring.
Spacing and Arranging Bulbs
When it comes to planting spring bulbs, one of the most crucial aspects is spacing and arranging them correctly. Proper spacing allows for healthy growth, prevents overcrowding, and ensures that each bulb has enough room to thrive.
A general rule of thumb is to plant bulbs 2-3 times their depth in diameter apart from each other. For example, if you’re planting tulips, which are typically 6-8 inches deep, make sure to space them at least 18-24 inches apart. This may seem like a lot, but trust us – it’s essential for the bulbs’ development.
When arranging your bulbs, consider their mature size and growth habits. Some bulbs, like daffodils and hyacinths, can grow quite tall and wide, so be sure to leave enough space between them. On the other hand, smaller bulbs like grape hyacinths and scilla can be planted closer together. To create a visually appealing display, group bulbs of similar sizes and colors together, or intersperse them with other plants for added texture and interest.
Remember, proper spacing is key to preventing overcrowding, which can lead to disease and pest issues. By following these simple guidelines, you’ll be well on your way to creating a beautiful and thriving spring bulb display.
Care and Maintenance
Now that you’ve planted those beautiful spring bulbs, it’s essential to care for them properly to ensure a vibrant display of color next season. Let’s review some vital tips for their maintenance.
Watering During the Growing Season
Watering spring bulbs during their growing season is an essential aspect of ensuring they receive the right amount of moisture to thrive. As a general rule, bulbs should be watered regularly during the active growth period, which typically begins when the foliage emerges from the soil and continues until it starts to yellow and die back.
However, overwatering can be detrimental to spring bulbs. This is because excess water can cause the bulb’s roots to rot, leading to reduced growth and a lower chance of flowering in subsequent years. To avoid this, make sure not to water your bulbs when the soil is already moist or during periods of prolonged rainfall.
As a rough guide, aim to water your spring bulbs once or twice a week, depending on weather conditions. If you live in an area with high temperatures and low humidity, you may need to water more frequently. Keep in mind that spring bulbs have different watering needs, so it’s essential to research the specific requirements of the varieties you’ve planted.
Avoid getting water directly onto the leaves or flower buds, as this can cause damage and lead to rot. Instead, focus on providing a thorough soaking to the soil around the bulb, allowing the roots to absorb moisture as needed.
Deadheading and Post-Bloom Care
When it comes to spring bulb planting, one of the most important aspects of care and maintenance is deadheading spent blooms. Deadheading not only keeps your garden looking its best but also encourages the bulb to focus its energy on re-growing and producing more flowers. To deadhead a bloom, simply remove the spent flower head at the base of the stem, making sure to leave the foliage intact.
Post-bloom care is equally crucial for promoting healthy bulb growth. After blooming has finished, allow the foliage to die back naturally, which can take several weeks or even months depending on the type of bulb. During this time, provide your bulbs with adequate moisture and nutrients by watering them regularly and fertilizing lightly. Avoid cutting back the foliage until it has turned yellow and died, as this can cause the bulb to put energy into producing new growth rather than storing energy for next year’s bloom.
By following these simple steps, you’ll be able to coax your spring bulbs into producing an abundance of beautiful blooms year after year.
Common Spring Bulb Problems
We’ve all been there – a disappointing crop of spring bulbs that just didn’t live up to expectations. This section tackles common issues that can affect your bulb planting endeavors.
Dealing with Pests and Diseases
Spring bulbs are a delight to plant and watch grow, but they’re not immune to pests and diseases. In fact, some common culprits can wreak havoc on your beautiful blooms. Let’s talk about the most common spring bulb problems caused by pests and diseases.
Squirrels and mice love to dig up newly planted bulbs, often eating them or scattering them across the garden. To prevent this, consider using physical barriers like chicken wire or mesh around the planting area. You can also try using repellents containing predator scents or hot peppers to deter these critters. If you do notice damage, don’t worry – simply replant the bulb and keep an eye on it.
Fungal infections are another common issue, caused by overwatering or poor drainage. To prevent this, make sure your bulbs have good air circulation and don’t waterlog the soil. Remove any dead or diseased foliage to prevent the spread of infection. If you do notice fungal growth, treat with a fungicide specifically designed for spring bulbs.
In addition to these pests and diseases, keep an eye out for aphids, slugs, and snails, which can all cause damage to your blooms. Regularly inspect your plants and take action quickly if you spot any issues – it’s better to catch problems early than to lose your entire crop!
Troubleshooting Planting Issues
When planting spring bulbs, it’s not uncommon to encounter issues that can affect their performance and appearance. One of the most common mistakes is planting them at the wrong depth. Bulbs need to be planted at a depth that’s 2-3 times their height above the soil surface. For example, if you’re planting daffodils, which are typically around 12 inches tall, they should be planted about 4-6 inches deep.
Incorrect spacing is another common issue. Planting bulbs too close together can lead to overcrowding and poor air circulation, making them more susceptible to disease. A good rule of thumb is to plant bulbs about 3-6 inches apart, depending on the type of bulb.
If you’ve already planted your bulbs at an incorrect depth or spacing, don’t worry! You can still correct these issues by carefully digging up the bulbs and replanting them at the right depth and spacing. It’s essential to do this as soon as possible after planting to minimize damage to the roots.
To avoid these mistakes in the first place, make sure to read the specific instructions on the bulb packaging or consult with a gardening expert.
Timing and Planning
Now that you’ve chosen your bulbs, let’s talk timing: when to plant them for a vibrant spring display and how to plan your garden layout.
Understanding the Right Time to Plant
When it comes to spring bulb planting, timing is everything. The right moment to plant can make all the difference between vibrant blooms and disappointing results. Weather conditions play a significant role in determining when to plant bulbs. In areas with frost, for example, you’ll want to wait until after the last frost date has passed before planting spring bulbs.
Soil temperature also impacts planting schedules. Most spring bulbs prefer soil temperatures between 35°F and 45°F (2°C and 7°C) for optimal growth. Check your local weather forecast or consult a gardening app to determine when the soil is at the right temperature.
Some bulb varieties, like tulips and daffodils, can be planted as early as late summer or early fall in areas with mild winters. However, if you live in an area with harsh winters, it’s best to wait until after the first frost has passed before planting these bulbs. In contrast, bulbs like hyacinths and grape hyacinths prefer a slightly warmer soil temperature and should be planted later in the fall.
Check your local nursery or gardening store for guidance on specific bulb varieties suitable for your region and climate. By understanding the unique needs of each bulb variety and timing them correctly with weather conditions, you’ll set yourself up for success and enjoy stunning spring blooms.
Creating a Bulb Planting Schedule
When it comes to creating a bulb planting schedule, timing is everything. To ensure optimal results and maximize blooming power, you’ll want to plan ahead and plant at the right time for your region.
In general, bulbs should be planted in the fall, about 6-8 weeks before the ground freezes. This allows them to establish themselves over the winter months, and then burst into bloom come springtime. For example, if you live in a zone with mild winters, you can plant bulbs as early as September or October.
Here’s a sample planting schedule for common spring-blooming bulbs:
* Tulips: Plant in late summer (August-September) for a mid-to-late spring bloom
* Daffodils and Hyacinths: Plant in late fall (October-November) for an early to mid-spring bloom
* Crocuses and Grape Hyacinths: Plant in late fall (October-November) for an early to mid-spring bloom
Keep in mind that this is just a general guideline, and you’ll want to adjust your planting schedule based on your specific climate and region. Be sure to check the average last frost date for your area and plan accordingly.
By following this simple planting schedule, you can set yourself up for success and enjoy beautiful blooms come springtime.
Conclusion
Now that you’ve completed planting, it’s time to review what makes a successful spring bulb garden and take away some final tips for next year.
Recap and Final Tips
As you wrap up this article on spring bulb planting, let’s recap the key takeaways and final tips to ensure a successful gardening season. By now, you should have a solid understanding of the importance of choosing the right bulbs for your climate, preparing the soil, and timing plantings correctly.
You’ve learned about the different types of bulbs, including tulips, daffodils, and hyacinths, each with their unique characteristics and growing requirements. You know that some bulbs, like grape hyacinth and snowdrops, are excellent choices for naturalizing in lawns and under trees. And you’re aware of the importance of allowing the foliage to die back after blooming, which will help recharge the bulb’s energy reserves.
Now that you’ve got a solid foundation, don’t be afraid to experiment with different bulbs and techniques to find what works best in your garden. Try pairing bulbs with other spring-flowering plants, like crocuses or forget-me-nots, for a stunning display of color. Consider adding a layer of mulch or compost around the bulbs to retain moisture and suppress weeds.
To take your bulb planting to the next level, remember to:
* Plant multiple varieties together for a dynamic display
* Experiment with different planting depths and spacings
* Make notes on which bulbs perform well in your garden each year
By following these tips and experimenting with new techniques, you’ll be well on your way to creating a vibrant and beautiful spring bulb garden that will bring joy and color to your outdoor space for years to come.
Frequently Asked Questions
How do I ensure my spring bulbs bloom consistently every year?
Consistency comes from proper care and planning. After planting, make sure to water them regularly during the growing season and avoid overwatering. Also, consider dividing and replanting your bulbs every 3-4 years to maintain their health and encourage blooming.
Can I plant spring bulbs in containers if I don’t have a garden bed?
Yes! Spring bulbs can thrive in containers, making it perfect for small spaces or areas with poor soil conditions. Choose a container that’s at least 6-8 inches deep and has drainage holes to prevent waterlogged soil. Use a well-draining potting mix and follow the same planting and care instructions as for garden beds.
What if I accidentally plant my spring bulbs too deeply? Will they still bloom?
Yes, but they may not bloom as vibrantly or at all. Spring bulbs need a certain amount of exposure to sunlight to grow properly. If you’ve planted them too deeply, consider gently lifting the soil and moving them up to the correct depth.
How can I prevent pests like squirrels and rodents from eating my spring bulb flowers?
To deter pests, plant your spring bulbs with their pointed ends facing upwards, making it harder for animals to dig into them. You can also use physical barriers or repellents specifically designed for garden pests. Additionally, consider planting a mix of bulb varieties that are less appealing to pests.
Can I still plant spring bulbs in the fall if I missed the ideal spring planting time?
No, fall is not the best time to plant spring bulbs, as they need a period of cold winter weather to bloom properly. If you’ve missed the spring planting window, consider planting spring-blooming annuals or perennials that can thrive during this time instead.