As a gardener, there’s nothing quite like watching your seedlings grow into strong, healthy plants. But before you can enjoy their full potential, they need to be transplanted into outdoor conditions where they’ll thrive. The key to success lies in determining whether your seedlings are truly ready for transplant – and that’s exactly what we’re going to cover in this article.
Transplanting too early can lead to shock, stunted growth, or even worse, the demise of your precious seedlings. On the other hand, waiting too long means missing out on prime planting season. So, how do you know when it’s time to transplant? In this post, we’ll walk through techniques for evaluating root system health and preparing your seedlings for outdoor conditions, ensuring a smooth transition from pot to garden bed.
Understanding Seedling Development Stages
To ensure a successful transplant, it’s essential to understand the different stages of seedling development and how they impact your plant’s overall health and resilience. Each stage has unique needs that require attention to achieve optimal results.
Recognizing Visible Growth Signs
As you care for your seedlings, it’s essential to recognize visible signs of growth that indicate they’re ready for transplanting. One of the most noticeable changes is cotyledon expansion. As the first pair of leaves emerges, look for them to unfold and expand, eventually giving way to the true leaves. This process usually occurs within 1-2 weeks after germination.
Another crucial sign is stem elongation. A healthy seedling’s stem will start to grow taller, often accompanied by a slight thickening of its diameter. This indicates that the seedling has developed a strong root system and is ready to support itself in a new pot. Monitor your seedlings’ leaves for uneven growth or “legginess,” where they stretch out too far from the center. This can be a sign of inadequate light, so ensure they’re receiving sufficient illumination.
Regular monitoring will help you catch any potential issues early on, giving you time to address them before transplanting.
Assessing Seedling Size and Color
Evaluating seedling size and color is crucial to determine transplant readiness. This assessment involves considering multiple factors, including root system development, stem thickness, and leaf density.
When evaluating seedlings, look for a developed root system that has grown beyond the cell pack or potting mix. A robust root system will have white, fibrous roots spreading out from the base of the plant. On the other hand, if the roots are circling around the container or appear constricted, it may be a sign that the seedling needs more time to develop.
In addition to root development, inspect the stem thickness and leaf density. A transplant-ready seedling should have a sturdy stem with a diameter of at least 1/4 inch (6-8 mm). The leaves should be dense, with some evidence of internode elongation – the growth between nodes on the stem. Leaf color can also indicate readiness; if the leaves are pale or spindly, it may be a sign that the seedling needs more time to develop.
Look for these signs and take necessary actions based on your observations.
Considering Climate and Weather Conditions
When transplanting seedlings outdoors, it’s essential to consider climate and weather conditions that may impact their growth. Extreme temperatures, moisture levels, and weather patterns can all affect seedling development post-transplant.
Temperature fluctuations are particularly concerning for young seedlings. Sudden changes from cool indoor environments to scorching outdoor heat can cause stress, leading to weakened roots, wilting leaves, or even death. For instance, if you’re transplanting seedlings in a region prone to sudden temperature drops, be prepared to provide protection using row covers or bringing them under shelter.
Weather patterns like intense sunlight, heavy rainfall, or strong winds also require attention. Seedlings may need additional care to withstand extreme weather conditions, such as providing shade cloth for high-intensity sunlight or securing plants with stakes and twine during gusty wind events.
To prepare your seedlings for potential climate-related challenges, monitor local weather forecasts before transplanting. Create a contingency plan by having necessary supplies on hand, like row covers, shade cloth, or trellises, to provide temporary protection when needed.
Evaluating Root System Health
Evaluating root system health is crucial when transplanting seedlings, so let’s dive into how to assess your seedling’s roots for readiness. A quick check can save you from potential shock and stress.
Inspecting Root Development
When inspecting root development, look for signs of healthy growth. Healthy roots will have fine, thread-like structures called root hairs that help absorb water and nutrients from the soil. These hairs are a crucial indicator of the seedling’s ability to establish itself after transplanting.
Branching roots, also known as secondary roots, indicate a well-developed root system. They allow the seedling to access more resources in the surrounding environment, increasing its chances of survival post-transplant. To inspect branching roots, gently remove the soil from around the root ball and spread out the roots.
Check for any signs of damage or stress, such as torn or broken roots. This can be a sign that the seedling is not yet ready for transplanting. If the roots are circling or growing in a compacted mass, this may also indicate that the seedling needs more time to develop before being transplanted.
By carefully inspecting root development, you can determine if your seedlings are ready for transplanting.
Assessing Soil Conditions and Moisture Levels
When transplanting seedlings, it’s essential to evaluate the soil conditions and moisture levels to ensure optimal growth. Soil pH is a crucial factor that affects nutrient availability for seedlings. Most vegetables prefer a slightly acidic to neutral soil pH, ranging from 6.0 to 7.0. To assess soil pH, you can use a DIY kit or send a sample to a laboratory for analysis.
Nutrient availability is also vital for seedling development. Soil testing will reveal the levels of essential macronutrients like nitrogen (N), phosphorus (P), and potassium (K). Fertilizers can be applied accordingly based on soil test results, ensuring that seedlings receive the necessary nutrients to thrive. Water retention capacity is another critical aspect; seedlings require adequate moisture, but excessive water can lead to root rot.
To determine water retention capacity, perform a simple field test by digging a hole and pouring in water. Observe how quickly it drains or if it stays moist for an extended period. This will give you insight into the soil’s ability to retain moisture, allowing you to adjust watering schedules accordingly.
Understanding Root Boundaries
When transplanting seedlings, it’s essential to understand root boundaries and how they impact the success of the process. The root system of a seedling is like an underground network that supplies nutrients and water to the plant. If the roots are too tightly packed or have grown beyond their container, they can become “root bound,” which can hinder the seedling’s ability to thrive after transplant.
Root boundaries refer to the physical limits within which the roots grow. When a seedling outgrows its container, its roots will naturally start to push against these boundaries, causing them to become compacted or even circling back on themselves. This can make it difficult for the seedling to absorb water and nutrients efficiently. Gently loosening the roots during transplanting is crucial to prevent damage and promote healthy growth.
To avoid damaging the delicate root system, gently run your fingers around the inner surface of the container to loosen any compacted soil before lifting out the seedling. Then, use a soft-bristled brush or a chopstick to gently tease apart any tangled roots. This will help the roots to spread out and absorb water and nutrients more efficiently after transplanting.
Preparing Seedlings for Transplantation
Before transplanting your seedlings, it’s essential to prepare them for a smooth transition by hardening off and inspecting their root systems. Let’s dive into these crucial steps together.
Thinning or Pruning Overcrowded Seedlings
When seedlings are overcrowded, competition for resources like light, water, and nutrients can hinder their growth. To prevent this and ensure they thrive post-transplant, you may need to thin or prune them. Thinning involves removing some of the weaker or smaller seedlings, while pruning focuses on reducing the size of the remaining plants.
To thin overcrowded seedlings, carefully inspect each pot and identify the healthiest-looking seedling. Gently remove any weaker or spindly growth by pulling it out at soil level. Leave about 2-3 inches between each seedling to allow for proper air circulation and growth. If multiple seedlings are vying for space, consider transplanting them into individual pots.
Pruning, on the other hand, involves cutting back the stems of the remaining seedlings to encourage bushy growth. Use sharp pruning shears or scissors to remove any weak or damaged leaves or stems. Make clean cuts just above a node – where a leaf meets the stem – and at a 45-degree angle. This will help prevent water from collecting on the cut and reduce the risk of disease. Prune seedlings to about half their height, but make sure they still have sufficient foliage to photosynthesize.
Be cautious not to damage roots when thinning or pruning, as this can cause more harm than good.
Gradual Acclimation to Outdoor Conditions
Gradual acclimation to outdoor conditions is a crucial step before transplanting seedlings. When seedlings are grown indoors under controlled conditions, they’re not accustomed to the harsher outdoor environment. This can lead to shock and stunted growth if exposed abruptly.
To mitigate this issue, it’s essential to gradually introduce your seedlings to increased light intensity, wind, and temperature fluctuations over a period of 7-10 days before transplanting. Start by moving them to a shaded area outdoors for a few hours each day, then gradually increase the duration and exposure to direct sunlight.
Monitor your seedlings’ response and adjust their acclimation accordingly. You can also use row covers or shade cloth to filter intense sunlight and reduce heat stress. Additionally, ensure that your seedlings are hardened off by watering them less frequently to encourage root growth and make them more resilient to outdoor conditions.
By following this gradual acclimation process, you’ll give your seedlings the best chance to thrive in their new environment, reducing the risk of transplant shock and promoting healthy growth.
Handling Seedlings During Transport
When transporting seedlings to their new location, it’s essential to handle them with care to prevent damage and shock. This can be a stressful time for young plants, but by following some simple guidelines, you can minimize the risk of root disturbance or water loss.
Firstly, make sure the soil is kept moist but not waterlogged during transport. A good rule of thumb is to avoid watering seedlings at least 24 hours before moving them. This will prevent excessive moisture from seeping into the packaging materials and causing mold or rot. If you must water, use a gentle spray bottle to mist the leaves and avoid getting water on the soil.
When handling seedlings, be gentle and support their root ball with your hand or a small container to prevent damage. Avoid holding them by the leaves, as this can cause stress and potentially lead to fungal diseases. Instead, cradle the plant in your hands, making sure not to squeeze or compact the soil.
Consider using specialized transport containers that provide adequate space for roots to breathe while minimizing water loss. These containers usually have a breathable material at the bottom to prevent moisture from accumulating.
Transplant Techniques for Maximum Success
When transplanting seedlings, employing the right techniques is crucial for their survival and growth. Let’s explore some effective methods to ensure a seamless transition for your young plants.
Digging the Right Planting Hole
When transplanting seedlings, one of the most critical steps is digging the right planting hole. This may seem like a straightforward process, but getting it wrong can lead to poor growth, reduced yields, and increased stress on the young plants.
First and foremost, the planting hole should be at least 2-3 times as wide as the root ball of the seedling. This allows for easy removal of the plant from its pot and minimizes the risk of damage to delicate roots. When digging, make sure the soil is loosened to a depth of about 12-18 inches. This helps prevent compacted soil that can impede root growth.
In terms of soil preparation, it’s essential to create a nutrient-rich environment for your seedlings to thrive in their new location. This involves incorporating organic matter such as compost or well-rotted manure into the planting hole. Aim to add about 2-4 inches of this material to ensure a smooth transition and optimal root development.
Keep in mind that soil pH levels should match those of the original potting mix to prevent shock on the seedlings’ roots.
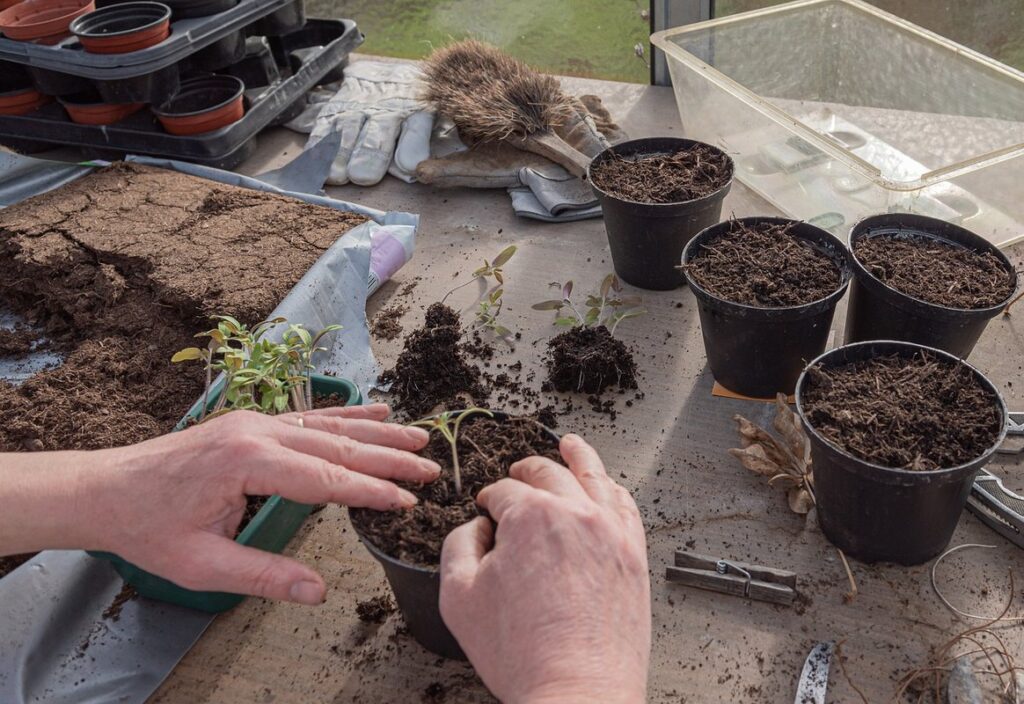
Gently Placing Seedlings in Their New Home
When transplanting seedlings, it’s essential to handle them with care to minimize root disturbance and promote establishment. Gently placing seedlings in their new home requires a delicate touch to avoid causing stress, which can lead to reduced growth rates or even plant death.
To begin, inspect the roots of your seedling for any signs of circling or tangling. If you notice any issues, gently tease out the roots with your fingers or a blunt instrument, taking care not to damage them further. Next, prepare your new container by moistening the soil and creating a small depression in the center. This will help guide the seedling into its new home.
Carefully lift the seedling from its temporary container or cell pack, taking note of any fragile roots that may be exposed. Place the seedling in the prepared hole, making sure not to bury the stem too deeply. Finally, gently firm the soil around the seedling’s roots, taking care not to compact it too much.
By following these steps, you’ll reduce the risk of root disturbance and promote healthy establishment for your newly transplanted seedlings.
Watering Strategies Post-Transplant
After transplanting seedlings into their new environment, it’s essential to provide optimal watering strategies to ensure their survival and growth. The key is to strike a balance between providing enough moisture and avoiding overwatering, which can lead to root rot and other problems.
Water your transplanted seedlings when the top 1-2 inches of soil feels dry to the touch. This is usually every 2-3 days during hot weather, but adjust the frequency based on temperature, humidity, and soil type. For example, if you’re transplanting into a sandy soil mix, you may need to water more frequently.
The volume of water applied should be sufficient to moisten the entire root zone without causing waterlogged conditions. Aim for about 1-2 gallons per square foot of soil. Water at the base of the seedling, avoiding the leaves to prevent fungal diseases.
Timing is crucial too – avoid watering during the hottest part of the day or when the sun is intense, as this can cause excessive evaporation and reduce water absorption by the plant. Instead, water in the morning or evening, when temperatures are cooler and plants are more receptive to moisture.
Monitoring and Caring for Seedlings Post-Transplant
Now that your seedlings have been successfully transplanted, it’s time to focus on providing them with the right conditions to thrive. This section will walk you through the key steps in monitoring and caring for your newly transplanted seedlings.
Establishing a Regular Care Routine
Establishing a regular care routine is crucial for seedlings post-transplant. This ensures they receive the necessary attention and support to grow and thrive. Start by assessing the seedling’s specific needs based on its species, soil type, and environmental conditions.
Watering should be done carefully, taking into account the moisture levels in the soil. Overwatering can be detrimental, causing root rot and other issues. Check the soil daily, sticking your finger into the soil up to the first knuckle. If it feels dry, it’s time to water. Water thoroughly until excess water drains from the pot.
Fertilization is also essential for seedlings post-transplant. Start with a balanced fertilizer (10-10-10) and gradually move to more specific blends as the seedling grows. For example, if you’re growing tomatoes, use a fertilizer high in phosphorus to promote fruiting.
Pest management is another critical aspect of care. Inspect your seedlings regularly for signs of pests like aphids, whiteflies, or spider mites. Use organic pest control methods whenever possible, such as neem oil or insecticidal soap.
Identifying Potential Issues Early
Identifying potential issues early on is crucial for the health and survival of seedlings post-transplant. As soon as you notice something amiss, take immediate action to prevent long-term damage. Here are some signs to look out for:
Nutrient deficiencies can manifest in various ways, such as yellowing leaves or stunted growth. Regularly inspect your seedlings for these symptoms and adjust your fertilization schedule accordingly. For example, if your seedlings are showing signs of nitrogen deficiency (such as pale yellow leaves), increase the frequency of your water-soluble fertilizer applications.
Pest infestations can be just as devastating. Keep an eye out for tiny eggs, larvae, or actual insects on your plants. Regularly inspect your seedlings’ undersides and stems for signs of aphids, whiteflies, or spider mites. If you notice any issues, isolate the affected plant to prevent the pests from spreading.
To take corrective action, ensure you have a well-organized nursery with proper air circulation and temperature control. This will help prevent pest infestations and nutrient deficiencies in the first place. Regularly monitor your seedlings’ water and nutrient levels to catch any issues early on.
Encouraging Healthy Growth and Development
As seedlings transition to their new environment post-transplant, it’s essential to create conditions that foster healthy growth and development. One critical aspect is pruning, which helps control the seedling’s shape, encourages bushy growth, and promotes root establishment. Prune seedlings within 1-2 weeks of transplanting, removing any weak or damaged leaves to direct energy towards healthy areas.
Providing support structures, such as stakes or trellises, can help guide young stems and prevent damage from wind or water stress. For instance, tender herb seedlings may benefit from being staked upright, while climbing varieties like peas or beans require a sturdy trellis for optimal growth.
Training techniques also play a vital role in encouraging healthy development. Guide the main stem upwards using twine or clips to direct growth and promote even branching. Be cautious not to over-train, as this can cause stress that may lead to disease or pest issues. By adopting these simple yet effective strategies, you’ll set your seedlings on a path towards robust growth and successful establishment in their new environment.
Frequently Asked Questions
What if I notice some seedlings are ready for transplant, but others aren’t? How do I handle this situation?
Handle the variability by selecting the healthiest seedlings to transplant first, ensuring they have a strong root system and sufficient foliage. You can also consider separating them into two groups: those ready for transplant now, and those that need more time in their pots. This approach will help you prioritize your efforts while allowing less mature seedlings to continue developing.
How long after transplanting should I expect my seedlings to adapt to outdoor conditions?
Gradual acclimation is key to a successful transition. Expect your seedlings to take around 7-10 days to fully adjust, depending on the climate and weather conditions. Monitor their progress closely and ensure they receive adequate water and care during this period.
What if I notice my transplanted seedlings are experiencing transplant shock? Are there any remedies?
Yes, transplant shock is a common issue that can be addressed with proper care. Increase watering frequency to help the plant recover, and consider providing some shade or partial protection from harsh winds. If you’ve recently repotted your seedlings, it’s also essential to inspect their root system for signs of damage.
Can I transplant seedlings during extreme weather conditions like intense heat or cold?
No, avoid transplanting during periods of excessive heat (above 85°F/30°C) or cold snaps (below 50°F/10°C). These conditions can further stress the plant, making it more susceptible to disease and pests. Instead, wait for a calm, overcast day with temperatures between 60-75°F (15-24°C).
How often should I inspect my seedlings after transplanting to ensure they’re recovering well?
Monitor your transplanted seedlings closely, inspecting them at least every other day during the first week. Look for signs of recovery, such as new growth, improved coloration, and increased water uptake. Adjust your care routine accordingly based on their response to the transplant.