Starting seeds indoors is an art that requires precision, patience, and practice. As any gardener knows, getting a head start on the growing season can be the difference between a bountiful harvest and a disappointing yield. But where do you begin? Choosing the right location for your seedlings, providing optimal lighting, and transplanting them into larger containers can seem like daunting tasks. However, with the right guidance, anyone can master the art of indoor seed starting. In this guide, we’ll walk you through the essential steps to overcome common challenges and achieve optimal results when starting seeds indoors. From selecting the perfect variety to successfully transplanting your seedlings, we’ll cover everything you need to know to get a jump-start on the growing season.
Preparing Your Indoor Seed Starting Environment
To start seeds indoors successfully, it’s essential to create a well-ventilated and controlled environment that mimics outdoor conditions. This section will guide you through preparing your space for seed starting success.
Choosing the Right Location and Lighting
When it comes to choosing the right location and lighting for seed starting indoors, it’s crucial to consider several factors that will ensure healthy growth and development of your seedlings. First, identify a spot with sufficient natural light. If you live in an area with limited sunlight during the winter months or have dense foliage outside, invest in a south-facing window or use sheer curtains to diffuse harsh direct light.
However, relying solely on natural light might not be enough, especially when starting seeds early in the season or for species that require more intense lighting. In such cases, supplement with artificial lighting options like LED grow lights or fluorescent tubes. These can provide up to 20 hours of supplemental lighting and have a specific spectrum tailored to promote seedling growth.
When selecting artificial lighting, consider the distance between the light source and your seed trays. A general rule is to keep the lights 6-8 inches above the seedlings to prevent overheating and promote healthy photosynthesis.
Selecting the Best Seeds for Indoor Starting
When it comes to selecting the best seeds for indoor starting, variety selection is crucial. Not all seed varieties are suited for indoor growing, and some may require more light or specific temperatures than you can provide indoors. For example, if you’re planning to grow vegetables like tomatoes or peppers, look for compact or dwarf varieties that mature quickly (around 50-60 days). These will be less demanding on space and lighting.
Seed quality is also vital. Look for seeds from reputable suppliers that have been stored properly to ensure high germination rates. Check the packaging for the expiration date and make sure it’s within a year or two of purchase. Some seed companies even offer ‘freshness guaranteed’ policies, so be sure to check their websites for more information.
To extend the shelf life of your seeds, store them in an airtight container in a cool, dry place (around 50-60°F). You can also keep them refrigerated to slow down germination. Be careful not to expose your seeds to light or moisture as this will reduce their viability. With proper storage and selection, you’ll be off to a great start with your indoor seed starting project.
Gathering Essential Supplies and Equipment
Before diving into seed starting, you’ll need some essential tools and equipment to get your indoor garden off to a great start. Let’s go over what you’ll be gathering next!
Seed Starting Trays and Containers
When it comes to seed starting indoors, having the right equipment is crucial for success. One of the most essential pieces of gear is a seed starting tray or container. There are several types available, each with its own set of benefits and drawbacks.
For small seeds like lettuce, herbs, and pansies, plastic cells or trays with individual compartments work well. These allow for precise spacing and even watering, reducing the risk of overcrowding and promoting healthy growth. On the other hand, larger seeds such as tomatoes and peppers require more space to develop their root systems. In these cases, a 12-cell or 20-cell tray is often sufficient.
When selecting seed starting trays or containers, don’t forget about drainage and air circulation. A well-draining mix can help prevent waterlogged soil, which is a common issue with indoor seed starting. Look for trays with built-in saucers or those made from breathable materials like mesh or foam inserts to ensure excess water doesn’t accumulate.
In addition to these considerations, it’s also worth noting the importance of proper air circulation within your containers. This can be achieved through the use of a fan or by placing the tray on a wire rack. By choosing the right seed starting equipment and following proper care practices, you’ll set yourself up for success in cultivating healthy seedlings.
Soil Mixes and Fertilizers
When it comes to seed starting indoors, choosing the right soil mix and fertilizer can make all the difference. There are several types of soil mixes available, each with its own unique characteristics.
Peat-based mixes have been a staple for seed starting for years, but they’re not without their drawbacks. Peat is acidic, which means it can leach nutrients from the roots, causing weak and spindly growth. Additionally, peat-based mixes are often made from non-renewable resources. On the other hand, coconut coir-based mixes are a more sustainable option, providing good drainage and structure while being neutral in pH.
Organic seed starting mixes offer an even more eco-friendly alternative, using natural ingredients like compost and worm castings to provide nutrients. These mixes tend to be more expensive, but they’re also less likely to contain synthetic additives or chemicals.
When it comes to fertilizers, you have a choice between liquid and solid options. Liquid fertilizers are often easier to apply, but they can be prone to over-fertilization. Solid fertilizers, on the other hand, provide a slower release of nutrients that’s harder to overdo. Look for a fertilizer with a balanced N-P-K ratio (nitrogen-phosphorus-potassium) to ensure your seedlings get the nutrients they need without burning their delicate roots.
Keep in mind that it’s also possible to make your own seed starting mix by combining different ingredients, like perlite and vermiculite. This can be a fun and cost-effective way to experiment with different recipes. Experimenting with different mixes and fertilizers will help you find what works best for your specific climate and growing conditions.
Seed Starting Techniques and Methods
Now that we’ve covered the basics of seed starting, it’s time to dive into specific techniques and methods for getting your seeds off to a strong start. This is where experimentation comes in handy!
Watering and Soaking Seeds for Optimal Germination
Proper watering techniques are crucial when starting seeds indoors to ensure optimal germination rates. When you water, make sure not to wash away delicate seedlings that have just started to emerge from the soil. To avoid this, use a gentle pouring motion to distribute water evenly across the surface of the soil.
Soaking seeds before planting can also significantly enhance germination rates. This process involves submerging the seeds in room-temperature water for 24 hours prior to sowing them in their growing medium. Soaking seeds helps to soften the seed coat, making it easier for the embryo inside to break through and initiate growth.
A good rule of thumb is to check on your seeds daily after soaking them. This allows you to identify which ones have begun to sprout prematurely, as this may be a sign that they need more time in water before planting.
Temperature Control and Heat Mats
When starting seeds indoors, temperature control plays a crucial role in seedling growth. A temperature that’s too low can slow down germination and development, while temperatures that are too high can lead to weak and spindly seedlings. Ideally, most seeds prefer daytime temperatures between 70-75°F (21-24°C) and nighttime temperatures around 10-15°F (5-7°C) lower.
To maintain optimal temperatures during seed starting, you have several options. One popular method is using heat mats specifically designed for seed starting. These mats warm the soil to a consistent temperature, usually between 70-85°F (21-30°C), which promotes rapid germination and healthy growth. You can place the heat mat under your seed starting trays or pots, ensuring even warmth.
Another approach is to use warm locations within your home, such as south-facing windowsills or heated patios. However, be cautious not to overheat, as direct sunlight or excessive warmth can scorch delicate seedlings. By carefully monitoring and controlling temperature, you’ll give your seeds the best chance at successful germination and a strong start in life.
Common Challenges and Solutions
One of the most common issues you’ll face when seed starting indoors is overcoming inconsistent lighting conditions, which can impact germination rates. We’re tackling these challenges head-on in this section.
Overwatering and Damping Off Prevention
Overwatering is one of the most common mistakes indoor seed starters make. It’s easy to get carried away with watering, especially when you’re excited about watching those tiny seeds sprout into robust plants. However, excessive moisture can lead to a range of problems, including root rot and fungal diseases.
To prevent overwatering, check your seedlings daily for signs of moisture stress. A healthy seedling should have bright green leaves and a slightly firm stem. If the leaves are pale or wilted, it’s likely due to underwatering rather than overwatering. Make sure the potting mix is moist but not waterlogged.
Damping off is another common issue that often accompanies overwatering. It’s a fungal disease caused by excess moisture and high temperatures. To prevent damping off, ensure good air circulation around your seedlings by keeping them at least 6-8 inches away from each other. Also, maintain a consistent temperature between 65°F to 75°F (18°C to 24°C). Regularly inspect your seedlings for any signs of disease or pests, and take action promptly if you notice anything amiss.
You can also use techniques like bottom watering or water trays to reduce the risk of overwatering. This involves placing a tray filled with water under the pot, allowing the roots to absorb moisture as needed.
Pests and Diseases Management
When seedlings are indoors, they’re more susceptible to pests and diseases that can cause significant damage. Among the most common culprits are whiteflies, spider mites, and root rot.
Whiteflies are small, winged insects that feed on sap, causing curled or distorted leaves. They’re often found near warm lights or in areas with high humidity. To manage an infestation, try using sticky traps or introducing beneficial insects like ladybugs or lacewings into the environment. For chemical control, neem oil can be effective.
Spider mites are tiny arachnids that spin webs and suck sap from leaves. They thrive in dry conditions, which is why it’s essential to maintain a humid microclimate around your seedlings. If you notice fine webbing or yellowing leaves, treat the area with insecticidal soap or neem oil.
Root rot occurs when seeds are overwatered or don’t have adequate drainage. To prevent this, use well-draining seed starting mix and avoid letting the soil become waterlogged. Remove any dead or dying plants to prevent the spread of disease.
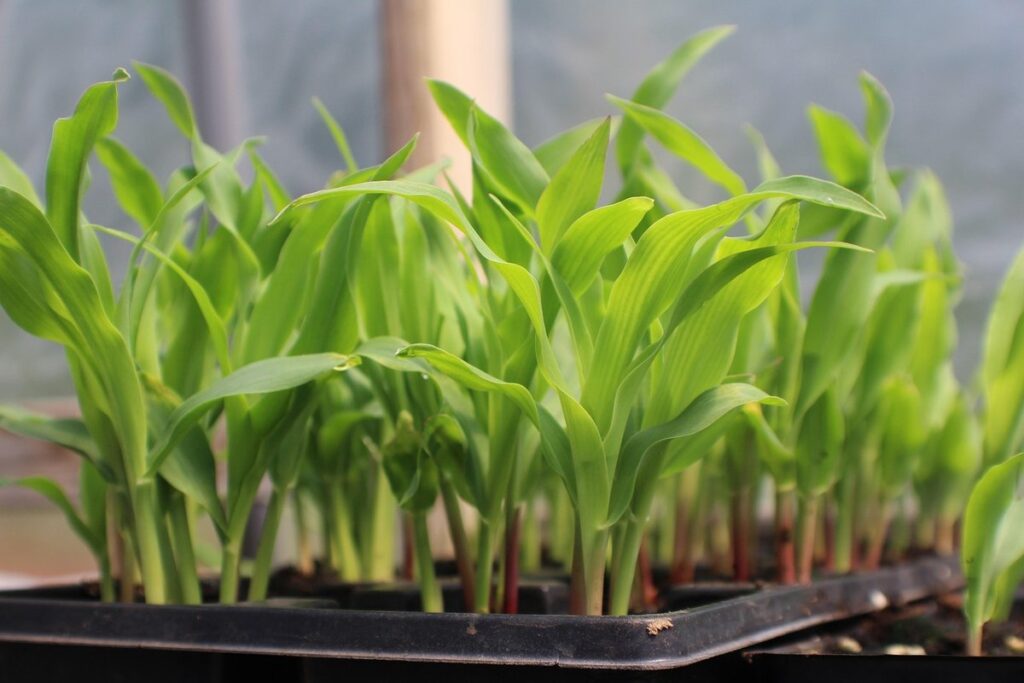
Transplanting Seedlings into Larger Containers
Now that your seedlings have outgrown their initial containers, it’s time to transplant them into larger pots where they can continue to thrive. This is a crucial step in their development.
Timing and Preparing Seedlings for Transplanting
When to transplant seedlings into larger containers is just as important as when to start them indoors. Typically, this occurs when seedlings have 2-3 sets of true leaves and are around 1-2 inches tall. Keep an eye out for signs that they’ve outgrown their small containers: roots begin to poke through the drainage holes or the soil appears packed and dry due to limited root growth.
At this stage, it’s essential to prepare your larger containers properly. Make sure they have good drainage holes in the bottom to prevent waterlogged soil. Fill them with a well-draining seed starting mix, and gently firm the soil after adding the transplanting seedlings. Water thoroughly, but avoid overwatering, which can lead to root rot.
Common mistakes to avoid during transplanting include not handling seedlings carefully to minimize shock, overwatering, or underwatering the newly transplanted seedlings. To prevent this, water your seedlings well a day before transplanting and ensure they’re in an optimal temperature range for their specific needs.
Transplant Shock Prevention
When transplanting seedlings into larger containers, it’s essential to minimize transplant shock. This can be achieved through a combination of hardening off, pruning roots, and providing a suitable environment after transplanting.
To start, make sure you’re giving your seedlings enough time to harden off before moving them outdoors or into larger containers. Gradually expose them to increased sunlight, wind, and temperature fluctuations over the course of 7-10 days. This will help them develop the necessary resilience to withstand changes in their environment.
Another crucial step is pruning the roots of your seedling before transplanting. Gently remove any dead or circling roots with a pair of sterile scissors, taking care not to damage the main root system. This will encourage the roots to grow outwards and downwards, promoting healthier growth in the new container.
After transplanting, ensure that your seedlings have a comfortable environment to settle into. Water them thoroughly, provide adequate air circulation, and maintain optimal temperatures between 65-75°F (18-24°C). Avoid exposing them to extreme conditions, such as direct sunlight or intense winds, until they’ve adjusted to their new surroundings.
Advanced Techniques and Special Considerations
As you’ve gained experience with seed starting, it’s time to dive deeper into advanced techniques that will take your indoor gardening to the next level. We’ll cover expert tips for tricky situations and specialized methods for specific plants.
Using Grow Lights and LED Lighting
When it comes to seed starting indoors, lighting is crucial for optimal growth and development. While natural light is ideal, many indoor spaces don’t receive sufficient sunlight, especially during the winter months. This is where advanced lighting options come into play.
Using grow lights or LED lighting can provide the necessary spectrum and intensity for your plants to thrive. Grow lights mimic the sun’s rays, emitting a broad spectrum of light that promotes photosynthesis and growth. They’re available in different types, including fluorescent, high-intensity discharge (HID), and LED lights.
When choosing a lighting option, consider the plant species‘ specific needs. Some plants require more intense light to produce robust foliage and blooms. For example, tomatoes and peppers prefer full-spectrum grow lights with a blue-rich spectrum to promote fruiting. Meanwhile, leafy greens like lettuce and kale benefit from lower-intensity LED lights.
To ensure optimal results, choose a lighting fixture that’s specifically designed for indoor seed starting. Consider the light’s color temperature (measured in Kelvin) and lumen output (the amount of light emitted).
Starting Seeds in Hydroponic Systems
Starting seeds in hydroponic systems is an innovative way to give them a head start before transplanting them outdoors. Hydroponics involves growing plants in a nutrient-rich solution rather than soil, allowing for precise control over the amount of nutrients delivered to the roots.
One of the main advantages of using hydroponics for seed starting is that it allows for faster growth rates and increased yields. This is because the nutrients are readily available to the roots at all times, eliminating the need for soil-based nutrient uptake. Additionally, hydroponic systems can be set up indoors, providing seeds with a controlled environment for optimal germination and development.
However, there are some potential drawbacks to consider when using hydroponics for seed starting. For example, it can be more expensive than traditional soil-based methods, and the risk of root rot and other diseases may increase if not properly managed. To set up a simple hydroponic system for indoor seed starting, you’ll need an air pump, a water reservoir, and a growing medium such as rockwool or coco coir.
Conclusion and Next Steps
Now that you’ve completed this comprehensive seed starting guide, it’s time to put your newfound knowledge into action. As you carefully tend to your seedlings indoors, remember to maintain a consistent environment with adequate light, temperature, and water. Ensure your containers have proper drainage holes to prevent waterlogged soil. With proper care, your seedlings will continue to thrive until they’re ready for transplantation outdoors.
As the weather warms up, begin hardening off your seedlings by gradually exposing them to direct sunlight and outdoor conditions over a period of 7-10 days. This process helps acclimate your plants to their new environment, reducing shock and promoting healthy growth. Don’t hesitate to reach out if you encounter any challenges along the way – with patience and practice, you’ll become a seasoned seed starter in no time.
Frequently Asked Questions
Can I use grow lights instead of a south-facing window for seed starting?
You can definitely use grow lights as an alternative to natural light, especially during the winter months or if you have limited sunlight indoors. LED grow lights are energy-efficient and provide consistent lighting conditions, which is ideal for promoting healthy growth and development in your seedlings.
How do I know when my seedlings need more light?
Keep a close eye on your seedlings’ height and leaf color. If they appear leggy or the leaves are pale green, it’s likely that they require more light. You can increase the duration of their lighting cycle or add more grow lights to provide supplemental lighting.
What’s the best way to prevent overwatering when starting seeds indoors?
To avoid overwatering, start by watering your seedlings gently but thoroughly. Then, check the soil moisture daily and only water when the top inch of soil feels dry to the touch. Also, make sure your trays or containers have good drainage holes to prevent waterlogged conditions.
Can I use a regular potting mix for indoor seed starting, or do I need a specialized mix?
While you can use a regular potting mix, it’s recommended to use a sterile and well-draining seed starting mix specifically designed for indoor seed starting. These mixes are usually formulated to promote healthy root growth and prevent damping off.
How often should I transplant my seedlings into larger containers?
Transplant your seedlings into larger containers when they have outgrown their original containers and need more room to develop their roots. Typically, this occurs 1-2 weeks after germination, depending on the variety of seeds you’re starting.