Are you and your little ones itching to get your hands dirty in the garden? Unlocking seed germination is an incredible way to encourage learning, growth, and a deeper connection with nature. By exploring the conditions and factors that support seed germination, you’ll be amazed at how quickly those tiny seeds sprout into vibrant plants. In this article, we’ll delve into the world of seed germination with your kids, covering everything from optimal temperatures and light levels to fun activities that make learning a breeze. From simple experiments to creative projects, we’ll show you how to make seed germination an engaging experience for both you and your mini-me’s, sparking a lifelong love of gardening and curiosity about the natural world. Get ready to cultivate some cool kid-friendly fun in the garden!
Understanding Seed Germination Basics
So, you want to know how seeds actually grow into plants? Let’s start by understanding the basics of seed germination and what it takes for a tiny seed to burst into life.
What is Seed Germination?
Seed germination is an incredible process that marks the beginning of a plant’s life cycle. It’s a fascinating topic that can spark curiosity and excitement in kids. Simply put, seed germination is the process by which a seed begins to grow into a new plant. This magical transformation occurs when a seed absorbs water, breaks its dormancy, and starts to sprout roots and shoots.
Understanding seed germination is crucial for plant growth, as it sets the stage for a healthy root system and eventual flower production. Without proper germination, plants may struggle to develop strong roots or produce blooms. But did you know that seed germination also has practical applications in everyday life? Farmers rely on accurate germination rates to predict crop yields and plan harvests. Gardeners use this knowledge to time their plantings and ensure optimal growth.
To demonstrate the importance of seed germination, consider a simple experiment: place two identical seeds in separate containers with similar conditions. One container may receive adequate water, while the other remains dry. Observe how the hydrated seed begins to sprout and grow, while the parched one remains dormant. This hands-on experience can help kids grasp the concept of seed germination and its impact on plant development.
Factors Influencing Seed Germination
Seed germination is like magic – it’s amazing to see a tiny seed transform into a sprout, and eventually, a strong plant. But have you ever wondered what factors influence this magical process? It’s not just luck; there are specific conditions that contribute to successful seed germination.
Light plays a crucial role in seed germination. Most seeds require light to germinate, but some, like those of the onion or garlic, need darkness. Ensure your soil has adequate light, and adjust accordingly for different types of seeds. Water is another essential factor – seeds need consistent moisture to germinate. However, overwatering can be detrimental, so make sure not to drown your seedlings.
Temperature also affects seed germination. Some seeds are sensitive to extreme temperatures, while others thrive in specific conditions. Research the optimal temperature for your chosen plant and maintain a stable environment. Finally, soil quality matters – seeds need a nutrient-rich medium to grow. Use high-quality potting mix or garden soil to provide the necessary nutrients for healthy growth.
When providing seeds with these ideal conditions, they’ll have the best chance of germinating successfully. It’s like giving them a gentle nudge in the right direction!
Preparing Seeds for Germination: A Kid-Friendly Guide
Let’s get started on preparing those seeds for germination! This is where you learn how to make your seeds happy and ready to grow into amazing plants.
Choosing the Right Seeds
When it comes to choosing seeds for kids’ projects, there are several factors to consider. Firstly, you want to pick seeds that are easy to grow and require minimal maintenance. Some great options for kids include radish, bean sprouts, and alfalfa seeds. These seeds germinate quickly, typically within 3-5 days, which is perfect for young learners who have short attention spans.
Another consideration is the interesting features of the seed itself. For example, did you know that sunflower seeds can grow up to 12 inches tall? Or that pumpkin seeds have a unique shape and coloration? These characteristics can make the germination process even more engaging and fun for kids.
When selecting seeds, also think about the growth habits of each plant. Some plants like lettuce and spinach are compact and can thrive in small containers, making them ideal for indoor projects. Others like tomato plants require more space to grow, so be sure to choose a spot with plenty of sunlight and room to expand.
Seed Selection for Cool Kids
When it comes to sparking curiosity in young explorers, choosing the right seeds can make all the difference. Why not try something truly unique and exciting? Seeds like giant pumpkins or rainbow-colored carrots are sure to captivate kids’ attention.
Giant pumpkin seeds, for instance, can produce massive fruits that weigh up to 200 pounds! Imagine watching your child’s excitement as they help care for these enormous plants and eventually harvest the biggest pumpkin in the neighborhood. Rainbow-colored carrots, on the other hand, add a pop of color to any garden or windowsill. These special varieties are perfect for kids who love experimenting with new flavors and colors.
To try your hand at growing giant pumpkins or rainbow carrots, start by selecting high-quality seeds from reputable sources. Follow the package instructions for proper sowing and care. Make sure to give these special plants extra attention and nutrients as they grow. As your child tends to their unique seedling, they’ll learn valuable lessons about patience, responsibility, and the magic of seed germination.
You can also explore other unusual seeds like purple cabbage, red okra, or golden beets – the possibilities are endless! With a little creativity and experimentation, you can create a kid-friendly garden that’s both fun and educational.
The Perfect Conditions for Germination
To create a perfect environment for germination, you’ll want to provide your seeds with the right balance of light, water, and temperature. This section explores those essential conditions in detail.
Light and Darkness: How it Affects Seeds
Light and darkness play crucial roles in seed germination. Light helps seeds determine their direction of growth by sensing the direction of light, a process known as phototropism. When seeds are exposed to light, they grow towards it, while those that are kept in dark conditions develop in any direction. For instance, cucumber seeds usually require darkness to sprout. On the other hand, sunflower seeds prefer bright light for optimal germination.
In some cases, however, seeds benefit from a period of darkness before being exposed to light. This process is called seed stratification. It helps initiate seed germination by mimicking natural conditions such as winter or spring. For example, lettuce and spinach seeds require cold temperatures followed by a few days in the dark before they can sprout.
Keep your seeds in a cool spot with consistent moisture if you want them to germinate properly. Monitor their growth closely, and make any necessary adjustments based on how they respond to light and darkness. This understanding will help you create ideal conditions for seed germination at home, making it easier for your kids to observe the process firsthand.
Temperature Control for Seed Success
When it comes to seed germination, temperature plays a crucial role in determining whether your seeds will sprout successfully. Different types of seeds have optimal temperature ranges for germination, and providing the right conditions can make all the difference.
For example, tomato seeds prefer warmer temperatures between 70-80°F (21-27°C), while lettuce seeds thrive in cooler temps around 60-70°F (15-21°C). On the other hand, seeds like broccoli and cauliflower need it a bit warmer, between 65-75°F (18-24°C).
To maintain optimal temperature conditions for seed germination, you can use a variety of methods. One simple way is to place the seed tray or container on a heating mat specifically designed for plant growth. These mats provide a gentle warmth that mimics the natural conditions found in the wild.
Another approach is to use a thermometer to monitor the temperature and adjust it as needed. You can also create a mini-greenhouse effect by placing a clear plastic bag over the seed tray, which helps retain heat and moisture. By paying attention to temperature fluctuations and providing the right conditions for your seeds, you’ll be well on your way to successful germination!
Watering Habits for Healthy Germination
Now that we’ve covered the basics of seed germination, let’s talk about how to give those little seeds a healthy drink to help them grow into strong and happy plants. Proper watering habits are key to successful germination!
The Right Amount of Water: A Delicate Balance
As you tend to your seeds, it’s easy to get carried away with watering them too much. But did you know that overwatering can be just as detrimental as underwatering? Recognizing when your seeds need a drink is crucial for healthy germination.
Here are some signs that indicate your seeds need water: the soil feels dry to the touch, or the seedlings start to wilt. You can also gently stick your finger into the soil up to the first knuckle – if it feels dry, it’s time to water. On the other hand, if you notice condensation on the pot or a soggy feel to the soil, it’s probably too wet.
To avoid overwatering, make sure not to waterlog the soil. Water your seeds when the top inch of soil feels dry, and avoid getting water on the leaves or crown (where the stem meets the roots). A good rule of thumb is to water in the morning so that any excess moisture has a chance to evaporate throughout the day. By striking this delicate balance, you’ll be well on your way to giving your seeds the perfect conditions for growth and development.
Types of Water Suitable for Seeds
When it comes to seed germination, choosing the right water source is crucial for healthy growth. As you encourage your kids to explore the magic of seed germination, make sure they understand that not all water is created equal.
Rainwater is an excellent choice for seed germination. It’s free from chemicals and minerals found in tap water, which can hinder seed growth. You can collect rainwater in a barrel or container and use it directly on your seeds. Just be sure to let the water sit for 24 hours to allow any debris to settle.
Filtered tap water is also a good option. While tap water may contain some chemicals, filtration systems can remove these impurities. However, make sure to check the filter’s effectiveness before using it for seed germination.
Avoid using distilled water, as it lacks essential minerals that seeds need to grow. Also, avoid water with high levels of sodium or chloride, which can damage seedlings.
To take it a step further, you can even try using homemade water by boiling and cooling tap water. This process removes any bacteria and chemicals, making it safer for seeds to germinate.
Soil Quality Matters: Creating a Germination-Friendly Environment
To create the perfect environment for your kids’ seeds to thrive, let’s talk about how good soil quality sets the stage for successful germination.
The Perfect Mix: Ingredients for Success
When it comes to creating an ideal environment for seed germination, the type of soil you use is just as important as providing adequate light and water. To get the best results, we recommend using a well-balanced soil blend that’s specifically designed for seed starting.
This special blend typically has a slightly acidic pH level between 5.5 and 6.5, which mimics the natural conditions found in forests where seeds germinate naturally. You can either create your own mix by combining separate ingredients or purchase a pre-mixed formula from a reputable supplier.
Some key components to look for in your soil blend include:
• A balanced fertilizer ratio (e.g., 10-10-10 NPK)
• Good water-holding capacity and drainage
• High organic matter content, which provides beneficial microorganisms
As an example, you can make your own seed starting mix by combining two parts peat moss with one part perlite and a quarter part vermiculite. This blend will provide excellent moisture retention while also preventing overwatering.
Remember to choose a reputable supplier for your soil blend, as the quality can vary significantly between brands.
Tips for Preparing Seed-Beds and Containers
Preparing your seed-beds and containers is an exciting part of the germination process. You want to make sure they’re ready for those tiny seeds to start growing into strong, healthy plants. To do this, follow these simple steps.
First, choose a container that’s specifically designed for seed starting or use a cell tray with individual cells. These types of containers are usually deeper and have better drainage, which is essential for seedlings. If you’re using regular pots, make sure they have holes in the bottom for excess water to escape.
Next, fill your containers with a good quality potting mix that’s designed for seed starting. Avoid using garden soil as it can be too dense and may cause seedlings to become leggy. Once your container is filled, gently firm the soil down to prevent air pockets from forming.
To ensure optimal conditions, make sure your containers are clean and free of any debris. Wash them with soap and water before filling them with potting mix. You can also sterilize them by soaking them in a solution of one part bleach to ten parts water for 10-15 minutes.
Now that you’ve prepared your seed-beds and containers, it’s time to think about how you’re going to provide the right amount of light and warmth for your seeds. This is where things can get really cool, especially if you have a sunny windowsill or a grow light at home!
Monitoring Progress and Encouraging Kids’ Interest
Now that you’ve got your seeds sprouting, let’s dive into monitoring their progress and ways to keep your kids excitedly engaged throughout the germination process.
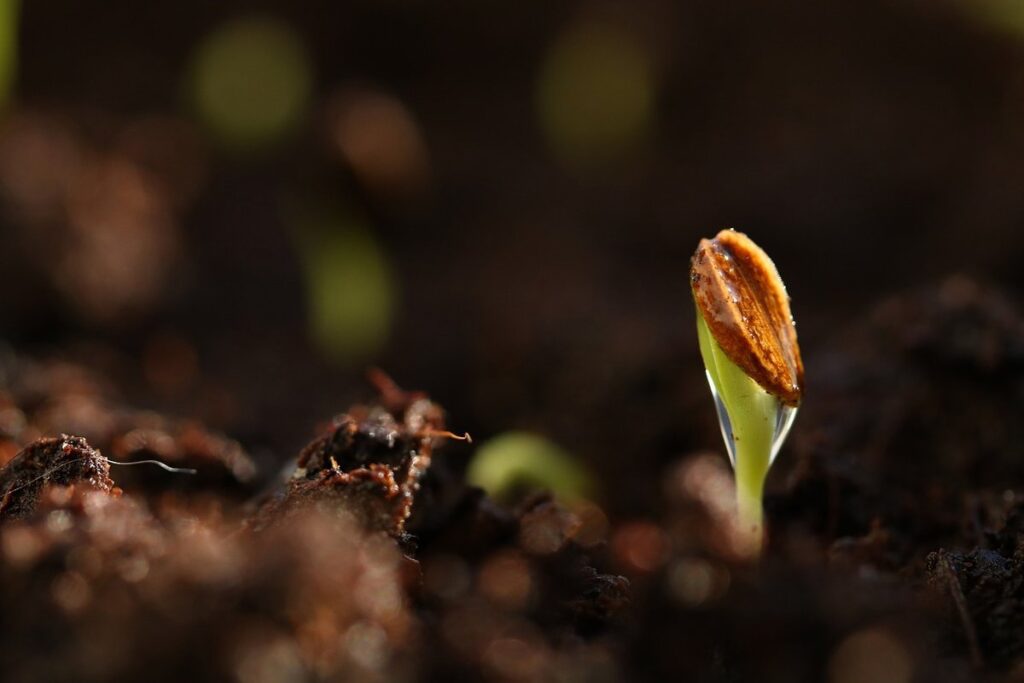
Checking for Signs of Life: What to Expect
As you begin to monitor the progress of your seeds, it’s essential to know what signs to look out for that indicate germination is underway. One of the most exciting moments is when the first sprout appears. You might notice a tiny green stem poking through the soil or a slight swelling on the surface where the seed meets the earth.
This usually occurs within 3-10 days after planting, depending on factors like temperature and moisture levels. Keep in mind that some seeds are slower to germinate than others, so don’t worry if you don’t see immediate action.
As the sprout grows, you’ll start to notice root development beneath the soil. You might not be able to see it directly, but as the seedling absorbs water and nutrients, its roots will begin to stretch out in search of more sustenance. This is a vital sign that your seed is getting what it needs to thrive.
Finally, leaf emergence marks another significant milestone in the germination process. New leaves will unfurl from the stem, gradually increasing their size as they photosynthesize and grow.
Activities and Experiments for Engaged Learning
Engaging kids in the process of seed germination is not only fun but also an incredible learning experience. To foster a deeper understanding and appreciation for this natural phenomenon, try incorporating hands-on activities that encourage observation and recording.
One simple yet effective way to get started is through journaling. Provide each child with a dedicated notebook or a special ‘germination journal’ where they can record their observations, note any changes in the seeds, and sketch the seedlings as they grow. Encourage them to document the entire process from planting to germination, noting down any challenges they face along the way.
You can also create a data collection system by setting up a chart or table to track key milestones such as water intake, temperature, and humidity levels. Assign specific tasks to each child, like monitoring the seedlings daily or taking photos at regular intervals. This hands-on approach not only develops their scientific curiosity but also helps them develop important skills in observation, recording, and analysis.
Frequently Asked Questions
How can I ensure consistent results with seed germination?
Consistency is key when it comes to achieving successful seed germination. To achieve this, make sure to maintain a consistent temperature range (usually between 65°F to 75°F) and provide adequate light for the seeds. Also, ensure that you’re using high-quality seeds and following proper storage and handling procedures.
Can I use tap water for seed germination?
Yes, but it’s not always recommended. Tap water can contain impurities like chlorine or fluoride, which might hinder seed growth. Instead, consider using filtered or distilled water to provide your seeds with the purest possible environment.
How long does it take for seeds to germinate in different conditions?
The time it takes for seeds to germinate varies depending on factors like temperature and light exposure. Generally, cool-season crops (like broccoli or cauliflower) take 7-14 days to germinate, while warm-season crops (like tomatoes or peppers) may take up to 21 days.
How can I troubleshoot common seed germination issues?
No matter how well you plan, issues may arise during the germination process. Common problems include inadequate water supply, extreme temperatures, or insufficient light exposure. To troubleshoot these issues, regularly inspect your seeds and adjust their environment as needed.
What are some fun activities to do with kids while waiting for seed germination?
Waiting for seeds to germinate can be an exciting time! Engage your little ones by creating a mini-greenhouse using a jar or container, or by making a “seedy” craft project. You can also teach them about the water cycle and how plants absorb moisture through their roots.