Starting your own garden or growing plants can be a thrilling experience, but one crucial aspect that often gets overlooked is seed germination. Did you know that using the right seed germination method can significantly improve the chances of successful growth? From traditional soil-based techniques to innovative methods like hydroponic and aeroponic systems, there’s a wealth of options available to enhance seed germination rates. However, with so many variables at play, it’s not uncommon for beginners to encounter challenges along the way. In this article, we’ll delve into comprehensive seed germination techniques, exploring what works and what doesn’t, as well as expert tips on how to overcome common obstacles. Whether you’re a seasoned gardener or just starting out, read on to discover how to give your seeds the best possible start in life.
Understanding Seed Germination Basics
Let’s dive into the basics of seed germination, starting with understanding the fundamental principles that govern this crucial process. You’ll learn what triggers germination and how to create an ideal environment for seeds to sprout successfully.
What is Seed Germination?
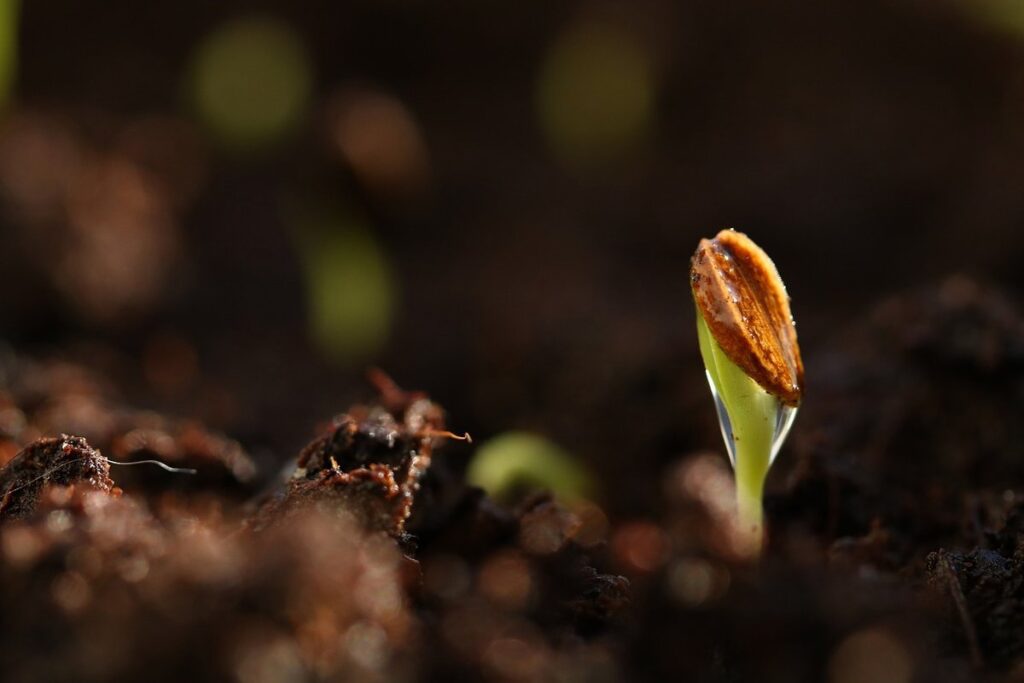
Seed germination is the process by which seeds develop into seedlings. It’s a critical stage in plant growth, as it sets the foundation for the development of roots, stems, and leaves. Without proper germination, plants may not grow or thrive.
Importance of Seed Germination
Seed germination affects plant growth in several ways. For instance, it determines the rate at which seeds sprout and develop. This is crucial because some plants require quick germination to remain competitive for resources like light and water. Fast-growing crops like radishes and lettuce rely on rapid seed germination to ensure they’re harvested before other plants overgrow them.
Inadequate or slow germination, on the other hand, can lead to stunted growth or delayed maturity. Some seeds may even fail to sprout altogether if conditions aren’t favorable for germination. This highlights why seed germination is essential in agriculture and gardening – it directly impacts crop yields and plant quality.
During germination, seeds undergo significant physiological changes. Water triggers these processes by breaking down the seed coat and activating enzymes that initiate growth. Proper moisture levels are therefore crucial for successful seed germination.
Factors Affecting Seed Germination
When it comes to seed germination, several environmental factors can significantly impact the rate at which seeds sprout. Temperature is one of the most crucial factors, as most seeds have an optimal temperature range for germination. For instance, tomato seeds typically require a temperature between 70°F and 80°F (21°C to 27°C) to germinate, while lettuce seeds prefer temperatures between 40°F and 60°F (4°C to 15°C).
Light exposure also plays a vital role in seed germination. Some seeds, such as those of the radish and cucumber, require light to germinate, while others, like those of the alfalfa and clover, can germinate in complete darkness. However, most seeds benefit from indirect light or even partial shade during the germination process.
Water is another essential factor, with seeds typically requiring consistent moisture but not waterlogged conditions. Soil quality also affects seed germination, as seeds need a well-draining medium to grow. A mix of sand and peat moss can provide an ideal balance for many types of seeds.
Methods for Enhanced Seed Germination
To get optimal seed germination results, you’ll want to explore specialized techniques such as scarification and stratification to overcome natural barriers. These methods can significantly boost your success rate.
Hydroponic Seed Germination
Hydroponics offers a unique approach to seed germination by providing optimal growing conditions without soil. By suspending plant roots in a nutrient-rich solution, hydroponic systems promote healthy root growth and minimize water loss through evaporation. This method is particularly beneficial for delicate seeds that struggle to germinate in traditional soil-based mediums.
To set up a basic hydroponic system for seed germination, you’ll need an air pump or aquarium aerator, a reservoir, a dripper or misting system, and a growing medium such as rockwool or coco coir. Fill the reservoir with water and add a balanced fertilizer specifically designed for hydroponics. Connect the pump to the reservoir and ensure proper oxygenation of the solution.
For optimal seed germination in a hydroponic system, maintain a temperature between 70-85°F (21-29°C) and provide sufficient light, typically around 12-14 hours per day. Monitor pH levels closely, as most seeds prefer a slightly acidic to neutral range. Keep the nutrient solution at a consistent level, replenishing it every week or two. By following these guidelines, you can successfully germinate delicate seeds in a hydroponic environment, giving them a strong start on their journey to maturity.
Aeroponic Seed Germination
Aeroponic systems provide an alternative to traditional soil-based methods for seed germination. These systems involve suspending roots in a nutrient-rich mist without the need for potting mix or other growth mediums. By avoiding the limitations of soil, aeroponics can significantly enhance seed germination rates and speeds.
One key advantage of aeroponic systems is their precise control over water and nutrient delivery. This allows for optimized conditions that promote even and efficient root development, ultimately leading to healthier seedlings. For example, studies have shown that tomato seeds germinated using aeroponics had a 20% higher germination rate compared to those in soil.
To successfully use an aeroponic system for seed germination, ensure the roots receive adequate humidity (typically around 90-95%). You can achieve this by using a fine-mist spray or a fogging system. Maintain optimal temperatures between 65°F and 75°F (18°C to 24°C) for most seeds, keeping in mind that different species have varying temperature requirements.
In addition to these basic conditions, make sure the aeroponic chamber is clean and free from contamination risks. Sterilize equipment before use, and choose nutrient solutions specifically formulated for seed germination. Monitor pH levels closely, as fluctuations can impact seedling health.
When setting up an aeroponic system, prioritize even nutrient distribution and adequate misting frequency to prevent root rot or under-watering stress.
Soil-Based Seed Germination Methods
For those who prefer a more natural approach, soil-based seed germination methods involve planting seeds directly into a potting mix and allowing them to sprout on their own. This method can be both simple and effective.
Direct Sowing in Soil
Direct sowing seeds into the ground can be an efficient and cost-effective method of seed germination. To achieve optimal results, it’s essential to prepare the soil properly before planting. This involves loosening the top 2-3 inches of soil to a depth that allows for easy root growth.
Begin by removing any debris or weeds from the area. Next, test the pH level of your soil using a DIY kit or send a sample to a lab for analysis. Most seeds germinate best in slightly acidic to neutral soils with a pH between 6.0 and 7.0.
When selecting a location for direct sowing, consider factors like sunlight, moisture levels, and temperature fluctuations. Ensure the area receives adequate sunlight (at least 4-6 hours per day) and has a consistent water supply. Plant seeds at the correct depth – typically 2-3 times their thickness. For example, if planting a tomato seed that’s about 1/8 inch thick, plant it 1/4 to 1/2 inch deep in the soil.
Sow seeds directly into the ground when the weather is favorable, and the temperature is suitable for germination (usually between 65-75°F). Keep the soil consistently moist during the first few weeks after planting. This will help promote healthy root development and ensure successful seed germination.
Pre-Germinated Seeds: A Quick Start
Pre-germinated seeds offer a quick and convenient way to jumpstart the growth of plants. These seeds have already begun their germination process before being purchased, which allows them to develop roots and a small amount of stem while still in storage. This accelerated start can give seedlings a significant boost over those started from dry seeds.
Using pre-germinated seeds can be particularly beneficial for gardeners with limited time or experience, as they require less attention during the initial growth phase. This is because the seeds have already overcome some of the challenges associated with germination, such as moisture and temperature fluctuations. With a head start, seedlings are more likely to thrive when transplanted into larger containers.
To use pre-germinated seeds effectively, make sure to choose varieties that are specifically labeled as “pre-germinated” or have been stored in optimal conditions to prevent further growth before planting. Plant them according to the package instructions, typically 1/4 inch deeper than dry seeds.
Innovative Seed Germination Techniques
Let’s dive into some of the most cutting-edge methods for kickstarting seed growth, including innovative uses for LED lighting and aeroponics.
Using Seed Starting Mixes
When it comes to promoting healthy germination, using seed starting mixes is an innovative and effective technique. These specialized mixes are specifically designed to provide seeds with the optimal balance of moisture, nutrients, and aeration necessary for successful germination.
A typical seed starting mix consists of a blend of peat moss, perlite or vermiculite, and sometimes worm castings or other organic fertilizers. The peat moss helps retain moisture while allowing excess water to drain, preventing waterlogged conditions that can lead to fungal diseases and root rot. Perlite or vermiculite add structure and improve drainage, making it easier for seeds to grow their roots.
Using a seed starting mix can greatly enhance germination rates. For instance, a study found that using a mix with a higher percentage of peat moss resulted in an 82% success rate compared to 45% when using regular potting soil. When selecting a seed starting mix, look for one that is sterile and has been treated to control diseases such as fungal spores.
Cold Stratification: A Method for Hardy Seeds
Cold stratification is a critical process for seeds that require a period of cold temperatures to germinate. This method mimics the natural environment where seeds typically overwinter, allowing them to break dormancy and initiate growth.
Seeds that benefit from cold stratification often come from temperate or alpine regions, such as certain species of clematis, hellebores, or sweet cicely. These seeds are designed to remain dormant during harsh winter conditions, only germinating when temperatures rise in the spring.
To apply cold stratification, you can place seeds between two moist paper towels or in a sealed container with damp peat moss. Store them in the refrigerator at around 40°F (4°C), allowing for 30-120 days of cold treatment before transferring them to warmer conditions. Be sure to check on the seeds periodically and maintain consistent moisture levels.
By utilizing cold stratification, you can successfully germinate even the most temperamental seeds, giving your garden a head start in the spring season.
Common Challenges in Seed Germination
As you begin experimenting with different seed germination methods, you may encounter some unexpected hurdles that can hinder your progress and affect the success of your plants. Let’s explore these common challenges together.
Overwatering: The Silent Killer
Overwatering can be a silent killer of seedlings, causing more damage than under-watering. It’s essential to recognize the warning signs and take preventative measures to avoid this common challenge.
When seeds are watered excessively, they may start to rot from the roots up, leading to a decrease in growth rate or even death. Warning signs of overwatering include yellowing leaves, droopy stems, and an unpleasant odor emanating from the soil. If you notice any of these symptoms, it’s crucial to reduce watering immediately.
To prevent overwatering, start by checking the soil moisture regularly using your fingers or a moisture meter. Make sure not to water your seeds when the top inch of soil feels dry to the touch. Also, ensure good drainage in your seed trays or pots by adding a layer of small rocks or perlite at the bottom. This will help excess water drain away from the roots, reducing the risk of overwatering. By being vigilant and taking these precautions, you can minimize the risk of overwatering and give your seeds the best chance to thrive.
Poor Light Conditions: Impact on Seedlings
Poor light conditions can significantly impact seedlings’ growth and development. Seedlings need adequate light to undergo photosynthesis, which is essential for producing energy-rich compounds that promote healthy growth. However, insufficient light can lead to stunted growth, weakened stems, and reduced yields.
When seeds are exposed to inadequate light, they may struggle to develop a strong root system, making them more susceptible to disease and pests. This is particularly true for seedlings grown indoors, where the lack of natural sunlight can be detrimental. For instance, a study found that seedlings grown in an environment with low light intensity (less than 50 μmol/m²s) had significantly reduced growth rates compared to those exposed to higher light intensities.
To improve lighting conditions, consider using grow lights or adjusting the placement of your seed starting tray to maximize natural light. If you’re growing seeds indoors, use LED grow lights specifically designed for seedlings. These lights provide a spectrum tailored to promote healthy growth and can be adjusted to meet your seedlings’ needs at different stages. By providing adequate lighting, you can give your seedlings the best chance to thrive and develop into strong, healthy plants.
Advanced Seed Germination Methods
Now that you’ve mastered the basics of seed germination, let’s dive into more advanced methods to give your seeds an extra boost. We’ll explore techniques like cold stratification and high-tech incubators.
Vermipost: Using Worm Castings
Using worms to create nutrient-rich soil for seed germination is an innovative approach known as vermipost. This method not only promotes healthy plant growth but also reduces waste by repurposing food scraps. Worm castings, which are the end product of this process, contain a balanced blend of nutrients, microorganisms, and beneficial compounds that enhance soil structure and fertility.
To create a worm casting system, start by acquiring red wiggler worms, as they are well-suited for vermicomposting. Set up an aerated bin or a dedicated vermipost area with adequate ventilation to prevent anaerobic conditions. Add a mix of “green” materials (food scraps, coffee grounds) and “brown” materials (dried leaves, shredded newspaper). Maintain the optimal moisture level by ensuring the mixture is damp but not waterlogged.
Some key benefits of using worm castings for seed germination include improved soil porosity, increased nutrient availability, and enhanced microbial activity. This can lead to healthier seedlings with stronger root development and faster growth rates.
Biochar-Based Seed Germination
Biochar has gained significant attention in recent years for its ability to enhance soil fertility and improve seed germination rates. This unique form of charcoal is produced by heating organic matter at high temperatures, resulting in a highly porous and stable material that can hold onto nutrients and water. By incorporating biochar into your seed starting mix, you can create an optimal environment for seed germination.
When used effectively, biochar has been shown to increase seed germination rates by up to 30% (University of California, Davis study). This is due in part to its ability to regulate soil pH and provide essential micronutrients. To get the most out of your biochar, it’s recommended to mix 1-2 tablespoons per gallon of potting mix. Additionally, consider using a slow-release fertilizer to complement the nutrients provided by the biochar.
When choosing a biochar product, look for one that is specifically designed for seed starting or horticulture use. Some popular options include coconut shell-based biochars and wood-based biochars. Experiment with different ratios and types of biochar to find what works best for your specific growing conditions.
Conclusion and Future Directions
As we conclude our comprehensive guide to seed germination methods, it’s essential to reflect on the various techniques discussed. From using paper towels to creating a mini-greenhouse, each method has its unique advantages and applications. Whether you’re a seasoned gardener or an avid botanist, choosing the right technique depends on the type of seeds you’re working with and your desired outcome.
Incorporating different seed germination methods can take your gardening experience to the next level. For example, using a hot water bath for large quantities of seeds can save time and effort in the long run. Similarly, experimenting with novel techniques such as using coffee grounds or coconut coir can provide innovative solutions to common challenges.
To continue exploring the world of seed germination, consider joining online forums or attending workshops focused on plant propagation. This will not only help you refine your skills but also introduce you to new ideas and methods.
Frequently Asked Questions
What if I don’t have the ideal temperature conditions for seed germination?
Yes, it’s still possible to achieve successful seed germination even with less-than-ideal temperatures. However, this may require using specialized equipment or techniques like seed warmers or cold frames. Research specific temperature requirements for your plants and take steps to create a microclimate that suits their needs.
Can I use recycled materials as a substitute for seed starting mixes?
While creative reuse is encouraged in gardening, it’s generally not recommended to use recycled materials as a direct substitute for seed starting mixes. These products are specifically designed to provide the necessary nutrients and structure for young seedlings to thrive. Using unsterilized or untested materials can introduce pathogens or contaminants that may harm your plants.
How do I know when my seeds have successfully germinated?
Yes, it’s relatively easy to determine if your seeds have germinated. Typically, you’ll see the radicle (seedling root) emerge from the seed coat, followed by the cotyledon (seed leaf). This process can take anywhere from a few days to several weeks, depending on factors like temperature and moisture.
Can I use hydroponic or aeroponic systems for all types of plants?
While these methods are ideal for many plants, some species may not thrive in soilless conditions. Research specific requirements for the types of seeds you’re working with, as certain varieties may need more traditional soil-based setups to succeed.
What if I accidentally overwater my seedlings? Is there a way to recover them?
Yes, overwatering can be a major setback, but it’s not always fatal. If caught early, you can try rescuing your seedlings by adjusting their watering schedule and providing adequate light and air circulation. However, in severe cases, overwatering can lead to root rot and other problems that may require replanting or taking more drastic measures.