Starting seeds indoors can be a thrilling experience, but did you know that the success of your plant’s growth depends on a crucial step: seed germination? This critical process sets the foundation for a healthy and thriving plant. However, many gardeners struggle with low germination rates or unpredictable results, which can be frustrating and costly.
In this essential guide to seed germination, we’ll explore the key factors that affect germination rates, such as light, temperature, moisture, and soil quality. We’ll also provide expert advice on choosing the right seeds for your needs and environment. By understanding these essential elements and optimizing conditions, you can boost your chances of achieving maximum success with seed germination. Whether you’re a seasoned gardener or just starting out, this guide will help you unlock the secrets to growing healthy and vibrant plants from seed.
Understanding Seed Germination Basics
To understand how seeds grow into plants, it’s essential to grasp the basics of germination. Let’s dive into what triggers seed growth and how to create an optimal environment for sprouting.
What is Seed Germination?
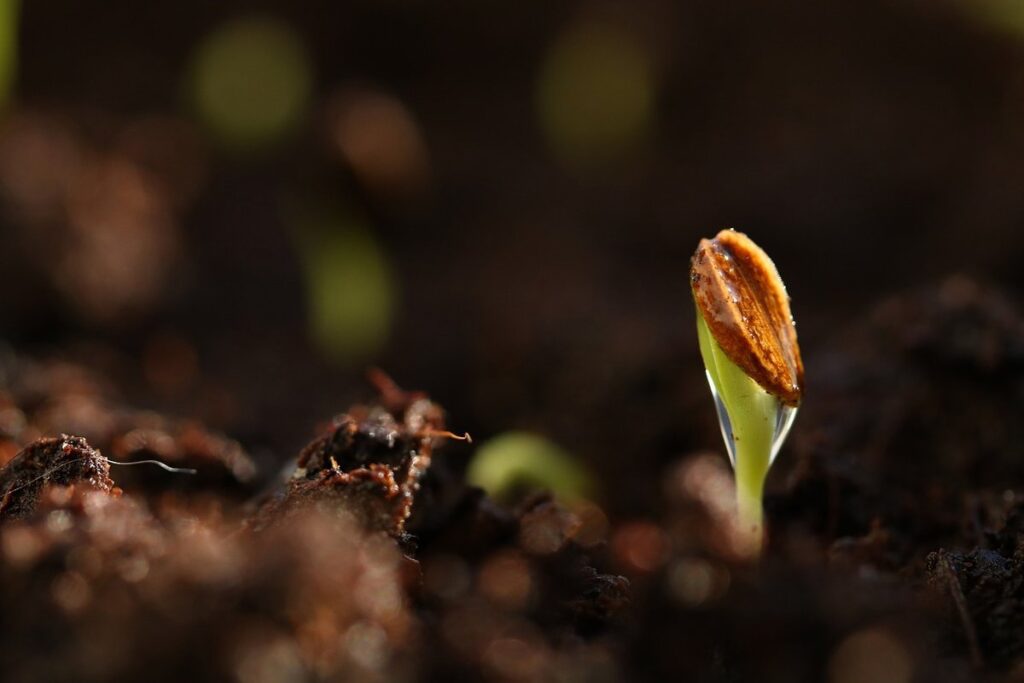
So you’ve got your seeds ready to plant, but have you ever wondered what actually happens when they start growing? Seed germination is the process by which a seed begins to grow into a plant. It’s an essential step in the life cycle of plants, and understanding it can help you improve your chances of successful planting.
Here’s how it works: when a seed absorbs water, it triggers a series of biochemical reactions that cause the embryo inside the seed to start growing. This tiny seedling will eventually break through the surface of the soil and start photosynthesizing, using sunlight to fuel its growth. It’s an incredible process that requires just the right conditions – too little or too much water, too much or too little light, and the seed may not germinate at all.
As a gardener, understanding seed germination can help you optimize your planting conditions. Make sure the soil is moist but not waterlogged, provide enough light (but not direct sunlight), and keep the temperature consistent. By giving your seeds the right environment, you’ll be more likely to see them sprout successfully.
Factors Affecting Seed Germination
Seed germination is a complex process influenced by several key factors. Temperature plays a crucial role, with most seeds requiring a specific temperature range to initiate germination. For example, tomato seeds typically germinate between 70°F and 85°F (21°C to 30°C), while lettuce seeds prefer temperatures below 75°F (24°C). If the soil is too cold or hot, it can prevent germination altogether.
Moisture is another essential factor, with seeds requiring adequate water to initiate germination. However, overwatering can lead to rot and kill the seedling. Aim for a consistent moisture level, allowing the top inch of soil to dry out between waterings.
Light and oxygen levels also impact germination. Some seeds, like those of alfalfa and beans, require darkness to germinate, while others, such as lettuce and spinach, prefer light. Ensure proper air circulation by loosening the soil or using a propagation tray with adequate ventilation.
To optimize seed germination, provide the right balance of temperature, moisture, light, and oxygen. Research the specific requirements for your seeds and create a suitable environment to promote healthy growth.
Choosing the Right Seeds for Your Climate
Choosing the right seeds is crucial to successful germination, and understanding your local climate will help you narrow down the perfect varieties for your garden. Selecting seeds that thrive in your specific conditions will give them the best chance to grow.
Selecting Seeds Suitable for Your Region
When it comes to selecting seeds for your garden, one of the most crucial decisions you’ll make is choosing seeds that are suitable for your region’s climate. This may seem obvious, but many gardeners overlook this essential step, which can lead to seed failure, reduced yields, or even plant death.
To choose the right seeds for your area, consider the local temperature fluctuations and extreme weather events. Some plants thrive in high temperatures, while others are sensitive to heat stress. Look for seeds that are bred for tolerance to your region’s average highs and lows. Additionally, think about drought resistance – if you live in an arid or semi-arid area, select seeds of plants that can withstand extended dry periods.
Research the specific growing conditions in your area, including soil type, moisture levels, and sunlight patterns. This will help you identify plants that are naturally adapted to your environment. You can consult with local nurseries, gardening clubs, or extension services for recommendations on seed varieties that perform well in your region.
Seed Classification and Types
When it comes to choosing the right seeds for your climate, understanding the different types is crucial. You’ll often come across three main categories: hybrid, heirloom, and open-pollinated varieties.
Hybrid seeds are bred specifically for their desirable traits, such as disease resistance or improved yields. They’re often the go-to choice for commercial growers due to their reliability and high performance. However, hybrids can be less adaptable to changing environments and may not produce viable offspring, making them more expensive in the long run.
Heirloom varieties, on the other hand, are open-pollinated and have been saved and handed down through generations. They’re prized for their unique flavors, textures, and colors, and often retain these characteristics even after successive plantings. While they may not offer the same level of consistency as hybrids, heirlooms can be more resilient to pests and diseases.
Open-pollinated seeds are also bred from natural pollination methods, but can produce offspring with varying traits. They’re a good choice for gardeners who want to experiment with different varieties or save their own seed stock.
Preparing Seeds for Germination
Before starting the germination process, it’s essential to prepare your seeds properly. This step is crucial for maximizing seed viability and ensuring healthy root development.
Seed Soaking and Stratification
Seed soaking and stratification are essential steps in breaking dormancy and promoting germination in various types of seeds. By understanding these processes, you can significantly improve the chances of successful seed germination.
Soaking seeds involves immersing them in water to rehydrate the embryo and break any physical dormancy caused by dry storage. For most seeds, soaking is done for 12-24 hours. Some examples of seeds that benefit from soaking include lettuce, spinach, and beans. To soak seeds, simply place them in a cup or bowl filled with lukewarm water. Let it sit at room temperature, changing the water every few hours to prevent bacterial growth.
Stratification is another critical process that helps break physiological dormancy in certain types of seeds. This involves simulating winter conditions by exposing seeds to cold temperatures for a specific period. For example, some seeds like orchids and firs require 30-60 days of stratification at around 40°F (4°C). To stratify seeds, place them in a sealed plastic bag or an airtight container filled with moist peat moss or vermiculite. Store it in the refrigerator for the specified duration.
Keep in mind that not all seeds require soaking and stratification. Always research specific requirements for your seed type to ensure optimal germination rates. By incorporating these simple steps into your seed preparation routine, you can improve the chances of successful germination and healthy plant growth.
Seed Storage and Handling
Proper seed storage is crucial for maintaining optimal germination rates. Store seeds in an airtight container, such as a glass jar or plastic container with a tight-fitting lid, to prevent moisture and light from entering. Keep the container in a cool, dry place like a basement or cupboard, away from direct sunlight.
Temperature control is also essential. Most seeds are sensitive to extreme temperatures, so store them between 32°F (0°C) and 50°F (10°C). Avoid storing seeds near heating vents, radiators, or air conditioning units.
Humidity management is critical as well. Seeds absorb moisture easily, which can lead to mold and fungal growth. Store seeds in a humidity-controlled environment with a relative humidity of around 30-40%. You can also use desiccants like silica gel or uncooked rice to control moisture levels.
When handling seeds, minimize exposure to light by storing them in an opaque container. Handle seeds gently to avoid damaging the delicate embryo inside. If you’re working with dry seeds, store them upright to prevent settling and ensure even distribution of moisture when rehydrated.
By following these storage tips, you’ll help maintain the viability and germination rates of your seeds.
Optimizing Germination Conditions
To achieve optimal seed germination, you’ll want to pay close attention to temperature and light conditions, as these factors can make all the difference in getting your seeds off to a healthy start.
Temperature and Light Requirements
When it comes to germinating seeds, understanding the temperature and light requirements for different plant species is crucial. This can be a bit tricky, as some plants thrive in specific conditions that might not be suitable for others.
Let’s take an example: tomato seeds typically require a warmer environment with temperatures ranging from 70-85°F (21-29°C) to germinate. On the other hand, lettuce and radish seeds prefer cooler temperatures between 40-75°F (4-24°C). Failing to meet these temperature requirements can lead to delayed or even inhibited germination.
In terms of light, some plants require darkness during germination, while others need a specific amount of light. For instance, seedlings like lettuce and radish benefit from indirect light or complete darkness until they emerge. However, seedlings like basil and marigold prefer more intense light to promote healthy growth.
To create a suitable environment for your seedlings, consider using grow lights or placing them near a sunny windowsill. Be sure to adjust the temperature and lighting according to the specific needs of your plant species. This will help ensure optimal germination and give your seeds the best chance at emerging strong and healthy.
Watering and Humidity Control
Maintaining optimal moisture levels during seed germination is crucial for successful growth. Watering schedules can vary depending on factors like soil type, temperature, and humidity. A general rule of thumb is to water seeds when the top 1-2 inches of soil feels dry to the touch. Overwatering can lead to rot and fungal diseases, while underwatering may cause stunted growth.
Humidity control is also essential during germination. Seeds require a humid environment, typically between 50-80% relative humidity, to initiate germination. You can use a cloche or plastic bag to cover the seed tray and maintain high humidity. Another option is to place the seed tray on a tray filled with water and pebbles, allowing for evaporation and maintaining moisture levels.
Signs of overwatering include soft, mushy roots and yellowing leaves. Conversely, underwatered seeds may have dry, wrinkled leaves and slow growth rates. Monitor your seeds regularly and adjust watering schedules accordingly. Keep in mind that it’s better to err on the side of caution and underwater slightly than risk overwatering and causing damage.
Monitor soil moisture by sticking your finger into the soil up to the first knuckle. If the soil feels dry, it’s time to water. Also, be aware of temperature fluctuations, as they can impact seed germination rates. Aim for a consistent temperature range between 65-75°F (18-24°C) during germination.
Troubleshooting Common Germination Issues
Don’t worry, we’ve all been there – seedlings that refuse to germinate can be frustrating! This section will help you tackle common germination issues and get your seeds growing.
Low Germination Rates
Low germination rates can be frustrating, especially when you’ve carefully prepared your soil and selected high-quality seeds. However, there are several common causes that may be contributing to this issue.
Inadequate soil quality is a significant factor in low germination rates. Soil that’s too dense or compacted can prevent seedlings from emerging, while soil with poor drainage can lead to waterlogged conditions that drown the seeds. To address this issue, try incorporating organic matter like compost or well-rotted manure into your soil to improve its structure and fertility.
Poor seed storage is another potential cause of low germination rates. Seeds that are exposed to high temperatures, moisture, or light can become dormant or even die. Store your seeds in a cool, dry place, such as an airtight container in the refrigerator, to keep them viable for longer.
Insufficient light is also a common culprit behind low germination rates. Seeds require light to trigger germination, so if they’re not getting enough exposure, they may struggle to sprout. Make sure your seeds are placed in a location that receives adequate light, or consider using grow lights to supplement the natural light.
Seed Rot and Mold
Seed rot and mold can be devastating to newly germinated seeds. These issues often arise from improper handling, storage, and care of seeds. When seeds come into contact with excessive moisture, they can quickly develop fungal growths that consume their internal tissues, leading to seed death.
To prevent seed rot and mold, it’s essential to store your seeds properly. Keep them in an airtight container, away from direct sunlight and moisture. Check the seeds regularly for signs of dampness or condensation, and discard any seeds that show visible damage.
When handling seeds, wash your hands thoroughly before touching them to prevent transferring oils from your skin. Also, make sure to handle seeds gently to avoid damaging their delicate structures.
If you notice mold or rot during germination, it’s crucial not to disturb the affected area. Instead, carefully remove the infected seeds and sterilize the surrounding soil and equipment with a solution of 1 part bleach to 10 parts water. This will help prevent the spread of fungal growths to healthy seeds.
Encouraging Healthy Seedling Development
To help your seedlings grow strong and healthy, it’s essential to create a nurturing environment that supports their development. Let’s explore some practical tips for encouraging optimal growth from day one!
Nutrient Requirements
When it comes to encouraging healthy seedling development, providing the right nutrients is crucial. Seedlings need essential macronutrients like nitrogen (N), phosphorus (P), and potassium (K) to grow strong and healthy.
Nitrogen promotes leaf growth and green coloration, making it a vital component for vegetative development. Phosphorus, on the other hand, supports root development and flower production, making it crucial for reproductive growth. Potassium helps with overall seedling health by regulating water balance and cell wall development.
In addition to these macronutrients, micronutrients like iron (Fe) and zinc (Zn) play a significant role in seedling development. Iron is essential for chlorophyll production, while zinc aids in enzyme function and growth regulation. Soil deficiencies or imbalances can lead to stunted seedlings, reduced yields, or even complete crop failure.
To ensure optimal nutrient uptake, consider using balanced fertilizers that provide the necessary NPK ratio. Regular soil testing will help you identify potential micronutrient deficiencies, allowing for targeted applications of iron and zinc supplements as needed.
Pest and Disease Management
Young seedlings are vulnerable to a range of pests and diseases that can quickly decimate an entire batch. Among the most common culprits are fungal infections like powdery mildew, damping off, and root rot, which thrive in warm, humid environments. These conditions are often created by overwatering or poor air circulation.
To prevent infestations, it’s essential to maintain good hygiene practices when handling seedlings. This includes regularly disinfecting tools and workspaces with a 1:10 bleach-to-water solution. You should also avoid overcrowding your seedling trays, as this can lead to moisture retention and create an ideal breeding ground for fungi.
If you do encounter affected plants, there are several methods you can employ to treat them. One effective approach is to treat the soil with fungicides specifically designed to combat root rot or damping off. For more severe cases of powdery mildew or other fungal infections, pruning infected areas may be necessary.
Conclusion: Maximizing Seed Germination Success
Now that you’ve learned how to create a perfect seed germination environment, it’s time to bring your seeds to life and watch them thrive in their new home. Let’s summarize the key takeaways for maximizing seed germination success.
Recap of Key Takeaways
When reviewing the key takeaways from our exploration of seed germination basics, it’s clear that optimizing conditions is crucial for success. This involves considering both the physical and biological needs of the seeds.
One essential aspect to keep in mind is the importance of proper storage prior to sowing. Seeds should be kept cool, dry, and protected from light to prevent degradation. It’s also vital to choose a suitable location with adequate moisture levels and optimal temperatures for your specific plant species.
Factors such as seed quality, depth, and spacing can significantly impact germination rates. For example, planting too deeply or allowing seeds to become waterlogged can be detrimental. Conversely, providing sufficient light and maintaining consistent temperature can greatly improve outcomes.
Best practices also emphasize the importance of preparing the soil properly before sowing. This may involve loosening compacted areas, removing debris, or adjusting pH levels as needed. By addressing these factors, gardeners can create an environment conducive to healthy germination.
To recap, optimizing seed germination involves considering storage conditions, physical needs, and biological requirements. It’s also essential to be mindful of external factors like light exposure, moisture levels, and temperature fluctuations. By implementing these best practices, you’ll significantly increase your chances of achieving successful seed germination.
Some key takeaways from this exploration are:
* Seeds should be stored in cool, dry conditions with minimal light
* Proper location preparation is crucial for optimal results
* Factors like seed quality, depth, and spacing can impact germination rates
* Best practices emphasize the importance of preparing the soil properly before sowing
By keeping these points in mind and adapting them to your specific situation, you’ll be well-equipped to achieve maximum success with your seed germination endeavors.
Frequently Asked Questions
How do I maintain optimal temperature and light conditions for seed germination?
Maintaining optimal temperature and light conditions is crucial for successful seed germination. To achieve this, ensure that the growing area has adequate ventilation to prevent overheating. Use a thermostat or temperature gauge to monitor the temperature, keeping it between 65-75°F (18-24°C) for most seeds. For specific requirements, consult your seed package or research the ideal temperature range for your chosen plant species.
Can I speed up the germination process using certain techniques?
While some methods can promote faster germination, they should be used judiciously to avoid damaging the seeds. One technique is to use a warm water soak (around 90°F/32°C) for seeds that require stratification or have hard outer shells. However, always research specific requirements for your seed type and plant species.
What are some common mistakes to avoid when storing and handling seeds?
When storing and handling seeds, it’s essential to avoid contamination and moisture exposure. Store seeds in a cool, dry place away from direct sunlight. Keep them sealed in airtight containers or packets to prevent moisture absorption. Avoid touching the seeds excessively, as oils from your skin can damage them.
How do I address low germination rates in my seedlings?
Low germination rates can be frustrating and costly. If you’re experiencing issues, consider factors like seed quality, storage conditions, and temperature fluctuations. Inspect your seeds for visible signs of mold or rot, and adjust your storage or handling procedures accordingly. Some seeds may require specific treatments or stratification periods to enhance germination.
Can I reuse or repurpose old or unused seeds?
While it’s technically possible to reuse seeds, their viability and quality will likely decline over time. Old seeds can be more challenging to germinate due to reduced energy reserves or degradation of the embryo. Before reusing seeds, inspect them carefully for signs of decay or mold. Even with proper storage, seed germination rates often decrease with age, so consider starting fresh with new seeds for optimal results.