Saving flower seeds is an essential skill for any gardener who wants to ensure a sustainable future for their garden. Not only does seed saving allow you to preserve your favorite flowers and pass them down to future generations, but it also helps maintain genetic diversity in plant populations. This is crucial for the long-term health of your garden, as monoculture farming practices have led to a significant loss of crop and flower varieties over the years. In this article, we’ll show you how to save flower seeds successfully, covering topics from selecting and harvesting the right flowers to storing and preserving them for future planting. By following our comprehensive guide on seed saving, you can enjoy a bountiful harvest while also doing your part for environmental conservation.
Understanding Why Seed Saving Matters
Seed saving is not just a hobby, but a crucial practice that affects the diversity of our gardens and ecosystems. Let’s explore why seed saving matters for your garden and beyond.
Benefits of Seed Saving
When you start saving flower seeds, it’s not just about preserving nature’s beauty for future generations; there are several tangible benefits that come with this practice. One of the most significant advantages is cost-effectiveness. Once you have a good stockpile of seeds, you can enjoy a vast array of flowers without having to purchase new packets every season.
Seed saving also plays a crucial role in genetic preservation. As commercial seed companies prioritize high-yield varieties over heirloom ones, there’s a growing risk of genetic loss. By saving your own seeds, you’re helping to safeguard the unique characteristics and traits that make certain flowers so special. This not only ensures the continuation of rare and exceptional blooms but also opens up opportunities for plant breeders and researchers.
In addition to these benefits, seed saving has environmental advantages too. When you save your own seeds, you reduce your reliance on commercial seed suppliers and contribute less to greenhouse gas emissions associated with transportation and packaging.
Challenges Faced by Commercial Seed Companies
Commercial seed companies play a crucial role in supplying high-quality seeds to gardeners and farmers worldwide. However, their reliance on a limited gene pool poses significant challenges that impact the long-term sustainability of our food and flower systems.
One major issue is the vulnerability to pests and diseases. When commercial seed companies rely heavily on a narrow range of varieties, they risk being susceptible to outbreaks that can decimate entire crops. For instance, the devastating effects of the late blight outbreak in 1845 on Ireland’s potato crop are a stark reminder of this vulnerability.
Furthermore, climate change exacerbates these challenges by altering temperature and precipitation patterns, making it difficult for commercial seed companies to adapt their varieties quickly enough. This can lead to reduced yields, lower quality seeds, or even total crop failure.
The consequences of these issues extend beyond the commercial sector, affecting home gardeners who rely on high-quality seeds for their own flower gardens. As a gardener interested in saving flower seeds, it’s essential to be aware of these challenges and consider the benefits of seed saving, which we’ll explore further in the next section.
Preparing Your Garden for Seed Saving
Before you start collecting seeds, it’s essential to prepare your garden by ensuring good air circulation and removing any weeds that could compete with your plants. This will give them a healthy start in seed production.
Choosing the Right Flowers
When choosing flowers to save seeds from, it’s essential to consider their ease of cultivation, seed yield, and adaptability. Some flowers are more suitable for saving seeds than others due to factors like their growth habits, pollination requirements, and resistance to pests and diseases.
Start by selecting varieties that are known to be prolific seed producers, such as sunflowers, cosmos, and zinnias. These flowers tend to produce a high number of seeds per plant, making it easier to collect enough for saving. Additionally, choose varieties that are easy to grow and require minimal maintenance, like marigolds and nasturtiums.
When evaluating a flower’s suitability for seed saving, also consider its adaptability. Some plants are more resilient to environmental changes and can thrive in different conditions, while others may be more sensitive. For example, if you live in an area with unpredictable weather patterns, choose flowers that can tolerate drought or excess moisture. By considering these factors, you’ll be able to select the right flowers for saving seeds and set yourself up for success in your seed-saving endeavors.
Optimizing Growing Conditions
Creating a conducive environment for seed production is crucial for successful seed saving. To start, ensure your garden bed receives sufficient sunlight, which varies depending on the plant species. Most annuals and perennials require at least 6 hours of direct sunlight per day, while some can tolerate partial shade.
Prepare your soil by loosening it to a depth of about 8-10 inches. Add organic matter like compost or well-rotted manure to improve its structure and fertility. This will facilitate root growth and seed development.
Watering is another critical factor in optimizing growing conditions. Most plants need consistent moisture, especially when producing seeds. However, overwatering can lead to disease and reduced seed quality. Aim for about 1 inch of water per week, either through rainfall or irrigation.
Some species require specific watering patterns, such as beans which benefit from a drying period between waterings. Be sure to research the needs of your plants.
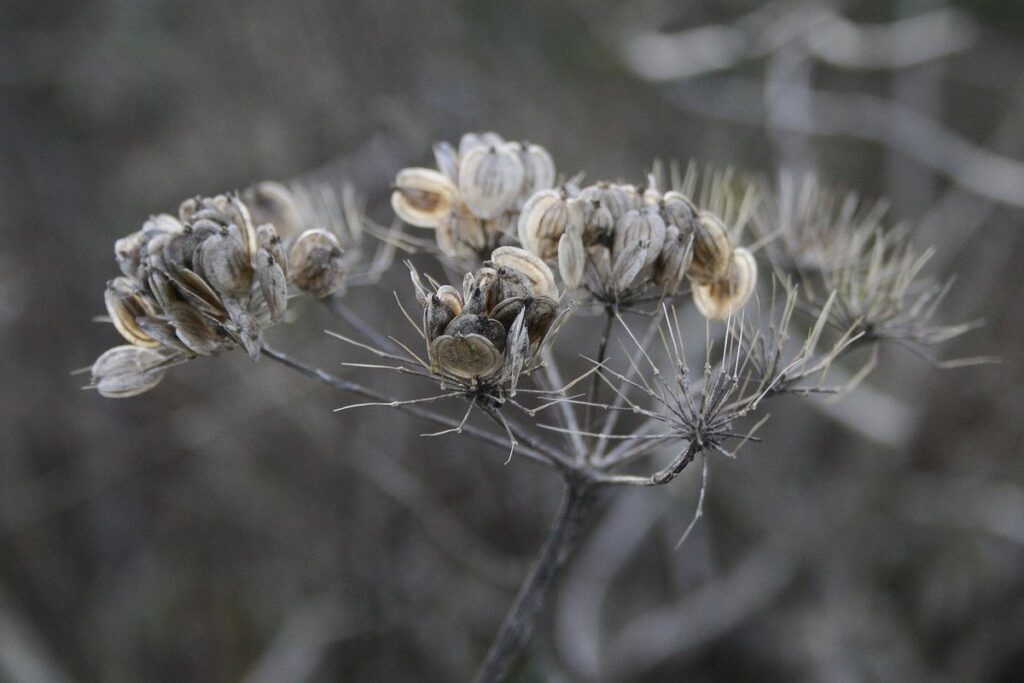
Collecting Seeds from Your Garden
When it comes time to harvest your seeds, knowing when and how to collect them is crucial for their viability. In this next step, we’ll walk you through the process of collecting seeds from your garden.
When to Harvest Seeds
When collecting seeds from your garden, timing is everything. You’ll want to harvest them at the optimal time to ensure they’re mature and healthy enough for planting. The ideal time for harvesting seeds depends on the type of flower you’re working with.
For annuals like marigolds and zinnias, wait until the flowers have fully bloomed and turned brown or dry. This is usually when the petals have dropped off and the seed pods are crunchy and brittle to the touch. For perennials like coneflowers and black-eyed Susans, you can harvest seeds when the blooms have faded and the seed heads are still green but starting to turn yellow.
As a general rule of thumb, seeds are ready to harvest when they’re dry and easy to remove from their pods. You can check for dryness by gently tugging on the seed head – if it comes off easily, it’s time to collect those seeds! Keep in mind that some seeds, like poppy seeds, require a longer drying period before harvesting.
When in doubt, observe your flowers closely and harvest the seeds when you notice these changes. Remember to check for any pests or diseases on the seed pods before storing them safely away.
Seed Identification and Storage
When it comes to saving flower seeds, proper identification and storage are crucial steps to ensure their viability. First, let’s talk about identifying ripe seeds. Ripe seeds are typically dry and have a hard shell. You can check for ripeness by gently squeezing the seed pod; if it opens easily, the seeds inside are likely ripe. Another way to determine ripeness is to observe the color of the seed pod – some plants, like marigolds and zinnias, will turn brown or tan when their seeds are mature.
To store seeds properly, you’ll want to keep them in a cool, dry place away from direct sunlight. Airtight containers or envelopes made specifically for seed storage work well. You can also use glass jars with tight-fitting lids or paper bags sealed tightly with tape. It’s essential to label the containers or bags with the type of seed and date stored to maintain organization.
Some plants, like sweet peas and morning glories, require specialized treatment before storing their seeds. Check specific guidelines for these types of seeds, as they may need to be dried further or cleaned before storage.
Cleaning and Drying Seeds
Now that you’ve harvested your flower seeds, it’s time to give them a good cleaning and drying to ensure they’re ready for storage. This step is crucial for preserving their viability.
Removing Excess Material
Removing excess material from flower seeds is a crucial step in the saving process. It’s essential to remove seed coats, pods, and other debris that can interfere with germination or cause damage to the seeds. Start by gently rubbing the seeds between your fingers or using a soft-bristled brush to loosen any adhering material.
Check for seeds that are still attached to their pods, such as those from sunflowers, zinnias, or marigolds. Gently twist and pull these seeds away from the pod, taking care not to damage them. For seeds with excess seed coat, try soaking them in water for a few hours before gently rubbing off the coating.
When removing debris, be gentle to avoid damaging the seeds’ delicate surfaces. Use tweezers or a small fork to carefully pick out any remaining material, such as chaff or bits of stem. For larger seeds like pumpkin or squash, you can use a gentle scraper or knife to remove excess pulp and fibers.
Remember to work in a well-ventilated area and handle the seeds by their edges to prevent damage. By taking your time and being careful, you’ll be able to successfully remove excess material from your flower seeds.
Drying Methods
When it comes to drying seeds, there are several methods you can use to ensure their viability. One of the most popular and simple methods is air-drying. This involves spreading the seeds out in a single layer on paper towels or a wire rack, allowing them to dry slowly and naturally. For example, if you’re saving sunflower seeds, simply place them in a single layer on a paper towel-lined plate and let them sit in a cool, dry spot for 1-2 weeks.
Another option is oven-drying, which can be more efficient but requires careful temperature control. To oven-dry seeds, preheat your oven to its lowest temperature setting (usually around 150°F), then spread the seeds out on a baking sheet lined with parchment paper. Place the baking sheet in the oven and dehydrate for 1-2 hours, checking on the seeds periodically to ensure they don’t overdry.
Desiccants are another option for drying seeds quickly and effectively. These absorb moisture from the air, allowing you to store your seeds in a dry environment without having to worry about them getting too wet or developing mold. Simply place the desiccant near the container holding the seeds and let it do its job – but be sure to check on the desiccants periodically to ensure they’re still effective.
Some popular types of desiccants include silica gel, calcium chloride, and activated alumina. Each has its own advantages and disadvantages, so you may need to experiment with a few different options to find what works best for your specific seeds.
Storing and Preserving Seeds
Now that you’ve collected and dried your seeds, it’s essential to store them properly to maintain their viability for future planting. This section will guide you through the process of storing and preserving flower seeds.
Long-Term Storage Options
When it’s time to store seeds for an extended period, you’ll need a reliable method to preserve their viability. Long-term storage options provide peace of mind by ensuring that your seeds remain healthy and ready to plant when needed.
One popular method is refrigeration. Seeds can be stored in sealed envelopes or containers placed inside the refrigerator at around 39°F (4°C). This temperature range slows down seed germination, but keep in mind that extreme cold can cause moisture to condense inside the container, potentially causing mold or damage.
Freezing seeds is another approach for long-term storage. Place seeds between two sheets of paper towels and store them in airtight containers or freezer bags. When stored correctly, seeds can remain viable for up to 20 years or more.
Vacuum-sealing is also an effective method for preserving seeds over the long term. By removing air from the container, moisture accumulation is minimized, reducing the risk of mold or damage. This technique is ideal for storing larger quantities of seeds.
When choosing a storage method, consider factors like seed type, quantity, and desired shelf life to ensure you’re selecting the best approach for your needs.
Seed Preservation Techniques
For sensitive seeds that are prone to degradation, specialized techniques like freeze-drying and lyophilization can be effective preservation methods. Freeze-drying involves slowly removing the water content from the seed using a vacuum pump, allowing it to remain in a dormant state until rehydration is needed. This method preserves the seed’s viability for extended periods.
Lyophilization is another approach that uses rapid freezing followed by vacuum drying, which helps maintain the seed’s structural integrity and prevents spoilage. For seeds that require more stringent preservation conditions, specialized facilities called seed banks can be used. These facilities often employ advanced storage techniques such as cold stratification, germination chamber control, and precise temperature management.
Some of these facilities have successfully stored seeds for decades or even centuries, providing valuable germplasm resources for future generations. If you’re considering preserving sensitive seeds, researching local seed banks or seeking guidance from experienced practitioners can be beneficial in selecting the most suitable preservation method for your specific needs.
Sowing and Germinating Saved Seeds
Now that you’ve harvested your seeds, it’s time to sow them for a successful germination process. Let’s dive into the essential steps for sowing and nurturing your saved seeds.
Seed Selection and Stratification
When it comes to sowing saved seeds, selecting the right ones and preparing them for germination is crucial. This process is called seed selection and stratification. The quality of the seeds will significantly impact the success of your plants. To ensure you’re working with healthy seeds, inspect them carefully before sowing.
Look for signs of viability such as intact coats, no visible damage or mold, and a fresh appearance. Remove any weak or damaged seeds to increase the chances of successful germination. Next, prepare the seeds for stratification by identifying the specific species’ requirements. Some plants like delphiniums, poppies, and winter aconite require cold stratification at temperatures between 32°F (0°C) to 40°F (4°C). Others, such as orchids, require warm stratification at around 70°F (21°C).
For cold stratification, store the seeds in an envelope or bag with moist peat moss or sand and place them in a sealed container or plastic bag. Keep this in the refrigerator for 30 to 90 days, depending on the species’ needs. For warm stratification, simply keep the seeds at room temperature (around 70°F) for 1-3 months. Proper stratification helps break seed dormancy, allowing your plants to thrive once sown.
Planting and Germination Tips
When sowing saved seeds, it’s essential to provide them with the right environment for successful germination. The optimal soil temperature varies depending on the type of flower seed you’re working with. For example, warm-season flowers like marigolds and sunflowers prefer a soil temperature between 70°F to 85°F (21°C to 30°C), while cool-season flowers like pansies and violas thrive in temperatures between 40°F to 65°F (4°C to 18°C).
To determine the correct sowing depth, follow these guidelines: sow seeds about 2-3 times deeper than their diameter. For example, if you’re planting a seed that’s about 1/8 inch thick, place it 1/4 inch deep in the soil.
Keep the soil consistently moist during the germination period, which typically lasts between 7 to 21 days depending on the type of flower and environmental conditions. A good rule of thumb is to water gently but thoroughly once or twice a week, making sure not to overwater and cause seed rot.
Conclusion: Saving Flower Seeds for Future Generations
Now that you’ve learned how to save flower seeds, let’s talk about preserving them for future generations. We’ll cover the best methods for storing and saving seeds for long-term use.
Recap of Key Takeaways
As we come to the end of this comprehensive guide on saving flower seeds, let’s recap the key takeaways that will help you save these precious treasures for future generations.
Seed saving is not just a fun hobby, but it also has significant benefits for our environment and the preservation of biodiversity. By saving flower seeds, you’re contributing to the conservation of rare plant species, reducing your reliance on commercial seed suppliers, and promoting sustainable gardening practices.
However, we’ve also discussed some challenges associated with seed saving, such as the need for proper storage conditions, handling techniques, and record-keeping. It’s essential to acknowledge these challenges and develop strategies to overcome them.
Throughout this guide, we’ve outlined a step-by-step process for saving flower seeds, from selecting the right varieties to harvesting, cleaning, and storing the seeds. By following these steps and incorporating some practical advice, such as labeling your seed packets and maintaining accurate records, you’ll be well on your way to becoming a successful seed saver.
Remember, every saved seed is a step towards preserving our natural heritage for future generations.
Encouraging Readers to Start Their Own Seed-Saving Journey
As you’ve learned throughout this comprehensive guide, seed saving is a rewarding hobby that not only connects you with nature but also contributes to genetic diversity. Now it’s time to encourage you to take the next step and start your own seed-saving journey! By doing so, you’ll become an active participant in preserving plant species for future generations.
Seed saving allows you to develop a deeper appreciation for the natural world and its intricate web of relationships. You’ll learn about the life cycle of plants, observe how they adapt to their environment, and understand the importance of pollinators. Moreover, by saving seeds from your favorite flowers, you’re helping to safeguard against potential extinctions and ensuring the continuation of unique genetic traits.
To begin, start small by choosing a few easy-to-save varieties like marigolds or zinnias. Learn about the specific seed-saving requirements for these plants, including any necessary drying, cleaning, or storage procedures. As you gain confidence and experience, you can expand your collection to more complex species. Remember, every saved seed is a testament to your dedication to preserving plant diversity – and that’s something to be proud of!
Frequently Asked Questions
What are the most common mistakes gardeners make when saving flower seeds?
Gardeners often overlook proper seed identification, leading to incorrectly labeled or even misidentified seeds. This can result in poor germination rates and an inconsistent harvest. To avoid this, carefully examine your seeds for any visible signs of genetic variation, such as distinctive colors or markings.
How do I store my saved seeds long-term, considering factors like moisture and temperature?
To ensure optimal seed preservation, store them in airtight containers made from materials resistant to moisture and pests. Place the containers in a cool, dry location with consistent temperatures between 40°F (4°C) and 50°F (10°C). A root cellar or a dedicated seed storage area can be ideal for long-term seed storage.
Can I save seeds from hybrid flowers, and will they produce true-to-type offspring?
While it’s technically possible to save seeds from hybrid flowers, the resulting plants may not exhibit the same desirable traits as their parent plants. This is because hybrids are bred for specific characteristics, which can be difficult to replicate in subsequent generations. If you want consistent results, focus on saving seeds from open-pollinated or heirloom varieties.
How do I handle seed rot and mold when storing my saved seeds?
To prevent seed rot and mold, ensure your storage containers have proper ventilation and maintain a dry environment. Regularly inspect stored seeds for signs of decay or moisture damage. If you notice any issues, remove the affected seeds and store them separately to prevent further contamination.
What are some strategies for encouraging germination rates in saved seeds?
Boosting germination rates involves creating optimal growing conditions, such as providing adequate light, temperature control, and water availability. You can also try stratification techniques or cold treatment to mimic natural winter conditions, which can help stimulate seed germination.