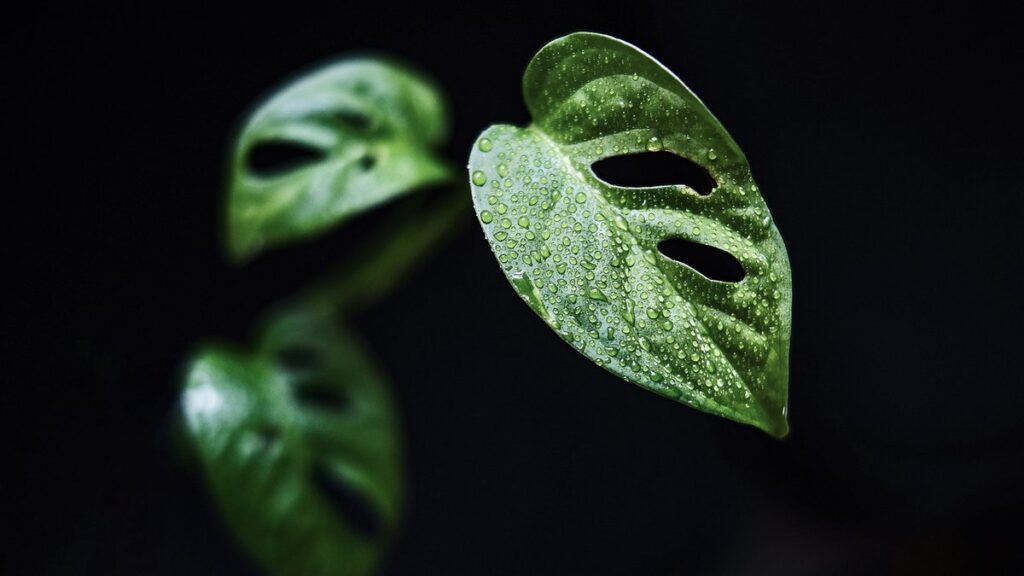
Are you tired of struggling with low success rates when propagating Monsteras? You’re not alone! Many plant enthusiasts face challenges when trying to multiply their beloved Monstera plants. But did you know that water propagation can be a game-changer? By using water instead of soil, you can increase your chances of successful propagation and reduce the labor time involved. In this article, we’ll dive into the benefits of water propagation for Monsteras and provide expert tips on how to make it work for you. We’ll cover everything from choosing healthy mother plants to maintaining a thriving water propagation setup, ensuring that you get the best results possible. Get ready to take your Monstera propagation skills to the next level!
Benefits and Advantages of Water Propagation
Now that you’ve mastered the basics of water propagation, let’s dive into the benefits and advantages of using this method to multiply your Monstera plants. This approach offers several unique perks.
Easy to Scale Up
One of the most significant advantages of water propagation for Monsteras is its ease to scale up. This method allows you to quickly and efficiently propagate large quantities of plants, making it an ideal solution for nurseries, gardeners, or anyone looking to multiply their Monstera collection.
Not only does water propagation save time and effort, but it’s also a cost-effective approach compared to traditional soil-based methods. With water propagation, you can produce multiple cuttings from a single stem in just a few days, reducing the need for labor-intensive repotting and pruning. For example, if you’re growing Monstera deliciosa, you can harvest 5-7 nodes (about 3-4 inches long) per cutting, which can be easily separated and potted up individually.
By scaling up your water propagation efforts, you can enjoy significant cost savings on materials like soil, pots, and fertilizer. Plus, with fewer plants requiring care, you’ll also save time spent on watering, pruning, and monitoring plant health. As a result, water propagation becomes an attractive option for commercial growers or large-scale gardeners who need to produce multiple Monstera plants quickly and efficiently.
Increased Success Rate
One of the most significant advantages of water propagation is its ability to reduce the risk of root rot and increase the chances of successful propagation. When you use a traditional potting mix for propagation, there’s always a chance that the cuttings will develop fungal diseases or suffer from overwatering, leading to root rot. In contrast, using a water-based propagation method minimizes these risks.
By growing your Monstera cuttings in a water-filled container, you create an environment that is less conducive to fungal growth and decay. This means that your cuttings are more likely to develop healthy roots without the risk of infection. Additionally, water propagation allows for better control over the moisture levels, reducing the likelihood of overwatering.
To maximize your chances of success with water propagation, make sure to change the water every 1-2 weeks and provide bright, indirect light. Regularly monitor the condition of your cuttings and transfer them to a pot once they develop a robust root system. By following these simple steps, you can enjoy an increased success rate when propagating Monstera using water.
Preparing the Monstera Stem Cuttings
Before we move on to planting, let’s focus on preparing your Monstera stem cuttings for a successful water propagation by cleaning and drying them properly.
Choosing Healthy Mother Plants
When selecting mother plants for propagation using water, it’s essential to choose healthy specimens with plenty of nodes. This will ensure that your cuttings have the best chance of thriving and producing roots.
A node is a joint on the stem where leaves meet the stem. Mother plants with multiple nodes are ideal because they provide more opportunities for cuttings to develop roots. If you’re selecting a new plant, look for one with at least three to four sets of nodes, as this will increase your chances of getting successful cuttings.
When inspecting the mother plant, check for signs of disease or pests. Fungal infections can weaken the stem and reduce its ability to produce healthy cuttings. Similarly, infestations like spider mites or mealybugs can cause damage that may compromise cutting performance.
By choosing a robust, disease-free mother plant with plenty of nodes, you’ll be setting yourself up for success in your Monstera propagation journey using water. This attention to detail will pay off when it’s time to harvest and propagate new plants.
Correct Cutting Techniques
When taking 2-4 inch stem cuttings from your Monstera plant for water propagation, it’s essential to get it right. This involves choosing the correct length of cutting and positioning the nodes correctly.
Aim for a cutting length between 2-4 inches (5-10 cm), as this provides an optimal balance between reducing transpiration stress and allowing enough stem tissue for root development. Cut just above a node, which is the point where a leaf meets the stem. This node will become an important part of the rooting process.
Make sure to cut at an angle, rather than straight across, to prevent water from collecting on the cutting and promoting rot. Also, take multiple cuttings from different parts of the plant to increase your chances of success.
When selecting nodes for your cuttings, look for those with two or more sets of leaves, as these tend to root more readily than single-node cuttings. Place the node that is closest to the base of the stem facing upwards when you submerge it in water, allowing it to develop roots and eventually grow into a new plant.
Water Propagation Setup and Materials
To successfully propagate Monstera using water, you’ll need a few essential materials that we’ll cover next, including containers and rooting solutions. Let’s take a closer look at what you’ll be working with.
Required Equipment and Supplies
To successfully propagate Monsteras using water, you’ll need to gather the right equipment and supplies. Start by selecting a clean glass or plastic container with a wide mouth, such as a jar or a vase, where your cutting will be able to submerge easily. Make sure it’s free of any residue or contaminants that could harm your plant.
You’ll also need to obtain healthy Monstera cuttings with at least two nodes, which are the joints on the stem from which new growth emerges. Cut just above a node using a sharp, sterile tool, and remove lower leaves, leaving only those closest to the node. Next, prepare a water treatment that will prevent bacterial growth and promote root development. You can use a commercial rooting hormone or create your own by dissolving one teaspoon of ascorbic acid in 100 mL of distilled water.
When selecting water, choose distilled or rainwater over tap water, which may contain high levels of minerals that could affect plant growth. Fill the container to just below the node with your chosen water treatment, and gently submerge the cutting, making sure it’s fully saturated.
Creating a Suitable Environment
When setting up your water propagation station for Monstera plants, it’s essential to create an environment that mimics their natural habitat. The ideal temperature range for Monstera propagation is between 65°F to 75°F (18°C to 24°C), which allows the roots to grow quickly and healthily. Avoid placing your propagation station near heating or cooling vents, fireplaces, or drafty windows.
Maintaining a humid environment is also crucial for successful water propagation. You can achieve this by covering the container with a clear plastic bag or a cloche. This will create a microclimate that retains moisture and warmth, promoting root growth. However, be sure to remove the cover occasionally to prevent overwatering and promote air circulation.
In terms of light, Monstera plants prefer bright, indirect light but can tolerate low light conditions. If you’re propagating in a sunny location, ensure the light is filtered through a sheer curtain or placed 2-3 feet away from direct sunlight to prevent scorching the roots. By replicating these conditions, you’ll be well on your way to successful Monstera water propagation.
Water Propagation Methods
You’ve learned how to propagate Monstera through water, but now it’s time to explore different methods for achieving successful growth in a liquid environment. Let’s dive into the world of water propagation techniques.
Node-and-Root Method
The node-and-root method is one of the most popular and effective water propagation techniques for Monstera plants. This method involves placing cuttings from a mature Monstera plant into a glass or container filled with water, ensuring that at least two nodes are submerged.
When using this method, it’s essential to make clean cuts on the stem section, just above a node. This will allow the cutting to develop roots more efficiently. You can use a sharp, sterile knife or pruning tool to prevent any potential infections.
Once you’ve prepared your cuttings, place them in a glass or container filled with room-temperature water. Make sure that at least two nodes are submerged, as these areas contain dormant buds that will eventually produce new growth. Keep the water level topped up and change it every 7-10 days to maintain optimal conditions for root development.
Within 1-2 weeks, you should start to notice white roots emerging from the node area. This is a clear indication that your cutting has successfully taken root in the water.
Stem-Only Method
The stem-only method is a popular and effective way to propagate Monstera using water. This technique involves placing cuttings above the waterline while still allowing them to absorb moisture and nutrients from the surrounding solution. To start, you’ll need to take healthy stem sections from your mother plant, making sure each cutting has at least two nodes (the joint where a leaf meets the stem). Dip the cut end into a rooting hormone powder or liquid to stimulate root growth.
Next, place the cutting above the waterline in a glass or container filled with a well-oxygenated propagation solution. This will provide the necessary moisture and nutrients for root development without drowning the cutting. It’s essential to keep the water level below the node to prevent rot and encourage rooting. Maintain high humidity around the cutting by covering it with a clear plastic bag or cloche, ensuring good air circulation to prevent fungal growth.
Monitor your cutting closely, as roots should develop within 1-3 weeks. Once you notice root emergence, carefully transfer the established plant into a pot filled with well-draining soil. Be patient and attentive during this process for optimal results.
Monitoring and Maintaining Water Propagation
Now that you’ve successfully propagated your Monstera using water, it’s time to ensure your new plants thrive: monitoring their progress and maintaining optimal conditions is crucial.
Watching for Signs of Health
As you’re monitoring your water-propagated Monsteras, it’s essential to keep an eye out for signs of their health and well-being. These indicators will help you determine if the plants are thriving or struggling during the propagation process.
Look for changes in leaf color, size, and shape. Healthy Monstera leaves should be a vibrant green with no signs of discoloration or spotting. If you notice yellowing or browning leaves, it could indicate that your plant is receiving too much or too little light. Adjust the lighting accordingly to prevent further stress.
Observe the roots for development and growth. A healthy root system will be visible within 1-2 weeks after propagation, with new roots forming and extending into the water. If you don’t see any signs of root growth, it may indicate that your plant is not receiving enough nutrients or that the water quality is poor.
Check for pests and diseases regularly. Inspect the leaves and stems for any signs of infestation or infection. Fungal diseases can thrive in water-propagated plants, so monitor for white powdery patches or black spots on the leaves.
Monitor the water level and change it every 1-2 weeks to maintain its clarity and prevent bacterial growth. Keep an eye out for a decrease in water quality, which can be indicated by cloudy or murky water.
Addressing Common Issues
As you navigate the world of monstera propagation using water, it’s not uncommon to encounter some common issues that can stump even the most experienced plant enthusiasts. Algae growth is one such problem that can quickly take over your water propagation station if left unchecked. To prevent this, ensure that you’re changing the water frequently enough – ideally every 1-2 weeks. A good rule of thumb is to change the water when it starts to turn slightly murky or cloudy.
Another issue you may encounter is root bound, which occurs when the roots of your Monstera have outgrown their container and are circling around in a tight spiral. This can happen relatively quickly in water propagation, especially if you’re using smaller containers. To avoid this, make sure to transfer your plant to a larger vessel as soon as its roots start showing signs of constriction.
Nutrient deficiencies can also be a problem, particularly if the water is not rich enough in essential micronutrients. To prevent this, consider adding a balanced fertilizer specifically designed for aquatic plants to your propagation station. A general rule of thumb is to add a few drops of fertilizer to each liter of water – but start with small amounts and observe how your plant responds before adjusting dosages further.
Transferring Cuttings to Soil and Aftercare
Now that your water-rooted monstera cutlings have developed a robust root system, it’s time to transfer them into soil where they can continue to thrive. Next, we’ll walk you through the process of transferring and caring for your newly potted Monstera deliciosa.
Recognizing Readiness for Transfer
When you’re propagating Monstera cuttings using water, it’s essential to recognize when they’ve developed enough roots to be transferred to soil. This is a critical step, as over-watering can lead to root rot and other issues.
Check the cutting’s progress by gently tugging on the node where it meets the roots. If the node resists being pulled away from the roots, this indicates that the roots have established themselves firmly in the water. You should also look for white or light-colored roots growing from the node, as these are a sign of healthy root development.
Another way to determine readiness is by examining the cutting’s color and firmness. A well-rooted Monstera cutting will typically turn a darker green color and develop more rigid leaves. Compare your cutting to one that has been in water for several weeks; if it looks similar, it may be ready for soil transfer.
Typically, this takes around 2-6 weeks, depending on the temperature of the water, the size of the cutting, and the health of the mother plant.
Post-Transfer Care and Maintenance
When transferring cuttings to soil, it’s essential not to overlook the post-transfer care and maintenance of your newly propagated Monsteras. This crucial phase determines their survival and growth rates in their new environment.
Upon transfer, water thoroughly but make sure excess moisture doesn’t accumulate around the roots. A well-draining potting mix is vital for healthy root development. Water only when the top inch of soil feels dry to the touch. However, check your plant more frequently during its first month in the soil, as it will be adjusting.
During this period, maintain temperatures between 65°F and 75°F (18°C and 24°C) for optimal growth. Mist regularly but avoid overwatering. Monitor your plants’ nutrient needs closely – a balanced fertilizer applied according to package instructions can help them recover from propagation stress.
Keep an eye out for pests such as spider mites or mealybugs, which thrive in moist conditions. Check under leaves and stems for any signs of infestation. Prune weak or damaged growth as needed to maintain your plant’s shape and promote healthy development. With proper care and attention, your newly transferred Monsteras should establish themselves quickly and grow into thriving plants.
Frequently Asked Questions
How often should I change the water in my Monstera propagation setup?
It’s essential to maintain a clean environment for your Monstera cuttings. Change the water completely every 1-2 weeks, or more frequently if you notice any signs of bacterial growth or decreased oxygen levels.
Can I propagate multiple Monsteras at once using the node-and-root method in a single container?
Yes! In fact, this is one of the advantages of water propagation – you can multiply multiple plants simultaneously. Just ensure each cutting has enough space and is receiving adequate light.
What are some common issues to watch out for when propagating Monstera cuttings in water?
Keep an eye out for signs of rot, such as soft or mushy stems. If you notice any of these symptoms, it’s best to remove the affected cutting to prevent the infection from spreading to other plants.
How long does it typically take for a Monstera cutting propagated through water to develop roots and become ready for transfer?
The time frame varies depending on factors like temperature, light, and water quality. However, you can expect to see visible root growth within 2-4 weeks. Be patient and observe your plants closely – when the roots have developed sufficiently, it’s time to move them into soil.
Can I use a mixture of tap and filtered water for my Monstera propagation setup?
No. Using tap water can introduce chlorine or other chemicals that might harm your cuttings. Stick to distilled or filtered water to provide your Monsteras with the best possible environment for growth.