Spring is just around the corner, and with it comes the perfect opportunity to revamp your outdoor space. Preparing your garden for the new season is crucial to ensure a lush and vibrant environment that’s teeming with life. A well-prepared garden not only boosts its aesthetic appeal but also improves soil health, reduces weed growth, and enhances overall plant resilience.
In this comprehensive guide, we’ll walk you through the essential steps to prepare your garden for spring, covering topics such as soil preparation, effective weed control methods, and strategic pruning techniques. By following these expert tips, you’ll be able to create a thriving outdoor oasis that’s perfect for gardening enthusiasts of all levels. From basic maintenance tasks to more advanced techniques, we’ve got you covered. Get ready to transform your garden into a blooming masterpiece!
Assessing Your Garden’s Condition
Before you start making plans for your garden, it’s essential to assess its current condition. Take stock of any damage, debris, and bare spots that need attention before spring arrives.
Evaluating Soil Health
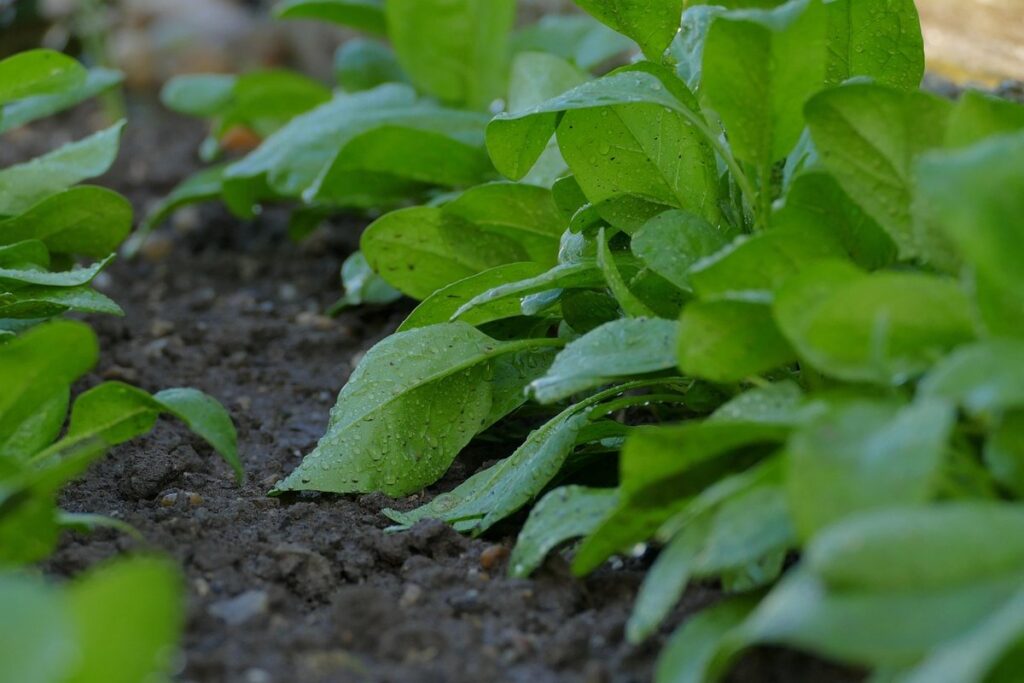
Soil health is often overlooked when assessing garden conditions, but it’s crucial for a thriving and productive garden. A healthy soil ecosystem provides essential nutrients to plants, supports beneficial microbial life, and improves water retention. To evaluate your garden’s soil condition, start by checking its pH levels.
The ideal pH range varies depending on the type of plants you’re growing, but most vegetables prefer a slightly acidic to neutral pH (around 6.0-7.0). You can purchase a DIY soil testing kit or send a sample to a lab for analysis. Another key aspect is nutrient content – test for nitrogen, phosphorus, and potassium levels using a soil testing kit.
Soil structure is also vital; a mix of clay, silt, and sand provides excellent drainage and water retention. If your soil is too dense or compacted, it can hinder root growth and plant development. To improve soil structure, add organic matter like compost, manure, or well-rotted leaf mold, which will aerate the soil and increase its water-holding capacity.
Regularly monitoring these factors will help you identify any issues early on, allowing you to take corrective measures before spring planting begins. Remember, a healthy garden starts from the ground up – investing time in evaluating your soil’s condition is an essential step towards creating a thriving and productive growing space.
Identifying Weeds and Pests
As you prepare to revive your garden for spring, it’s essential to assess its current condition. This includes identifying any weeds and pests that may have taken advantage of the winter months while your garden was dormant. Weeds can outcompete your desired plants for water, nutrients, and light, while pests can cause significant damage to leaves, stems, and roots.
Start by manually removing weeds from your garden beds. Use a tool like a hoe or weeder to carefully dig up the entire root system of the weed. Be thorough in your removal, as any remaining roots can regrow into new weeds. For areas with extensive weed growth, consider using a mulch layer to suppress future weed germination.
To address pests, consider organic control methods such as neem oil or insecticidal soap. These products work by disrupting the pest’s life cycle and are safer for beneficial insects. Apply these treatments in early spring, before pests become established, to prevent infestations. Regular monitoring of your garden will also help you catch any issues early on, allowing for prompt treatment and minimizing damage to your plants.
Cleaning and Preparation
Before you start planting, it’s essential to clean up your garden from winter debris and prepare the soil for new growth. Let’s get started on that cleaning and preparation process!
Removing Debris and Winter Mulch
As winter comes to an end, it’s essential to remove debris and old mulch from your garden to make way for new growth. Start by clearing away dead plant material, including leaves, branches, and spent perennials. Cut back any dead or damaged stems to about an inch above the ground, making sure to disinfect your tools between cuts to prevent the spread of disease.
Next, remove old mulch that may have been damaged or displaced over winter. This will help prevent moisture from accumulating, which can lead to rot and fungal diseases. Use a rake or shovel to gently lift away old mulch, taking care not to disturb any newly emerging shoots.
Also, inspect your garden for any debris accumulated during the winter months. Check for twigs, leaves, and other materials that may have blown in. Remove these items to prevent them from competing with your plants for water and nutrients. Regularly clearing away debris will help maintain a healthy and thriving garden come springtime. By doing so, you’ll create an environment conducive to growth, allowing your plants to flourish as the seasons change.
Pruning Trees and Shrubs
Pruning trees and shrubs is an essential task to perform during spring preparation. By removing dead, diseased, or damaged branches, you can improve air circulation, reduce the risk of disease, and promote healthy growth. Pruning also enhances the overall aesthetic appeal of your garden by shaping plants into desired forms.
The best time for pruning depends on the type of plant. For deciduous trees and shrubs, prune during their dormant season (winter or early spring) to minimize stress and prevent infection. Evergreen conifers can be pruned at any time of year, but it’s best to do so during the cooler months when new growth is slower.
Before pruning, consider the mature size of your plants and prune accordingly. For example, if you’re pruning a young tree that will eventually grow into a large canopy, remove about one-third of its branches each year to maintain a balanced shape. Remove no more than 20-25% of the total foliage at any given time to avoid stressing the plant.
Soil Preparation
To create a thriving garden, proper soil preparation is essential. This step involves testing and amending your soil to ensure it’s nutrient-rich and suitable for your plants’ needs.
Adding Organic Matter
Adding organic matter to your soil is one of the most effective ways to improve its fertility and structure. As plants grow, they deplete the soil’s nutrient reserves, making it essential to replenish these nutrients to maintain soil health. Organic matter acts as a natural fertilizer, providing essential micronutrients and improving the soil’s water-holding capacity.
There are various organic materials you can add to your soil, depending on what’s available in your area. Compost is an excellent choice, as it’s rich in nutrients and improves soil structure. You can make your own compost by collecting kitchen scraps and yard waste or purchase it from a local supplier. Manure from herbivores like cows or horses is another great option, providing essential nitrogen and phosphorus to plants.
Other organic materials you can use include green waste, such as grass clippings or leaves, which add carbon-rich compounds to the soil. When incorporating these materials into your soil, be sure to mix them well to avoid compacting the soil. Aim to add a 2-3 inch layer of organic matter to your soil and let it break down over time to improve its fertility and structure.
Adjusting pH Levels (If Necessary)
When it comes to adjusting pH levels in your garden, the goal is to create an optimal environment for plant growth. Most plants prefer a slightly acidic to neutral soil pH, ranging from 6.0 to 7.0. However, if your soil test results indicate that your garden’s pH is too high or too low, it’s essential to take corrective action.
To adjust pH levels, you’ll need to choose the right amendment and apply it at the correct rate. Lime, for example, can raise pH levels by adding calcium and magnesium to the soil. Peat moss or sulfur, on the other hand, can lower pH levels. When selecting an amendment, consider the type of plants in your garden and their preferred pH range.
As a general rule, apply lime at a rate of 1-2 pounds per 100 square feet for every point you want to raise the pH. For peat moss or sulfur, follow the package instructions for application rates. Remember to mix amendments well into the top 6-8 inches of soil to ensure even distribution.
Keep in mind that adjusting pH levels can be a gradual process and may require multiple applications over several seasons. Be patient and monitor your soil pH regularly to avoid making excessive changes that could harm your plants.
Plant Selection and Sowing
When it comes to getting your garden ready for spring, choosing the right plants is key. Selecting the perfect blooms and vegetables will set your garden up for success.
Choosing Spring-Ready Plants
When choosing spring-ready plants, consider the type of plant that best suits your garden’s climate and conditions. Annuals are a great option for adding pops of color to your garden in the spring. These plants complete their life cycle within a year, so they’re perfect for replacing old or worn-out plants. Petunias, marigolds, and geraniums are popular annuals that thrive in spring.
Perennials, on the other hand, come back year after year and require less maintenance than annuals. Consider adding perennials like daffodils, hostas, and coneflowers to your garden for a beautiful display of blooms. Bulbs like tulips and crocuses also thrive in spring and provide vibrant colors.
Before selecting plants, consider the amount of sunlight and water your garden receives. Make sure to choose plants that match these conditions to ensure they’ll be healthy and happy throughout the spring season. Some great resources for choosing spring-ready plants include gardening books, online plant databases, or visiting local nurseries and speaking with experienced gardeners.
When selecting perennials, consider factors like soil quality, air circulation, and space constraints in your garden. This will help ensure that new additions don’t overcrowd existing plants or create unhealthy growing conditions.
Seed Starting Indoors or Directly into the Garden
Starting seeds indoors or directly sowing them into the garden can be a crucial decision for spring gardening. When deciding which method to use, consider the type of plant you’re growing and its specific needs.
For direct seeding, prepare your soil by loosening it to a depth of about 8-10 inches. This will allow for healthy root growth and prevent compacted soil that can hinder seed germination. Add organic matter like compost or well-rotted manure to improve drainage and fertility. If you’re planting in raised beds, make sure they’re at least 6-8 inches high to accommodate the growing season.
For seeds that require a head start, such as tomatoes, peppers, and eggplants, starting them indoors can be beneficial. Use seed starting mix and sow seeds about ¼ inch deep. Keep the soil warm (around 70-80°F) with grow lights or a south-facing window. Once seedlings have two sets of leaves, transplant them into larger containers before moving them outside.
Timing is also crucial; direct seeding typically begins when soil can be worked in your area, usually around late March to early April, depending on your region’s climate and frost dates.
Irrigation and Water Management
Now that your garden’s soil is ready, it’s time to think about how you’ll supply it with the water it needs to thrive. Let’s dive into the essentials of irrigation and water management for a healthy spring garden.
Installing Drip Irrigation Systems (If Necessary)
Installing a drip irrigation system is an excellent way to conserve water and reduce evaporation in your garden. As we discussed earlier, efficient watering practices are crucial for healthy plant growth during the spring season. Drip irrigation systems deliver water directly to the roots of plants, reducing runoff and evaporation by up to 50%. This means you’ll be using less water overall, while still providing your plants with the necessary moisture.
If you don’t already have a drip irrigation system in place, installing one is relatively straightforward. You can purchase kits specifically designed for small gardens or larger areas, depending on your needs. When choosing a drip irrigation system, consider the following factors: soil type, plant water requirements, and space constraints. For example, if you have a raised bed with clay-heavy soil, look for a kit that includes emitters specifically designed to handle these conditions.
Before installing, ensure you have a clear plan for where pipes will be run and how they’ll be connected to existing irrigation systems or hoses. This might involve digging shallow trenches or burying the tubing under mulch or gravel. As you connect each drip emitter, test it by turning on the water supply slowly to avoid any damage.
Understanding Watering Needs Based on Plant Types
As you prepare your garden for spring, it’s essential to understand the unique watering needs of different plant types. Each type of plant has its own specific requirements when it comes to hydration, and ignoring these differences can lead to over- or under-watering.
For example, trees and shrubs typically require less frequent watering than perennials and annuals. This is because their root systems are generally deeper and more extensive, allowing them to tap into groundwater more efficiently. As a rule of thumb, trees and shrubs should be watered once a week during dry spells, whereas perennials and annuals may need daily or every-other-day watering.
Perennials, such as roses and coneflowers, often require consistent moisture levels throughout the growing season. They’re best watered deeply once or twice a week to encourage deep root growth and prevent shallow roots from developing. Annuals, on the other hand, can be more sensitive to overwatering and should be watered carefully, ideally allowing the top inch of soil to dry out between waterings.
To determine optimal watering schedules, observe your plants’ responses to different levels of moisture. Check the soil regularly by inserting your finger into the soil up to the knuckle. If the soil feels dry, it’s time to water. Keep in mind that climate and weather conditions also play a significant role in determining watering needs.
Maintenance and Upkeep
Now that you’ve got your garden cleaned up, it’s time to focus on the regular tasks that’ll keep it thriving all season long. We’ll walk through the essential maintenance habits to adopt for a healthy and beautiful garden.
Creating a Garden Schedule
Creating a garden schedule is crucial to ensure that your garden receives regular maintenance tasks, such as watering, pruning, and weeding. This will not only help keep your garden looking its best but also prevent common issues like overwatering or pests taking hold.
Start by planning out the specific tasks you need to perform each week. For example, you may want to dedicate one day per week for watering, another for pruning, and a third for weeding. Be sure to consider factors like weather, seasonal changes, and plant growth when determining your schedule.
To make it even easier, break down larger tasks into smaller, manageable chunks. For instance, if you have a large garden with multiple sections, assign specific days for each area rather than tackling the entire space at once. This will also give you time to adjust as needed based on how quickly plants grow and respond to weather conditions.
Also consider creating a separate schedule for seasonal tasks like fertilizing or mulching, which may only be necessary every few months.
Monitoring Progress and Adjusting Plans
As you tend to your garden throughout the spring season, it’s essential to regularly monitor its progress and make adjustments as needed. This will help ensure that your plants receive the right amount of care and attention to thrive.
Regular monitoring involves checking on the health, growth rate, and overall appearance of your plants. Take note of any changes in their color, texture, or size, as these can be indicative of underlying issues. For example, if you notice yellowing leaves or stunted growth, it may be a sign that your soil lacks essential nutrients or that pests are present.
Be prepared to adjust your plans accordingly. This might involve reapplying fertilizers, pruning back overgrown branches, or introducing beneficial insects to control pest populations. Make adjustments gradually and incrementally, rather than making drastic changes all at once. This will help prevent shocking your plants and allow them to adapt smoothly.
By staying on top of your garden’s progress, you’ll be able to make informed decisions that promote optimal growth and health, ultimately leading to a more vibrant and thriving garden.
Frequently Asked Questions
Can I skip evaluating soil pH levels if my garden seems to be doing fine?
No, it’s always a good idea to evaluate your garden’s soil condition regularly. Soil health can change over time due to various factors such as seasonal changes or new plant additions. Regular assessments will help you identify potential issues before they become major problems.
What’s the best way to determine if I need to adjust my pH levels?
To determine if you need to adjust your pH levels, start by testing your soil regularly using a DIY kit or sending it to a lab for analysis. Based on the results, consult with local nurseries or gardening experts to understand the ideal pH range for your specific plants and climate.
How often should I add organic matter to my garden?
The frequency of adding organic matter depends on your garden’s specific needs. If you have heavy clay soil, you may need to add more compost regularly to improve drainage and fertility. For lighter soils, less frequent additions (every 2-3 months) can be sufficient.
Can I use store-bought fertilizers instead of making my own compost?
While store-bought fertilizers can provide a quick fix for nutrient deficiencies, they often contain synthetic chemicals that can harm beneficial microorganisms in the soil. Making your own compost is a more sustainable and environmentally friendly option that will promote long-term soil health.
How do I handle garden debris and winter mulch removal efficiently?
To remove garden debris and winter mulch effectively, start by clearing large items like branches and twigs. Then, use a rake or leaf blower to collect smaller debris and compostable materials for later processing. Finally, discard non-compostable waste responsibly.