Are you getting ready to give your tiny seedlings a boost? Potting them up is an exciting milestone in their growth, but it can also be intimidating if you’re new to gardening. Transplanting seedlings from small cells into larger containers requires careful planning and execution to prevent shock and promote healthy growth.
That’s why we’ve put together this comprehensive guide on potting up seedlings step by step. In this article, we’ll walk you through the essential steps of selecting the right container, preparing the perfect soil, and preventing transplant shock. By following our simple tips and tricks, you’ll be well on your way to giving your seedlings the best possible chance at thriving in their new home. Whether you’re a seasoned gardener or just starting out, this guide has got you covered!
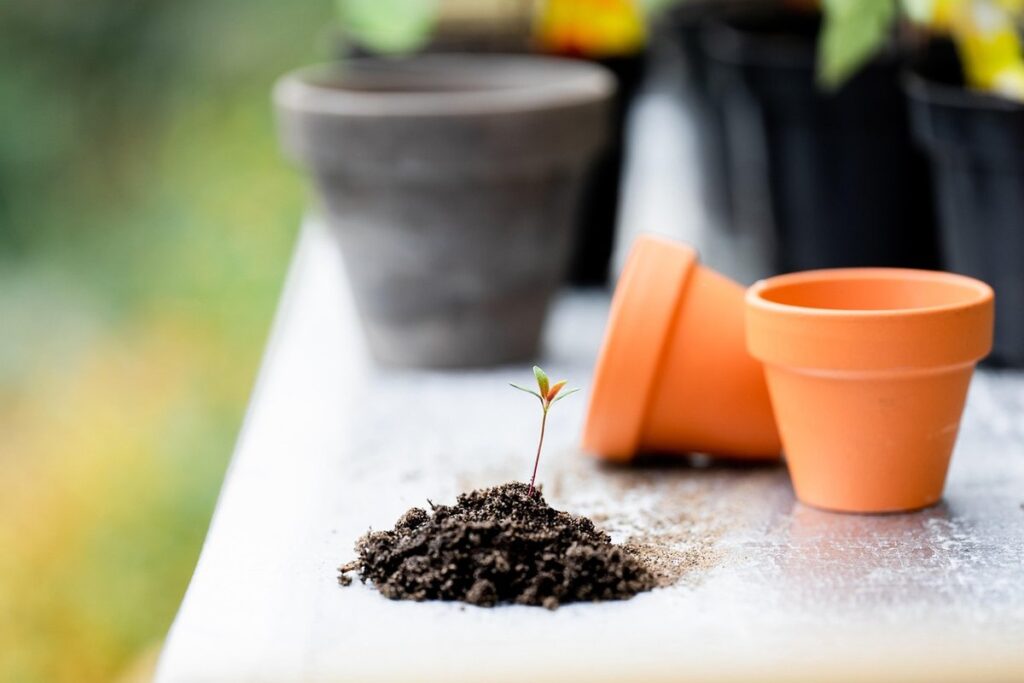
Choosing the Right Container
When potting up seedlings, choosing the right container is crucial for healthy growth. Select a pot that’s at least 1-2 inches deeper than the original one to give roots room to expand.
Selecting the Perfect Size
When it comes to potting up seedlings, selecting the perfect container size is crucial. You want one that’s large enough to accommodate the seedling’s root system as it grows, but not so big that it becomes waterlogged and prone to overwatering.
A good rule of thumb is to start with a container that’s only slightly larger than the original pot or plug tray. For example, if your seedlings were in a 1-inch cell pack, try moving them into a 4-6 inch pot. This will give their roots room to grow without taking up too much space.
Consider the type of plant you’re working with as well. Some seedlings, like those from bulbous plants or cacti, prefer more root space and can tolerate larger containers. On the other hand, delicate herbs or seedlings that prefer moist soil may do better in smaller pots.
Take a look at the seedling’s current growth and development to gauge how quickly its roots will spread out. You can gently remove the plant from its original container to assess the size of its root system and plan accordingly. This way, you’ll avoid under- or over-potting your seedlings, which can impact their overall health and success.
Considering Material and Durability
When it comes to seed starting containers, material selection can make a significant difference in the success of your young plants. Let’s consider some popular options: plastic, clay, and biodegradable materials.
Plastic containers are inexpensive, lightweight, and easy to clean, making them a convenient choice for many gardeners. However, they may retain heat, which can cause seedlings to overheat and suffer from stress. On the other hand, clay pots breathe well, allowing for healthy root growth and preventing waterlogged soil. But, they can be heavy, prone to cracking, and more difficult to clean.
Biodegradable materials, such as peat pots or coconut coir pots, offer a sustainable alternative. They often mimic natural conditions, providing the right balance of moisture and aeration for seedlings. When ready to transplant, simply biodegrade these containers in your garden bed, eliminating the need for removal. While biodegradable options may be more expensive upfront, they can save you from the hassle of disposing of traditional plastic or clay pots.
Preparing the Seedling for Potting
Before potting up your seedlings, it’s essential to prepare them by gently washing off any excess soil and trimming off weak or damaged roots. This ensures a healthy start in their new home.
Inspecting the Root System
Inspecting the root system of your seedling is crucial before potting it up. This step helps you identify potential issues that could affect its growth and health in its new container. Gently remove the seedling from its current growing medium, taking care not to damage any roots.
Begin by examining the length and thickness of the primary root. If it’s too long or woody, this may be a sign of overwatering. On the other hand, if the roots are short and sparse, it could indicate underwatering. Check for signs of circling or twisting, which can occur when roots have been confined to a small space for too long.
Now, inspect the root system more closely. Look for any areas where the roots appear to be dying off or rotting. This is often due to overwatering and can lead to root decay if not addressed promptly. If you notice this happening, it’s best to delay potting up your seedling until you’ve corrected the issue.
Take note of how easily the roots separate from the growing medium. If they’re difficult to release or seem stuck, this may indicate that the plant has developed a taproot or has been grown in an excessively wet environment.
Pruning and Training
Before potting up your seedlings, it’s essential to prune and train them to promote healthy growth. Pruning involves cutting back or removing certain parts of the plant, while training refers to providing support for its structure.
Start by examining each seedling’s growth habit. For plants like tomatoes and peppers, remove lower leaves that will be buried in the soil when potting up. This helps prevent fungal diseases from developing. For plants with leggy growth, like sunflowers or beans, cut back the top set of leaves to encourage bushy growth.
Use soft ties or plant clips to provide support for seedlings with weak or fragile stems. You can also use stakes to prop up tall plants. Gently tie the stem to the stake using a soft material like twine or cloth. This will help prevent damage during handling and give the plant stability in its new pot. Regular pruning and training will ensure your seedling grows strong and healthy, ready for the next stage of development.
Potting Up: A Step-by-Step Guide
Now that your seedlings have outgrown their pots, it’s time to give them some extra space to thrive. This step-by-step guide will walk you through potting up your seedlings with ease.
Preparing the Soil Mix
When it comes to potting up seedlings, one of the most critical steps is preparing the soil mix. A well-balanced soil mix is essential for providing your seedlings with the right balance of nutrients, water retention, and aeration.
To create an ideal soil mix, you’ll want to combine ingredients like peat moss, perlite, and vermiculite. Peat moss helps retain moisture in the soil while also providing acidity that most plants prefer. Perlite, on the other hand, improves drainage and prevents waterlogged soil, which can be detrimental to seedlings.
Vermiculite is another key component, as it retains moisture without making the soil too dense or compacted. Aim for a mix of 40% peat moss, 20% perlite, and 10% vermiculite. This blend will provide your seedlings with the necessary support to thrive.
Remember to use sterile ingredients and avoid overmixing the soil, as this can cause compaction and harm your seedlings’ roots.
Handling Seedlings with Care
When handling seedlings with care, it’s essential to be gentle and deliberate to prevent damage. Start by gently removing the seedling from its tray or cell pack, taking care not to disturb the roots. If the seedling is stuck, run a knife or spatula around the edges to loosen it.
Next, inspect the roots for any tangles or knots. Use your fingers or a small tool to carefully tease out any twisted roots without causing unnecessary stress to the plant. Be mindful of the soil’s moisture level, as dry soil can be brittle and prone to breaking.
To minimize shock, handle seedlings by their leaves rather than their stems. This will also help you avoid accidentally crushing or damaging the stem. When placing the seedling in its new pot, position it at the same depth as before, taking care not to compact the soil excessively. Gently firm the soil around the roots using your fingers or a blunt instrument.
By following these steps and handling seedlings with care, you’ll give them the best chance of thriving after being potted up.
Transplant Shock Prevention
When transplanting seedlings, it’s crucial to take steps to prevent transplant shock, a common issue that can weaken your young plants. Let’s explore some essential tips for successful transplanting.
Reducing Stress on Young Plants
When potting up seedlings, one of the most significant challenges they face is transplant shock. This occurs when a young plant’s roots are disturbed during the transition from its original container to a new one, causing stress and potentially stunting its growth.
To minimize the effects of transplant shock, it’s essential to handle your seedlings with care. Start by acclimating them to outdoor conditions gradually. Begin by moving them to a shaded area outdoors for 1-2 hours a day, then increase the duration over time. This will help them adjust to natural light and temperature fluctuations.
Another crucial step is to harden off your seedlings before transplanting them into their final position. This involves keeping them in a protected location, such as a cold frame or greenhouse, for 7-10 days before exposing them to full sun and wind. By doing so, you’ll reduce the shock of being transplanted outdoors.
Some key considerations when hardening off seedlings include monitoring temperature fluctuations and providing sufficient moisture to prevent drought stress.
Providing Adequate Care After Potting
Providing adequate care after potting is crucial to prevent transplant shock and ensure your seedlings thrive. Watering schedules play a significant role here. Immediately after potting, water the seedling thoroughly until the soil feels moist but not soggy. This will help settle the roots in their new container.
In the first week, water every 2-3 days to keep the soil consistently moist. However, as your seedlings grow and adapt, reduce watering frequency. Overwatering is a common mistake that can lead to root rot and other issues, so be cautious with the amount of water you provide.
Fertilization is another critical aspect of post-potting care. Use a balanced, water-soluble fertilizer (10-10-10 N-P-K) at half the recommended strength for seedlings. Apply it once a week, but skip fertilizing during periods of rapid growth or when seedlings are stressed.
Lastly, keep an eye out for pests like aphids, whiteflies, and spider mites, which can infest your seedlings quickly. Inspect them regularly, and treat any issues promptly with neem oil or insecticidal soap to prevent pest populations from getting out of control.
Common Challenges When Potting Up Seedlings
As you work on potting up your seedlings, it’s inevitable that you’ll encounter some common challenges along the way, like root shock and transplant trauma. Let’s tackle these issues together.
Overwatering and Underwatering
When potting up seedlings, it’s easy to get carried away with watering them. Overwatering and underwatering are two common challenges that can hinder the growth of your seedlings. Both conditions can be detrimental to the health of your plants.
Signs of overwatering include yellowing leaves, soft stems, and water pooling around the base of the plant. If you notice these symptoms, it’s essential to adjust your watering schedule immediately. To correct overwatering, allow the top inch of soil to dry out between waterings. You can also repot the seedling in fresh, well-draining mix to prevent waterlogged soil.
On the other hand, signs of underwatering include crispy leaves and wilted stems. If you suspect your seedlings are thirsty, check the soil moisture by inserting your finger into the soil up to the knuckle. If it feels dry, it’s time to water. Make sure to water thoroughly, but avoid getting water on the leaves to prevent fungal diseases.
By recognizing these signs and adjusting your watering habits accordingly, you can prevent damage and ensure your seedlings thrive. Regular monitoring of your plants’ moisture levels will help you find a balance that works for them.
Pest Infestations and Diseases
When potting up seedlings, it’s essential to monitor for common pests and diseases that can quickly spread and devastate your plants. One of the most notorious culprits is spider mites, tiny arachnids that feed on sap, causing yellowing or bronzing leaves. To identify them, look for fine webbing on stems or soil surfaces.
Mealybugs are another common pest, easily recognizable by their white, cottony coating on leaves and stems. They secrete a sticky substance called honeydew, which can attract ants and promote fungal growth. Inspect your seedlings carefully, checking the undersides of leaves and around leaf nodes for these pesky critters.
Root rot is often caused by overwatering or poor drainage, leading to a range of symptoms, including yellowing leaves, soft stems, and a mushy texture. To prevent root rot, ensure good air circulation, use well-draining potting mix, and water judiciously, taking care not to get water on leaves.
Regular monitoring and prompt action can save your seedlings from pest infestations and diseases.
Troubleshooting and Common Issues
Don’t worry if you encounter problems while potting up your seedlings, we’ve got some helpful tips to troubleshoot common issues that can arise. These solutions will get your plants back on track in no time.
Identifying Problems Early
As you pot up your seedlings, it’s essential to keep an eye out for potential problems. Monitoring them regularly will help you catch any issues early on, preventing more severe damage down the line.
Some common signs of stress or disease to watch out for include:
* Yellowing or droopy leaves
* Soft, mushy stems
* White powdery patches or black spots on leaves
* Wilting or sudden drops in temperature
Keep an eye out for pests like aphids, spider mites, and mealybugs, which can cause damage to your seedlings. Regularly inspect the undersides of leaves and stems for eggs, larvae, or other signs of infestation.
Check the soil moisture daily, ensuring it’s not too dry or waterlogged. Overwatering is a common mistake that can lead to root rot and kill your seedlings quickly. By being vigilant and catching these issues early on, you’ll be able to intervene before they cause long-term damage.
Addressing Specific Problems
When potting up seedlings, it’s not uncommon to encounter specific problems that can be frustrating and costly. Fungal diseases such as root rot and leaf spot are common issues that arise from overwatering, poor air circulation, or contaminated soil. To prevent these problems, ensure your seedling is being watered correctly – check the soil moisture before watering, and avoid getting water on the leaves to minimize risk of infection.
Nutrient deficiencies can also occur if the seedling potting mix lacks essential nutrients or if the plants are not receiving adequate light. Look for signs such as yellowing leaves or stunted growth, which may indicate a lack of nitrogen, phosphorus, or potassium. You can use a balanced fertilizer to provide necessary nutrients, but be careful not to overfertilize.
Mechanical damage during potting up is another common issue. When handling seedlings, be gentle and minimize root disturbance to prevent injury. Avoid over-pruning roots or stems, as this can cause significant stress to the plant. If you do accidentally damage a seedling, treat the affected area with a fungicide to prevent infection.
To further reduce risk of mechanical damage, consider using a potting mix specifically designed for seedlings, which is usually more gentle on delicate roots. Additionally, use a gentle yet firm touch when handling seedlings, taking care not to bruise or bend stems.
Conclusion: Caring for Seedlings After Potting
Now that your seedlings are potted up, it’s essential to provide them with proper care to ensure they continue to thrive in their new containers. This section offers guidance on providing optimal conditions for your seedlings’ growth and development.
Recap and Review
Now that you’ve successfully potted up your seedlings, let’s take a moment to review the key takeaways from this step-by-step guide. Choosing the right container is crucial; consider using biodegradable pots or cell packs to minimize transplant shock and reduce waste. When preparing soil mixes, combine high-quality potting mix with organic matter like compost or worm castings for optimal drainage and fertility.
Preventing transplant shock is also essential to give your seedlings a strong start in their new home. To do this, avoid overwatering the day before transfer, and instead, provide your seedlings with bright, indirect light for 24-48 hours prior to potting up. This gentle acclimation period will help reduce stress on your plants.
By following these best practices and incorporating them into your potting routine, you’ll be well on your way to raising healthy, thriving seedlings that are sure to grow strong and robust in their new containers. Remember to observe your seedlings closely and make adjustments as needed – with time and patience, you’ll develop the skills to become a master seedling caretaker!
Ongoing Care and Maintenance
As you’ve successfully potted up your seedlings, it’s time to shift focus from initial care to ongoing maintenance. This is a crucial phase where consistent attention and care will determine their growth trajectory. To ensure your seedlings continue thriving, establish a routine that includes:
Regular watering: Check the soil daily, and water only when the top inch feels dry to the touch. Overwatering can be detrimental, so monitor your seedlings’ response.
Provide sufficient light: Most seedlings need bright, indirect light for 12-14 hours a day. Be prepared to adjust their position or supplement with grow lights if necessary.
Monitor temperature fluctuations: Avoid placing seedlings near heating vents, radiators, or drafty areas. Maintain a consistent temperature between 65-75°F (18-24°C) during the day and no lower than 55°F (13°C) at night.
Fertilize sparingly: A balanced fertilizer applied once a month will suffice until your seedlings mature. Avoid overfertilizing, which can cause more harm than good.
By sticking to these guidelines, you’ll be well on your way to nurturing healthy, robust seedlings that are ready for the next stage of their growth journey.
Frequently Asked Questions
Can I pot up seedlings at any time of the day, or is there a best time for transplanting?
The best time to pot up seedlings is when they’re most active, which is usually during the cooler morning hours or late afternoon. Avoid transplanting during peak sun hours (usually between 11am and 3pm) to prevent further stress on the young plants.
How often should I water my newly potted seedlings, and how can I tell if they need it?
Water your newly potted seedlings gently but thoroughly after potting up. For the first week or two, check the soil daily by sticking your finger into the top inch of the soil. Water when the soil feels dry to the touch, usually every 2-3 days in warm weather.
What are some common mistakes beginners make when potting up seedlings, and how can I avoid them?
Common mistakes include overwatering, underwatering, and not providing enough light for young plants. To avoid these issues, ensure you’re using a well-draining soil mix, water carefully, and provide sufficient indirect light for your seedlings.
Can I reuse the original potting mix from my seed starting cells in my new containers, or do I need to use a fresh mix?
It’s generally recommended to start with a fresh, high-quality potting mix when potting up seedlings. Reusing old potting mix can lead to nutrient deficiencies and poor root growth.
How long should it take for my seedlings to adjust to their new containers after potting them up, and what signs indicate they’re adapting well?
Seedlings usually take 1-2 weeks to fully adjust to their new containers. Look for signs of healthy growth, such as new leaves unfurling, increased stem elongation, or a robust root system. If you notice stunted growth or yellowing leaves, it may be a sign that your seedlings need more time to adapt.