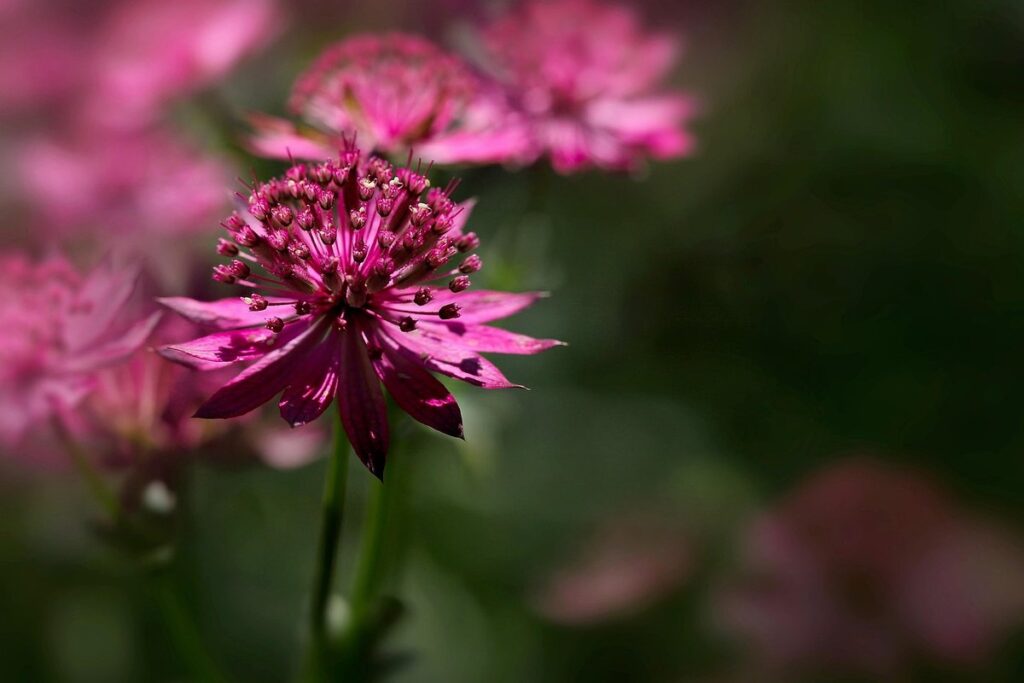
Are you ready to add some drama and elegance to your garden with stunning astrantia flowers? These perennials are perfect for adding a pop of color and texture to your outdoor space, but can be intimidating if you’re new to gardening. With their unique blooms and architectural foliage, it’s no wonder astrantia has become a popular choice among gardeners.
In this comprehensive guide, we’ll walk you through the basics of planting and caring for astrantia perennials. From choosing the right soil and climate conditions to tips on watering and propagation, we’ve got you covered. By following our expert advice, you’ll be able to grow healthy, thriving astrantia flowers that will add a touch of sophistication to your garden. Whether you’re a seasoned gardener or just starting out, this guide is perfect for anyone looking to bring these beautiful plants into their outdoor space.
Choosing the Right Location for Your Astrantia
When selecting a spot for your astrantia, consider its full-grown height and spread to ensure it won’t overcrowd nearby plants. Also, think about the amount of sunlight and shade your location receives.
Understanding the Soil Requirements of Astrantia
When it comes to planting astrantia, understanding its soil requirements is crucial for optimal growth and blooming. Astrantia prefers moist, well-draining soil with a slightly acidic pH. This may seem like a tall order, but don’t worry, it’s easier than you think.
First, let’s talk about the importance of drainage. Astrantia doesn’t like wet feet, so make sure your soil has good water penetration and aeration. You can achieve this by adding organic matter like compost or well-rotted manure to your soil. This will help improve its structure and ability to absorb excess moisture.
As for pH levels, astrantia thrives in slightly acidic conditions, with an optimal range between 6.0 and 7.0. If you’re unsure about your soil’s pH level, consider getting a soil test kit or consulting with a local nursery expert. To lower the pH if it’s too high, add elemental sulfur or peat moss to your soil. Remember, small adjustments can make a big difference in your astrantia’s overall health and beauty.
By replicating astrantia’s natural habitat in terms of moisture and acidity, you’ll be well on your way to growing these stunning flowers in your garden.
Selecting the Ideal Climate for Astrantia Growth
When it comes to choosing the right location for your Astrantia, selecting an ideal climate is crucial for its growth and development. Astrantia thrives in temperate climates with moderate temperatures and humidity levels. In these conditions, the plant can reach its full potential, producing beautiful flowers and foliage.
Temperatures between 65°F (18°C) and 75°F (24°C) are perfect for Astrantia growth. Avoid extreme heat or cold, as this can cause stress to the plant. A moderate humidity level of around 50-60% is also ideal. This allows the plant to absorb moisture without suffering from overwatering.
In regions with harsh winters, provide protection for your Astrantia by mulching or bringing it indoors during the colder months. Conversely, in areas with hot summers, ensure adequate shade and watering to prevent scorching and drought. By understanding and replicating these temperate conditions, you’ll be able to create a suitable environment for your Astrantia to flourish.
In USDA Hardiness Zones 4-8, Astrantia can be grown outdoors year-round. However, in zones with colder winters (below zone 4), consider container growing or bringing the plant indoors during winter to safeguard its survival.
Planting Astrantia: A Step-by-Step Guide
To successfully plant astrantia, follow these easy steps to ensure your flowers get off to a healthy start and thrive in their new environment. We’ll walk you through each stage.
Preparing the Soil for Planting Astrantia
Before planting astrantia, it’s essential to prepare the soil to ensure optimal growth and blooming. Start by loosening the soil to a depth of about 12-18 inches using a fork or spade. This will help break up any compacted soil and allow roots to grow freely. If your soil is heavy clay or sandy, you may need to add organic matter like compost or well-rotted manure to improve its structure.
Check the drainage in your garden bed by digging a small hole about 6 inches deep. Fill it with water, and if it drains within an hour or less, your soil’s drainage is likely sufficient. However, if it takes longer than two hours to drain, consider adding organic matter to help improve drainage. Also, avoid planting astrantia in areas where water tends to collect, as this can lead to root rot.
To ensure the best results, test your soil pH and adjust it if necessary. Astrantia prefers a slightly acidic to neutral soil pH (around 6.0-7.0). If your soil is too alkaline, add elemental sulfur or peat moss to lower the pH. Finally, rake the soil to create a smooth surface for planting, making sure to remove any debris or weeds that could compete with your astrantia.
Planting Astrantia Seeds or Seedlings
Planting astrantia seeds directly into the ground can be a cost-effective and rewarding way to grow these beautiful flowers. In early spring, when the soil is workable but still quite cool, you can sow the seeds about 1-2 inches deep and 6-12 inches apart. Make sure the area receives full sun to partial shade and has well-draining soil with a pH between 6.0 and 7.0.
If your astrantia seeds don’t germinate within a few weeks, you can try stratifying them in the fridge for 30 days before planting. This process mimics winter conditions and can help break seed dormancy.
Alternatively, you can purchase seedlings from a nursery or garden center and transplant them into your garden later in spring when the danger of frost has passed. Harden off the seedlings by gradually exposing them to outdoor conditions over the course of 7-10 days before transplanting. Plant them about 12 inches apart, making sure the crown (where the stem meets the roots) is level with the soil surface.
Keep in mind that seedlings may require more care than directly sown seeds, as they are more susceptible to shock and disease.
Care and Maintenance of Astrantia Plants
To keep your astrantia plants thriving, you’ll want to focus on proper care and maintenance, including watering and pruning techniques. Let’s dive into these essential details together.
Watering and Irrigation for Healthy Astrantia Growth
Watering and irrigation are crucial aspects of astrantia care, particularly during their growing season. Astrantia plants require consistent moisture to produce lush foliage and vibrant blooms. However, overwatering can lead to root rot, a condition that’s detrimental to the plant’s health.
To water your astrantia correctly, allow the soil to dry slightly between each watering session. This will help prevent waterlogged roots. Water deeply but infrequently, making sure the soil is moistened to a depth of about 6-8 inches. During periods of drought or hot weather, increase the frequency of watering.
You can also take advantage of rainwater collection by placing a rain barrel under your plant’s drip line. This will provide a natural and free source of water for your astrantia. When irrigation is necessary, use a soaker hose or a fine spray nozzle to deliver moisture directly to the roots.
Remember that different regions have varying weather conditions. Adjust your watering schedule accordingly based on factors such as soil type, climate, and temperature fluctuations.
Mulching and Fertilizing Astrantia Plants
Mulching and fertilizing are essential care practices for astrantia plants to ensure their healthy growth and flowering. Mulch helps retain moisture around the plant’s roots, reducing the need for frequent watering. It also suppresses weeds that can compete with astrantia for nutrients and water. Organic mulch like wood chips or bark is a good choice as it breaks down slowly, releasing nutrients into the soil.
When fertilizing astrantia plants, use a balanced plant food that contains nitrogen (N), phosphorus (P), and potassium (K) in the ratio of 10-10-10. Fertilize once in spring when new growth starts and again after blooming to promote healthy foliage and encourage repeat flowering. Dilute the fertilizer to half the recommended strength to avoid burning the roots.
Remember, astrantia plants are low-maintenance, so don’t over-fertilize. Too much nitrogen can lead to weak stems and fewer flowers. Also, make sure to mulch around the plant’s crown, not touching it directly to prevent rotting. This simple care routine will help your astrantia thrive and provide you with a stunning display of white, pink, or red flowers throughout the summer months.
Common Issues with Astrantia: Troubleshooting Tips
If you’re new to growing astrantia, you might encounter some unexpected challenges that can make or break your plants’ success. This section addresses common issues and offers practical troubleshooting tips to get your blooms back on track.
Identifying and Addressing Overwatering in Astrantia
Overwatering can be a major problem when it comes to Astrantia plants. One of the most common issues that arises from excessive watering is root rot, which occurs when the roots of the plant start to decay due to prolonged exposure to waterlogged soil. This can lead to the death of the plant if left unchecked.
To identify if your Astrantia is suffering from overwatering-induced root rot, look out for yellowing or droopy leaves, a soft and mushy stem, and a foul odor emanating from the soil. If you catch it early, there’s still hope for recovery. Here are some steps to take:
* Reduce watering immediately to allow the soil to dry out slightly.
* Inspect the roots by gently removing the plant from its pot. If they’re soft and mushy, prune them back with sterile scissors or pruning shears.
* Repot the Astrantia in a well-draining potting mix and provide good air circulation around the roots.
By being mindful of watering schedules and soil conditions, you can prevent root rot and keep your Astrantia plants healthy.
Managing Pests and Diseases Affecting Astrantia Plants
Astrantia plants are indeed beautiful additions to any garden, but they can be susceptible to certain pests and diseases that may hinder their growth. One of the most common issues you might encounter is powdery mildew, a fungal disease that causes a white, powdery coating on the leaves. This can be especially prevalent in humid or rainy climates.
To prevent powdery mildew, ensure good air circulation around your plants and avoid watering them from above, which can create a moist environment conducive to fungal growth. Regularly inspect your plants for signs of infestation, such as yellowing or distorted leaves, and treat promptly with a fungicide if necessary.
In addition to powdery mildew, you may also encounter slugs and snails, slimy pests that feed on the leaves and flowers of astrantia plants. These nocturnal critters are often most active at night, so keep an eye out for them after dark by gently shining a flashlight over the plant’s foliage.
To manage slug and snail populations, use physical barriers like copper tape or crushed eggshells around the base of your plants to deter these pests. Alternatively, set up a beer trap to lure slugs and snails away from your garden.
Propagating and Dividing Astrantia Plants
To keep your astrantia collection thriving, it’s essential to propagate new plants regularly by division. This process is relatively simple and can be done at any time during the growing season.
Propagation Methods for Astrantia: Seeds and Cuttings
When it comes to propagating new astrantia plants, you have two primary methods: seeds and cuttings. Propagation from seed is a more time-consuming process that requires patience, but it’s also a great way to get multiple plants from a single packet of seeds.
To propagate from seed, start by sowing them indoors 8-10 weeks before the last frost date in your area. Sow the seeds about 1/4 inch deep and 1 inch apart in a good quality potting mix. Keep the soil consistently moist but not waterlogged, as this can lead to rot and poor germination rates.
On the other hand, cuttings are a faster method that produces more reliable results. Take stem cuttings from established plants in late spring or early summer when they’re actively growing. Cut 3-4 inch sections of stem just below a node (where a leaf meets the stem), and remove lower leaves to prevent moisture loss. Plant the cuttings in well-draining potting mix, firming the soil gently around them. Water thoroughly and keep the soil consistently moist until roots develop.
Both methods require careful attention to detail, but with the right conditions and care, you should be able to successfully propagate new astrantia plants.
Dividing Established Astrantia Clumps
When it’s time to divide established astrantia clumps, spring and autumn are ideal seasons for this process. As the plant goes dormant during these periods, dividing it will cause minimal stress. Start by carefully digging up the entire clump, making sure to get as much of the roots as possible.
Use a fork to gently tease apart the roots, working from the outside in. This is where patience comes into play – take your time and be gentle to avoid damaging any of the delicate root hairs. Once you’ve separated individual plants or smaller clumps, trim back the foliage by about half to help the plant focus its energy on establishing new growth.
Replant your divided astrantia in a location with well-draining soil, making sure the crown (where the stem meets the roots) is level with the surrounding soil. Water thoroughly and keep the soil consistently moist during the first growing season after replanting. With proper care, these newly established plants should thrive and provide years of beauty in your garden.
Designing with Astrantia: Tips and Ideas for Gardeners
To get the most out of your astrantia plants, let’s dive into some creative ways to incorporate them into your garden design, from dramatic cut flower arrangements to understated border elements.
Using Astrantia in Perennial Borders and Containers
When it comes to incorporating astrantia into your garden design, perennial borders and containers are two excellent options for showcasing these stunning flowers. In a perennial border, astrantia can add a dramatic pop of color and texture among other plants with different growth habits and bloom times.
For a striking display in a container, choose a large planter or tub that’s at least 12-18 inches deep to accommodate the plant’s taproot. Combine astrantia with complementary plants like ornamental grasses, sedum, or daylilies that thrive in similar conditions and add contrasting foliage textures.
Consider using a mix of tall and short plants to create a layered look in your container garden. For example, place taller stems like ornamental grasses or delphiniums towards the back, while placing shorter plants like astrantia or creeping thyme at the front.
When planting astrantia in containers, be mindful of their water needs. Make sure the pot has good drainage holes and use a well-draining potting mix to prevent root rot.
Combining Astrantia with Other Ornamental Plants
When it comes to designing with astrantia, one of the best ways to add visual interest and create stunning displays is by pairing it with other flowering perennials or grasses. This is where the art of combination planting comes into play.
For a dramatic look, try pairing astrantia with bold-colored blooms like peonies, poppies, or delphiniums. These plants share similar growth habits and bloom times, making it easy to create a cohesive look in your garden. For example, combine astrantia with vibrant pink peonies for a romantic and whimsical feel.
If you want to add some movement and texture to your display, consider pairing astrantia with ornamental grasses like fountain grass or pampas grass. These tall, feathery plants provide a beautiful contrast to the delicate, airy blooms of astrantia. For instance, pair astrantia with blue oat grass for a striking combination that adds depth and visual interest to your garden.
Remember to choose plants that share similar growing conditions and light requirements to ensure they thrive together. With a little creativity, you can create stunning displays that showcase the beauty of astrantia in new and exciting ways.
Conclusion: Enjoying the Benefits of Growing Astrantia
Now that you’ve successfully grown your astrantias, let’s explore the joys of enjoying their beautiful blooms and learning how to make the most of this wonderful perennial.
The Rewards of Growing Astrantia in Your Garden
Growing astrantia in your garden can be a truly rewarding experience. Not only do these beautiful flowers add a pop of color and texture to your outdoor space, but they also attract pollinators like bees and butterflies, which are essential for a healthy ecosystem.
One of the most unique features of astrantia is its show-stopping flowers. These blooms come in a variety of colors, including pink, white, purple, and red, and have a delicate, star-shaped appearance that’s sure to catch your eye. But what really sets them apart is their ability to attract pollinators like bees and butterflies.
Studies have shown that astrantia flowers are particularly attractive to solitary bees, which are crucial for pollinating many crops, including tomatoes, peppers, and eggplants. By growing astrantia in your garden, you’re not only adding beauty to your outdoor space but also contributing to the health of your local ecosystem.
Astrantia’s foliage is another reason why it’s a great addition to any garden. Its slender stems and delicate leaves are perfect for adding a touch of whimsy and texture to your planters or borders. Plus, the flowers themselves are long-lasting, blooming from mid-summer to early fall, which means you’ll enjoy their beauty for months on end.
To get the most out of growing astrantia in your garden, be sure to provide it with plenty of sunlight and well-draining soil. This will help ensure that its flowers and foliage stay healthy and vibrant all season long. With a little care and attention, astrantia is sure to become one of your favorite additions to your outdoor space.
Frequently Asked Questions
How do I handle astrantia plants that are not blooming as expected?
If your astrantia plants are not producing blooms, check their soil pH levels and adjust if necessary. Make sure they’re receiving enough sunlight (at least 4-6 hours of direct sun) and watering them correctly to maintain moist but well-draining soil conditions.
Can I grow astrantia in containers or do they need to be planted directly in the ground?
Yes, you can grow astrantia in containers. Choose a container that is at least 12-18 inches deep to accommodate the plant’s roots. Use a high-quality potting mix and ensure good drainage holes to prevent waterlogged soil.
How often should I divide and propagate my established astrantia clumps?
Divide and propagate your established astrantia clumps every 3-4 years to maintain their health and vigor. Spring or fall are the best times for division, when the plant is actively growing. Cut back old foliage before dividing, and replant the new sections in well-draining soil.
Can I use mulch around my astrantia plants to retain moisture and suppress weeds?
Yes, using a thin layer of organic mulch (like wood chips or bark) can help retain moisture and suppress weeds around your astrantia plants. However, keep it a few inches away from the base of the plant to prevent rotting.
How do I protect my astrantia plants from pests like slugs and snails?
To protect your astrantia plants from pests like slugs and snails, use copper tape or crushed eggshells around the base of the plant. You can also hand-pick them in the early morning when they are most active. Consider using organic pest control methods to maintain a healthy ecosystem in your garden.