Spring is in the air, and with it comes the excitement of planting those gorgeous spring bulbs that will bloom into vibrant displays of color in your garden. But have you ever wondered when to plant tulips, daffodils, and hyacinths for optimal blooming? The timing can be crucial, as planting too early or late can impact their growth and beauty.
As a gardener, knowing the right time to plant spring bulbs is essential for a stunning display of flowers in your garden. In this comprehensive guide, we’ll walk you through the process of determining when to plant spring bulbs based on climate zones, soil preparation, and aftercare tips. We’ll explore the best planting times, how to prepare the soil, and what to do once they’ve bloomed to ensure a healthy and thriving display of flowers every year.
Choosing the Right Bulb Selection
When selecting bulbs, consider factors like bloom time, color palette, and hardiness zone to ensure you choose varieties that will thrive in your specific garden conditions. Choose a mix of early, mid-season, and late-blooming bulbs for year-round interest.
Understanding Types of Spring-Blooming Bulbs
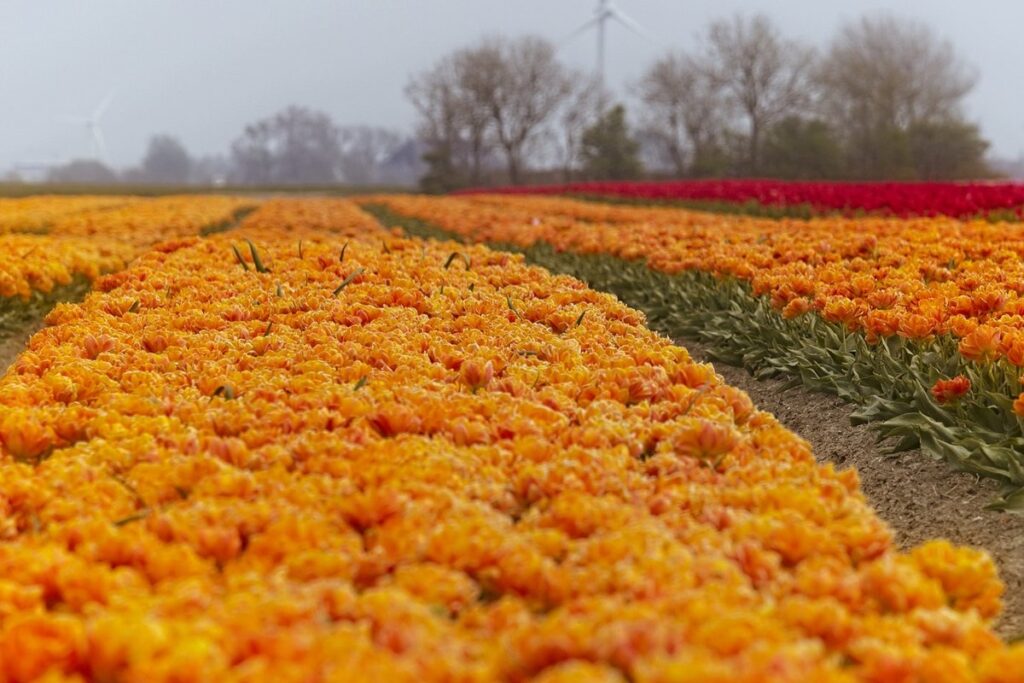
When it comes to spring-blooming bulbs, there are several types to consider, each with its own unique characteristics and growing conditions. One of the most popular types is tulips, which come in a wide range of colors and varieties. These bulbs prefer well-draining soil and full sun to partial shade, making them perfect for gardens with plenty of sunlight.
Daffodils are another popular choice, known for their trumpet-shaped blooms and ability to naturalize over time. They thrive in areas with full sun to partial shade and require minimal maintenance once planted. Hyacinths, on the other hand, produce fragrant flowers that attract pollinators and hummingbirds. These bulbs prefer well-draining soil and full sun to partial shade.
Crocuses are some of the smallest spring-blooming bulbs, but they pack a punch with their vibrant colors and early blooms. They require minimal maintenance and can thrive in areas with poor soil quality. When selecting these types of bulbs, consider the specific growing conditions and bloom times to ensure you’re planting at the right time for maximum impact.
In general, tulips and daffodils tend to bloom later in the spring season, typically around late March to early May, while hyacinths and crocuses often bloom earlier, from February to April.
Factors to Consider When Selecting Bulbs
When selecting spring bulbs, there are several key factors to consider to ensure they thrive in your specific region and microclimate. First and foremost, think about the climate where you live. If you’re in a cooler zone, such as USDA Hardiness Zones 3-5, choose bulbs that are specifically bred for these conditions, like tulips, daffodils, or hyacinths. In warmer zones (Zones 6-8), opt for heat-tolerant varieties like azaleas, rhododendrons, or daylilies.
Another crucial consideration is soil type and moisture levels. If your soil drains poorly or tends to be soggy, choose bulbs that prefer wet conditions, such as snowdrops or grape hyacinths. For well-draining soils, opt for bulbs like crocuses or scilla. Be mindful of sunlight requirements too – some bulbs, like daffodils and tulips, need full sun, while others, like winter aconite and snowdrops, prefer partial shade.
Consider your specific region’s microclimate as well – coastal areas tend to be cooler and more humid than inland regions. Take these factors into account when selecting the perfect spring bulbs for your garden.
Preparing the Soil for Spring Bulbs
Before you start planting spring bulbs, it’s crucial to prepare your soil properly to give them a healthy foundation for growth and blooming. We’ll walk through the steps to create an optimal environment.
Fall Preparation is Key
As you’re planning for spring bulb planting, it’s easy to overlook the importance of fall preparation. However, this crucial step sets the stage for optimal growth and blooming come springtime. The fall season is the perfect opportunity to give your soil a makeover before winter sets in.
Start by digging up any existing plants or debris from the bed. This will allow you to assess the current condition of the soil and make necessary adjustments. Next, loosen the soil with a fork or spade, breaking up any clods and aerating the bed. This simple task promotes healthy drainage, reduces the risk of waterlogging, and encourages root growth.
Now it’s time to add some organic matter to the mix. Mix in a 2-3 inch layer of compost, well-rotted manure, or aged leaf mold. These natural materials enrich the soil with nutrients, improve its structure, and support beneficial microbial activity. By investing just a little effort into fall preparation, you’ll be rewarded with vibrant blooms and healthy growth come spring.
Soils that Need Special Attention
When preparing the soil for spring bulbs, some types of soil require extra care and attention. If you have clay-heavy soils, it’s essential to improve drainage to prevent waterlogged conditions that can lead to rot and poor bulb growth. To do this, mix in compost or well-rotted manure to help break down clay particles and increase the soil’s porosity.
Sandy soils, on the other hand, may require more organic matter to hold moisture and nutrients. Adding a 2-inch layer of mulch or compost can help improve water retention and reduce erosion. Areas with poor drainage often have compacted soil, which can be alleviated by digging in some perlite or grit to increase air pockets.
Another area that needs special attention is heavy clay soils, especially those prone to waterlogging. These conditions are ideal for bulbs like tulips, daffodils, and hyacinths, but without proper care, they may not perform well. To address this issue, create a raised bed or mound the soil, allowing excess water to drain freely.
For particularly challenging areas with both clay and poor drainage, consider installing French drains or reconfiguring the garden layout to ensure optimal water flow. Regularly checking the soil’s moisture levels will also help you determine when to water bulbs in these conditions.
Planting Spring Bulbs at the Right Time
To ensure your spring bulbs bloom beautifully, timing is crucial: we’ll explore the ideal planting periods for different types of bulbs in this next section.
Understanding Climate Zones and Frost Dates
When planting spring bulbs, it’s essential to consider your climate zone and local frost dates. Climate zones are determined by average temperature and precipitation patterns, which can significantly impact the timing of bulb planting. In general, bulbs planted too early may not have sufficient time to establish themselves before winter, while those planted too late may be exposed to excessive heat stress.
In regions with mild winters (USDA Hardiness Zones 9-11), spring bulbs like tulips and daffodils can be planted as soon as the soil is workable in fall or early winter. For areas with moderate winters (Zones 4-8), planting typically occurs in late fall to early winter, around October or November.
To determine your local frost dates, check a reliable weather source or consult with a nursery expert. Frost dates can vary significantly depending on elevation and proximity to large bodies of water. A good rule of thumb is to plant bulbs about 6-8 weeks before the last frost date in your area. This allows the bulb roots to establish themselves before winter, ensuring healthy growth come spring.
Keep in mind that these are general guidelines, and specific conditions may vary depending on your location. Research local weather patterns and consult with gardening experts to determine the best planting times for your area.
How to Know When It’s Safe to Plant
Before you start planting those beautiful spring bulbs, it’s essential to determine if the soil and weather conditions are suitable for their growth. A crucial step in this process is checking the soil temperature.
Soil temperature plays a vital role in bulb germination and growth. Typically, spring bulbs require a minimum of 40°F (4°C) for tulips, daffodils, and hyacinths to start growing. You can use a soil thermometer to check the temperature. If it’s still too cold, wait for a few more days or weeks until the soil warms up.
Another way to gauge if it’s safe to plant spring bulbs is by monitoring weather forecasts. Avoid planting when there’s a risk of frost in your area. A general rule of thumb is to plant 2-4 weeks after the last frost date. You can check local gardening forums, social media groups, or consult with neighbors to get an idea of when it’s safe to start planting.
Finally, observe what’s already blooming in your garden and surrounding areas. If you notice early bloomers like crocuses, winter aconite, or snowdrops pushing through the soil, that’s usually a sign it’s time to plant other spring bulbs.
Aftercare and Maintenance for Spring Bulbs
Now that you’ve planted your spring bulbs, it’s time to think about how to keep them looking their best throughout their blooming season. In this section, we’ll cover essential aftercare and maintenance tips to ensure they thrive.
Watering and Mulching Habits
When it comes to aftercare and maintenance for spring bulbs, proper watering and mulching habits are essential for healthy bulb growth. Over-watering is a common mistake that can lead to rotting bulbs, while under-watering can cause them to dry out. To strike the right balance, water your spring bulbs when the top 2-3 inches of soil feels dry to the touch.
Mulch plays a crucial role in retaining moisture and suppressing weeds. Apply a thin layer (about 1-2 inches) of organic mulch such as wood chips or bark around the base of your spring bulbs. This will also help regulate soil temperature, keeping it cooler during hot summer days. Remember to reapply mulch annually, as it breaks down over time.
After blooming, allow the foliage to die back naturally. Resist the temptation to cut back the leaves too soon, as this can weaken the bulb for next year’s bloom. Instead, wait until the foliage has turned yellow and begun to wilt before carefully removing any dead or dying leaves. By following these simple aftercare practices, you’ll be well on your way to enjoying healthy, thriving spring bulbs in your garden for years to come.
Deadheading and Staking
Deadheading and staking are crucial steps in aftercare and maintenance for spring bulbs. As spent flowers begin to wilt and fade, it’s essential to remove them to encourage repeat flowering and promote good plant health.
Deadheading involves removing the dead flower heads from the stem, just above a leaf node. This simple process not only enhances the appearance of your garden but also directs the plant’s energy towards producing new blooms rather than seed production. For example, tulips that are left undeadheaded may focus their energy on producing seeds, reducing the likelihood of repeat flowering.
Tall spring bulbs like daffodils and hyacinths often require staking to prevent them from toppling over in the wind. Use stakes or supports to gently tie the stems to a nearby plant or trellis, making sure not to damage the bulb or its roots. This will help maintain the plant’s structural integrity while allowing it to continue producing flowers.
Tips for Troubleshooting Common Issues
If you’re experiencing issues with your spring bulb planting, don’t worry – we’ve got you covered. This section will walk you through common problems and their easy fixes.
Addressing Root Rot and Other Problems
If you notice that your spring bulbs are struggling due to root rot, pests, or diseases, it’s essential to address these issues promptly. Root rot often occurs when bulbs are overwatered or planted too deeply, causing the roots to decay. To prevent this, make sure to plant bulbs at the correct depth and water them sparingly until they’re established.
If you do encounter root rot, carefully dig up the affected bulb, remove any damaged tissue, and treat the remaining healthy portion with a fungicide. Plant the treated bulb in fresh soil, taking care not to overwater it. Regularly inspect your bulbs for signs of pests like mice, voles, or slugs, which can damage bulbs while they’re dormant.
Common diseases affecting spring bulbs include tulip fire (a fungal infection), botrytis (a fungal disease causing gray mold), and powdery mildew (a fungal disease that appears as a white powder). To prevent the spread of these diseases, remove any infected leaves or flowers to prevent spores from dispersing. For existing infections, apply fungicides specifically designed for bulb care.
When inspecting your bulbs, be on the lookout for physical damage like cracks, splits, or broken stems. Handle bulbs gently to avoid causing further damage, and trim off any damaged areas with a sterile tool to promote healthy growth.
Encouraging Repeat Flowering
Encouraging repeat flowering in spring bulbs is a great way to extend their blooming period and get more bang for your buck. One of the simplest ways to encourage repeat flowering is through deadheading. This involves removing spent flowers, or blooms that have faded, from the plant as soon as possible after they’ve dropped their petals. Not only does this make your garden look neater, but it also sends a signal to the bulb that it’s time to produce new growth and flowers.
To maximize repeat flowering, you’ll also want to provide optimal growing conditions for your bulbs. This includes making sure they receive plenty of sunlight, as most spring bulbs need at least six hours of direct sun per day to bloom well. You should also ensure that the soil is well-draining and fertile, with a slightly acidic pH that’s suitable for most bulb varieties.
Another important factor in encouraging repeat flowering is staking. This helps support tall plants that may otherwise flop over or become weighed down by their own blooms. Simply insert stakes into the soil next to each plant when they’re still small, and tie them gently to the stake as they grow. By following these simple tips, you can enjoy a longer blooming period from your spring bulbs year after year.
Conclusion
Now that we’ve covered the ins and outs of planting spring bulbs, let’s wrap up by recapping our key takeaways. Here’s a quick summary to help you get growing this season!
Recap of Key Takeaways
To ensure you have a successful spring bulb planting experience, it’s essential to remember these key takeaways. Proper planning is crucial, so let’s recap the most important points.
Timing is everything when it comes to planting spring bulbs. We discussed the ideal time for planting bulbs based on your location and climate. Make sure to plant your bulbs at the right time for your area, typically between September and November in cooler climates. This allows them to establish themselves before winter, resulting in a beautiful bloom come spring.
Another critical aspect of successful bulb planting is soil preparation. We talked about how to choose the right spot with well-draining soil and adequate sunlight. Make sure to loosen the soil to a depth of 8-10 inches, add compost or fertilizer if necessary, and mix it well to give your bulbs a strong start.
Aftercare is just as important as planting itself. We covered the importance of watering during dry spells, mulching around the plants to retain moisture, and deadheading spent flowers to encourage new blooms. Keep in mind that overwatering can be detrimental to spring bulbs, so make sure not to overdo it.
Don’t forget to label your bulb plantings so you can easily identify which types are where. This will come in handy when they’re blooming and you want to enjoy the fruits of your labor.
To sum it up, remember: proper planning, soil preparation, and aftercare will ensure a successful spring bulb planting experience. Take the time to plan ahead, prepare your soil, and care for your bulbs during the growing season. With these key takeaways in mind, you’ll be on your way to enjoying vibrant blooms come spring.
Frequently Asked Questions
What’s the best way to ensure that my spring bulbs are planted at the right depth?
Plant your spring bulbs 2-3 times deeper than their height, and make sure the pointed end is facing upwards. This will help prevent moisture from collecting around the base of the bulb, which can cause rot.
Can I plant spring bulbs in containers or only directly in the ground?
Yes! Spring bulbs can thrive in containers as long as they have well-draining soil and are placed in a location that receives the right amount of sunlight for their specific needs. Just keep in mind that you may need to water them more frequently due to the smaller root system.
What’s the ideal temperature range for planting spring bulbs?
The ideal temperature for planting spring bulbs is around 40-50°F (4-10°C), which is usually around late winter to early spring, depending on your climate zone. Planting too early or late can impact their growth and blooming cycle.
How often should I water my spring bulbs after they’ve finished blooming?
Yes! Spring bulbs still need regular watering even after they’ve finished blooming, as the foliage will continue to grow and need moisture to stay healthy. Water them once a week during dry periods, but make sure not to overwater, which can lead to root rot.
Can I divide and replant spring bulbs that have finished blooming?
Yes! Spring bulbs like tulips, daffodils, and hyacinths can be divided and replanted every 3-4 years to maintain their vigor. Choose a time when the foliage has died back naturally, then dig up the clump, separate the offsets, and replant them in well-draining soil.