Are you tired of watching your beautiful plants grow crowded and uninvited, desperate for some space to thrive? Dividing plants is an essential skill every gardener should master. Not only does it help maintain healthy plant growth, but it also allows you to share your favorite plants with friends and family, giving them a new lease on life.
But dividing plants can be intimidating if you’re not sure where to start. That’s why we’ve put together this comprehensive guide to help you divide plants successfully, step by step. In this article, we’ll take you through everything from preparing healthy plants for division to post-division care and troubleshooting common issues that may arise. By the end of it, you’ll be a pro at dividing plants and enjoying the benefits of having more space to grow your favorite varieties.
Understanding Plant Division Basics
To successfully divide plants, you need a solid grasp of the basics, which is exactly what we’ll cover next: the fundamental concepts and principles involved in plant division. Let’s dive right in!
What is Plant Division?
Plant division is a fundamental process in plant propagation that involves separating a mature or overgrown plant into two or more smaller plants. This technique allows gardeners and horticulturists to reproduce plants quickly, efficiently, and with minimal waste. By dividing a mature plant, you’re not only creating new individuals but also rejuvenating the parent plant’s growth.
The importance of plant division lies in its ability to increase plant stock for propagation purposes. Whether you’re a seasoned gardener or just starting out, having multiple healthy plants at your disposal is essential for maintaining a thriving garden. Plant division also enables you to share your favorite varieties with friends and family, spreading knowledge and experience about specific plant species.
When done correctly, plant division can be an incredibly rewarding process, yielding high-quality plants that will thrive in their new environments. With regular practice, you’ll develop the necessary skills to identify suitable candidates for division, ensuring healthy growth and minimizing stress on both parent and newly separated plants.
Benefits of Plant Division
When you divide plants, you’re not just creating new individuals, but also unlocking their full potential. One of the most significant benefits of plant division is the sheer increase in numbers. With a single division, you can have two to three times as many plants as before, depending on the species and size of the parent plant.
Not only does this boost your overall plant count, but it also reduces transplant shock for the new divisions. By dividing established roots into smaller sections, you’re giving each new plant a head start in terms of development. This means they’ll be less likely to struggle after being transplanted into their new pots.
Furthermore, division promotes healthy root growth by encouraging new roots to develop from the cut ends of the divided sections. This can lead to stronger, more robust plants that are better equipped to thrive in a variety of conditions.
Preparing for Plant Division
Before you start dividing plants, it’s essential to prepare your tools and workspace carefully to minimize stress on your plants during the division process. Take a few minutes to gather all necessary materials.
Choosing Healthy Plants
When it comes to plant division, selecting healthy plants is crucial for their success after division. A thriving and vibrant parent plant is essential for producing robust offspring that will grow well in their new environment.
To identify a healthy plant suitable for division, look out for signs such as sturdy stems, bright green leaves, and an abundance of new growth. Healthy roots should be firm and white or light-colored, with a moderate amount of root hairs. On the other hand, signs of unhealthy plants include soft or mushy stems, yellowing or browning leaves, and reduced new growth.
Before dividing your plant, inspect it carefully to identify any areas that are struggling. Remove any dead or dying sections to prevent the spread of disease. If you notice any fungal infections or pests, treat the affected area before division to minimize the risk of transferring them to the new plants.
When in doubt, it’s always best to err on the side of caution and wait for your plant to recover before attempting division. A healthy parent plant will ensure that your divisions have a strong foundation for growth, increasing their chances of success in their new home.
Pre-Division Care
Before you start dividing your plants, it’s essential to give them some TLC. Proper pre-division care will ensure that your plants are healthy and robust enough to withstand the division process.
Start by checking your plant’s watering schedule a week or two before division. Make sure it’s not too wet or dry, as this can cause stress during division. Water your plant thoroughly until the soil is moist but not waterlogged. You should also fertilize your plant lightly to give it an extra boost of nutrients.
Pruning is another crucial step in pre-division care. Remove any dead or dying leaves and stems to prevent the spread of disease and encourage healthy growth. Cut back overgrown areas to promote bushy growth and make division easier. This will also help you see the individual plantlets more clearly, making it simpler to separate them.
With proper watering, fertilizing, and pruning, your plants should be ready for division in no time.
Step 1: Inspect and Prepare the Plant
When dividing plants, it’s essential to inspect each plant carefully for any signs of disease or pests before preparing them for division. This step ensures healthy and thriving new growth.
Examining the Root System
When inspecting the root system of your plant, it’s essential to look for signs of circling or entangled roots. This can be a sign that the plant is being constricted by its own roots, which can hinder growth and even lead to plant decline.
To examine the root system, gently remove the plant from its pot and gently tease apart the roots using your fingers or a blunt instrument like a chopstick. Start at the base of the plant and work your way up, looking for any signs of circling or entanglement.
Circling roots can be identified by their tendency to twist around each other in a circular motion. This can cause the plant’s growth to become stunted, leading to smaller leaves and reduced flowering. Entangled roots, on the other hand, appear as a tangled mess of roots that are difficult to separate.
Look for any areas where the roots have become twisted or knotted together – these are signs that the plant is experiencing root constriction. Use your fingers to gently tease apart the roots, working from the bottom up, and then assess whether any additional root pruning is needed before proceeding with division.
Removing Dead or Damaged Roots
When dividing plants, it’s essential to inspect the roots thoroughly and remove any dead or damaged sections. This process is crucial for promoting healthy growth in newly divided plants. Dead or damaged roots can be a significant hindrance to the plant’s ability to absorb water and nutrients, leading to stunted growth or even root rot.
To identify dead or damaged roots, gently wash away any soil from the root system, and inspect each root carefully. Look for signs of decay, such as soft spots, brittle texture, or a sour smell. Use sterile pruning tools to cut away these sections, making sure to disinfect your tools between cuts to prevent spreading disease.
Make clean cuts just above a growth node, and avoid crushing the remaining healthy tissue. This will help minimize stress on the plant and encourage new root growth. For example, when dividing a rhododendron, you may need to remove up to 30% of its roots due to damage or decay, but this will promote healthier development in the newly divided sections.
In addition to promoting healthy growth, removing dead or damaged roots also reduces the risk of disease and pests that often target compromised root systems. By taking the time to inspect and clean your plant’s roots, you’ll be giving it the best possible chance to thrive after division.
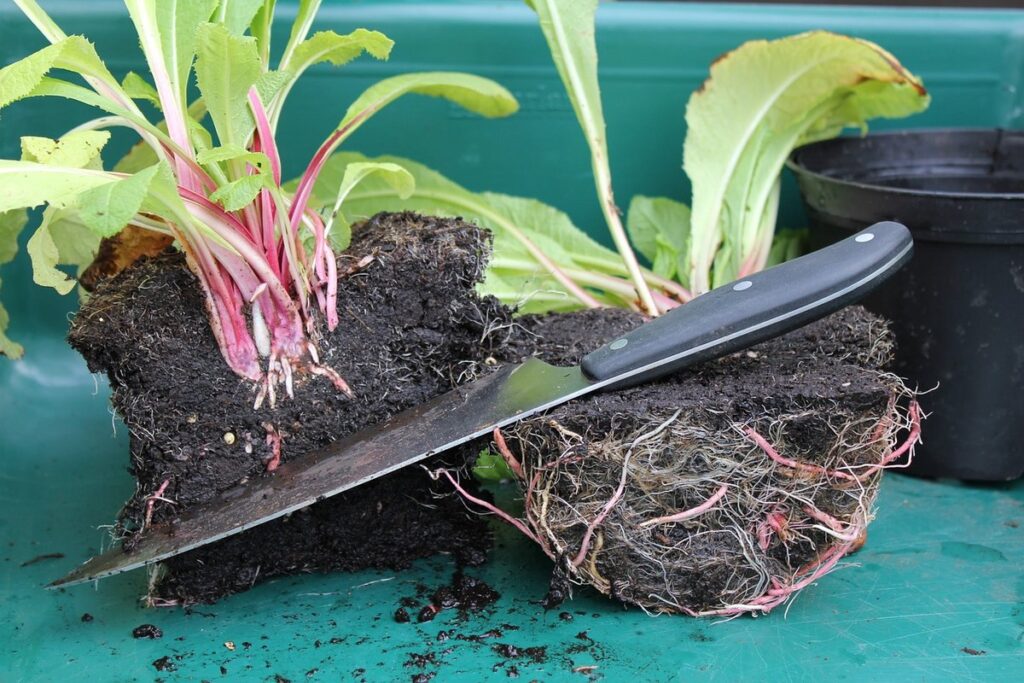
Step 2: Separate the Rhizome
Now that you’ve carefully selected and prepared your plant for division, it’s time to separate the rhizome from its roots. This crucial step will make all the difference in the success of your divided plants.
Identifying Rhizomes and Tubers
When dividing plants, it’s essential to identify rhizomes and tubers correctly. These underground plant structures can be tricky to distinguish from each other, but understanding their characteristics will help you separate them successfully.
Rhizomes are thick, fleshy stems that grow horizontally just below the soil surface. They produce new shoots and roots along their length, allowing the plant to spread quickly. Examples of plants with rhizomes include ginger, irises, and certain species of orchids. Rhizomes can be divided into sections, each with its own growing tip, making it possible to propagate multiple new plants from a single division.
Tubers, on the other hand, are swollen storage organs that produce new shoots and roots at their tips. They’re often found on plants like potatoes, dahlia, and gladiolus. Unlike rhizomes, tubers typically don’t have growing points along their length, making it more challenging to divide them. When handling tubers, be gentle to avoid damaging the delicate new growth.
To distinguish between rhizomes and tubers, look for signs of new growth or a prominent bud at one end of the structure. This will indicate which part is the growing tip. With practice, you’ll become more comfortable identifying these underground plant parts and dividing them successfully.
Carefully Separating the Rhizome
When carefully separating the rhizome or tuber into sections, it’s essential to preserve as much of the root system as possible. This will help ensure that each new plant has a strong foundation for growth and establishment.
Start by gently washing the rhizome with water to remove any dirt or debris. Then, use a sharp, sterile knife or pruning tool to carefully cut through the rhizome, separating it into sections. Make sure to make clean cuts just above a node (where a leaf meets the stem), as this will help promote new growth.
It’s also crucial to maintain the integrity of the root system by avoiding excessive handling and cutting back too much tissue. Instead, focus on making precise incisions that minimize damage to the delicate roots. If you’re separating a particularly large or complex rhizome, consider working in a sequence of small sections to avoid overwhelming yourself with root material.
Remember, each new section should have a sufficient amount of roots attached to it for optimal growth and establishment.
Step 3: Replant the Divided Section
Now that your plant has been divided, it’s time to replant each section into its new pot, making sure the soil is firmly in place. Gently firm the soil around each division.
Choosing a New Potting Mix
When replanting divided sections of plants, it’s crucial to choose a well-draining potting mix that will help prevent waterlogged soil and root rot. This is particularly important for newly divided roots, which can be more susceptible to disease and stress.
A good potting mix should have excellent drainage properties, retaining moisture in the right amounts while allowing excess water to escape quickly. You can identify a well-draining potting mix by its ingredients: look for mixes containing perlite, vermiculite, or sand, which help improve soil structure and facilitate water movement.
To choose a suitable potting mix, consider the specific needs of your plant species. For example, cacti and succulents require extremely well-draining mixes to prevent root rot. In contrast, seedlings may benefit from a more balanced mix with higher organic matter content.
When selecting a potting mix, read reviews and labels carefully. Avoid mixes labeled as “all-purpose” or containing excessive amounts of fertilizer, which can lead to overwatering issues. Instead, opt for mixes specifically designed for plants in your climate zone or with similar growing conditions.
Planting the Divided Section
Now that you’ve divided your plant, it’s time to plant the individual sections. This is an exciting stage as you get to see your newly divided plants grow and thrive. To ensure a smooth transition for your divided sections, make sure to follow these key steps.
When planting the divided section, start by digging a hole that’s about two to three times wider than the root system of the plant. The depth will depend on the type of plant you’re working with – for example, if it’s a bulbous plant like an iris or a lily, make sure the base of the plant is sitting at soil level, while for plants like hostas and daylilies, you can bury them about 1-2 inches deeper. Space each divided section about 12-18 inches apart, depending on their mature size.
Water your newly planted sections well after planting to settle the soil and provide enough moisture to establish a strong root system. Keep the soil consistently moist during the first few weeks after planting to ensure the plant gets off to a good start. Avoid overwatering, which can lead to root rot and other issues.
Post-Division Care and Troubleshooting
Now that you’ve successfully divided your plant, it’s essential to ensure it thrives in its new environment. This section addresses common issues that may arise post-division.
Watering and Fertilizing
After dividing your plant, it’s essential to provide it with proper care to ensure its survival and encourage healthy growth. Watering is a critical aspect of post-division care, as newly divided plants are more susceptible to moisture stress.
Water your plant thoroughly the day after division, making sure the soil feels moist but not waterlogged. Then, reduce watering frequency gradually over the next week or two, allowing the soil to dry slightly between waterings. As a general rule, check the soil’s moisture by inserting your finger into it up to the first knuckle. If it feels dry, it’s time to water.
When it comes to fertilizing, wait until about 2-3 weeks after division before applying any nutrients. This allows the plant to recover from the shock of being divided and develop a robust root system. Use a balanced, water-soluble fertilizer (diluted to half the recommended strength) once a month during the growing season.
Keep in mind that over-fertilizing can be detrimental to your newly divided plants, so monitor their response closely and adjust accordingly. Also, consider repotting your divided plant into fresh potting mix with good drainage to prevent waterlogged soil and root rot.
Common Issues and Solutions
After dividing your plant, it’s not uncommon to encounter some common issues that can be frustrating and even detrimental to its health. One of the most prevalent problems is transplant shock, which occurs when a newly divided plant struggles to adjust to its new environment. To combat this, make sure to handle the roots gently during division and avoid exposing the plant to extreme temperatures or light.
Another issue you may face is root rot, caused by overwatering or poor drainage. This can be prevented by repotting your plant in a well-draining mix and avoiding frequent watering. Check the soil moisture regularly, and water only when necessary.
If you notice any signs of stress or decay, consider applying a fungicide to prevent further damage. Monitor your plant closely for the first few weeks after division, and adjust its care accordingly.
In some cases, newly divided plants may experience delayed growth due to nutrient deficiencies or root development issues. To promote healthy growth, fertilize sparingly during this period, using a balanced, water-soluble fertilizer at half the recommended strength.
Tips for Successful Plant Division
Now that you’ve mastered the basics of plant division, let’s dive into some valuable tips to ensure a successful process and healthy new plants. Follow these expert recommendations.
Timing and Seasonality
When it comes to timing and seasonality for plant division, understanding the specific needs of your plants is crucial. Different species have unique growth patterns and dormancy periods, which affect when they should be divided. For example, perennials like hostas and daylilies are best divided in the spring or fall, when their energy is focused on root growth rather than top production.
Conversely, plants that thrive in warmer temperatures, such as cannas and elephant ears, typically do well when divided in late spring to early summer. On the other hand, cool-season crops like astilbe and peonies are best split in the fall, after they’ve finished their blooming cycle.
Before dividing your plant, observe its growth habits and adjust accordingly. If you’re unsure about the specific needs of your plants, research their specific requirements or consult with a local nursery expert. By understanding the timing and seasonality for each species, you’ll be able to ensure healthy root development and minimize stress on your newly divided plants.
Avoiding Over-Division
When dividing plants, it’s tempting to split them into as many sections as possible, especially if you’re eager to share them with friends and family. However, over-dividing can be detrimental to the plant’s health and growth potential.
Over-dividing occurs when a plant is divided too frequently or excessively, leading to weakened roots and reduced vitality. This can cause new divisions to struggle to establish themselves, increasing the risk of root rot, fungal diseases, and other issues. For example, dividing an overgrown clump of hostas into 10-15 sections may seem like a good idea, but in reality, it’s better to divide them every 3-4 years when they’ve reached 6-8 inches in diameter.
So, how do you know when to stop dividing? A general rule of thumb is to divide plants only when they’re showing clear signs of overcrowding or have outgrown their container. If you’re unsure, it’s better to err on the side of caution and wait another year before dividing. By doing so, you’ll give your plant a chance to recover from any potential stress caused by excessive division.
Frequently Asked Questions
What if I don’t have a separate pot for each divided section? Can I plant multiple divisions together?
You can plant multiple divisions together, but make sure to leave enough space between them for proper growth and air circulation. This method is called “mass planting.” However, keep in mind that this may lead to more competition among the plants, potentially slowing down their growth.
How do I handle divided sections with a weak or sparse root system?
If you notice that a divided section has a weak or sparse root system, it’s best to give it more time to recover before replanting. You can also try gently rubbing the roots with a soft brush or using a rooting hormone to stimulate growth.
Can I divide plants in the winter months? Shouldn’t they be dormant then?
While it’s generally recommended to divide plants during their active growing season, some plant species are more adaptable to division year-round. For example, spring-flowering bulbs like tulips and daffodils can be divided in late summer or early fall, when they’re still actively growing.
What if I accidentally damage the root system while separating it? Can I still replant?
Yes, you can still replant a divided section with a damaged root system. However, make sure to gently trim away any damaged areas and treat the remaining roots with a rooting hormone to stimulate regrowth. This may slow down the plant’s initial recovery, but it should eventually recover.
How do I know if my newly divided plants are getting enough water? What signs should I look for?
Newly divided plants require more frequent watering due to their increased surface area and potential shock from division. Signs that your plants need more water include yellowing leaves, droopy stems, or a general wilted appearance. However, overwatering can be just as detrimental, so make sure to check the soil moisture regularly and adjust your watering schedule accordingly.