Corn kernel planting can be a rewarding experience for gardeners and farmers alike, but it requires careful planning and attention to detail. With so many varieties of corn to choose from, selecting the right one for your needs is crucial. Whether you’re looking to grow corn for personal consumption or plan to harvest a large crop, knowing how to plant corn kernels correctly can make all the difference.
In this article, we’ll take a closer look at the essential steps involved in planting corn kernels, including selecting the perfect variety and preparing the soil for optimal growth. We’ll also cover tips on sowing seeds, managing pests and diseases, and harvesting your crop when it’s ready. By following these expert guidelines, you’ll be well-equipped to grow healthy, thriving corn plants that yield a bountiful harvest.
Choosing the Right Variety of Corn
When it comes to planting corn, selecting the right variety can be overwhelming. Let’s break down the key factors to consider when choosing a corn kernel type that suits your needs.
Factors to Consider When Selecting a Corn Variety
When selecting a corn variety for planting, it’s essential to consider several key factors that will impact its performance and success. One of the most critical considerations is climate. Different regions have unique temperature and precipitation patterns, which can affect how well a particular variety grows. For example, if you live in an area with hot summers, you’ll want to choose a heat-tolerant variety. On the other hand, if you’re in a cooler region, look for varieties that mature quickly.
Another crucial factor is soil type. Some corn varieties are bred specifically for well-draining soils, while others thrive in wetter conditions. If your soil is heavy clay or prone to waterlogging, choose a drought-tolerant variety to minimize the risk of yield loss. Additionally, consider the desired yield and intended use of the corn. For example, if you’re planting for sweet corn, prioritize varieties that produce high-quality kernels with good flavor.
When evaluating different varieties, also consider factors like disease resistance, pest tolerance, and maturation rate. By carefully selecting a variety that suits your local climate, soil conditions, and desired yield, you’ll set yourself up for success and ensure a bountiful harvest.
Popular Corn Varieties for Different Regions
When selecting a corn variety for planting, it’s essential to choose one that suits your region’s climate and growing conditions. Different regions have varying temperature and moisture levels, which can impact the growth and health of your corn crop.
For warm climates like those found in the southern United States, consider varieties like ‘Silver Queen’ or ‘Golden Bantam’, which are heat-tolerant and resistant to drought. These varieties thrive in temperatures above 65°F (18°C) and require minimal watering.
In cooler regions with shorter growing seasons, such as parts of the Midwest or Northeast, opt for early-maturing varieties like ‘Honey & Cream’ or ‘Golden Drop’. These types can withstand light frosts and mature quickly to ensure a successful harvest before winter sets in.
For areas with high moisture levels, choose disease-resistant varieties like ‘Finger Corn’ or ‘Butter and Sugar’. These types are less prone to fungal diseases common in humid climates.
When selecting a corn variety, be sure to consider the average temperature, rainfall, and sunlight hours for your region. This will help you choose a variety that grows well in your specific environment.
How to Evaluate Corn Seed Quality
Evaluating corn seed quality is crucial to ensure optimal growth and yields. When selecting seeds, look for those from reputable suppliers with a good track record of producing high-quality seeds. Check the seed package or consult with the supplier for information on germination rates, disease resistance, and hybrid vigor.
To evaluate seed quality yourself, perform a simple visual inspection. Check for physical damage, such as cracks or breaks in the seed coat. Also, inspect for signs of mold or mildew, which can indicate poor storage conditions. If possible, conduct a germination test by soaking seeds overnight and observing their ability to sprout within 3-5 days.
Another important factor is the moisture content. Seeds should have a moisture level between 10-12%. You can use a seed tester or consult with a supplier for guidance on how to check this. Properly storing seeds, keeping them cool and dry, will also help maintain their quality over time.
By taking these steps, you can ensure that your corn seeds are of high quality and ready for planting.
Pre-Planting Preparation
Before planting your corn kernels, it’s essential to prepare the soil and make any necessary adjustments to ensure optimal growing conditions for a successful harvest. Let’s walk through these crucial pre-planting steps together!
Soil Testing and Preparation
When it comes to growing a successful corn crop, soil testing and preparation are often overlooked but crucial steps. Testing your soil can help you understand its pH levels, nutrient deficiencies, and compaction issues – all of which can impact corn growth.
pH levels are particularly important for corn, as it prefers a slightly acidic to neutral soil pH between 6.0 and 7.0. If your soil is too alkaline or acidic, it may limit nutrient availability, leading to poor growth. For example, if your soil’s pH is above 8.0, nitrogen fixation by rhizobia bacteria will be impaired, affecting corn’s ability to absorb nitrogen.
Before planting, test your soil for nutrients like phosphorus and potassium, which are essential for root development and overall plant health. You can also check for compaction issues, which can restrict water and air circulation in the soil. To improve compaction, add organic matter like compost or manure to loosen the soil structure. By identifying and addressing these soil issues, you’ll be setting your corn crop up for success from the very beginning.
Fertilizer Application and Timing
When it comes to promoting healthy corn growth, fertilizers play a crucial role. Corn requires a balanced diet of nutrients to develop strong roots, stalks, and ears. There are two primary types of fertilizers used for corn production: nitrogen-based (N) and phosphorus-based (P). Nitrogen promotes leaf growth, while phosphorus encourages root development.
The application rate of fertilizer depends on the soil type, crop density, and climate. A general rule of thumb is to apply 50-75 pounds of actual N per acre in the spring, with a follow-up application 30 days later. For P, apply 20-30 pounds per acre at planting time and another 10-15 pounds after silking.
Timing is also essential when it comes to fertilizer application. In regions with cool springs, apply half the recommended rate of N in late winter or early spring. This allows the soil to absorb the nutrients before corn emergence. In areas with hot summers, consider applying P in the fall to promote root growth during the dormant season.
Crop Rotation and Planning
Crop rotation is a crucial aspect of corn kernel planting that often gets overlooked. By rotating crops, you can improve soil fertility, reduce pests and diseases, and increase overall crop yields. The key to successful crop rotation is planning ahead.
Start by identifying the types of crops that will thrive in your specific climate and soil conditions. In most cases, it’s best to rotate corn with other heavy feeders like soybeans or wheat. These crops have similar growing requirements and can help break disease cycles associated with continuous corn planting.
To plan your crop rotation effectively, consider the following tips:
* Divide your field into sections for different crop rotations
* Identify any areas that may be prone to erosion and use cover crops accordingly
* Take note of soil test results to determine nutrient levels and adjust fertilizer applications as needed
* Consider using a 3-4 year rotation cycle to avoid depleting soil nutrients
By incorporating crop rotation into your pre-planting preparation, you’ll set yourself up for success in the long run.
Planting Techniques and Methods
When it comes to planting corn kernels, you’ll want to know the best techniques and methods for success. Let’s dive into some expert-approved tips for optimal growth.
Proper Seed Depth and Spacing
When planting corn kernels, proper seed depth and spacing are crucial for optimal germination and growth. The ideal seed depth for corn is about 1-2 inches (2.5-5 cm) below the soil surface. Planting too shallow can lead to poor establishment, while planting too deep can result in reduced yields.
As for seed spacing, corn is typically planted at a density of around 8,000-12,000 seeds per acre. However, this can vary depending on factors such as climate, soil type, and desired yield. In general, it’s recommended to plant corn kernels about 6-8 inches (15-20 cm) apart in rows that are spaced 30-36 inches (75-90 cm) apart.
To achieve optimal growth, make sure the soil is moist but not waterlogged before planting. Planting at the correct depth and spacing will also help minimize competition among seedlings for resources like light, water, and nutrients. By following these guidelines, you’ll be well on your way to growing a healthy and productive corn crop.
Planting Equipment and Tools
When it comes to planting corn kernels, having the right equipment and tools can make all the difference. As you prepare for the planting season, consider investing in a reliable planter that suits your farm’s needs.
One popular option is manual planters, which are ideal for small-scale farming or gardening. These handheld tools allow for precise control over seed placement and depth, making them perfect for intricate row patterns or spot seeding. However, manual planters can be time-consuming and labor-intensive, especially for larger fields.
For bigger operations, air seeders and drill seeders are more efficient options. Air seeders use compressed air to plant seeds at a consistent rate, while drill seeders utilize a rotating drum to drop seeds into the soil. Both types of planters offer higher speeds and greater accuracy than manual planters, making them suitable for large-scale corn kernel planting.
Before choosing your planter, consider factors such as soil type, terrain, and crop yield goals. It’s essential to select equipment that complements your specific needs, ensuring a smooth and productive planting process.
Tips for Smooth Sowing and Seeding
When it comes to sowing and seeding corn kernels, getting it right is crucial for a bountiful harvest. To ensure smooth planting, start by preparing the soil properly. Till the land to a depth of about 8-10 inches, loosening up any clods or compacted areas. This will give your seeds enough room to germinate and grow.
Next, choose a spot with full sun and well-draining soil, as corn requires at least six hours of direct sunlight per day. If you’re planting in rows, make sure they’re at least 30 inches apart to accommodate the mature plant’s spread. When sowing your seeds, follow the package instructions for depth, but generally, it’s around 1-2 inches deep.
For optimal growth, sow 1-2 seeds every 6-8 inches, depending on the variety. Once the soil is moist and warm, keep it consistently watered throughout the growing season. If you’re using seed starting mix, be sure to add a balanced fertilizer according to the manufacturer’s instructions for healthy root development.
Keep in mind that some seeds may require cold stratification before planting – check your specific package for details. And remember, overwatering can lead to fungal diseases and poor growth, so monitor your soil moisture closely to prevent issues down the road.
Post-Planting Care and Maintenance
Now that you’ve planted your corn kernels, it’s time to focus on giving them the best care possible to ensure a healthy and thriving crop. This includes regular watering, fertilizing, and monitoring for pests and diseases.
Irrigation Management and Water Requirements
When it comes to growing healthy and productive corn kernels, proper irrigation management is crucial. This means paying close attention to water requirements, frequency, and timing to avoid under- or over-watering your crop. The right amount of moisture will help your corn plants develop strong roots, grow tall stalks, and produce plenty of ears.
Corn plants typically require about 20-25 inches of rainfall or irrigation per growing season. However, this can vary depending on factors like climate, soil type, and weather conditions. It’s essential to monitor the soil moisture levels regularly by inserting a finger into the soil up to the knuckle. If the soil feels dry, it’s time to water.
Water your corn plants deeply once or twice a week, depending on rainfall patterns. Avoid frequent shallow watering, as this can lead to weak root growth and make the plants more susceptible to disease. Timing is also critical – aim to water early in the morning so the plants have the entire day to absorb the moisture.
Pest and Disease Management Strategies
Corn crops are susceptible to various pests and diseases that can significantly impact yields and quality. Among the most common issues are corn borers, rootworms, and stalk borer infestations. These insects feed on plant tissues, weakening the stalks and reducing kernel formation.
Diseases like rust, smut, and northern leaf blight also threaten corn crops. These fungal infections can be spread through irrigation water, nearby infected plants, or contaminated soil.
To prevent pest and disease issues, adopt a holistic approach that incorporates crop rotation, sanitation, and integrated pest management (IPM) strategies. For example, planting resistant varieties can help minimize the impact of certain diseases. Regular monitoring for signs of infestation or infection allows for timely intervention, reducing damage and preserving yields.
Some actionable tips include:
* Maintaining proper soil pH and nutrient levels to support healthy plant growth
* Removing weeds that can harbor pests or spread diseases
* Using physical barriers like row covers to prevent insect infestations
* Implementing biological controls, such as beneficial insects or microorganisms, to manage pest populations
Monitoring and Adjusting Crop Growth
Monitoring crop growth is crucial to ensure a bountiful harvest of corn kernels. As a corn kernel farmer, you need to keep a close eye on the progress of your crops from sowing to harvesting. Regular monitoring will help you identify potential issues and take corrective measures before they become major problems.
To monitor crop growth, check for signs of stress such as yellowing or drooping leaves, which can be due to inadequate water supply, nutrient deficiency, or pests. Also, inspect the soil moisture regularly by inserting your finger into the soil up to the knuckle. If the top 2-3 inches of soil feels dry, it’s time to irrigate.
Another critical aspect is to keep track of growth stages using a growth chart. Corn kernel plants go through V1-V18 growth stages, each with specific characteristics. For instance, during V4-V5, the plant produces its first set of leaves and develops its root system. By tracking these stages, you can anticipate potential issues like earworms or drought.
Regular monitoring also helps in adjusting your care strategies based on weather conditions. For example, if there’s a dry spell, reduce watering to prevent shallow roots development. Conversely, during periods of excessive rainfall, ensure good air circulation by pruning the plants slightly. By being proactive and adjusting your care accordingly, you can optimize your corn kernel crop’s growth and yield.
Harvesting and Storage Techniques
Now that you’ve successfully planted your corn kernel seeds, let’s move on to harvesting and storing them properly to ensure maximum yield and longevity. We’ll cover essential techniques for a successful harvest.
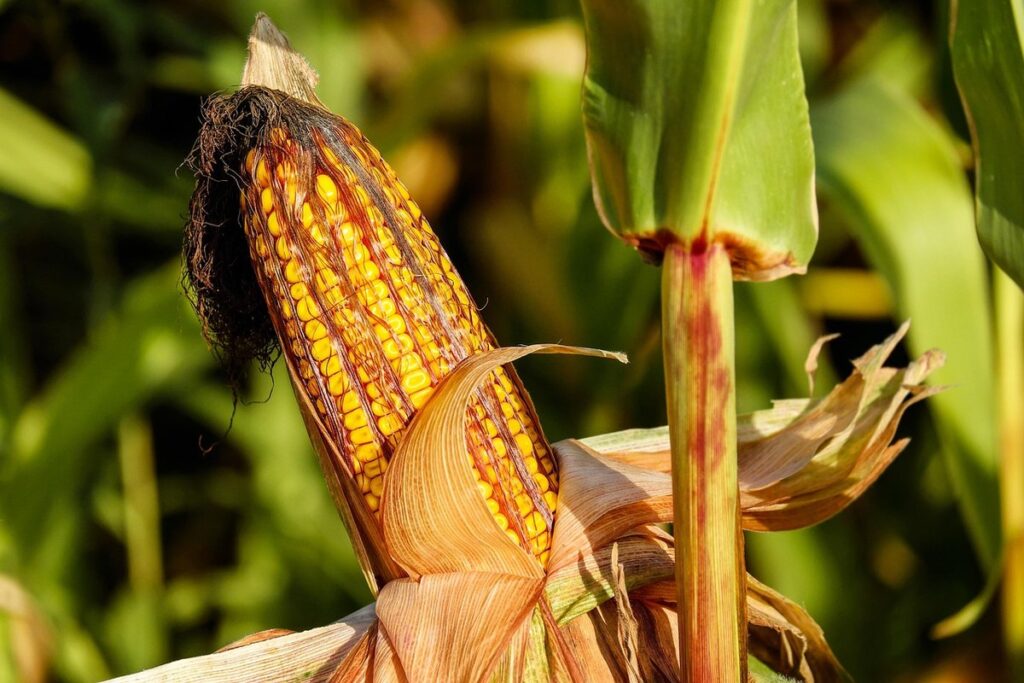
Timing and Methodology for Corn Harvest
When it’s time to harvest your corn kernels, timing and methodology are crucial for optimal yield and quality. The ideal moisture content for harvesting corn is between 20% and 25%. If the kernels are too moist, they may be prone to spoilage, while dry kernels can lead to reduced yields.
To determine the best time for harvesting, check the kernel moisture levels regularly by inserting a finger into the ear of corn. When the kernels feel firm but still yield slightly when pressed between your fingers, it’s usually ready to harvest.
Harvesting during the cooler part of the day, preferably in the early morning or late evening, can also help minimize damage and reduce stress on the plant. Use sharp, clean cutting tools to avoid crushing the ears, which can lead to mold growth.
It’s essential to dry your harvested corn kernels to a moisture level of 13% or lower before storing them in airtight containers. This will prevent mold and pest infestations during storage.
Drying and Storing Corn Kernels
Drying is a crucial step in preserving corn kernels. If not done correctly, moisture can lead to mold and spoilage, reducing grain quality. To dry corn, spread it out in a single layer on a clean surface or use a food dehydrator. Aim for a moisture level of 15% or less to ensure long-term storage.
For longer-term storage, store dried corn kernels in airtight containers or bins with a tight-fitting lid. A cool, dry place like a basement or pantry is ideal. Store the containers off the floor and away from direct sunlight.
To prevent pests and rodents from getting into your stored grain, use rodent-proof containers or add natural deterrents like bay leaves or cinnamon sticks. Check on your stored corn regularly for signs of moisture or pest infestation, and take action promptly to prevent spoilage.
In areas with high humidity, consider using silica gel packets or a dehumidifier in the storage area to maintain a stable moisture level. Proper drying and storage techniques will help you maintain the quality of your corn kernels for an extended period.
Tips for Efficient Post-Harvest Handling
When it’s time to harvest your corn crop, efficient post-harvest handling is crucial to maintain quality and prevent losses. Here are some key tips to keep in mind:
Dry the ears as soon as possible after harvesting by spreading them out in a well-ventilated area or using a machine specifically designed for this purpose. This helps prevent moisture-related issues like mold and rot, which can quickly spread through the crop.
Another important aspect is storage. Store the dried corn kernels in a dry, cool place with good ventilation to maintain their quality. Avoid storing them near heating vents or direct sunlight, as this can cause moisture to accumulate and damage the kernels.
When handling your harvest, be gentle to avoid damaging the delicate kernels. Use clean equipment and containers to prevent contamination. If you’re planning to store your corn for an extended period, consider using airtight containers or bags to maintain humidity levels.
Properly drying and storing your corn crop can significantly impact its quality and shelf life. By following these simple tips, you can enjoy a bountiful harvest while minimizing potential losses.
Frequently Asked Questions
What if I’m new to growing corn? Are there any beginner-friendly varieties?
Don’t worry, many corn varieties are suitable for beginners! Look for heirloom or hybrid types that are known for their ease of growth and tolerance to common pests and diseases. Some popular choices include ‘Stowell’s Evergreen’ or ‘Golden Bantam’. These varieties tend to be more forgiving and less prone to complications.
How often should I check on my corn plants after planting?
Regular monitoring is crucial in ensuring a healthy crop. Check on your corn plants every 3-4 days during the first week after planting, and then weekly thereafter. Look for signs of pests or diseases, as well as any nutrient deficiencies that may impact growth.
Can I use a drip irrigation system to water my corn?
Yes, drip irrigation is an excellent choice for watering corn! It delivers water directly to the roots, reducing evaporation and runoff while minimizing waste. This method also helps prevent fungal diseases by keeping the soil moist but not saturated.
How do I know if I’ve selected a suitable climate-resistant variety?
Check the seed packet or consult with local nurseries or experts about which varieties are known to perform well in your specific region’s climate conditions. Consider factors such as temperature, precipitation patterns, and daylight hours when making your selection.
What should I do if I notice pests damaging my corn plants?
Act quickly! Common pests like aphids, earworms, or raccoons can significantly impact your crop. Use organic pest control methods whenever possible, such as introducing beneficial insects (e.g., ladybugs for aphid control), using neem oil or insecticidal soap, or hand-picking pests at night when they’re most active.