Are you eager to grow your own delicious and nutritious asparagus at home? With its delicate flavor and impressive health benefits, it’s no wonder this popular vegetable has become a staple in many gardens. But for those new to growing asparagus, the process of planting seeds can seem daunting. Don’t worry – with our expert tips on planting asparagus seeds, you’ll be well on your way to enjoying fresh homegrown spears all season long.
In this article, we’ll cover everything from choosing the right variety and preparing the soil, to sowing seeds and caring for your new asparagus plants. We’ll also touch on common issues that can arise during growth and how to troubleshoot them. Whether you’re a seasoned gardener or just starting out, our step-by-step guide will walk you through the process of planting asparagus seeds with confidence and success.
Understanding Asparagus and Its Requirements
Before diving into planting asparagus seeds, it’s essential to understand their specific needs, including optimal climate and soil conditions. This affects the success of your harvest greatly.
Choosing the Right Variety
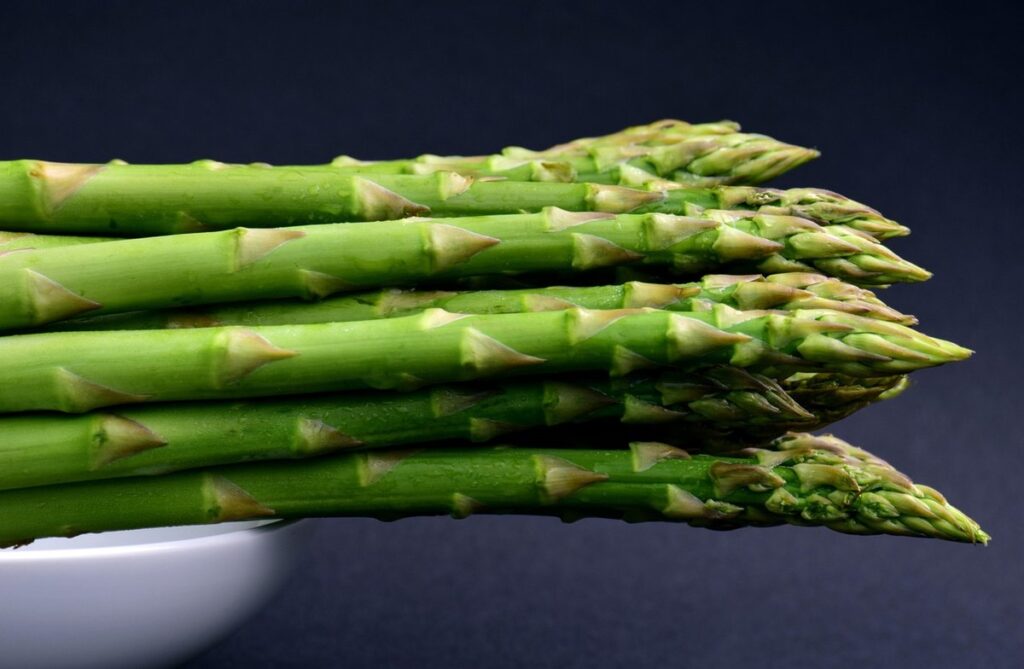
When selecting asparagus seeds for planting, it’s essential to choose a variety that suits your climate and desired growth habits. There are three primary types of asparagus: green, purple, and white. Green asparagus is the most common and widely available, with slender spears and a mild flavor.
Purple asparagus has a thicker stem and a sweeter taste than its green counterpart. It’s also more resistant to bolting (premature flowering), making it an excellent choice for colder climates. On the other hand, white asparagus is often grown in shaded conditions, which can make it more challenging to cultivate.
Before planting, consider the suitable climate for each type: green and purple asparagus thrive in full sun and well-drained soil, while white asparagus prefers partial shade and consistent moisture. Check your local hardiness zone and plant asparagus seeds accordingly. If you live in an area with extreme temperatures or harsh winters, opt for a variety that’s bred to be more resilient.
Some popular varieties include ‘Jersey Giant’, ‘UC 157’, and ‘Purple Flare’. Research the specific needs of each variety to ensure a successful harvest.
Soil Preparation and pH Levels
When preparing to plant asparagus seeds, it’s essential to understand that these plants thrive in well-draining soil. This is crucial because asparagus roots are sensitive to waterlogged conditions, which can lead to root rot and other problems. To achieve well-draining soil, add compost or organic matter to improve the soil‘s structure and increase its ability to absorb excess moisture.
It’s also vital to check your soil’s pH levels to ensure they fall within the optimal range of 6.5-7.5. Asparagus prefers a slightly acidic to neutral soil pH, which allows for healthy nutrient uptake. To test your soil, you can purchase a DIY kit or send a sample to a lab for analysis. Keep in mind that some regions have naturally alkaline or acidic soils, so it’s best to know what you’re working with.
If your soil tests are out of range, make adjustments accordingly. Add lime to raise the pH if necessary, but avoid over-liming as this can cause more harm than good. Conversely, if your soil is too acidic, mix in dolomitic limestone or peat moss to adjust the pH levels.
Preparing the Seeds for Planting
Before moving on to planting, it’s essential to properly prepare your asparagus seeds to ensure they have a strong start and optimal chances of success. This includes steps such as scarification and stratification.
Sowing asparagus seeds indoors
Starting asparagus seeds indoors 8-10 weeks before the last frost date is an excellent way to get a head start on the growing season. This method allows you to control the environment and provide optimal conditions for germination, which can be challenging outdoors. By starting indoors, you’ll also have a jump-start on outdoor planting, reducing the risk of seed loss due to weather fluctuations.
To sow asparagus seeds indoors, begin by filling a seed tray or small pots with a well-draining seed starting mix. Plant 1/4 inch deep and 1-2 inches apart for each seed, depending on their size. Cover them lightly with the soil mix and gently water. Keep the soil consistently moist but not waterlogged, as this can lead to rot.
As you wait for the seeds to germinate (typically within 7-14 days), provide a warm location with temperatures between 65-75°F (18-24°C). Once they’ve sprouted, move them to a bright, indirectly lit area. Avoid exposing young seedlings to direct sunlight, which can cause scorching.
This indoor approach not only gives your asparagus seeds the best possible start but also allows you to carefully monitor their progress before transplanting them outdoors.
Germination rates and sowing depth
When sowing asparagus seeds, it’s essential to consider the optimal germination rates and sowing depth. On average, asparagus seeds take around 2-3 weeks to germinate under ideal conditions. However, this timeframe can vary depending on factors such as temperature, moisture, and seed quality.
To encourage healthy germination, sow your asparagus seeds at a depth of between 1/4 inch to 1/2 inch. This allows the delicate taproot to emerge without being too deeply buried or exposed. It’s also crucial to maintain adequate spacing between seeds, about 12 inches apart, to prevent overcrowding and promote even growth.
If you’re sowing multiple rows, make sure to space them at least 18-24 inches apart to allow for proper air circulation and sunlight penetration. Keep in mind that asparagus is a perennial crop, and by giving the plants enough room to grow, you’ll be rewarded with healthier and more productive spears in the long run.
By following these guidelines, you’ll set your asparagus seeds up for success and increase their chances of producing delicious and nutritious crops.
Transplanting Asparagus Seedlings
When transplanting asparagus seedlings, it’s essential to handle them gently and avoid disturbing their delicate roots to ensure a healthy start. Follow these steps for successful transplantation.
Timing for outdoor transplanting
When transplanting asparagus seedlings outdoors, timing is crucial to ensure their survival and optimal growth. One of the most critical factors to consider is weather conditions.
In general, it’s best to wait until the danger of frost has passed before moving seedlings outside. This typically occurs when nighttime temperatures remain above 40°F (4°C). However, it’s essential to check your local weather forecast to determine if any late-season frosts are predicted. You can also check with your local nursery or gardening association for specific advice tailored to your region.
Another consideration is the soil temperature. Asparagus prefers a slightly acidic to neutral soil pH and a consistent moisture level. If the soil isn’t yet warm enough, it may cause the seedlings to become stressed or develop fungal diseases. Check the soil temperature by inserting a thermometer about 2-3 inches deep into the soil.
Ideally, transplant your asparagus seedlings when daytime temperatures are in the mid-60s to low 70s (18-22°C) and nighttime temperatures remain above 50°F (10°C). This will give them a head start on the growing season, allowing them to establish themselves before hot weather sets in.
Hardening off asparagus seedlings
Hardening off asparagus seedlings is an essential step to ensure they can thrive once transplanted into their permanent location. This process involves gradually acclimating the seedlings to outdoor temperatures and sunlight over a period of 7-10 days.
To start, place the seedlings in a shaded area outdoors for a few hours a day. Begin by leaving them outside for just one hour on the first day, then gradually increase the duration by an additional hour each day. By day five or six, they should be spending around 4-6 hours in the shade.
Next, start introducing direct sunlight to your seedlings over the next two days. Start with short periods of morning sun and gradually increase the time as they become more tolerant. Monitor their response closely; if you notice any signs of stress, such as wilting or discoloration, return them to a shadier spot immediately.
Remember, patience is key here. Rushing this process can cause your seedlings unnecessary stress, which may lead to stunted growth or reduced yields in the long run.
Planting Asparagus Crowns
When planting asparagus crowns, it’s essential to follow some specific guidelines to ensure healthy growth and a bountiful harvest for years to come. This process is slightly different from direct sowing seeds.
Key differences between seeds and crowns
While planting asparagus seeds can be an exciting and cost-effective way to start growing this delicious vegetable, it’s worth considering established asparagus crowns as an alternative. One of the main benefits of using crowns is their faster growth rate – they typically produce spears within a year or two after planting, whereas seed-grown plants may take 2-3 years to mature.
Crowns are also generally more productive than seed-grown plants, producing larger and more consistent yields. This is because crowns come from established asparagus plants that have already developed a strong root system and a robust crown of buds.
In terms of availability, you can often find asparagus crowns at local nurseries or online plant retailers in the spring or fall. Keep in mind that crowns may be more expensive than seeds, but they offer a faster return on investment – and the sooner you start enjoying fresh homegrown asparagus!
Preparing the planting site for crowns
Before planting asparagus crowns, it’s essential to prepare the site properly. Start by loosening the soil to a depth of about 12 inches using a garden fork or spade. Remove any debris, rocks, and weeds that can compete with your asparagus for nutrients.
When spacing the crowns, leave about 18-24 inches between each one, depending on the variety you’re planting. This will give them enough room to grow without overcrowding. If your soil is heavy clay or prone to waterlogging, consider raising the bed by a few inches to improve drainage.
Check your asparagus crown for any signs of damage or disease before planting. Inspect the roots and discard any weak or damaged crowns. Plant the healthy ones at the same depth they were previously grown, making sure the buds are facing upwards. This will ensure successful establishment and help prevent transplant shock.
Ongoing Care and Maintenance
To ensure a healthy harvest, it’s essential to keep your asparagus bed well-maintained year-round, from weeding to fertilizing. Regular upkeep will make all the difference in your crop’s success.
Watering requirements
When it comes to watering young asparagus plants, consistency and attention to their growth stages are crucial. During the first few weeks after planting, water them deeply once a week. This helps establish a strong root system, which is essential for future growth.
As the plants begin to grow, typically around 4-6 weeks after sowing, you can gradually increase the frequency of watering. Water them every 3-4 days during this period, providing about 1 gallon of water per plant at each session.
Keep in mind that asparagus plants have a shallow root system and are prone to overwatering. Avoid getting excess moisture on the leaves or crown (where the stem meets the soil) to prevent fungal diseases.
During peak growth stages (around 2-3 months after planting), reduce watering frequency to every 5-7 days, but increase the amount of water per session to about 1.5 gallons per plant.
By following this schedule and observing your plants’ responses, you’ll be able to provide them with just the right amount of moisture at each growth stage, ensuring a healthy and robust asparagus harvest in the future.
Fertilization needs
To ensure that your asparagus plants thrive, it’s essential to provide them with the right nutrients. Asparagus is a heavy feeder and requires a balanced diet of nitrogen (N), phosphorus (P), and potassium (K) for healthy growth.
Nitrogen promotes leafy growth and green coloration, making up about 50-70% of the fertilizer applied. Phosphorus supports root development and flower formation, accounting for around 10-20%. Potassium helps with overall plant health, resistance to disease, and water balance, making up the remaining 10-30%.
For optimal results, apply a balanced fertilizer (such as 10-10-10 NPK) in early spring when new growth begins. You can also side-dress with high-phosphorus fertilizer (around 15-30-15 NPK) after about six weeks of growth to promote flowering and seed production.
Some popular organic options include fish emulsion, compost tea, or manure tea. Remember to always follow the instructions on the label and avoid over-fertilizing, which can lead to weak, leggy spears.
Troubleshooting Common Issues
If you encounter any problems during the asparagus seed planting process, don’t worry, we’ve got some solutions to help you get back on track. Check out these common issues and their easy fixes below.
Identifying pests and diseases
When planting asparagus seeds, it’s essential to be aware of common problems that can affect your crop. Aphids and spider mites are two of the most prevalent pests that can damage your asparagus plants. These tiny insects feed on plant sap, causing curled or distorted leaves. To manage aphid infestations, use neem oil spray or introduce natural predators like ladybugs.
Crown rot is another common issue affecting asparagus crops. This fungal disease causes softening and decay of the crown area, leading to reduced yields and plant death. Prevention is key: ensure proper soil drainage, avoid overwatering, and rotate your asparagus bed every 10-15 years to break disease cycles. If you notice symptoms, treat with a fungicide specifically labeled for crown rot control.
Monitor your plants regularly during the growing season, inspecting them for signs of pests or diseases. By being proactive and taking prompt action, you can minimize damage and maintain a healthy asparagus crop. Regular soil testing can also help identify nutrient deficiencies that may contribute to disease susceptibility.
Addressing poor yields or growth issues
If you’re experiencing poor yields or growth issues with your asparagus crop, there are several possible causes to consider. One common reason for stunted growth is inadequate watering, particularly during the first year after planting. Asparagus seedlings need consistent moisture, especially when they’re young and establishing their root system.
To address this issue, make sure to water your asparagus beds regularly, but avoid overwatering which can lead to root rot. You can also consider installing a drip irrigation system for more efficient watering.
Another possible cause of poor yields is insufficient sunlight. Asparagus requires full sun to produce well, so ensure that your plants are receiving at least six hours of direct sunlight per day.
In terms of corrective actions, you can try thinning out overcrowded asparagus beds to give individual spears more space to grow. This will promote healthy growth and prevent competition for nutrients. Additionally, consider applying a balanced fertilizer in the spring to provide your asparagus plants with essential nutrients.
Frequently Asked Questions
What is the ideal time to plant asparagus seeds outdoors, considering different climates and regions?
In areas with frost, it’s best to wait until late spring or early summer when the soil has warmed up. In warmer climates, you can plant asparagus seeds in fall or early winter for a spring harvest. Be sure to check the specific planting times for your region to ensure optimal growth.
Can I mix different types of asparagus (green, purple, and white) together in the same bed, or should I separate them?
It’s generally recommended to grow different varieties separately to prevent cross-pollination, which can affect flavor and texture. If you’re growing multiple varieties, consider dedicating a separate bed for each type.
How often should I water asparagus seedlings after transplanting outdoors, especially during hot weather conditions?
Yes, it’s essential to maintain consistent moisture levels during the first few weeks after transplanting. Water your asparagus plants every 2-3 days, or whenever the top inch of soil feels dry to the touch.
Can I use a greenhouse to start my asparagus seeds indoors, and how does this impact germination rates?
Yes, using a greenhouse can provide optimal conditions for seed germination, especially in areas with cold winters. A greenhouse can retain heat and maintain humidity levels, resulting in higher germination rates (up to 90% or more) compared to indoor environments.
What are some common mistakes to avoid when preparing the soil for asparagus planting, which could impact plant health?
Be cautious not to over-till the soil, as this can damage delicate roots. Also, avoid compacting the soil during preparation, as this can prevent proper drainage and root growth. It’s also essential to test your soil pH levels regularly to ensure optimal conditions for asparagus growth.