When starting your seeds indoors, providing the right environment is crucial for their growth. However, many growers struggle with determining the ideal distance between their grow lights and seedlings. This can be a tricky balance to strike, as too little light may not promote healthy growth, while too much light can lead to scorching.
In this article, we’ll take a closer look at how to determine the perfect grow light distance for your seedlings, considering factors like light intensity, spectrum, and wattage. By understanding these key elements, you can create an optimal growing environment that fosters healthy growth and maximizes yields. We’ll break down the essential information you need to know, so you can make informed decisions and achieve successful results with your indoor garden.
Understanding Seedling Growth and Lighting Requirements
To grow strong and healthy seedlings, it’s essential to understand their unique growth patterns and lighting needs. In this section, we’ll delve into these specifics.
The Importance of Light Intensity for Seedlings
Light intensity plays a crucial role in seedling growth, and it’s essential to understand its impact on photosynthesis and chlorophyll production. Photosynthesis is the process by which plants convert light energy into chemical energy, and it occurs in specialized organelles called chloroplasts. Chlorophyll, the green pigment responsible for absorbing light, plays a critical role in this process.
When seedlings receive adequate light intensity, they’re able to undergo photosynthesis efficiently, producing the energy needed for growth. However, if light intensity is too low or inconsistent, it can lead to stunted growth, weak stems, and reduced yields. On the other hand, excessive light intensity can cause damage to delicate seedling tissues.
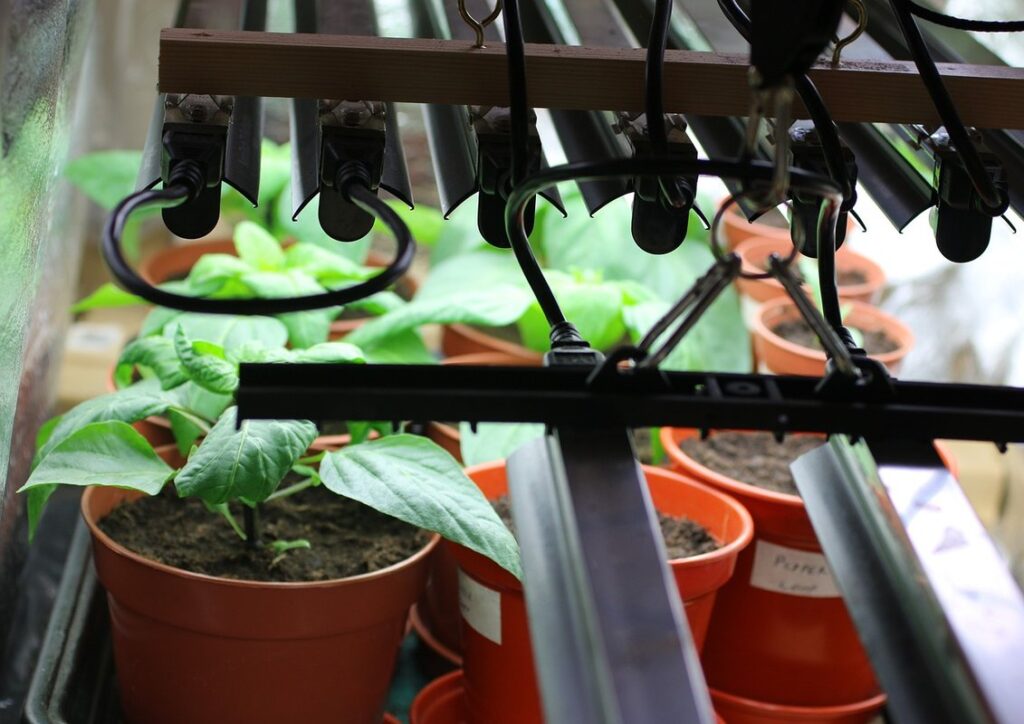
To ensure optimal seedling growth, aim for a light intensity of around 20-40 micromoles per second (μmol/s) at the leaf surface. This is typically achieved with grow lights positioned between 6-12 inches above the seedlings. Keep in mind that different species have varying light requirements, so research specific needs for your plants to achieve the best results.
Factors to Consider When Choosing a Grow Light
When choosing a grow light for seedlings, it’s essential to consider the unique characteristics of different types of lights. LED grow lights are energy-efficient and produce minimal heat, making them an excellent choice for indoor growing. However, they can be more expensive than other options.
Fluorescent grow lights, on the other hand, are affordable and provide a broad spectrum of light. They’re ideal for small seedling batches but may not be as intense as LED or HPS lights.
HPS (High Pressure Sodium) grow lights produce a lot of heat and are typically used in larger growing operations. While they can be effective, they require careful temperature control to prevent overheating.
When selecting a grow light for seedlings, consider the following factors: energy efficiency, heat output, and spectrum. Seedlings need a balanced spectrum that promotes healthy growth. Look for lights with a high PAR (photosynthetic active radiation) value, which indicates the amount of usable light produced. This will help you choose a light that meets your seedlings’ needs while also being mindful of your energy consumption and growing space limitations.
Determining the Ideal Grow Light Distance
To determine the ideal grow light distance for your seedlings, you need to consider the type of plants, their growth stage, and the intensity of the grow light. Let’s dive into these factors together!
Measuring Light Intensity with a Lux Meter
When it comes to determining the ideal grow light distance for seedlings, accurately measuring light intensity is crucial. One of the most effective tools for this task is a lux meter. A lux meter measures the amount of light emitted by a source in a given area, expressed in units called lux (lx). To use a lux meter correctly, ensure it’s calibrated and functioning properly before taking readings.
When measuring light intensity with a lux meter, place the device at the seedling’s growing level, about 1-2 inches above the leaves. Take multiple readings from different areas of the grow space to account for any variations in light distribution. It’s also essential to measure at different times of day and under varying light conditions.
For accurate measurements, keep in mind that lux meters can be affected by ambient lighting in the room. Turn off or block external light sources before taking readings to minimize interference. Also, consider using a meter with an adjustable sensitivity setting to account for different light levels. Regularly calibrating your lux meter will also ensure reliable results over time.
Calculating the Optimal Grow Light Distance
Calculating the ideal grow light distance for seedlings can be a complex process, but with the right tools and knowledge, you’ll be able to find the perfect spot. To get started, consider the following factors: light spectrum, wattage, and growing space.
First, think about the type of light your seedlings need. LED grow lights, in particular, come in various spectrums that mimic natural daylight. Cool white (5000-6000K) is ideal for vegetative growth, while warm white (2700-3000K) promotes blooming and fruiting. Consider which spectrum your seedlings require and adjust the distance accordingly.
Next, calculate the total wattage of your grow lights. A general rule of thumb is to start with a lower intensity and increase as needed. For every 10 inches of growing space, you’ll want about 20-40 watts per square foot of LED light. This means that if you have a small grow area (about 2×2 feet), you might need around 80-160 watts total.
To determine the optimal distance, start with a general guideline: for seedlings, keep the lights 12-18 inches away from the plants. You can then adjust as needed based on your specific setup and plant growth.
Common Mistakes When Setting Up Grow Lights for Seedlings
When setting up grow lights for seedlings, it’s easy to make mistakes that can harm their development – from insufficient light to overheating, we’ll explore these common errors.
Too Far Away: The Risks of Insufficient Lighting
When it comes to setting up grow lights for seedlings, placing them too far away can have devastating consequences. If the distance between the light source and the seedling is not optimal, it can lead to stunted growth and reduced yields.
One of the main reasons why insufficient lighting is detrimental to seedlings is that it limits their ability to undergo photosynthesis. Photosynthesis is the process by which plants convert sunlight into energy, and it’s essential for their growth and development. If the light source is too far away, the seedling won’t receive enough photons to undergo efficient photosynthesis, resulting in weak and leggy growth.
To give you a better idea, studies have shown that when grow lights are placed 12-18 inches above seedlings, it can lead to a 20-30% reduction in yield. This is because the plant is not receiving the necessary amount of light to produce adequate photosynthetic pigments and energy.
To avoid this common mistake, make sure to position your grow lights at a distance that allows for optimal lighting conditions. A general rule of thumb is to place them 6-8 inches above seedlings during the vegetative stage and gradually increase the height as they mature.
Too Close: The Dangers of Overheating and Scorching
When positioning grow lights too close to seedlings, you risk causing more harm than good. Overheating is a significant concern, as it can lead to scorching of leaves and damage to delicate tissues. The ideal temperature range for most seedlings is between 65°F to 75°F (18°C to 24°C), but when grow lights are too close, the air temperature can quickly rise above this threshold.
This is particularly problematic in indoor settings where ventilation may be limited. If you notice the leaves of your seedlings becoming wilted or developing brown tips, it could be a sign that they’re being scorched by excessive heat from the grow light. To avoid this issue, keep an eye on the temperature near your seedlings and adjust the distance between them and the grow light accordingly.
In general, aim to maintain a safe distance of at least 12-18 inches (30-45 cm) between the top of the seedling and the grow light. This will help prevent overheating while still providing the necessary light for growth. Monitor your seedlings’ responses to different distances and adjust as needed to ensure optimal growing conditions.
Adjusting Grow Light Distance for Different Seedling Stages
As your seedlings grow and develop, their lighting needs change too – that’s why adjusting the distance between the grow light and your seedlings is crucial at different stages. Let’s explore how to do it just right.
Germination Phase: Minimum Lighting Requirements
During the germination phase, seedlings require gentle and consistent light exposure to initiate growth. While it’s tempting to provide maximum light intensity, research has shown that excessive lighting can actually hinder germination rates.
In fact, studies have demonstrated that high-intensity lighting can cause seedlings to become leggy and weak, rather than promoting healthy development. To avoid this, maintain a minimum of 1-2 inches (2.5-5 cm) distance between the grow light and seed tray during the germination phase. This allows for gentle illumination without causing unnecessary stress.
For example, using T5 or T8 fluorescent lights at a low wattage setting can provide the necessary light while minimizing heat emission. Alternatively, LED grow lights with a blue spectrum output (around 450-500 nanometers) are excellent choices for seedlings, as they promote healthy growth without producing excessive heat.
Remember to keep the lighting schedule consistent, with 12-14 hours of light and 10-12 hours of darkness per day, to simulate natural daylight patterns. By providing optimal lighting conditions during germination, you’ll set your seedlings up for success in their subsequent growth stages.
Vegetative Growth Phase: Increased Lighting Needs
As seedlings transition into the vegetative growth phase, their lighting needs increase dramatically. This stage is characterized by rapid stem elongation and leaf expansion, requiring more intense light for photosynthesis to support growth. To accommodate this surge in demand, you’ll need to adjust the grow light distance to provide sufficient illumination.
During the vegetative growth phase, seedlings can double in size every week or two, depending on factors like temperature, nutrient availability, and light quality. As a result, their photosynthetic rates increase significantly, making them more sensitive to light intensity. To ensure optimal growth, aim for a grow light distance that provides at least 20-30 watts per square foot of growing area.
To achieve this, start by increasing the distance between the grow lights and seedlings by about 6-8 inches (15-20 cm). This will help prevent burning or scorching the leaves while providing enough light for photosynthesis. Monitor your plants’ responses closely and adjust the lighting as needed to avoid over- or under-lighting.
Tips for Maximizing Grow Light Efficiency and Minimizing Energy Consumption
To get the most out of your grow lights, it’s essential to optimize their efficiency by following a few simple tips that will also minimize energy consumption.
Using Reflectors and Diffusers to Optimize Light Distribution
Using reflectors and diffusers can significantly improve light distribution for seedlings by directing energy where it’s most needed. This is especially important when working with focused grow lights that tend to produce intense hotspots.
When choosing a reflector or diffuser, consider the type of lighting you’re using and the space constraints of your grow area. For example, if you have a LED strip light, a diffuser can be an effective way to soften harsh edges and create a more even spread of light. On the other hand, if you’re working with a high-intensity HPS or MH bulb, a reflector might be necessary to bounce excess energy towards the plants.
To use these tools effectively:
* Position the reflector or diffuser 6-12 inches from the grow lights, adjusting as needed for optimal performance.
* Experiment with different angles and placements to achieve the best light distribution for your specific setup.
* Clean your reflectors regularly to ensure maximum effectiveness – a dirty reflector can actually reduce energy efficiency.
By incorporating reflectors and diffusers into your grow light setup, you’ll be able to direct more of the light’s energy towards your seedlings, promoting healthy growth and reducing waste.
Scheduling Lighting Cycles for Seedlings
When it comes to using grow lights for seedlings, scheduling lighting cycles can make a significant difference in their growth and development. By implementing a timed lighting schedule, you can create an environment that simulates day-night cycles, which is essential for healthy plant growth.
Research has shown that plants grown under scheduled lighting cycles exhibit improved growth rates compared to those grown under continuous light. This is because the simulated day-night cycle helps regulate the plant’s internal clock, promoting more efficient photosynthesis and nutrient uptake.
To implement a scheduling system, start by setting a timer or using an app that allows you to control your grow lights remotely. Aim for 16-18 hours of light exposure per day, with the remaining time being in complete darkness. This will give your seedlings the optimal amount of time to photosynthesize and recover from the intense light.
By following this simple strategy, you can not only boost your seedlings’ growth rates but also reduce energy consumption by up to 30%.
Best Practices for Monitoring and Adjusting Grow Light Distance Over Time
As your seedlings continue to grow, it’s essential to monitor and adjust their light distance to prevent burning or under-illumination. This is where timing and observation come into play.
Regularly Checking Seedling Growth and Development
As seedlings continue to grow and develop, it’s essential to regularly check their progress to ensure they’re receiving the right amount of light. This involves monitoring their growth habits, leaf coloration, and overall health. By doing so, you can make adjustments to the grow light distance as needed.
Check for signs of over- or under-lighting by observing your seedlings’ leaves. If they’re becoming scorched or developing brown tips, it may be a sign that the lights are too close. On the other hand, if the leaves appear pale or spindly, it could indicate that the lights are too far away.
Make a habit of checking on your seedlings at least once a week to assess their growth and adjust the light distance accordingly. Keep in mind that different plant species have varying needs for light, so research specific requirements for the varieties you’re growing.
Some common signs of optimal lighting include: leafy green coloration, strong stem development, and a healthy root system. Use these indicators as a guide to make necessary adjustments to your grow light distance. Remember, seedlings are more sensitive to light intensity than mature plants, so be prepared to make frequent adjustments during the early stages of growth.
Troubleshooting Common Lighting Issues
When working with grow lights, it’s not uncommon to encounter issues that affect seedling health and growth. If you notice inadequate light intensity or overheating, here are some steps to troubleshoot common lighting problems.
Firstly, assess the situation by observing the seedlings’ appearance. Are they pale or have a weak stem? This could indicate insufficient light. To address this, try increasing the distance between the grow lights and the seedlings by 1-2 inches at a time until you see an improvement.
On the other hand, if your seedlings are scorched or discolored, it may be due to overheating from the grow lights. Check the temperature in the growing area using a thermometer, and consider adjusting the lighting schedule to reduce burn risk.
Some common signs of inadequate light intensity include stunted growth, poor leaf coloration, and reduced photosynthetic activity. To avoid these issues, maintain optimal lighting conditions by adjusting the distance between the grow lights and seedlings as they mature.
Frequently Asked Questions
How do I measure the ideal grow light distance for my seedlings if I don’t have a lux meter?
You can use a plant growth stage chart to determine the optimal lighting requirements for your specific seedling type. However, if you still want to estimate the ideal distance without a lux meter, consider starting with a general rule of thumb: 2-3 inches (5-7.5 cm) above the leaves for most seedlings.
Can I use the same grow light distance for all stages of seedling growth?
No, it’s essential to adjust the grow light distance as your seedlings progress through different growth phases. For example, during the germination phase, seedlings require minimal lighting, while in the vegetative growth phase, they need increased lighting to promote healthy development.
How often should I check and adjust the grow light distance for my seedlings?
Regularly checking and adjusting the grow light distance can be time-consuming, but it’s crucial for optimal results. As a general rule, inspect your seedlings every 1-2 weeks during the vegetative growth phase, making adjustments as necessary.
Can I use LED grow lights for seedlings without worrying about overheating?
Yes, many modern LED grow lights are designed to minimize heat output and prevent scorching. However, it’s still essential to monitor temperature levels near your plants, especially in warmer environments or with high-intensity lighting setups.
How do I know if my seedlings are receiving the right amount of light intensity for optimal growth?
Observe your seedlings’ coloration, shape, and overall health. If they appear pale or stretched out, it may indicate insufficient light. Conversely, if they’re experiencing discoloration or scorching, it could be a sign of excessive lighting.