Growing vibrant blue or pink hydrangeas is all about understanding the intricate relationship between your plant, its surroundings, and the science behind it. Did you know that the stunning color of your hydrangea flowers is directly influenced by the pH level of the soil it’s planted in? It’s not just a matter of aesthetics; adjusting your soil pH can also impact nutrient availability and overall plant health. If you’re eager to grow gorgeous blue or pink blooms, this article is for you! We’ll delve into the world of hydrangea care and provide expert tips on testing and adjusting your soil pH. By the end of this post, you’ll have a solid understanding of how to create an optimal environment for your hydrangeas, ensuring they thrive and display their full color potential.
Understanding Hydrangeas and Soil pH
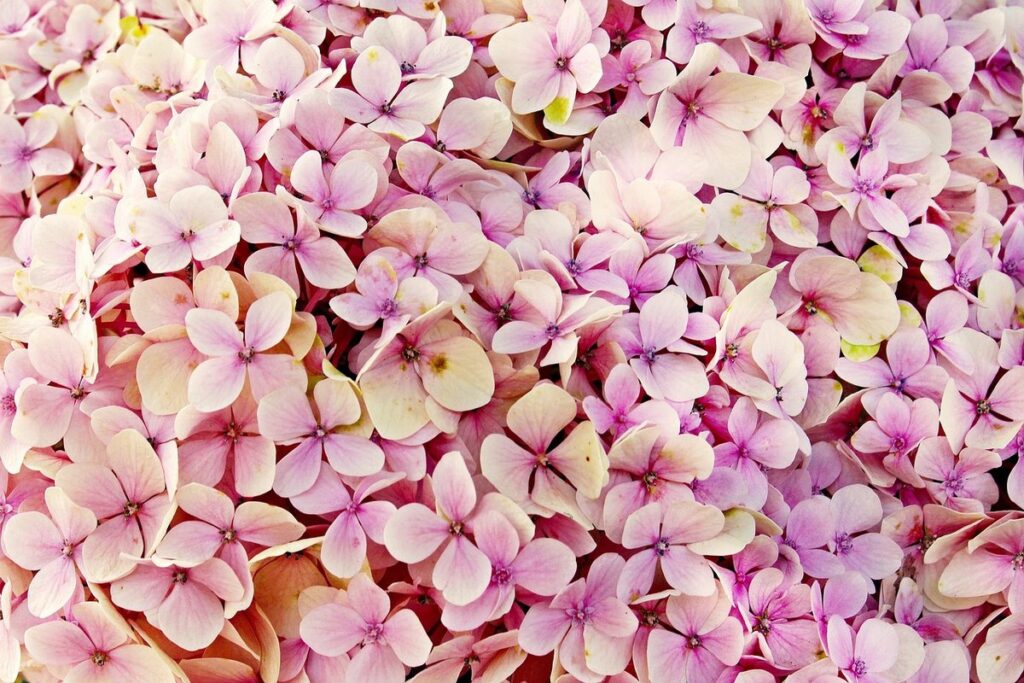
Hydrangea flowers change color based on soil pH, but did you know it’s not just a simple matter of acidic vs alkaline? Let’s dive into what affects your hydrangea’s bloom hue.
What are Hydrangeas?
Hydrangeas have become a staple in many gardens worldwide, thanks to their breathtaking beauty and versatility. These stunning flowers are not only a favorite among gardeners but also play a significant role in adding vibrancy and life to outdoor spaces. As one of the most popular flowering shrubs, hydrangeas bring joy and serenity to gardens with their delicate petals and robust growth.
One of the fascinating aspects of hydrangeas is their unique ability to change color based on soil pH levels. This phenomenon has puzzled many gardeners for years, but understanding it can be a game-changer for achieving the perfect blue or pink hue. In acidic soils (pH 6.0 or lower), hydrangeas tend to produce blue flowers, while alkaline soils (pH 7.0 or higher) bring out the pink and purple shades.
This unique characteristic makes soil pH an essential factor in determining the color of your hydrangea blooms. Gardeners can now experiment with their soil’s pH levels to achieve the desired blue or pink hue, adding another layer of excitement and creativity to gardening.
Importance of Soil pH for Hydrangeas
Soil pH plays a critical role in determining the growth and flowering of hydrangeas. As we’ve established, the color of hydrangea blooms is directly influenced by the soil’s pH levels. However, it’s not just about producing blue or pink flowers – maintaining optimal soil pH has far-reaching benefits for your plant’s overall health.
When soil pH is within a suitable range (5.5-6.5 for bigleaf hydrangeas), essential nutrients like nitrogen, phosphorus, and potassium become more readily available to the plant. This leads to robust growth, healthy foliage, and, of course, vibrant blooms. Conversely, an extreme pH imbalance can cause nutrient deficiencies, stunted growth, and a host of other problems that may even lead to plant death.
In practical terms, if you’re cultivating blue hydrangeas, aiming for a slightly acidic soil pH (around 5.5-6.0) will help your plants thrive. On the other hand, pink hydrangeas prefer a slightly alkaline environment (pH 6.0-6.5). It’s essential to test your soil regularly and adjust it as needed using organic or inorganic amendments to maintain an optimal pH balance for your specific variety of hydrangea.
The Science Behind Blue and Pink Hydrangeas
So, how do hydrangea flowers decide whether to turn blue or pink? It all comes down to a fascinating combination of science and soil chemistry.
How Soil pH Affects Hydrangea Color
When it comes to determining the color of hydrangea flowers, soil pH plays a crucial role. The chemistry behind blue and pink hydrangeas lies in the availability of aluminum ions in the soil. You see, when the soil is acidic (low pH), aluminum ions become more readily available for uptake by the plant.
As these aluminum ions accumulate in the plant’s cells, they affect the production of anthocyanin and delphinidin pigments responsible for flower color. If the aluminum levels are high enough, the resulting pigment combination produces blue flowers. Conversely, if the soil pH is alkaline (high pH), the aluminum ions become scarce, leading to a predominance of pink or red hues.
To change the color of your hydrangea blooms from one shade to another, you can adjust the soil pH accordingly. For instance, adding sulfur or peat moss will lower the pH and promote blue flowers, while incorporating lime or dolomitic limestone will raise the pH and encourage pink blooms.
pH Ranges for Blue and Pink Hydrangeas
To grow blue or pink hydrangeas, it’s essential to understand the specific pH ranges they require. Blue hydrangeas typically thrive in acidic soils with a pH range of 6.0-6.5. In these conditions, aluminum ions become more available, promoting the production of anthocyanin pigments that give the flowers their blue color. On the other hand, pink hydrangeas prefer slightly alkaline to neutral soils with a pH between 6.5-7.5.
However, it’s crucial to note that these pH ranges can vary depending on factors like climate, soil type, and nutrient levels. For instance, in cooler climates or where the soil is rich in organic matter, blue hydrangeas may tolerate slightly higher pH levels. Conversely, in warmer climates with poor soil quality, pink hydrangeas might require more acidic conditions.
To achieve your desired flower color, test your soil regularly to determine its pH level and adjust it accordingly. For blue hydrangeas, add elemental sulfur or aluminum sulfate to lower the pH. For pink hydrangeas, incorporate lime or dolomitic limestone to raise the pH. Keep in mind that sudden changes can be detrimental; make gradual adjustments over time to give your plants time to adapt.
Testing Your Soil pH: A Step-by-Step Guide
To determine whether your hydrangeas will bloom blue or pink, you’ll first need to test and adjust your soil’s pH levels. We’ll walk you through a simple step-by-step process for testing your soil pH.
Choosing the Right Testing Method
When it comes to determining your soil’s pH level, you have several testing methods at your disposal. One popular option is DIY kits, which can be purchased online or at a local nursery. These kits usually involve collecting a soil sample and sending it off for analysis, but some kits also provide instant results using test strips or a color chart.
While DIY kits are convenient and relatively inexpensive, they may not always provide the most accurate readings. Laboratory tests, on the other hand, offer precise measurements and can be tailored to specific needs, such as detecting nutrient deficiencies. However, these tests often require sending off samples and waiting for results, which can take several days or even weeks.
For a more immediate solution, consider investing in an at-home pH meter. These devices allow you to quickly and accurately measure your soil’s pH level, making it easier to make adjustments on the spot. However, be aware that pH meters may not be as accurate as laboratory tests and require regular calibration to ensure reliable results.
Ultimately, the best testing method for you will depend on your specific needs and preferences. Consider factors such as budget, convenience, and accuracy when selecting a method.
Interpreting Your Soil Test Results
Now that you have your soil test results in hand, it’s time to interpret them accurately. This is where many gardeners go wrong – they misinterpret their data and end up making the wrong adjustments to their soil pH levels. To avoid this common mistake, let’s break down what each part of your soil test report means.
Your soil test report will likely include a range of parameters, including pH levels, nutrient content, and other chemical properties. When it comes to interpreting your results, start by looking at the pH level – is it within the ideal range for hydrangeas (around 6.0-7.0)? If not, you’ll need to make adjustments.
Don’t just focus on the pH level itself; also consider the nutrient content and other chemical properties that can impact soil pH. For example, high levels of magnesium or potassium can contribute to an acidic pH environment, while high levels of calcium or lime can make it more alkaline. By considering all these factors, you’ll be able to accurately assess your soil’s needs and take steps to adjust the pH accordingly.
When making adjustments, remember that small changes can add up over time. Start with incremental changes (e.g., adding a small amount of lime or sulfur) and reassess your results after several months. This will help you fine-tune your approach and ensure the best possible growing conditions for your hydrangeas.
Adjusting Your Soil pH for Blue or Pink Hydrangeas
To encourage your blue or pink hydrangea to bloom its best, you’ll need to adjust the soil pH in a way that favors either acidic or alkaline conditions. Let’s dive into the specifics of how to do this effectively.
Methods for Raising or Lowering Soil pH
Adjusting soil pH is crucial for growing vibrant blue or pink hydrangeas. There are several methods to raise or lower soil pH, each with its pros and cons.
To raise soil pH (make it more alkaline), you can apply lime to the soil. Dolomitic limestone is a popular choice as it also provides essential minerals like calcium and magnesium. However, be cautious not to overdo it, as excessive lime application can lead to nutrient imbalances. For example, adding 1-2 pounds of dolomitic limestone per 100 square feet of garden bed should do the trick.
On the other hand, sulfur additions are used to lower soil pH (make it more acidic). Alfalfa meal or peat moss are good options for this purpose. Sulfur is slow-acting and may take a few months to show results. It’s essential to follow instructions carefully, as over-sulfurization can cause long-term damage to the soil.
Organic matter amendments like compost or well-rotted manure can also help adjust soil pH. These additions improve soil structure, increase nutrient availability, and promote beneficial microbial activity. Mix 2-3 inches of compost into the top 6-8 inches of soil for optimal results. Remember to test your soil regularly to monitor progress and make adjustments as needed.
Precautions When Changing Your Soil pH
When changing your soil pH to encourage blue or pink blooms on your hydrangeas, it’s essential to be cautious and make adjustments gradually. Rapid pH changes can shock your plants, leading to root damage, stunted growth, or even plant death.
This is because hydrangeas have adapted to thrive in acidic or alkaline environments over time. A sudden shift in soil pH can cause stress, making them more susceptible to pests, diseases, and nutrient deficiencies. To avoid this, it’s crucial to monitor your soil pH closely and make adjustments gradually over several months.
For example, if you’re trying to lower the pH of your soil to encourage blue blooms, start by adding a small amount of elemental sulfur (about 1 pound per 100 square feet) and retest the soil every few weeks. Repeat this process until you reach the desired pH level. It’s better to err on the side of caution and make slow adjustments than to risk shocking your plants with drastic changes.
Common Mistakes to Avoid When Growing Hydrangeas
As you strive for vibrant blue or delicate pink blooms, be mindful of these common mistakes that can harm your hydrangea’s health and affect its flower color. Don’t let preventable errors sabotage your garden’s beauty.
Overlooking Nutrient Deficiencies
When growing hydrangeas, it’s easy to get caught up in worrying about soil pH levels, but neglecting essential nutrient deficiencies can be just as detrimental. A well-balanced fertilizer application is crucial for optimal growth and blooming.
One common oversight is magnesium deficiency, which can cause leaves to turn yellow or develop brown tips. This essential mineral helps with photosynthesis and is particularly important during the flowering stage. Soil pH has a significant impact on magnesium availability – acidic soils tend to be more prone to magnesium deficiencies.
Potassium, another critical nutrient, plays a vital role in flower development and overall plant health. Potassium shortages can lead to weak stems, reduced blooming, and increased susceptibility to disease. Fertilizers high in phosphorus (P) may exacerbate potassium deficiencies, as they promote root growth but can leach potassium from the soil.
Regular soil testing can help identify nutrient imbalances early on. Based on your results, adjust your fertilizer applications to ensure you’re providing a balanced diet for your hydrangeas.
Neglecting Soil Aeration and Structure
When growing hydrangeas, it’s easy to overlook the importance of soil aeration and structure. However, neglecting these essential aspects can lead to a range of problems, from poor root development to reduced flower production.
To ensure healthy growth, your hydrangea’s roots need oxygen to thrive. Compacted or waterlogged soil can deprive them of this vital resource, causing roots to rot and plants to become vulnerable to disease. To improve soil drainage, consider incorporating organic matter like compost or well-rotted manure into the soil. This will help break down clay particles and improve the overall structure.
When it comes to improving soil aeration, mulching is an effective solution. Apply a 2-inch layer of organic mulch around your hydrangea’s base, keeping it several inches away from the plant’s stem. As the mulch breaks down, it will help maintain a consistent moisture level and reduce soil compaction.
If you’re unsure about the current state of your soil, consider getting a professional to assess its structure and recommend necessary adjustments. By prioritizing soil aeration and structure, you’ll be giving your hydrangea the best chance to thrive – and enjoy those beautiful blue or pink blooms.
Conclusion: Tips for Growing Healthy Blue or Pink Hydrangeas
Now that you’ve learned how to make your hydrangeas bloom blue or pink, let’s wrap up with some practical tips to keep them thriving in their new color. Here are our top recommendations for healthy growth.
Recap of Key Takeaways
To ensure you grow healthy blue or pink hydrangeas, remember these key takeaways from our comprehensive guide. Understanding soil pH is crucial for achieving the desired bloom color and overall plant health. You can test your soil’s pH using a DIY kit or sending it to a laboratory for analysis.
Adjusting your soil pH requires patience, but with the right techniques, you can achieve optimal results. For blue hydrangeas, aim for acidic soil with a pH between 5.0 and 6.0. To lower your soil’s pH, add elemental sulfur or peat moss. On the other hand, pink hydrangeas thrive in alkaline soils with a pH between 6.0 and 7.0.
To raise your soil’s pH, mix in lime or crushed eggshells. Remember to take gradual steps when adjusting your soil pH, as sudden changes can harm your plants. By following these tips and keeping your soil’s pH in check, you’ll be well on your way to growing vibrant blue or pink hydrangeas that add a pop of color to your garden. Regular testing and adjustments will help maintain optimal conditions for your plants’ health and beauty.
Final Thoughts on Hydrangea Care
As you continue to nurture your blue or pink hydrangeas, remember that maintenance is an ongoing process. It’s essential to keep monitoring your soil pH and making adjustments as necessary. This ensures your plants remain healthy and continue to thrive.
Make sure to check your soil pH regularly, especially during the growing season when hydrangeas require more nutrients. A simple DIY kit or a trip to your local nursery can provide you with the necessary tools for accurate testing. Once you have your results, use them to guide your fertilization decisions.
For blue hydrangeas, aim for an acidic to slightly acidic soil pH between 5.0 and 6.0. If your soil is too alkaline (above 7.0), consider adding elemental sulfur or peat moss to lower the pH. On the other hand, pink hydrangeas prefer a more neutral to slightly alkaline soil pH ranging from 6.0 to 7.5.
Keep in mind that these are general guidelines, and your specific climate, soil type, and plant variety may require adjustments. Consult with local experts or online resources for tailored advice. By staying vigilant and making informed decisions about your soil’s pH, you’ll be well on your way to enjoying vibrant blue or pink blooms season after season.
Frequently Asked Questions
What if I’m unsure which testing method to choose for my soil pH?
Yes, you can consider multiple testing methods before making a decision, but ultimately, the most accurate results come from taking your own soil sample and sending it to a lab for analysis. This ensures you’re working with precise data tailored to your specific garden environment.
Can I raise or lower the pH of my entire yard at once?
No, this approach can be costly and potentially disrupt other plants in your garden that rely on their native pH levels. Instead, focus on adjusting the soil pH around individual hydrangea plants as needed, using targeted methods like adding lime to acidify alkaline soils.
What’s a common mistake people make when trying to adjust their soil pH?
Many gardeners overlook the need for patience and regular monitoring of their soil conditions. Hydrangeas take time to respond to pH adjustments, so it’s essential to regularly test your soil and make adjustments gradually rather than trying to force sudden changes.
How can I ensure my hydrangea flowers retain their blue or pink color over multiple seasons?
By maintaining a consistent level of acidity or alkalinity in the soil surrounding each plant, you’ll promote stable flower coloration. Regularly check your soil pH levels, and make adjustments as needed to create an optimal environment for long-term bloom health.
What if I have limited gardening experience; how can I still achieve the right soil pH for my hydrangeas?
Start by investing in a basic soil testing kit that allows you to collect accurate pH readings. You can then use online resources or consult with local nurseries and gardening experts to determine the best methods for adjusting your soil’s pH levels based on your specific climate and plant types.