Are you eager to grow your own elderberries but not sure where to start? With their delicious fruit, beautiful flowers, and numerous health benefits, it’s no wonder elderberry gardening has gained popularity in recent years. But with so many varieties to choose from, planting, pruning, and pest control can be overwhelming for even the most experienced gardeners.
In this article, we’ll share expert advice on how to grow and care for these incredible plants. From selecting the perfect variety for your climate and needs, to tips on harvesting and preserving the fruit, we’ve got you covered. We’ll also cover essential topics like pest control and pruning to ensure a bountiful harvest every year. Whether you’re a seasoned gardener or just starting out, our elderberry gardening tips will help you get the most out of your plants.
Choosing the Right Variety of Elderberry
When selecting a variety of elderberry for your garden, you’ll want to consider factors such as climate adaptability and desired berry size. This will ensure you choose a type that thrives in your specific environment.
Understanding the Different Types of Elderberry
When it comes to choosing the right variety of elderberry for your garden, understanding the different types is crucial. There are several species of elderberries, but the three most commonly cultivated are Sambucus nigra (European), Sambucus canadensis (American), and Sambucus caucasica.
The European elderberry (Sambucus nigra) is a popular choice for gardeners due to its compact growth habit and high yields. It’s also known for its dark purple berries, which are rich in anthocyanins and other antioxidants. This variety is ideal for small spaces and containers.
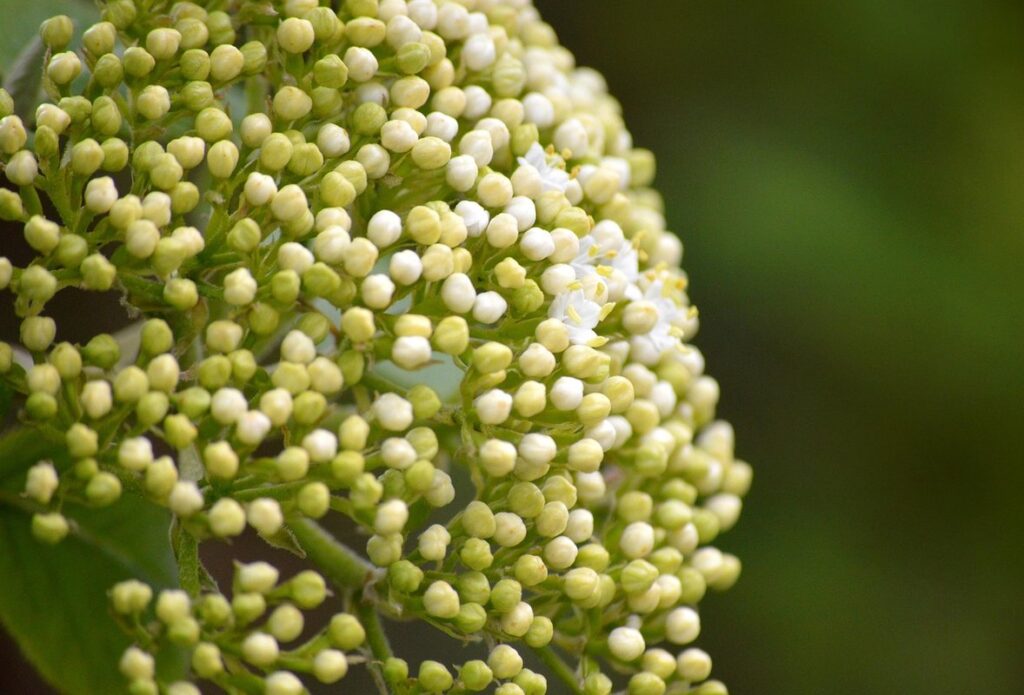
In contrast, the American elderberry (Sambucus canadensis) is a larger shrub that produces white flowers and yellow-orange berries. It’s native to North America and has a more robust growth habit than the European variety. The American elderberry is known for its cold hardiness and ability to thrive in a range of soils.
The Caucasus elderberry (Sambucus caucasica) is a lesser-known variety that’s gaining popularity among gardeners. It produces dark purple berries with a sweeter flavor profile than other elderberries. This variety is more tolerant of heat and drought, making it an excellent choice for warmer climates.
When selecting an elderberry variety, consider factors such as space, climate, and desired yield. Research the specific needs of each type to ensure you’re choosing the best fit for your garden.
Selecting a Variety for Your Climate and Region
When selecting an elderberry variety for your garden, it’s essential to consider your local climate and region. Elderberries are adaptable plants, but they still have specific needs when it comes to temperature, humidity, and sunlight.
Start by assessing your area’s average temperature range. Some elderberry varieties thrive in cold climates with temperatures as low as -20°F (-29°C), while others prefer warmer temperatures above 40°F (4°C). For example, ‘Adams’ is a good choice for cooler climates, but it may not perform well in areas with extremely hot summers.
Humidity also plays a crucial role in elderberry growth. Varieties like ‘York’ and ‘Patriot’ are more tolerant of humidity, making them suitable for coastal regions or areas with high rainfall. On the other hand, varieties like ‘Black Beauty’ prefer drier conditions.
Lastly, consider your area’s sunlight requirements. Some elderberry varieties need full sun (six hours of direct sunlight), while others can tolerate partial shade. Choose a variety that matches your garden’s sunlight levels to ensure optimal growth and fruit production. By taking these factors into account, you’ll be well on your way to selecting an elderberry variety that thrives in your specific climate and region.
Factors Affecting Elderberry Growth: Soil and Sunlight
When it comes to growing elderberries, two of the most critical factors that affect their growth and productivity are soil quality and sunlight exposure. Soil pH levels play a crucial role in determining the nutrient availability for your plants. Elderberries prefer slightly acidic to neutral soil pH (6.0-7.5), so if your soil is too alkaline or acidic, you’ll need to take corrective measures.
Sunlight is another essential factor that can significantly impact elderberry growth. These plants require full sun to partial shade, depending on the specific variety and climate conditions. In areas with intense sunlight, provide some afternoon shading to prevent scorching of leaves. On average, elderberries require at least 6 hours of direct sunlight per day for optimal growth.
To optimize your soil quality, consider adding organic matter such as compost or well-rotted manure to improve its structure and fertility. Regularly test your soil pH levels to ensure they’re within the ideal range for your plants. By creating an optimal growing environment with suitable soil conditions and sufficient sunlight exposure, you’ll be well on your way to producing healthy, thriving elderberry bushes.
Planting and Care Techniques
To grow a thriving elderberry plant, you’ll need to know the best planting and care techniques for optimal fruit production and healthy growth. This includes tips on soil preparation, watering, and pruning.
Preparing the Soil for Elderberry Planting
When preparing the soil for elderberry planting, it’s essential to create a well-draining and fertile environment that will support healthy growth. Start by removing weeds from the area using a tool like a fork or hoe. This is crucial because weeds can compete with your elderberries for water and nutrients, hindering their development.
Next, loosen the soil using a garden fork to a depth of about 12-18 inches. This loosening process will help improve drainage and prevent waterlogged conditions that can lead to root rot. If your soil is particularly dense or heavy clay, consider incorporating organic matter like compost or well-rotted manure to enhance its structure.
Add necessary nutrients by mixing in 2-4 cups of balanced fertilizer (10-10-10 NPK) per plant. You can also incorporate slow-release fertilizers for long-term nutrition. Finally, create a shallow ditch around the planting area to capture rainwater and reduce soil erosion during heavy rainfall events. With proper soil preparation, you’ll be setting your elderberries up for success from day one.
Watering and Mulching Best Practices
When it comes to watering and mulching your elderberry plants, getting it right is crucial for healthy growth and maximum fruit production. Overwatering can be just as detrimental as underwatering, so finding that sweet spot is essential.
Here are some key things to keep in mind: Water your elderberries regularly, but make sure the soil isn’t waterlogged. Aim to provide about 1 inch of water per week, either from rainfall or irrigation. It’s also a good idea to mulch around the base of your plants to retain moisture and suppress weeds.
Mulching can be particularly beneficial for elderberry plants, as it helps keep the roots cool and stable during hot summer months. Use organic materials like wood chips or straw, keeping the layer about 2-3 inches thick. Avoid over-mulching, which can prevent air from reaching the roots and cause more harm than good.
By following these simple tips, you’ll be well on your way to growing healthy, thriving elderberry plants that produce a bounty of delicious fruit every year.
Pruning and Training Your Elderberry Bushes
Pruning and training your elderberry bushes are essential tasks to ensure they maintain an optimal structure and produce abundant fruit. Regular pruning not only promotes healthy growth but also encourages the bush to become more productive.
When it comes to pruning, timing is crucial. For most varieties of elderberries, spring pruning (late February or early March) and summer pruning (July-August) are recommended. During this period, remove any dead, diseased, or damaged branches, as well as those that are crossing over each other or growing inwards.
To train your elderberry bush into a central leader or open center system, focus on selecting three to four main branches that will serve as the primary framework for the plant’s structure. Remove any weak or spindly growth by cutting back these branches to about one-third of their length. This process encourages branching and promotes an even distribution of fruit.
By pruning and training your elderberry bushes regularly, you’ll be rewarded with a more compact, productive, and beautiful shrub that provides plenty of delicious berries for years to come.
Elderberry Pests and Diseases: Identification and Control
As you tend to your elderberry bushes, it’s not uncommon for pests and diseases to pop up. Let’s go over how to identify and control common issues affecting these beautiful plants.
Common Pests Affecting Elderberries
When it comes to growing elderberries, one of the most frustrating issues gardeners face is pest infestations. Unfortunately, these tiny critters can wreak havoc on your plants, causing damage and reducing yields. Let’s take a closer look at some common pests that target elderberries.
Aphids are one of the most common pests affecting elderberry plants. These small, soft-bodied insects feed on sap, causing curled or distorted leaves. To control aphid infestations, use neem oil or insecticidal soap to spray affected areas. You can also introduce natural predators like ladybugs or lacewings to your garden.
Spider mites are another common pest that can cause significant damage to elderberry plants. These tiny arachnids feed on plant sap, causing yellowing leaves and white webbing. To control spider mite infestations, use a strong jet of water to wash off the mites or apply horticultural oil.
Beetles, such as Japanese beetles and June beetles, can also target elderberry plants. These pests feed on leaves and flowers, causing significant damage. To control beetle infestations, hand-pick them from your plants at night when they’re most active, or use traps with pheromone lures to attract the males.
By being aware of these common pests and taking proactive measures to control infestations, you can protect your elderberry plants and enjoy a bountiful harvest.
Recognizing Common Elderberry Diseases
Elderberry diseases can be a major concern for gardeners, causing damage to leaves, flowers, and ultimately, berries. Among the most common diseases affecting elderberries are powdery mildew and leaf spot. Powdery mildew appears as a white, powdery coating on leaves, while leaf spot manifests as small, circular lesions with yellow or brown centers.
To prevent these diseases, it’s essential to maintain good garden hygiene. Remove any infected plant material to avoid spreading the disease, and keep your garden well-ventilated to reduce moisture buildup. Regular watering schedules can also help prevent fungal growth.
If you do notice powdery mildew or leaf spot on your elderberry plants, there are steps you can take to treat them. For mild cases, try spraying a mixture of 1 tablespoon of baking soda and 1 gallon of water on the affected areas. For more severe infections, use a fungicide specifically designed for ornamental plants.
To manage these diseases long-term, consider implementing integrated pest management (IPM) strategies, such as crop rotation, pruning infected branches, and practicing good soil health through composting.
Harvesting and Preserving Elderberries
Now that you’ve harvested your elderberry bounty, let’s dive into the best methods for preserving these delicate berries to enjoy them year-round. From drying to freezing, we’ll cover it all!
Timing and Techniques for Optimal Harvesting
When it comes to harvesting elderberries, timing is everything. You want to pick them at just the right moment to ensure optimal flavor and nutrition. One way to determine when they’re ready is by observing their color, texture, and aroma.
Start by checking the color of the berries. Ripe elderberries are a deep purple color, almost black. If they’re still green or light purple, give them a few more days. Keep in mind that some varieties may stay green even when ripe, so it’s essential to check their firmness as well.
Gently touch the berry to assess its texture. A ripe elderberry will be slightly soft to the touch but still hold its shape. Avoid picking berries that are too soft or mushy, as they’ll be more prone to spoilage.
Another indicator of ripeness is the aroma. Ripe elderberries give off a sweet, earthy scent. If you don’t notice this fragrance when you gently rub the berry against your nose, it may not be ripe yet.
Methods for Preserving Fresh Elderberries
When it comes to preserving fresh elderberries, there are several methods that can help you enjoy their flavor and nutritional benefits throughout the year. One of the easiest ways is to freeze them. To do this, simply rinse the berries with cold water, pat them dry with a paper towel, and spread them out on a baking sheet lined with parchment paper. Place the sheet in the freezer until the berries are frozen solid, then transfer them to an airtight container or freezer bag for storage.
Dehydrating is another popular method that helps retain the berries’ nutrients and flavor. You can use a food dehydrator or your oven on its lowest temperature setting. Spread the berries out in a single layer and allow them to dry until they reach your desired level of dryness. Once dry, store them in an airtight container.
Canning is also a great option for preserving elderberries, but it requires some extra equipment and knowledge. You’ll need a water bath canner and some basic canning supplies. Sterilize the jars and lids, fill with the berries and any desired liquid, and process them in the canner according to your recipe’s instructions. This method is perfect for making jams, jellies, or sauces that will last all year long.
Regardless of which method you choose, make sure to follow proper food safety guidelines to ensure your preserved elderberries remain safe to eat. With a little practice and patience, you’ll be enjoying your home-preserved elderberry treats in no time!
Utilizing Your Elderberry Harvest
Now that you’ve harvested your elderberries, it’s time to think creatively about how to use them. From jams and wines to salves and syrups, we’ll explore some delicious and practical ideas.
Cooking with Elderberries: Recipes and Tips
When it comes to utilizing your elderberry harvest, cooking with these delicious berries is one of the most rewarding ways to enjoy their flavor and nutritional benefits. From sweet treats like jams and preserves to savory pies and tarts, there are countless ways to incorporate elderberries into your baking repertoire.
Let’s start with some basics: you can use fresh or frozen elderberries in most recipes, but be sure to wash them thoroughly before using. A great way to get started is by making a simple elderberry jam – simply combine 2 cups of berries with 1 cup of sugar and 1/4 cup of water in a saucepan, then cook over medium heat until the mixture thickens.
Elderberries also pair beautifully with other fruits like raspberries or blueberries, so don’t be afraid to experiment with new flavor combinations. For example, try making an elderberry-raspberry pie by mixing equal parts fresh berries and sugar with 1 tablespoon of cornstarch in a bowl, then filling pre-made pie crusts and baking until golden brown.
Some other tips for cooking with elderberries include using them in baked goods like muffins or scones, where their natural sweetness and earthy flavor can add depth to your creations. You can also try making elderberry syrup by combining 2 cups of berries with 2 cups of water and a bit of sugar, then straining the mixture through a cheesecloth and storing it in the fridge for up to a month.
Medicinal Uses for Elderberries
Elderberries have been used for centuries to promote overall health and well-being. These small, dark purple fruits are packed with medicinal properties that can be utilized in a variety of ways. The most significant benefit of elderberries lies in their antiviral and anti-inflammatory capabilities, making them an excellent remedy for combating colds and flu.
You can harness the medicinal power of elderberries by brewing them into teas or infusions. To make a traditional elderberry tea, simply add 1-2 tablespoons of dried elderberries to a cup of boiling water. Steep for 5-7 minutes, then strain and enjoy as needed. This is an excellent way to incorporate elderberries into your daily routine, especially during the winter months when colds and flu are more prevalent.
You can also use elderberry syrup or tincture as a preventative measure against illness. Add a spoonful of syrup to your morning juice or smoothie for an immune-boosting kick. Alternatively, mix 10-15 drops of elderberry tincture with water to create a soothing and protective drink.
It’s essential to note that while elderberries are medicinal, they should not be used as a replacement for medical treatment. Consult with a healthcare professional before using elderberries as a remedy, especially if you’re pregnant or have any underlying health conditions.
Frequently Asked Questions
What are the ideal growing conditions for elderberries, and how can I replicate them in my garden?
Elderberries prefer well-drained soil with a pH between 6.0 and 7.0, as well as full sun to partial shade. To replicate these conditions, ensure your garden receives at least six hours of direct sunlight and plant the bushes in a location with good air circulation.
How often should I water my elderberry plants during hot summer months, and what are some signs of overwatering?
Yes, it’s essential to keep the soil consistently moist, especially during droughts. However, avoid overwatering by checking for signs such as yellow leaves, droopy stems, or water pooling around the base of the plant.
Can I grow multiple types of elderberries together in a single garden, and how do they interact with each other?
No, it’s not recommended to grow different species of elderberry together due to potential disease transmission and competition for resources. Instead, consider planting companion plants that benefit from the shade provided by your elderberries.
How can I prevent my elderberry bushes from becoming too leggy or unproductive after a few years of growth?
Yes, regular pruning is crucial in maintaining healthy, productive bushes. Remove dead or diseased branches and thin out the center to allow for air circulation. This will promote new growth and encourage fruiting.
Can I use mulch around my elderberry plants to retain moisture and suppress weeds, and are there any specific types of mulch that work well?
Yes, using a 2-3 inch layer of organic mulch such as wood chips or straw can help retain moisture and suppress weeds. However, be cautious not to pile mulch too close to the base of the plant, as this can cause damage.