If you’re one of the many plant enthusiasts who’s fallen in love with the vibrant, colorful leaves of the croton, you’re probably eager to learn how to care for your new green friend. With over 250 species to choose from, it can be overwhelming to figure out what works best for your specific variety. But don’t worry – we’ve got you covered! In this comprehensive guide, we’ll walk you through everything you need to know about croton care, from planting and watering to fertilizing and pruning. We’ll also cover some common issues that might arise, so you can troubleshoot with confidence. By the end of this article, you’ll be well-equipped to give your croton the TLC it deserves, and enjoy a thriving plant that brings joy and beauty to your space.
Understanding Your Croton
Crotons are known for their vibrant colors and unique shapes, but did you know there’s more to these plants than meets the eye? Let’s dive into what makes your croton tick.
Choosing the Right Variety
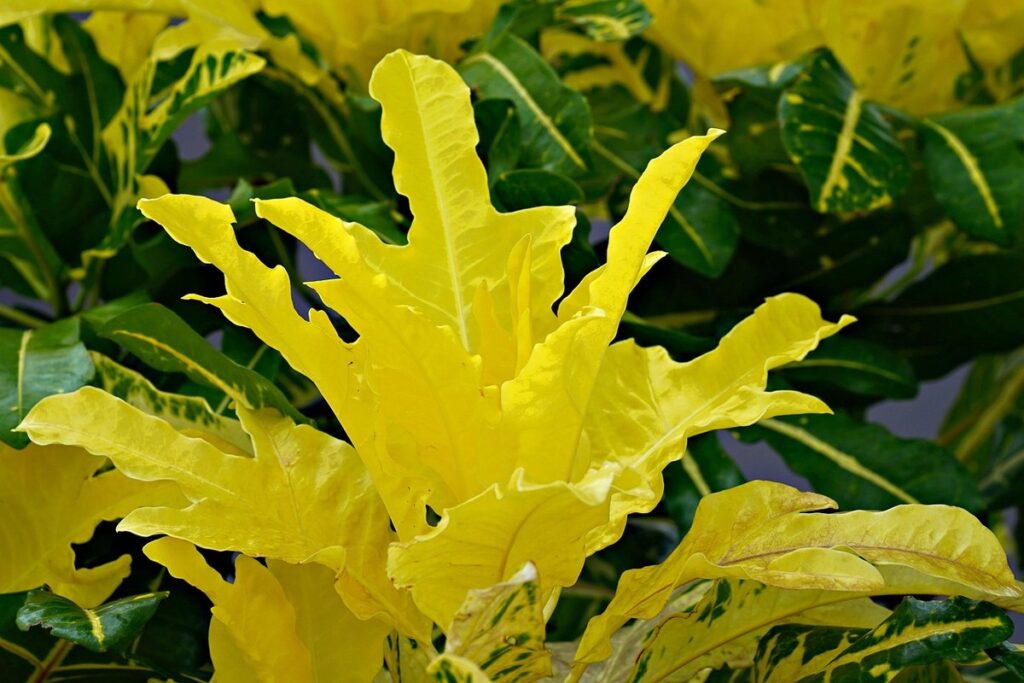
When it comes to choosing the perfect croton for your space, you’re not limited to just one option. There are over 250 species of crotons, each with its unique characteristics, growth habits, and leaf patterns. Some popular varieties include ‘Petra’, known for its vibrant orange-red foliage, while others like ‘Lemon Lime’ boast bright yellow and green stripes.
To select the right variety for your space, consider factors such as lighting conditions, temperature tolerance, and desired maintenance level. For example, if you live in a hot and sunny climate, look for varieties that are resistant to heat stress, like ‘Gold Dust’. On the other hand, if you’re short on space or have limited care time, choose compact varieties like ‘Mini’ or ‘Tiger Stripe’.
Keep in mind that some croton varieties can grow quite large, up to 6 feet tall, while others remain relatively small. Also, be aware of any potential allergens or sensitivities when introducing a new plant to your space. Research the specific needs and requirements for each variety before making a final decision.
Environmental Factors to Consider
When it comes to caring for your croton, understanding its environmental needs is crucial. The truth is, different species of crotons have varying requirements when it comes to temperature, humidity, light, and watering.
For instance, Croton capitatus and Croton lechleri thrive in warmer temperatures between 65-75°F (18-24°C), while Croton arborescens prefers cooler temps around 55-65°F (13-18°C). Be sure to research the specific needs of your croton species to ensure you’re providing it with an optimal environment.
Lighting is another critical factor. Some crotons, like Croton multiflorus, love bright indirect light, while others, such as Croton persimmon, can tolerate low light conditions. Over-exposure to direct sunlight can lead to scorching and leaf drop, so consider using a sheer curtain or placing your plant a few feet away from a sunny window.
Humidity is also essential. Most crotons prefer a relatively high humidity of 50-60%, but some species are more tolerant than others. To maintain the right level, you can place the pot on a tray filled with water and pebbles or use a humidifier nearby.
Proper watering is also key, as overwatering can lead to root rot and other issues. Research your croton’s specific watering needs based on its species, pot size, and time of year. A general rule of thumb is to allow the top inch of soil to dry out between waterings.
Planting and Soil Requirements
To grow a healthy croton, you’ll want to focus on choosing the right soil mix and planting it at the correct depth. We’ll walk through these essential steps in the next section.
Preparing the Perfect Potting Mix
When it comes to preparing the perfect potting mix for your croton, you’ll want to focus on creating a well-balanced blend that provides optimal growing conditions. Crotons prefer a slightly acidic to neutral soil pH, ranging from 6.0 to 7.0. To achieve this, look for a potting mix with a pH level within this range.
A good potting mix should also contain a combination of ingredients such as peat moss or coconut coir, vermiculite, and perlite. These components help retain moisture, improve drainage, and provide aeration to the roots. You can either purchase a high-quality commercial potting mix specifically designed for tropical plants like crotons or create your own blend using these ingredients.
When selecting a potting mix, also consider its nutrient content. Crotons are heavy feeders and require a balanced fertilizer with a slightly higher nitrogen content than phosphorus and potassium. A water-soluble 20-5-10 NPK (nitrogen-phosphorus-potassium) fertilizer can be applied regularly to promote healthy growth. By choosing the right potting mix and fertilizing accordingly, you’ll set your croton up for optimal health and a vibrant display of color.
Transplanting and Repotting Tips
When it’s time to transplant or repot your croton, handling its roots with care is crucial. Before you start, make sure to gently remove the plant from its container and wash away as much of the old soil as possible. This will help prevent any potential diseases or pests from spreading to the new soil.
To minimize root shock during this process, try not to disturb the roots more than necessary. If the roots are circling or growing out of the drainage holes, use a fork to gently loosen them and encourage new growth in all directions.
Choose a container that’s only 1-2 sizes larger than the original one, as crotons prefer slightly root-bound conditions. Select a well-draining potting mix specifically designed for tropical plants like yours. Water thoroughly after repotting, but make sure not to overwater – this can lead to root rot and other issues.
For best results, transplant or repot your croton in the spring or summer when it’s actively growing. Avoid doing so during winter months when growth is slower. With a little care and attention, your croton should adjust quickly to its new home and thrive with proper care.
Watering and Humidity Management
To keep your croton happy and thriving, it’s essential to get its watering and humidity needs just right, which can be a bit tricky. Let’s dive into some expert tips on managing these key factors.
The Importance of Consistent Moisture Levels
Watering your croton too little can cause leaves to drop and become discolored. Conversely, overwatering can lead to root rot and kill the plant. To maintain optimal health, it’s essential to keep a consistent moisture level.
Factors such as pot size, climate, and time of year significantly impact watering frequency. Smaller pots dry out faster than larger ones, so adjust your schedule accordingly. In hot and dry climates, crotons require more water than those in cooler environments. During the growing season (spring-fall), crotons need more moisture than during their dormant period (winter).
As a general rule of thumb, check the soil’s moisture by sticking your finger into the top 1-2 inches of soil. If it feels dry, it’s time to water. Water thoroughly until you see water draining out of the bottom of the pot. Allow the pot to drain completely before returning it to its saucer.
For a general guideline, consider watering every 3-4 days during the growing season and once a week in the winter months. However, this may vary depending on your specific climate and pot size. Monitor your croton’s response to adjust your schedule as needed.
Maintaining Optimal Humidity for Healthy Growth
Maintaining optimal humidity levels is crucial for promoting healthy growth in crotons. To monitor and manage humidity levels effectively, you’ll need to understand the ideal range for your plant. Generally, crotons prefer a humid environment with a relative humidity of 50-60%. However, this can vary depending on factors such as temperature and air circulation.
To gauge the humidity level in your home, use a hygrometer – a device specifically designed for measuring humidity. This will give you an accurate reading of the current humidity levels. You can then take steps to adjust the environment if necessary. For instance, placing the croton on a tray filled with water and pebbles can increase the surrounding humidity.
Another option is using a humidifier, which releases moisture into the air to maintain a consistent level. However, be cautious not to overdo it – too much humidity can lead to root rot and other issues. Monitor your plant’s response closely, making adjustments as needed to ensure optimal growth and health. Regularly checking the hygrometer will help you fine-tune the environment for your croton’s specific needs.
Fertilizing Your Croton
Proper fertilization is crucial for your croton’s continued health and vibrant color, so let’s dive into the best methods for feeding it what it needs. We’ll cover tips on how to fertilize indoors and outdoors.
Nutrient Requirements at Different Stages
When it comes to fertilizing your croton, it’s essential to consider the specific nutrient requirements at different stages of growth. As a general rule, seedlings require less fertilizer than mature plants. In fact, over-fertilization can be detrimental to young seedlings, causing them to become scorched and weakened.
At the seedling stage (0-6 months), provide your croton with a balanced, water-soluble fertilizer at half the recommended strength. This will promote healthy root development without burning the delicate roots. As your plant matures, you can gradually increase the fertilizer concentration up to full strength.
For established plants (6+ months), focus on promoting robust leaf growth and vibrant colors. Use a fertilizer rich in phosphorus, such as 10-20-10 NPK (nitrogen-phosphorus-potassium). During periods of high growth or stress, like during blooming or transplanting, increase the frequency of fertilization to once every 1-2 weeks.
Keep in mind that some croton species have varying fertilizer requirements. For example, the ‘Petite’ series tends to require less fertilizer than other varieties. Be sure to research your specific variety’s needs and adjust your fertilizing schedule accordingly.
Best Practices for Feeding Your Plant
When it comes to feeding your croton, you want to provide it with the right nutrients at the right time. The best practices for fertilizing your croton involve choosing a balanced fertilizer that’s high in nitrogen (N), phosphorus (P), and potassium (K). Look for a fertilizer labeled as 20-20-20, which means it contains 20% N, P, and K.
When applying fertilizer, make sure to follow the instructions on the label. A general rule of thumb is to fertilize your croton during the growing season (spring and summer) with a liquid or water-soluble fertilizer. For best results, dilute the fertilizer to half the recommended strength to avoid burning your plant’s roots.
It’s also essential to consider the type of soil you’re using. If you’re potting mix is high in organic matter, you may not need to fertilize as frequently. However, if your soil is depleted or lacking in nutrients, a balanced fertilizer will help replenish what’s missing. To avoid over-fertilizing, start with a small dose and gradually increase as needed based on your plant’s response.
A good dosing strategy is to fertilize every 2-4 weeks during the growing season. Be sure to water thoroughly after application to prevent any burning of the roots. With these best practices in mind, you’ll be well on your way to keeping your croton happy and healthy!
Pruning and Training Techniques
To keep your croton looking its best, you’ll need to learn some essential pruning and training techniques to maintain its shape and promote healthy growth. Let’s dive into the details of these crucial care practices!
Regular Pruning for Shape and Size Control
When it comes to maintaining the shape and size of your croton plant, regular pruning is essential. Pruning not only helps control the growth but also encourages a fuller appearance. To prune your croton for aesthetic appeal, start by removing any dead or damaged leaves with scissors or pruning shears.
Next, focus on shaping the plant’s overall form. Cut back long stems to encourage branching and prevent legginess. You can also remove select branches to maintain a balanced shape or promote air circulation within the plant. To control size, prune your croton every 6-8 weeks during the growing season by removing around one-third of the new growth.
For larger plants, you may need to prune more frequently, ideally once a month. Keep in mind that pruning too much at once can shock the plant, so be gentle and only remove what’s necessary. Remember, it’s better to err on the side of caution when pruning your croton, as over-pruning can lead to stress and potentially damage the plant.
By incorporating regular pruning into your care routine, you’ll maintain a healthy, visually appealing croton that continues to thrive with minimal maintenance.
Encouraging Bushy Growth and Fullness
When it comes to encouraging bushy growth and fullness in your croton, there are several techniques you can use. One of the most effective methods is to prune your plant regularly. Pruning helps to control the shape of the plant, encourages new growth, and promotes branching.
To promote bushy foliage, focus on removing any long, leggy stems or branches that are growing outwards from the center of the plant. Cut these stems back by about one-third to one-half to encourage the plant to produce more lateral growth. You can also try pinching off the tips of new shoots as they appear, which will help to direct the plant’s energy towards producing more foliage rather than extending its height.
Another technique for promoting fullness is to provide your croton with plenty of indirect light and maintain a warm temperature between 65-75°F (18-24°C). This will encourage the plant to produce more leaves and stems, creating a fuller, bushier appearance.
Troubleshooting Common Issues
We’ve all been there – a brown leaf, a yellow stem, and suddenly your lovely croton’s looking less than its best. Let’s tackle some common care issues together!
Identifying Pests and Diseases
As you tend to your croton plant, it’s essential to be vigilant for signs of pests and diseases that can quickly spread and cause significant damage. One of the most common pests affecting indoor plants like crotons is spider mites. These tiny, eight-legged creatures are barely visible to the naked eye but leave behind a telltale trail of fine webbing on the leaves.
To identify spider mite infestations, inspect your plant’s undersides and edges, where they tend to congregate. Mealybugs and scale insects can also be problematic, often hiding in crevices or on stems. If you notice white cottony patches or sticky residue, it may indicate an infestation.
Diseases like root rot and leaf drop can also be indicative of underlying issues. Root rot is typically caused by overwatering, while leaf drop can result from a combination of factors, including temperature fluctuations, humidity changes, or inadequate light exposure. If you notice droopy leaves, yellowing foliage, or soft spots on the stems, it’s crucial to investigate further and adjust your care routine accordingly.
Regularly inspect your plant’s roots for signs of rot, and be mindful of water usage. Prune affected areas promptly, and consider repotting in well-draining soil to prevent future problems.
Problem-Solving Tips and Remedies
When dealing with pest infestations or diseases on your croton plant, it’s essential to take swift action to prevent further damage. If you notice whiteflies, mealybugs, or spider mites, treat the affected areas with neem oil or insecticidal soap. These products can be applied directly to the leaves and stems of the plant.
To prevent future pest issues, ensure good air circulation around your croton by keeping it a few inches away from other plants. Regularly inspect your plant for signs of pests, such as sticky substance on leaves or tiny eggs on stems.
If you’re dealing with diseases like leaf spot or root rot, adjust your watering habits to provide the right amount of moisture. Overwatering is often the culprit behind these issues. Make sure the soil drains well and avoid getting water on the leaves to prevent fungal infections.
Preventing pests and diseases requires regular maintenance. Prune affected areas to maintain your croton’s health and encourage new growth. Consider repotting your plant in well-draining potting mix to improve its overall health and reduce the risk of root rot.
Propagating Your Croton
To ensure a steady supply of your favorite plant, learning how to propagate your croton is essential. This section will walk you through the process step-by-step.
Methods for Leaf Cuttings and Division
When it comes to propagating crotons, leaf cuttings and division are two of the most effective methods. To start, you’ll need a healthy, mature croton plant with plenty of leaves. Choose the strongest, healthiest leaves for propagation, as these will have the best chance of rooting successfully.
For leaf cuttings, simply snip off a section of stem about 2-3 inches long, making sure each cutting has at least two sets of leaves. Remove lower leaves, leaving only the top two or three pairs. Dip the cut end into a rooting hormone powder or liquid to stimulate root growth, and plant the cutting in a well-draining potting mix. Keep the soil consistently moist but not waterlogged.
Division is another popular method for propagating crotons. To do this, carefully dig up the entire plant, gently separating the roots with your fingers or a blunt instrument. Replant each section in a new pot, making sure the crown (where the stem meets the roots) is above soil level. Water thoroughly and keep the soil moist during the first few weeks after division. With proper care, you should see new growth emerging from the base of each plant within a few months.
Starting Seeds Indoors and Outdoors
Propagating croton plants from seeds can be a rewarding experience for growers. When mature croton plants produce seeds, they can be collected and used to start new plants indoors or outdoors.
To collect seeds from a mature croton plant, allow the seed pods to dry completely on the plant. Once the pods are brittle and break apart easily, remove the seeds and store them in an airtight container.
For indoor propagation, fill small pots or seed trays with a well-draining potting mix. Plant 1-2 seeds about ¼ inch deep in each pot. Water gently but thoroughly, making sure the soil is moist but not waterlogged. Keep the pots in a warm location with bright indirect light. Transplant the seedlings into larger pots once they have two sets of leaves.
For outdoor propagation, sow croton seeds directly into a prepared garden bed in late spring or early summer, when the danger of frost has passed. Plant 1-2 seeds about ¼ inch deep and 6-8 inches apart. Water regularly and provide full sun to partial shade.
Frequently Asked Questions
How often should I repot my croton, and when is the right time to do so?
Repotting your croton every 1-2 years can help maintain its health and encourage new growth. Look for signs like roots growing out of the pot or a decrease in water absorption rate as indicators that it’s time for repotting.
What are some common pests that target crotons, and how do I prevent infestations?
Common pests like mealybugs, spider mites, and scale can harm your croton. Regularly inspect your plant, use neem oil or insecticidal soap to prevent infestations, and maintain optimal humidity levels to discourage pests.
Can I propagate my croton using leaf cuttings, and what’s the best method for doing so?
Yes, you can propagate crotons through leaf cuttings. Take 2-3 healthy leaves with a small stem attached, remove lower leaves, and place them in water or a propagation medium until roots develop. This is an effective way to multiply your favorite variety.
How do I maintain the right humidity levels for my croton, especially during dry winter months?
Maintain optimal humidity (50-60%) by placing the pot on a tray filled with water and pebbles, using a humidifier, or grouping plants together. Avoid overwatering, which can lead to root rot and other issues.
What are some signs that my croton is receiving too much direct sunlight, and how do I mitigate this issue?
If your croton’s leaves become scorched, develop brown tips, or turn yellow, it may be receiving excessive direct sunlight. Move the plant to a spot with filtered or dappled light during peak sun hours (10am-4pm) to prevent damage.