Are you tired of struggling to get your carrots off the ground? Do you find yourself wondering why some seeds just won’t take off, no matter how carefully you’ve planned and prepared? Optimizing carrot germination rates can be a challenge, but with the right advice, you’ll be harvesting crunchy, delicious carrots in no time.
In this comprehensive guide, we’ll share expert tips on everything from seed quality to soil preparation, and even explore the optimal growing conditions for successful carrot cultivation. We’ll delve into the secrets of achieving high germination rates, so you can enjoy a bountiful harvest and impress your friends with your gardening prowess. From avoiding common mistakes to creating an ideal environment for your seeds to thrive, we’ve got you covered. Let’s get started on the journey to perfecting your carrot cultivation skills!
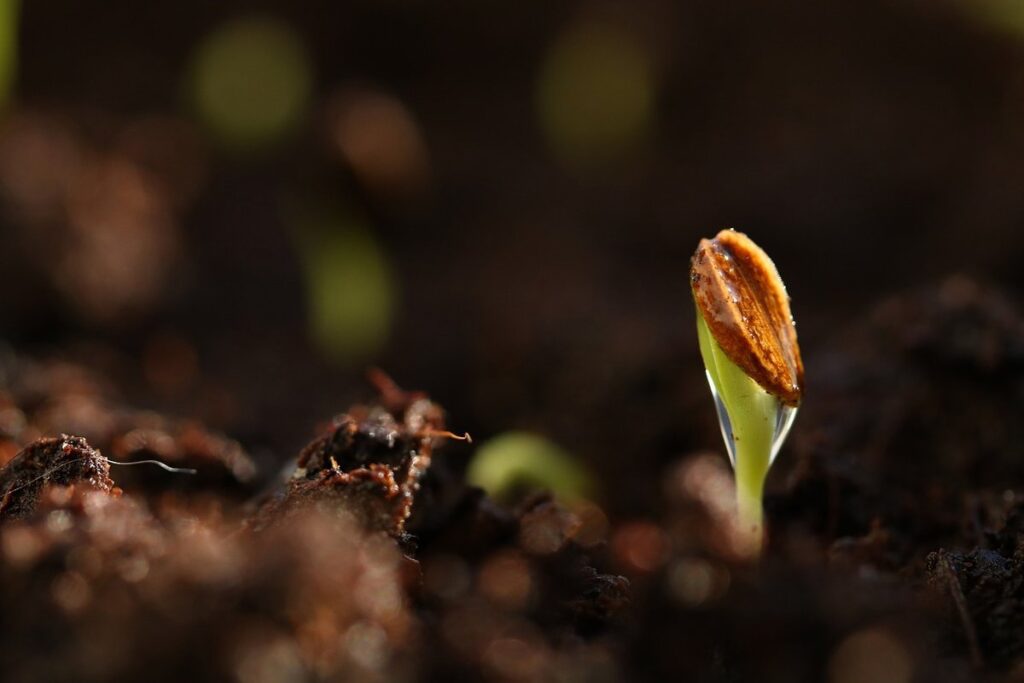
Understanding Carrot Germination
To grow healthy carrots, it’s essential to understand how they germinate and what factors affect this process. Let’s dive into the world of carrot germination!
Factors Influencing Germination Rate
When it comes to carrot germination rates, several key factors come into play. The quality of the soil is a crucial factor that significantly impacts the germination rate. Well-draining, loose soils with a pH between 6.0 and 6.8 provide an ideal environment for carrots to grow. On the other hand, heavy clay or sandy soils can hinder seedling growth.
Temperature also plays a vital role in carrot germination. Most carrot varieties prefer temperatures ranging from 60°F to 75°F (15°C to 24°C) during the day and above 40°F (4°C) at night for optimal results. Consistent moisture levels are essential, but overwatering can lead to fungal diseases that harm seedlings.
By controlling these factors, you can manipulate your environment to achieve optimal germination rates. For example, using raised beds or containers allows for better soil drainage and aeration. Providing supplemental heat through row covers or greenhouses can also help maintain the ideal temperature range. Additionally, monitoring soil moisture levels closely will prevent overwatering. By paying attention to these factors, you’ll be well on your way to growing healthy carrot seedlings that thrive in their environment.
Importance of Seed Quality
When it comes to carrot germination, one of the most critical factors that can make or break success is seed quality. Using high-quality seeds is essential for achieving optimal germination rates and healthy growth. Poor-quality seeds, on the other hand, can lead to inconsistent results, reduced yields, and increased susceptibility to pests and diseases.
To select the best seeds for your needs, look for reputable suppliers that offer high-germination-rate (HGR) or hybrid varieties specifically bred for local climate conditions. These types of seeds are designed to thrive in your specific region’s temperature, moisture levels, and soil type. Check the seed packet or label for information on germination rates, days to maturity, and resistance to common pests and diseases.
When handling seeds, make sure to store them properly in a cool, dry place to maintain their viability. Use fresh seeds within the recommended timeframe to ensure optimal germination. By investing in high-quality seeds, you’ll set yourself up for success and increase your chances of growing healthy, delicious carrots.
Preparing the Soil for Carrot Germination
To grow healthy carrots, it all starts with preparing the soil correctly. Learn how to optimize your garden’s soil conditions for successful carrot germination and a bountiful harvest.
Testing and Conditioning the Soil
Testing and conditioning the soil is crucial for optimal carrot germination. Before planting, you’ll want to determine the pH levels, nutrient content, and potential contaminants in your soil using various testing methods. A simple pH test kit can help you assess if your soil falls within the ideal range of 6.0-7.0 for carrots. If your soil is too acidic or alkaline, amend it with lime or sulfur accordingly.
Nutrient-rich soils typically contain a balanced mix of nitrogen (N), phosphorus (P), and potassium (K) – often referred to as NPK. A soil test will reveal whether your soil’s nutrient levels need supplementation. For example, if the report indicates low phosphorus levels, consider adding bone meal or rock phosphate.
In addition to testing, conditioning the soil is equally important. Carrots prefer well-draining, loose soils to prevent root deformation and rot. Remove debris, till the soil to a depth of 8-10 inches, and incorporate organic matter like compost or manure to improve drainage and aeration. This will ensure your carrots grow with optimal access to oxygen and water.
Soil Preparation Techniques
When preparing the soil for carrot germination, it’s essential to focus on creating an optimal environment that encourages healthy root development. To achieve this, you’ll need to employ various soil preparation techniques that improve structure and fertility.
One effective method is tilling, which involves loosening the top 8-10 inches of soil to a depth that allows for proper drainage and aeration. This process helps break up compacted layers, allowing water and nutrients to penetrate deeper into the soil. By tilling your soil before planting carrots, you’ll create an environment where their taproots can grow unhindered.
Composting is another valuable technique for enriching the soil. By mixing in a 2-3 inch layer of compost, you’ll introduce beneficial microorganisms that promote nutrient cycling and soil fertility. This, in turn, will support the growth of healthy carrot roots. Mulching also plays a vital role in maintaining soil temperature and moisture levels.
Regular mulching can help retain up to 30% more water than an unmulched area, which is crucial for carrots, as they require consistent moisture levels during germination.
Sowing Carrot Seeds Correctly
When sowing carrot seeds, it’s essential to get them right from the start. Follow these simple steps to ensure your seeds are placed at the correct depth and spacing for optimal germination.
Depth and Spacing Considerations
When sowing carrot seeds, it’s essential to consider the ideal depth and spacing for optimal germination rates. If the seeds are sown too shallowly, they may be exposed to drying winds, rodents, or birds that might eat them before they have a chance to germinate.
On the other hand, planting them too deeply can lead to poor soil contact, which may also affect their ability to germinate successfully. Generally, carrot seeds should be sown ¼ inch (6-8 mm) deep and ¼ inch apart in rows that are 1-2 inches (2.5-5 cm) apart.
It’s worth noting that some varieties of carrots can tolerate more crowding than others. If you’re growing a smaller variety, such as ‘Parisienne’ or ‘Thumbelina’, they may be sown closer together, around 2-3 inches (5-7.5 cm) on center.
When spacing seeds, also consider the mature size of the plants and allow enough room for easy access during weeding and harvesting. By paying attention to these factors, you can help ensure that your carrot seeds germinate at a high rate and grow into healthy, vibrant plants.
Seed Starting Methods
When it comes to starting carrot seeds, you have several methods to choose from, each with its own benefits and considerations. Direct sowing is one of the most straightforward approaches, where you sow the seeds directly into the garden bed at the correct depth and spacing. This method saves time and effort but requires a smooth, fine soil that’s free of debris.
Transplanting involves starting carrot seeds in seed trays or small pots indoors 2-3 weeks before the last frost date, then transplanting them outside when they have 2-3 sets of leaves. This approach allows for earlier harvesting but can be more labor-intensive and may lead to root disturbance during transplanting. Seed trays are also an option, where you sow multiple seeds per cell, thinning them out later as seedlings develop.
Ultimately, the choice of method depends on your specific climate, garden size, and personal preference. If you’re new to growing carrots, direct sowing or using seed trays may be a better starting point, while transplanting can offer more control over the germination process.
Maintaining Optimal Germination Conditions
To ensure healthy carrot seedlings, it’s essential that you maintain optimal germination conditions in your growing environment. Let’s explore some key factors to get this right.
Temperature Control
When it comes to carrot germination, temperature control is crucial for optimal growth. The ideal temperature range for germinating carrots is between 7-10°C (45-50°F), which may seem quite low compared to other vegetables. However, this temperature allows for even and consistent seed germination.
To achieve the right temperature conditions in your garden or indoor setup, consider using a cold frame or greenhouse. These structures can maintain temperatures within the optimal range during the day and night. Alternatively, you can create a mini-greenhouse effect by covering your seeds with a clear plastic bag or cloche.
Keep in mind that extreme temperatures, either too high or too low, can slow down germination rates. For example, if the temperature is too warm (above 20°C/68°F), it may cause the seeds to germinate unevenly or even rot. Similarly, temperatures below 5°C (41°F) can prolong germination times.
Maintaining consistent temperatures will help your carrot seeds grow strong and healthy from the start.
Watering and Humidity Management
Maintaining consistent moisture levels during the germination period is crucial for carrot seeds to sprout evenly and strongly. If the soil is too dry, seeds may struggle to break through the surface, while excessive moisture can lead to rot and other issues. To monitor moisture levels, you can use a spray bottle or a watering can to gently water the seeds once a day.
A humidity dome or cloche can also help maintain consistent moisture levels by trapping warm air around the seeds. You can place the seeds in a plastic bag or cover them with a clear lid to create a mini-greenhouse effect. This will help maintain a humid microclimate, ideal for germination.
In addition to monitoring moisture levels, it’s essential to understand that carrots require moderate humidity – between 50-70% relative humidity – during germination. You can achieve this by placing the seeds in a spot with consistent temperature and minimal air movement. By controlling humidity levels, you’ll be able to provide your carrot seeds with the perfect environment for germination, leading to healthy and robust growth.
Troubleshooting Common Germination Issues
Don’t worry if not all your seeds are sprouting – we’ve got you covered with solutions to common germination problems, including temperature and moisture issues. Let’s troubleshoot together!
Delayed or Inhibited Germination
If you’re experiencing delayed or inhibited germination of your carrot seeds, it’s essential to identify the underlying cause and address it promptly. Poor soil quality is one common reason for this issue. Carrot seeds require a well-draining, loose soil with a pH between 6.0 and 6.8 to germinate efficiently. Soil that is too dense or contains high levels of salt can hinder seed growth.
Inadequate temperature control is another factor that can prevent carrot seeds from germinating properly. Carrots typically require a minimum temperature of around 7°C (45°F) for germination, but optimal temperatures range between 10°C to 20°C (50°F to 68°F). If the soil temperature drops below this threshold, seed growth will be significantly delayed or even inhibited.
Seed aging is also a common issue that can affect carrot germination. Even if you store your seeds properly, their viability can decline over time. Old seeds may take longer to germinate or have lower germination rates altogether.
Seed Rot or Mold
When it comes to germinating carrots, one of the most frustrating issues you may encounter is seed rot or mold growth in the soil. This can be a result of overwatering, poor air circulation, or contaminated seeds. To identify this issue, look for visible signs such as white, fuzzy patches or black spots on the surface of the soil.
If you suspect that your seeds are rotting or growing mold, it’s essential to act quickly to prevent the problem from spreading. Start by gently removing the affected seedlings and disposing of them in a sealed bag to prevent the spread of the fungus. Next, inspect the remaining seeds and remove any others that show signs of decay.
To prevent seed rot or mold growth in the future, ensure good air circulation around your seedlings by keeping the soil surface slightly dry between waterings. You can also try using a seed starting mix specifically designed to promote healthy germination and prevent fungal growth. By taking these precautions, you’ll be well on your way to growing healthy carrots with strong roots.
Encouraging Healthy Carrot Growth After Germination
Once your carrots have germinated, it’s essential to provide them with optimal growing conditions to ensure they develop into healthy, flavorful roots. This is where proper care and maintenance come into play.
Nutrient Provision
When it comes to promoting healthy carrot growth after germination, providing essential nutrients is crucial. Carrots require three primary macronutrients: nitrogen (N), phosphorus (P), and potassium (K). These elements are vital for various aspects of plant development.
Nitrogen plays a key role in foliage growth and leaf development. It’s essential to maintain adequate levels of N to promote strong, healthy carrot tops. However, excessive N can lead to lush top growth at the expense of root development. Maintain a balanced ratio by incorporating nitrogen-rich fertilizers like fish emulsion or compost tea.
Phosphorus is critical for cell division, root development, and overall plant establishment. It helps carrots develop a robust taproot. Use phosphorus-based fertilizers such as bone meal or rock phosphate to promote healthy root growth. Potassium (K) aids in carbohydrate production, water balance, and disease resistance. Incorporate potassium-rich fertilizers like potassium sulfate or wood ash to maintain optimal levels.
When selecting fertilizers, consider the carrot’s specific needs at each stage of development.
Pests and Disease Prevention
As your carrots begin to sprout and grow, it’s essential to be aware of the common pests and diseases that can affect them. Carrots are susceptible to a range of issues, from root maggots to powdery mildew, which can quickly spread and destroy your crop.
Some common pests to watch out for include:
• Root maggots: These tiny insects lay eggs in the soil near your carrots, and their larvae feed on the roots, causing damage.
• Carrot rust flies: These flies are attracted to the sap of your carrots and can transmit a fungal disease called carrot rust fly fungus.
To prevent these pests, maintain good garden hygiene by removing weeds and debris that can attract them. Use row covers or fine mesh to keep flies away from your plants. If you do notice any infestations, use insecticidal soap or neem oil to control the problem.
Diseases like powdery mildew, leaf blight, and root rot can also affect carrots. To prevent these issues, ensure good air circulation around your plants and avoid overwatering, which can lead to fungal growth. Regularly inspect your crop for any signs of disease, and take action promptly if you notice anything unusual.
Conclusion: Putting Carrot Germination Tips into Practice
Now that you’ve learned how to successfully germinate your carrot seeds, it’s time to put these tips into action and start growing a healthy crop. Let’s review the key takeaways from this comprehensive guide.
Recap of Key Takeaways
As you’ve reached the end of this comprehensive guide on carrot germination tips, let’s recap the key takeaways to ensure you’re well-equipped to grow healthy carrots. You now know that temperature and moisture play a crucial role in the germination process – aim for optimal temperatures between 70°F to 85°F (21°C to 30°C) and maintain consistent moisture levels.
We also explored the importance of sowing seeds at the correct depth, typically ¼ inch deep, and spaced about ¼ inch apart. This allows for even growth and minimizes overcrowding. Additionally, we discussed the significance of using fresh seeds and providing adequate light – direct sunlight can be beneficial but be cautious not to overexpose your seedlings.
Remember that patience is key; carrot germination times vary from 7-14 days. Avoid overwatering, which can lead to rot and other issues. By putting these tips into practice, you’ll be well on your way to successfully growing healthy carrots in no time.
Final Thoughts and Recommendations
As you’ve made it through this comprehensive guide on carrot germination tips, we hope you’re now equipped with a solid understanding of what works and what doesn’t when growing carrots. Remember that every garden is unique, and what might work for us may not necessarily work for you.
Don’t be afraid to experiment with new techniques and adapt the advice provided to suit your specific growing conditions. Try out different types of seed starting mixes, experiment with varying levels of moisture, or explore alternative temperature ranges. You might be surprised at how well a particular technique works for your carrots.
Pay attention to what doesn’t work too – note any patterns or consistencies in your findings and use them as valuable insights for future grows. And don’t forget to record your observations, whether it’s in a garden journal or on your phone, so you can look back and refine your approach next season. By embracing trial and error, you’ll become a more confident and effective gardener over time.
Frequently Asked Questions
What are the optimal conditions for carrot germination in containers or indoor settings?
In a controlled environment, ensure that the soil temperature is between 70°F to 85°F (21°C to 30°C) and maintain humidity levels above 50%. Use grow lights if natural light is insufficient. Keep in mind that container-grown carrots may require more frequent watering due to drier conditions.
How can I identify if my seeds have been compromised or are past their germination peak?
Inspect the seeds for any visible damage, such as cracks, mold, or discoloration. Check the packaging for an “expiration date” or “sow by” indicator. If you’re unsure, perform a simple germination test: soak the seeds in water for 24 hours and monitor for signs of growth.
Can I use companion planting to enhance carrot germination rates?
Companion planting can be beneficial, but its impact on germination is often indirect. Some plants like radishes and nasturtiums repel pests that target carrots, while others like beans and corn provide shade and help regulate soil temperature. However, the most significant factor in successful germination remains proper soil preparation and optimal growing conditions.
How do I handle delayed or inhibited germination due to suboptimal soil pH?
If your soil’s pH is too high (above 7) or too low (below 6), adjust it by adding lime to raise pH levels or sulfur to lower them. However, be cautious not to make drastic changes, as this can cause other issues. For small-scale adjustments, consider using organic amendments like compost or well-rotted manure.
Can I reuse carrot seeds from last season’s harvest for the upcoming growing season?
It’s generally recommended to use fresh seed each season to ensure optimal germination rates and avoid potential diseases that may have developed in stored seeds. If you must reuse seeds, perform a thorough inspection and clean them before storing to minimize risks.