Germinating old seeds can be a challenging but rewarding experience for gardeners. Many of us have stashed away seeds from past harvests, wondering if they’re still viable and worth trying to grow again. But how do you know if those seeds will sprout? Understanding seed viability is key to success, and that’s where this guide comes in. We’ll explore the secrets to germinating old seeds, including aftercare techniques to help them thrive. You’ll learn how to assess the health of your seeds, overcome common challenges like low germination rates, and boost your chances of getting a healthy crop. With our comprehensive guide, you’ll be equipped with the knowledge to give those old seeds another try and enjoy the satisfaction of growing something new from what seemed like nothing at all.
Understanding Seed Viability and Storage
To successfully germinate old seeds, you need to understand how seed viability changes over time and what factors affect its storage. Let’s dive into these essential concepts together.
Factors Affecting Seed Viability
When storing seeds for long periods, maintaining optimal conditions is crucial to preserving their viability. Temperature fluctuations, for instance, can significantly impact seed quality. Seeds stored at temperatures between 32°F and 40°F (0°C and 4°C) tend to retain their viability better than those exposed to extreme heat or cold.
Moisture levels also play a critical role in maintaining seed viability. Seeds absorb moisture from the surrounding environment, which can cause them to degrade faster. Ideally, seeds should be stored in airtight containers to prevent moisture absorption. You can store seeds in sealed glass jars, plastic containers, or even Mylar bags with desiccants.
Light exposure is another factor that affects seed viability. Direct sunlight and artificial lighting sources can cause photodamage to seeds, leading to reduced germination rates. Store your seeds away from direct light sources and in a cool, dark place if possible. This will help minimize the risk of seed degradation due to light exposure.
Remember, proper storage conditions are essential for maintaining seed viability over time. By controlling temperature fluctuations, managing moisture levels, and shielding seeds from light exposure, you can significantly increase the chances of successful germination with old seeds.
Long-Term Storage Methods for Seeds
Properly storing seeds for an extended period is crucial to maintain their viability. You can employ various techniques, such as vacuum sealing, silica gel desiccants, and cold storage, to achieve this goal.
When using vacuum sealing, make sure the container is airtight and free of moisture. Remove as much air as possible from the package before sealing it. This method works best for small quantities of seeds.
Silica gel desiccants are effective at controlling humidity levels within sealed containers. You can purchase silica gel packets or refillable containers online. Simply place the desiccant packet inside the container and seal it. Check on the desiccant periodically to ensure it remains dry and functioning correctly.
Cold storage is another viable option for long-term seed storage. Store seeds in an airtight container at a temperature between 0°C and 5°C (32°F to 41°F). A root cellar or a basement with stable temperatures works well for this purpose.
Preparing Old Seeds for Germination
When it comes to reviving old seeds, proper preparation is key. This crucial step ensures your ancient seeds have the best chance of successfully germinating and growing into thriving plants.
Testing Seed Viability Before Germination
Before attempting to germinate old seeds, it’s essential to determine their viability. This can be done through various methods, including water tests and tetrazolium assays.
A simple water test involves placing a seed in a cup of water and observing its behavior over the next 24-48 hours. If the seed sinks to the bottom of the cup, it’s likely still viable. However, if it floats or remains suspended, it may be dead. This method is quick and easy but not always reliable.
Tetrazolium assays are a more accurate way to test seed viability. This involves cutting open the seed and applying a tetrazolium salt solution that stains damaged cells. If the seed is viable, the cells will remain unstained. However, if the cells are dead or damaged, they’ll turn red, indicating the seed’s inability to germinate.
Scarification techniques can also be used to test seed viability. This involves scratching the seed coat with a nail file or sandpaper to expose the embryo inside. If the seed responds by sprouting, it’s likely viable.
Scarification Techniques for Old Seeds
Scarification is a crucial step in preparing old seeds for germination. The seed coat can become hardened over time, making it difficult for water and air to penetrate, which can inhibit germination. To break down the seed coat and enhance moisture penetration, various scarification methods can be employed.
One of the most common techniques involves using sandpaper or a file to gently rub away the outer layer of the seed. This method is effective for seeds with relatively thin coats, such as those from annual plants like beans or peas. To use this method, simply hold the seed firmly between your thumb and index finger and gently rub it back and forth against the sandpaper or file.
Chemical scarification is another approach that can be used to break down the seed coat. Solutions like hydrogen peroxide (3% concentration) or white vinegar can help dissolve the seed coat without damaging the embryo inside. To use this method, mix one part of the solution with two parts of water and soak the seeds for 24-48 hours.
When using either of these methods, it’s essential to exercise caution not to damage the delicate inner tissues of the seed. Start by testing a small group of seeds first to ensure the method you choose is effective without causing harm.
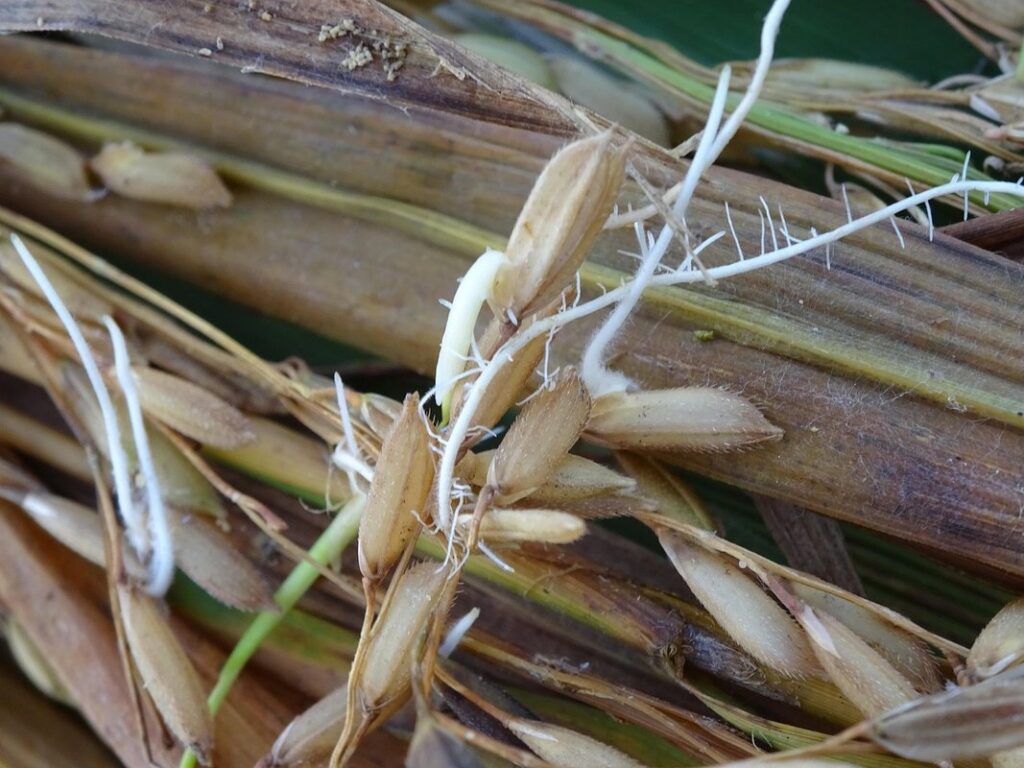
The Germination Process
So you’ve got your seeds ready, but now what? Let’s dive into the germination process, where water and oxygen ignite a spark of life in those dormant seeds.
Optimal Conditions for Seed Germination
When it comes to germinating old seeds, providing optimal conditions is crucial for successful sprouting. The ideal temperature range for seed germination varies depending on the type of plant, but most seeds thrive between 65°F and 75°F (18°C and 24°C). However, some seeds like tomatoes and peppers require warmer temperatures around 80°F to 85°F (27°C to 30°C) to germinate.
Maintaining high humidity is also essential for seed germination. You can cover the container with a clear plastic bag or a cloche to create a mini-greenhouse effect, which helps retain moisture and warmth. The soil quality plays a significant role in successful germination as well. Use a good quality potting mix that drains excess water well, as this prevents root rot.
Light exposure is also crucial for seed germination. Most seeds require indirect light or no light at all during the germination process. Some seeds like cucumbers and squash require more light to germinate. Make sure the container is placed in a bright but not direct light area to prevent scorching of delicate roots.
Common Challenges During Germination
When germinating old seeds, it’s not uncommon to encounter some challenges along the way. One of the most common issues is fungal or bacterial infections, which can cause the seeds to rot or develop mold. This is often caused by excess moisture or poor soil quality. To prevent this, make sure to use a well-draining potting mix and avoid overwatering.
Another issue you might encounter is poor soil pH. Old seeds are more sensitive to extreme pH levels, so it’s essential to use a balanced potting mix that has a slightly acidic to neutral pH (around 6-7). If your tap water has high alkalinity, consider using filtered or distilled water to prevent further altering the soil pH.
A lack of sufficient moisture can also hinder germination. However, be cautious not to overwater, as this can lead to fungal growth and root rot. Check the seeds regularly, and ensure that the soil is consistently moist but not waterlogged. If you’re unsure about your seed’s specific requirements, research its native climate and adjust your care accordingly.
In extreme cases, it may be necessary to take action to prevent these issues from arising. For example, if you suspect fungal growth, try gently scrubbing the affected area with a soft brush before repotting in fresh soil.
Encouraging Seedlings
Now that you’ve germinated your old seeds, it’s time to give them a gentle nudge towards growth – and that’s exactly what we’ll cover in this section. Learn how to care for fragile seedlings.
Aftercare for Young Seedlings
Once you’ve successfully germinated your old seeds, it’s essential to provide them with the right conditions for growth. Aftercare is a critical phase that can make all the difference between a healthy, thriving seedling and a struggling one.
When it comes to providing adequate light, remember that young seedlings need more light than mature plants. Place your seedlings near an east- or west-facing window, or invest in grow lights if you’re growing indoors. Aim for 12-14 hours of light per day, but be cautious not to overdo it – too much direct sunlight can cause scorching.
Maintaining humidity levels is also crucial during the early stages of seedling development. Cover your pot with a clear plastic bag or cloche to create a mini-greenhouse effect. This will help retain moisture and keep the soil consistently moist but not waterlogged.
Regularly inspect your seedlings for signs of pests, such as aphids, whiteflies, or spider mites. Use neem oil or insecticidal soap to control infestations. Fungal diseases like damping off can be prevented by avoiding overwatering and maintaining good air circulation around the pot.
Strategies for Improving Seedling Survival Rates
When it comes to germinating old seeds, one of the biggest challenges is ensuring that the seedlings survive long enough to thrive. To boost seedling survival rates and give your plants the best possible start in life, try these strategies.
Reducing transplant shock is crucial for young seedlings. This can be achieved by using a good quality potting mix that’s designed to retain moisture but also drain excess water quickly. You should also handle the seedlings as little as possible during the transplant process, making sure not to disturb their roots excessively. To further minimize stress, consider repotting your seedlings into larger containers as soon as they’ve developed a decent root system.
Using root stimulators can also give your seedlings an extra boost. These products work by stimulating the growth of healthy roots and promoting strong plant development. They can be especially beneficial for older seeds that may not have the same level of vigor as younger ones. Just remember to follow the instructions carefully and only use a product specifically designed for root stimulation.
Preventing diseases is another key aspect of seedling care. To minimize the risk of fungal or bacterial infections, make sure your potting mix is clean and free from debris. Regularly inspect your seedlings for any signs of stress or damage, such as yellowing leaves or soft spots on the stems. Addressing these issues promptly can help prevent more serious problems down the line.
When it comes to implementing disease prevention methods, there are a few things you can do to keep your seedlings healthy. Start by using a fungicide specifically designed for seedlings and follow the instructions carefully. You should also ensure good air circulation around your plants and avoid overwatering, which can create an ideal environment for fungal growth.
In addition to these strategies, consider implementing some of the following practices to further boost seedling survival rates:
* Make sure your potting mix is at the right temperature for germination. Most seeds prefer a temperature between 65-75°F (18-24°C).
* Use a clear plastic bag or cloche to create a mini-greenhouse effect and trap warmth and moisture.
* Avoid over-handling your seedlings, which can cause them to become stressed and more susceptible to disease.
By following these tips and implementing some of the strategies mentioned above, you should be able to significantly boost your seedling survival rates and give your plants the best possible start in life.
Overcoming Specific Challenges
One of the biggest hurdles to germinating old seeds is addressing specific challenges that come up during the process, such as stubborn soil or inconsistent moisture levels. We’ll walk you through common obstacles and their solutions.
Germinating Seeds from Specific Plant Families
When germinating seeds from specific plant families, you may encounter unique challenges that require extra attention. Succulents, for instance, have evolved to thrive in arid environments, and their seeds often mimic this adaptation by requiring a dry start to germinate properly.
To overcome this challenge, sow succulent seeds on the surface of a well-draining mix, keeping it bone-dry until you notice the first signs of germination. Water sparingly from then on, as overwatering can lead to rot and kill the seedling. On the other hand, tropical plants like Hibiscus or Bougainvillea often require a warmer and more humid environment to sprout.
Begin by providing a heat source, such as a propagation mat, set at around 75°F (24°C), and maintain high humidity using a cloche or plastic bag. Water carefully, avoiding overwatering, which can lead to root rot. Some plant families, like Brassicas (broccoli, cauliflower) and Alliums (garlic, onions), may need additional light and cooler temperatures to germinate.
Experiment with different conditions and monitor your seeds closely for the first signs of life. Keep in mind that old seeds may be more sensitive, so start with a small number and gradually increase as needed. With patience and the right approach, you can successfully germinate even the most finicky plant families.
Reviving Dormant Seeds Using Stimulators
When germinating old seeds, it’s not uncommon to encounter dormant seeds that need an extra boost to sprout. This is where seed stimulators come into play. These products are specifically designed to revive dormant seeds and increase their chances of successful germination.
Seed stimulators work by breaking down the natural dormancy mechanisms within the seed. They typically contain a combination of ingredients such as gibberellic acid, auxins, and ethylene gas. These substances help to break down the seed coat, promoting water uptake and cell division.
Some popular seed stimulators on the market include products like Vitalis-A, Gibb’s 20, and Green Light. When using these products, it’s essential to follow the instructions carefully. Typically, you’ll need to soak the seeds in a solution of the product for several hours or overnight before planting.
In some cases, seed stimulators can have varying effects on different types of seeds. For example, some may work well with seeds that are naturally dormant due to high moisture levels, while others might be more suitable for seeds that require a longer period of dormancy. Always read the label carefully and consider factors like seed type, age, and storage conditions before selecting a stimulator.
Conclusions and Next Steps
Now that you’ve successfully germinated your old seeds, it’s time to tie up loose ends and plan for future gardening endeavors. Let’s summarize what we’ve covered so far and discuss next steps.
Recap of Key Takeaways
When germinating old seeds, it’s essential to remember that success often hinges on patience and persistence. From our comprehensive guide, you now know how to identify viable seeds, prepare them for germination, and provide the ideal conditions for growth.
One key takeaway is that not all old seeds are created equal. Some may be more resistant to degradation than others, so it’s crucial to handle each type with care. When storing old seeds, keep them in a cool, dry place away from direct sunlight, and consider using a desiccant or silica gel to maintain optimal humidity levels.
To recap, successful germination of old seeds requires: providing the right temperature range (usually between 70-85°F), maintaining adequate moisture levels, and offering sufficient light. You should also monitor your seeds regularly for signs of growth, such as sprouting or root development.
Remember that old seeds may not germinate at all, so it’s essential to have a backup plan in place. Consider starting multiple seeds at once to account for potential failures. By following these strategies and being mindful of the unique characteristics of each seed type, you can increase your chances of success when germinating old seeds.
Resources and Further Reading
If you’ve found this comprehensive guide on germinating old seeds helpful, there’s still more to explore. For those looking to dive deeper into seed germination, we recommend the following resources.
Books like “The New Seed Starter’s Handbook” by Nancy Bubel and “Seeds: Time Capsules of Life” by Christina Freeman offer valuable insights into the process of seed germination. Online forums such as Reddit’s r/seedstarting and r/gardening communities provide a wealth of information from experienced gardeners. Websites like Seed Savers Exchange and The Old Farmer’s Almanac also offer tips, advice, and expert opinions on seed germination.
In addition to these resources, it’s essential to stay updated with the latest research and studies on seed germination. We recommend bookmarking websites that specialize in plant science and botany, such as ScienceDaily and BioMed Central. These sources will keep you informed about breakthroughs and advancements in the field of seed germination.
Remember, practice makes perfect when it comes to germinating old seeds. Start with small experiments, record your progress, and adjust your techniques accordingly. With patience and persistence, you’ll be successfully germinating old seeds like a pro!
Frequently Asked Questions
Can I use seeds from plants that have been exposed to extreme temperatures?
Yes, while temperature fluctuations can impact seed viability, not all seeds are completely unusable after exposure to extreme heat or cold. If you’re unsure about the quality of your seeds, consider testing their viability before germination.
How do I know if my old seeds will be successful in a specific climate or region?
Consider factors like temperature, humidity, and sunlight hours when deciding which seeds to use for your garden. For example, if your area has a cold winter, choose varieties that are known to thrive in similar conditions. Additionally, research optimal growing conditions for the specific plant species you’re working with.
What’s the best way to store old seeds long-term for future germination?
Store seeds in airtight containers or ziplock bags, labeling each container with the seed type and date stored. Keep them in a cool, dry place away from direct sunlight, ideally between 32°F (0°C) and 40°F (4°C). This helps preserve seed viability over time.
How often should I check on germinated seeds for signs of disease or pests?
Regularly inspect your seedlings every few days for any signs of disease or pests. Common issues include fungal infections, aphids, and spider mites. Remove infected plants immediately to prevent the spread of disease and treat healthy plants with organic pest control methods as necessary.
Can I still use seeds from plants that have been treated with pesticides or herbicides?
It’s generally recommended not to use seeds from plants that have been treated with pesticides or herbicides, as these chemicals can be harmful to humans and wildlife. Consider starting fresh with untreated seeds for the healthiest and most sustainable results.