Are you eager to attract these beneficial pollinators to your garden? Setting up a mason bee house is a great way to invite mason bees into your yard, but it requires some planning. Choosing the right location for your bee house can make all the difference in attracting these busy bees. In this article, we’ll take you through every step of setting up a mason bee house, from selecting the perfect spot to monitoring and maintaining your bee home. We’ll cover the best materials to use, how to install your bee house, and what to expect from these incredible pollinators. By following our comprehensive guide, you’ll be well on your way to creating a welcoming habitat for mason bees and enjoying their many benefits in your garden. Let’s get started!
Choosing the Right Location
When it comes to setting up a mason bee house, choosing the right location is crucial for attracting these beneficial pollinators. Consider factors like sunlight and proximity to flowers.
Understanding Sunlight Requirements
When it comes to choosing the perfect location for your mason bee house, understanding the sunlight requirements of these beneficial pollinators is crucial. Mason bees need direct sunlight to regulate their body temperature and maintain a stable internal environment, which is essential for their activity and success.
In fact, research has shown that mason bees can only fly when their body temperature is between 64°F (18°C) and 90°F (32°C). This means they require at least six hours of direct sunlight per day to thrive. So, where should you place your bee house? Look for a spot that receives full sun for most of the day, ideally south-facing.
Consider installing your mason bee house near a south-facing wall or against a sunny trellis. Even if it’s not directly in the sun, proximity to sunlight can still benefit the bees. Just be mindful of nearby obstructions like trees or buildings that could block direct sunlight. By placing your bee house in a spot with sufficient sunlight, you’ll create an ideal environment for these incredible pollinators to thrive and provide excellent benefits for your garden.
Considerations for Wind Protection
When it comes to choosing the perfect spot for your mason bee house, wind protection is an essential consideration. Harsh winds can damage the structure of your bee house, making it difficult for the bees to nest and potentially harming them as well.
Strong gusts can dislodge the wooden pieces that make up the nesting holes, rendering them unusable. This is especially true if your bee house is made from thin or brittle materials. Furthermore, wind-borne debris such as twigs and leaves can accumulate on the roof of your bee house, clogging the entrance and preventing bees from accessing their nests.
To mitigate these risks, consider placing your mason bee house in a spot that provides some shelter from strong winds. This could be against a wall or fence, under a tree with a dense canopy, or even near a group of shrubs that can block the wind.
Factors Influencing Temperature
When it comes to choosing a location for your mason bee house, temperature plays a crucial role in determining the success of your colony. Mason bees are ectothermic, meaning they rely on external sources of heat to regulate their body temperature. As a result, they thrive best in locations with temperatures that range between 40°F (4°C) and 90°F (32°C).
To select an optimal location for your mason bee house, consider the following factors:
* Direct sunlight: Mason bees need warmth to fly and collect pollen, so a location that receives direct sunlight for at least six hours a day is ideal.
* Shading: While mason bees prefer warmer temperatures, they can get overheated in extreme sun exposure. A shaded area with partial sun can provide a more stable temperature range.
* Wind protection: Mason bees are sensitive to strong winds, which can disrupt their flight patterns and nesting activities. Choose a location that provides some wind protection.
By considering these factors, you can create an environment that supports the health and productivity of your mason bee colony.
Designing Your Bee House
When it comes to designing your mason bee house, there are a few essential elements to consider for maximum occupancy and efficiency. Let’s dive into the key features that will make your bee house a haven for these busy pollinators.
Types of Mason Bee Houses
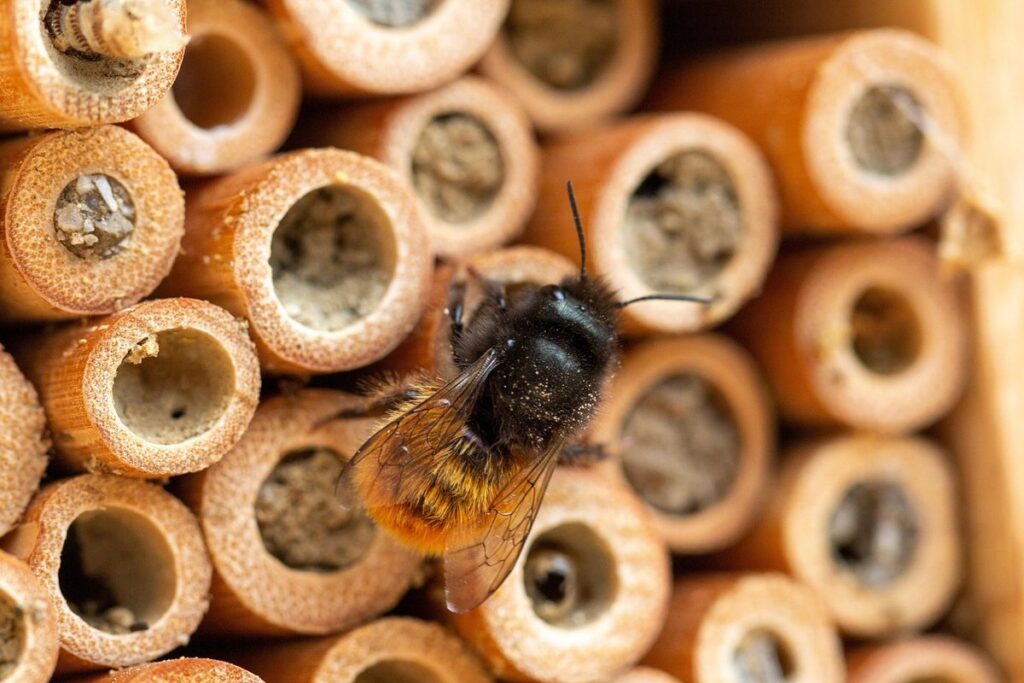
When it comes to choosing a mason bee house for your garden, you’re not limited to just one type. There are several options available, each with its own unique characteristics and benefits. Let’s take a closer look at three popular types of mason bee houses: log hotels, wooden blocks, and nesting tubes.
Log hotels are designed to mimic the natural environment that mason bees would typically inhabit. These structures usually consist of hollowed-out logs or wooden blocks, often with multiple compartments for different species. They’re a great option if you want to create a cozy, woodland-like atmosphere in your garden. Wooden blocks, on the other hand, offer a more modern take on traditional bee houses. These can be as simple as a few wooden planks stacked together or as complex as intricate block designs with built-in features.
Nesting tubes are another popular choice, especially for gardeners who want to provide a clean and organized space for their mason bees. Typically made from plastic or wood, these tubes have individual compartments that allow the bees to lay eggs in peace. When choosing between these types of bee houses, consider your garden’s layout, climate, and the specific needs of the mason bee species you’re trying to attract.
Importance of Ventilation
When designing your mason bee house, ventilation is crucial to maintaining a healthy environment for these beneficial pollinators. Just like humans need fresh air to thrive, mason bees require adequate airflow to regulate their body temperature and prevent moisture buildup.
As mason bees collect nectar and pollen from flowers, they bring back debris and moisture that can accumulate in the bee house. Without proper ventilation, this trapped moisture can lead to mold growth, which can be toxic to mason bees and other beneficial insects. By ensuring good airflow, you create a dry environment that prevents mold and fungal growth.
Aim for at least 1 inch of space between each compartment or cell, allowing for easy air circulation. You can also add small vents or slits on the sides or back of the bee house to promote cross-ventilation. Consider using materials with natural gaps, such as bamboo or wooden slats, which provide built-in ventilation.
Remember, a well-ventilated mason bee house will not only improve the health and longevity of your mason bees but also increase their productivity, ultimately leading to a bountiful harvest in your garden.
Adding Protective Coatings or Finishes
When it comes to extending the life of your mason bee house, applying protective coatings or finishes is an essential step. This will not only protect your bee house from harsh weather conditions but also make cleaning and maintenance a breeze.
You can use a variety of materials for your protective coating, such as beeswax, linseed oil, or even varnish. Beeswax, in particular, is a popular choice due to its natural, non-toxic properties that won’t harm your mason bees. Apply a thin layer of wax to the interior and exterior surfaces, making sure to cover all areas evenly.
Another option is using a UV-resistant finish like polyurethane or epoxy. These coatings will not only protect against weather damage but also prevent mold and mildew growth. When choosing a finish, be sure to select one that’s specifically designed for outdoor use and follows the manufacturer’s instructions.
Regularly reapplying your protective coating can ensure your bee house remains in good condition for years to come. This simple step will not only extend its lifespan but also provide a safe haven for your mason bees to thrive.
Building Your Bee House
Now that you have your mason bee house, it’s time to build a cozy home for these beneficial pollinators. This section guides you through assembling and customizing their habitat safely and effectively.
Materials Needed
When building your mason bee house, it’s essential to have the right materials on hand. This will ensure that your project is successful and safe for both you and the bees.
To start, you’ll need some basic wood types. Cedar is a popular choice because of its natural resistance to rot and insects. You can use either Western red cedar or Eastern white cedar, as both are suitable options. If you’re looking for an alternative, you can also consider using untreated pine or fir. Avoid using pressure-treated wood, as the chemicals used in this process can be toxic to bees.
In addition to wood, you’ll need some screws and adhesives. Use galvanized or stainless steel screws to prevent rusting, and opt for a waterproof adhesive like silicone or epoxy. These materials will ensure that your bee house remains secure and free from moisture damage.
When selecting materials, consider using locally sourced options whenever possible. This not only supports the local economy but also reduces transportation-related carbon emissions. By choosing sustainable materials, you’ll be creating a safe haven for mason bees while minimizing your environmental footprint.
Assembly Instructions for Different Designs
Now that you have chosen a design for your mason bee house, it’s time to assemble it. The assembly process may vary depending on the design and materials used, but don’t worry, we’ve got you covered.
For example, if you’re building a simple log-style bee house, you’ll need to attach the roof and sides to the main body of the house using screws or nails. Make sure to leave enough space between each compartment for the mason bees to nest comfortably. You can also add some decorative features like a small door or a perch for the bees.
If you’re building a more complex design, such as a hexagonal or pyramid-shaped bee house, you may need to use specialized tools and techniques. For instance, you may need to cut and fit pieces together precisely to create the desired shape. In this case, it’s essential to follow the manufacturer’s instructions carefully and take your time to ensure accuracy.
Regardless of the design, always make sure to secure all parts firmly in place using screws or nails to prevent the bee house from collapsing under weather conditions.
Tips for Maintenance and Upkeep
Regular maintenance and upkeep are essential to ensure the long-term health and productivity of your mason bee house. Over time, you may need to perform some repairs to keep your bee house in good condition. Start by inspecting the structure regularly for signs of damage or wear and tear. Check for any gaps or holes that might have formed due to settling or pest activity.
Clean out the nesting cells annually to remove debris and old nests. This will help prevent disease and parasites from spreading. You can use a soft brush or a small vacuum cleaner to gently remove any debris without harming the bees’ cocoons.
If you notice any structural issues, such as cracks or loose joints, repair them promptly using a waterproof sealant. Also, make sure to replace any damaged or rotten wood with new material to prevent further damage. By taking these simple steps, you can extend the life of your bee house and provide a safe haven for your mason bees for years to come.
Installing the Bee House
Now that you’ve chosen a perfect spot, let’s dive into installing your mason bee house safely and securely to ensure a thriving bee community. This step-by-step guide will walk you through it.
Mounting Options and Considerations
When it comes to mounting your mason bee house, you have several options to consider. Attaching it to a tree is a popular choice, as it provides a natural and sheltered spot for the bees to inhabit. When selecting a tree, look for one that receives partial shade to full sun, depending on the type of trees in your area. You can use a sturdy branch or a piece of twine to secure the bee house to the trunk.
Alternatively, you can mount the bee house to a fence post using screws or nails. This option works well if you don’t have suitable trees nearby. Make sure the fence post is stable and won’t topple over in the wind. When attaching to either a tree or fence post, ensure the bee house is at least 3-5 feet off the ground to protect it from potential flooding and pest issues.
Consider the direction of your mason bee house’s entrance when mounting. Ideally, face it south to southeast to capture warmth and sunlight, which will help regulate the interior temperature.
Ensuring Accessibility
When it comes to installing a mason bee house, one crucial aspect is ensuring that the nesting tubes are easily accessible for our beneficial friends. Mason bees need an unobstructed entry and exit point to their nesting tubes, as they fly back and forth collecting pollen and nectar while simultaneously caring for their young.
To guarantee easy access, consider installing the mason bee house in a spot where it will receive direct sunlight for at least six hours a day, yet also be shielded from harsh winds. This is because mason bees are cold-blooded creatures that rely on external heat to regulate their body temperature and fly efficiently. Additionally, place the bee house about 3-5 feet off the ground to minimize interference from predators or human activity.
Some creative ways to install your mason bee house include attaching it to a south-facing wall of your home, a nearby tree trunk, or even a garden trellis. Just remember to position it in an area that is out of direct rain and snowfall, yet still accessible for maintenance and monitoring. By providing easy access to the nesting tubes, you’ll be giving your mason bees the best chance at successful reproduction and population growth.
Integrating with Surrounding Environment
When installing your mason bee house, it’s essential to consider its integration with the surrounding environment. This means not only placing it in a spot that receives the right amount of sunlight and protection from harsh weather but also making sure it blends harmoniously into nature.
Think about the location you’ve chosen for your bee house. Is it near a garden or meadow, where mason bees can easily access flowers for nectar and pollen? Alternatively, consider placing it in a more secluded area with native plants that provide shelter and food sources for these beneficial insects.
When mounting the bee house to a wall or fence post, ensure it’s at least 3-5 feet off the ground to prevent predators like raccoons, snakes, or birds from accessing the entrance. Consider adding some nearby vegetation like grasses or wildflowers to create a natural barrier around the structure. This will help conceal the bee house from view while maintaining its functionality.
By thoughtfully integrating your mason bee house with its surroundings, you’ll be creating an inviting environment for these vital pollinators to thrive in.
Attracting Mason Bees
To attract these beneficial pollinators, it’s essential to create a welcoming environment that mimics their natural nesting sites and provides a source of water. This section covers the key elements for attracting mason bees to your garden.
Understanding Bee Behavior
When it comes to attracting mason bees, understanding their behavior is crucial. These solitary bees are attracted to nesting sites that provide protection from the elements and predators. Mason bees prefer cavities with a diameter of about 3-4 mm, often found in tree bark, rock crevices, or abandoned insect nests.
When selecting a location for your mason bee house, consider the proximity to food sources. Mason bees are primarily pollinators and feed on nectar from flowers. They’re especially attracted to blooms rich in pollen and nectar, such as apple, cherry, and plum trees.
In their natural habitat, mason bees often nest near their preferred food sources, which is why placing your bee house near a garden or orchard can be beneficial. When placing the bee house itself, face it east to southeast to receive morning sunlight and maintain a relatively consistent temperature throughout the day.
By mimicking these natural conditions in your backyard, you’ll create an inviting environment for mason bees to nest and thrive, ultimately increasing their chances of survival and successful pollination of nearby plants.
Tips for Attracting Local Species
When it comes to attracting local mason bee species, understanding which ones are native to your area is crucial. Start by researching and identifying the most common types of mason bees in your region. A simple online search or a visit to your local nursery can provide valuable information on the specific species found in your area.
Once you’ve identified your local species, it’s essential to create an environment that welcomes them. Mason bees are solitary creatures and prefer a quiet, undisturbed space. Choose a location for your bee house that receives direct sunlight and is protected from strong winds. Also, consider the type of flowers and plants that will attract these pollinators; mason bees are particularly fond of apple blossoms, lavender, and coneflowers.
To make your bee house even more inviting, provide a shallow water source for drinking and puddling. A birdbath or shallow dish with fresh water is perfect for this purpose. By creating a welcoming environment that caters to the specific needs of your local mason bee species, you’ll increase their chances of visiting and thriving in your backyard ecosystem.
Creating a Pollinator-Friendly Garden
Creating a pollinator-friendly garden around your mason bee house is crucial for supporting the health of both bees and plants. As you set up your bee hotel, consider the surrounding environment as an integral part of the ecosystem. Mason bees rely on flowers for nectar and pollen to feed their young and sustain themselves throughout the summer.
When designing your pollinator-friendly garden, choose a variety of native wildflowers that bloom at different times to provide a constant source of food. For example, early-blooming plants like crocuses and grape hyacinth attract bees in late winter and early spring, while summer-flowering plants like coneflowers and black-eyed susans cater to the needs of mason bees during peak foraging season.
Consider including host plants that provide shelter and protection from predators. For example, lavender and rosemary can serve as a haven for solitary bees like mason bees. Planting a mix of annuals and perennials also ensures a diverse range of nectar sources throughout the growing season. By creating a pollinator-friendly garden around your bee house, you’ll be providing a welcoming environment that supports the local ecosystem.
Monitoring and Maintaining Your Bee House
Now that you’ve set up your mason bee house, it’s essential to keep an eye on its maintenance needs to ensure a healthy home for your pollinator friends. This section will guide you through regular checks and upkeep.
Observing Mason Bee Activity
When it comes to monitoring and maintaining your mason bee house, observing their activity is crucial to understanding their behavior. This knowledge will help you identify potential issues and make adjustments to ensure a thriving colony.
Start by sitting quietly near the bee house during peak activity hours, usually between 9 am and 3 pm. Take note of the number of bees visiting, entering, or exiting the hive. Observe the types of flowers they visit before returning to their nesting sites. This will give you an idea of their food preferences.
Make a habit of recording your observations in a logbook or spreadsheet. Track the dates, times, and activities you’ve noted. This data will help you identify patterns, such as when they are most active or which types of flowers attract them. Use this information to plant more of those flowers near your bee house or adjust their placement if needed.
Remember that mason bees typically emerge from hibernation around late February or early March, and females start laying eggs soon after. Watching for these signs will indicate the colony’s health and activity level.
Identifying Common Issues or Pests
As you observe and monitor your mason bee house, it’s essential to stay vigilant for potential issues that may arise. One of the most significant concerns is pests. Carpenter bees, wasps, and hornets are common invaders that can take over your bee house if not addressed promptly.
Regular inspections are crucial in identifying pest infestations early on. Check for holes drilled into the wood, mud nests taken over by wasp or ant colonies, or evidence of hornet activity like discarded wings or torn nest material. If you notice any of these signs, remove the affected section or clean out the entire house to prevent further damage.
Another issue that may arise is disease. Fungal infections can decimate bee populations, so keep an eye out for symptoms like matted hair, yellowing brood, or a sour odor emanating from the nest. To address this, you can use a gentle antifungal treatment specifically designed for bees. Be sure to follow instructions carefully and take necessary precautions to avoid harming your beneficial pollinators.
By monitoring your bee house regularly, you’ll be able to catch any issues before they spiral out of control. Keep a log or journal to track your observations and note any changes over time. This will help you refine your maintenance routine and ensure the health and well-being of your mason bees.
Record-Keeping for Future Reference
As you monitor and maintain your mason bee house, it’s essential to keep a record of your observations. This habit will help inform future improvements to your bee house, ensuring that it continues to thrive and support the health of your local pollinator population.
Start by dedicating a notebook or spreadsheet specifically for tracking your mason bee house activities. Record the date, number of bees emerging, and any notable observations, such as unusual visitor patterns or issues with nesting tubes. You can also track the weather, noting how temperature, precipitation, and sunlight impact bee activity.
Take note of any problems you encounter, like pest infestations or insufficient food sources. This information will be invaluable when making decisions about future upgrades or modifications to your bee house design. For instance, if you notice that your mason bees are struggling to navigate a particular section of the nesting tubes, you can adjust the design accordingly in the next iteration.
By keeping a record of your observations, you’ll develop a deeper understanding of your mason bee house’s performance and be better equipped to make data-driven decisions for its continued success.
Frequently Asked Questions
How often should I clean my mason bee house to ensure their health?
Cleaning your mason bee house regularly is essential for maintaining a healthy environment for the bees. Remove any debris, dead bees, or pests every spring before the new generation emerges. Use a soft brush and water to gently clean the inside of the house, but avoid using chemicals that can harm the bees.
What if I notice a lot of wasps or spiders in my mason bee house? How do I prevent them from taking over?
Wasps and spiders can be pests for mason bees. To discourage them, ensure your bee house has proper ventilation to prevent moisture buildup. You can also add a mesh screen around the entrance to keep these unwanted visitors out. If you notice a significant infestation, consider relocating the bee house or seeking advice from a local expert.
Can I use any type of wood for my mason bee house, or are there specific requirements?
When choosing wood for your mason bee house, opt for untreated and naturally weather-resistant materials like cedar or cypress. Avoid using pressure-treated wood, as it may harm the bees. The wood should also be smooth to prevent any splinters or rough edges that could hurt the bees.
How do I ensure my mason bee house is secure from strong winds?
To protect your mason bee house from wind damage, choose a location with some natural protection, such as near a wall or under an overhang. You can also consider installing a windbreak around the house or using screws to secure it firmly to the mounting surface.
What if I notice a decline in mason bee activity after installation? Are there any common issues I should be aware of?
If you notice a decrease in mason bee activity, inspect your bee house for signs of damage, pests, or inadequate maintenance. Check for proper ventilation, ensure the entrance is clear, and make sure the surrounding area is free from potential threats like pesticides or heavy machinery. Also, consider consulting with local experts to determine if any regional factors might be contributing to the decline in activity.