Transplanting seedlings can be a daunting task for even the most seasoned gardeners. As your precious seedlings grow, they’ll eventually need to be transplanted into individual pots or directly into the ground. But how do you ensure their optimal growth and survival during this delicate process? Choosing healthy seedlings is just the beginning – proper soil preparation and aftercare instructions are also crucial for successful transplanting. In this comprehensive guide, we’ll walk you through every step of the way, covering everything from selecting robust seedlings to preparing the perfect growing conditions. By following our expert tips, you’ll be able to successfully transplant your seedlings and give them the best chance at thriving in their new environment.
Choosing Healthy Seedlings for Transplantation
When selecting seedlings for transplantation, make sure you’re choosing healthy ones by inspecting their roots and leaves carefully. A strong foundation is crucial for a successful transplant.
Selecting the Right Size and Age of Seedlings
When selecting seedlings for transplantation, it’s crucial to choose those that are at the right stage of growth. Typically, seedlings between 2-4 inches tall have a strong enough root system to adapt quickly to their new environment. This size allows them to withstand transplanting shock and establish themselves in their new home more efficiently.
Seedlings that are too small may not have developed a robust enough root system, making them more susceptible to stress and disease after transplantation. On the other hand, seedlings that are too large might experience transplanting shock due to their extensive root systems being disturbed during the process.
To ensure you’re selecting healthy seedlings, inspect them carefully before purchasing or transferring them from your nursery. Look for vibrant green leaves, sturdy stems, and a well-developed root system. Avoid seedlings with signs of pests, disease, or nutrient deficiencies.
Inspecting Seedlings for Disease and Pests
When inspecting seedlings for disease and pests, it’s essential to be thorough to avoid introducing problems into your garden. Start by gently turning over the leaves of each plant to check for signs of infestation. Look for actual insects such as aphids, whiteflies, or spider mites on the undersides of leaves or along stems.
Check for yellowing leaves, which can be a sign of nutrient deficiencies, overwatering, or root rot. Black spots or patches may indicate fungal diseases like leaf spot or powdery mildew. Gently pull off any affected leaves to prevent the spread of disease.
Also, inspect seedlings for eggs, larvae, or actual pests on the plant, especially near nodes where new growth occurs. Some pests, like slugs and snails, can leave behind slimy trails on leaves. If you suspect a pest issue, quarantine the seedling before transplanting it to prevent further damage to your garden.
Keep an eye out for signs of nutrient deficiencies, such as curled or distorted leaves, which may indicate a lack of essential micronutrients like nitrogen, iron, or magnesium.
Preparing Seedlings Before Transplantation
Before transplanting seedlings into their new home, it’s essential to prepare them for a smooth transition. This involves hardening off the seedlings to reduce shock and improve their chances of survival.
Start by moving the seedlings outdoors or into a shaded area 7-10 days before transplantation. Gradually increase exposure to sunlight over a period of 3-4 days, starting with just an hour or two per day. Monitor the weather and adjust the hardening off schedule accordingly.
As you acclimate your seedlings, inspect them for signs of stress such as yellowing leaves, droopy stems, or excessive watering needs. Prune any weak or damaged growth to promote healthy root development. If using containers, ensure they have sufficient drainage holes to prevent waterlogged soil.
Some crucial factors to consider during this stage include the timing of transplanting – typically when daytime temperatures are consistently above 60°F (15°C) and nighttime temperatures remain above 45°F (7°C). Make sure the new location has adequate space for growth and sunlight exposure.
Soil Preparation and Selection for Successful Transplantation
When transplanting seedlings, proper soil preparation is crucial for their survival. Let’s dive into selecting the right soil mix to give your new plants a healthy start.
Understanding Soil pH Levels and Requirements
When transplanting seedlings, it’s essential to consider the specific soil pH requirements of each species. Soil pH levels can vary greatly depending on factors like climate, region, and local geology. If the soil pH is too far off from what your seedling needs, it can lead to nutrient deficiencies, stunted growth, or even plant death.
To determine the ideal soil pH for your seedlings, consult the specific growing instructions provided with the seeds or online research for that particular species. Most plants fall within a pH range of 6.0-7.0, but some like blueberries and azaleas require acidic soils (pH 4.5-5.5), while others like succulents thrive in alkaline conditions (pH 8.0-9.0).
To test your soil’s pH levels, you can purchase a DIY kit or send a sample to a lab for analysis. If the results indicate that your soil needs adjusting, use lime to raise the pH or sulfur to lower it. For example, if you’re growing tomatoes and your soil is too acidic (pH 5.0), add 1-2 cups of lime per square foot to gradually bring up the pH over several weeks.
Keep in mind that sudden changes can shock the roots, so gradual adjustments are key. Always follow the recommended application rates and take necessary precautions to avoid over-correcting the soil pH.
Organic vs. Synthetic Fertilizers: What’s Best for Seedlings?
When it comes to fertilizing young seedlings, you’ll want to make sure you’re giving them the best possible start. This is where organic vs synthetic fertilizers come into play.
Organic fertilizers are made from natural ingredients like animal manure, bone meal, and fish emulsion. They release nutrients slowly over time, promoting healthy root growth and development. Pros include improved soil structure, increased beneficial microbial activity, and reduced environmental pollution. For example, using compost tea as a fertilizer can increase the number of beneficial microbes in your seedlings’ roots by up to 10 times.
On the other hand, synthetic fertilizers are made from chemical compounds that provide a quick burst of nutrients. While they may produce fast results, they can also harm microorganisms in the soil and lead to environmental pollution. However, for seedlings, synthetic fertilizers can be more convenient as they’re often easier to apply and provide immediate results.
For young seedlings, it’s generally recommended to start with organic fertilizers. These will help promote healthy growth while avoiding any potential harm to the delicate roots. Begin by using a balanced fertilizer like fish emulsion or compost tea at half the recommended strength. As your seedlings grow, you can gradually switch to more concentrated applications of synthetic fertilizers if needed.
Composting and Other Soil Amendments
Composting and other soil amendments are crucial steps in preparing the soil for successful transplantation. When transplanting seedlings, it’s essential to provide them with a nutrient-rich environment that will support their growth and development. Compost is an excellent way to enrich the soil, as it is teeming with beneficial microorganisms, nutrients, and organic matter.
To create compost, collect kitchen scraps, leaves, and other organic materials and mix them in a 2:1 ratio of green to brown materials. Let the mixture decompose for at least six weeks before incorporating it into the soil. You can also purchase pre-made compost or use worm castings as an alternative.
Other soil amendments that are beneficial for transplantation include well-rotted manure, peat moss, and perlite. These products help improve drainage, aeration, and nutrient availability in the soil. Mix 2-4 inches of these amendments into the top 6-8 inches of the soil to create an optimal growing environment.
When selecting compost or other soil amendments, choose products that are certified organic or made from sustainable materials. This will ensure that you’re providing your seedlings with a healthy and non-toxic environment to grow in.
Transplanting Techniques for Optimal Success
Now that you’ve got your seedlings growing, it’s time to transplant them into a larger container or directly into your garden bed. This section will walk you through the best techniques for a smooth transition.
Preparing the New Bed or Container
When transplanting seedlings into a new bed or container, it’s essential to prepare the soil before planting. Start by loosening the top 6-8 inches of soil to create space for the roots to grow. Use a fork or spade to gently break up any clods and compacted areas. This will also help improve drainage and prevent waterlogged soil.
Next, consider adding necessary amendments such as compost, manure, or fertilizer to enrich the soil. If your seedlings are sensitive, you may want to use a balanced fertilizer that’s low in nitrogen to avoid burning their roots. For example, if you’re transplanting tomatoes, which prefer well-draining soil, add some perlite or vermiculite to improve drainage.
Finally, create a smooth surface for planting by raking the soil to remove any debris and level it out. This will give your seedlings a solid foundation and prevent them from sitting too deeply in the soil. Remember to also check the pH levels of your new bed or container and adjust as necessary to ensure optimal growing conditions for your seedlings.
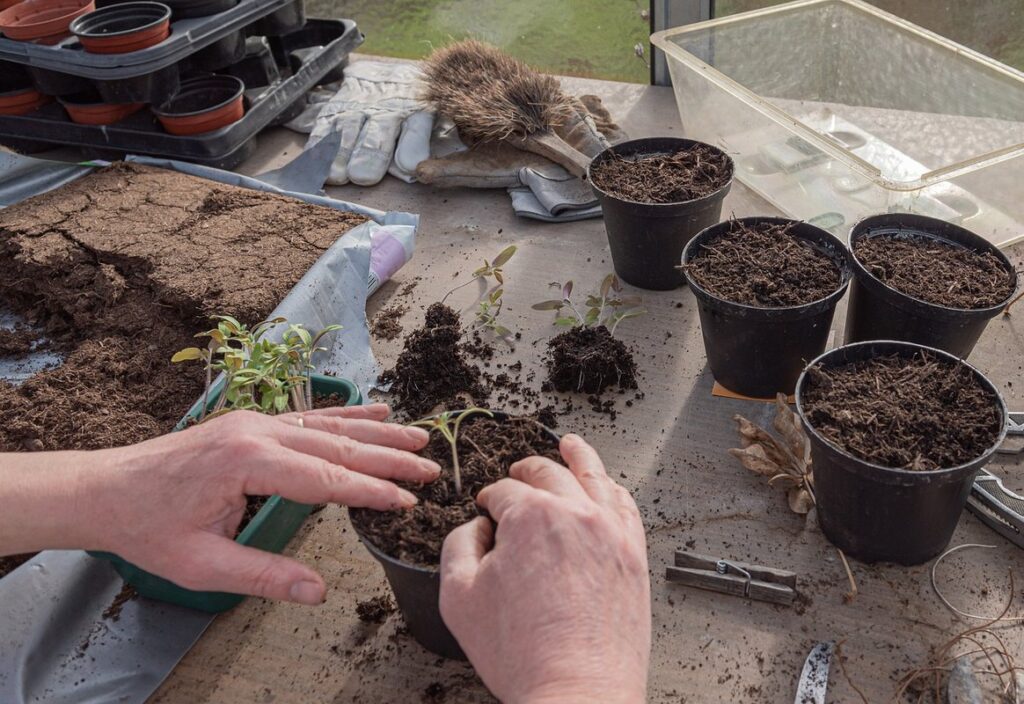
Handling Seedlings During Transplantation
When gently removing seedlings from their pots, it’s essential to take care not to damage the delicate roots. Start by carefully grasping the seedling just above the soil line, with your thumbs on either side of the stem. Gently rotate the pot while keeping a firm grip on the seedling. This will loosen the soil without causing the roots to become exposed.
To minimize root disturbance during transplantation, try to handle the roots as little as possible. If you must touch them, use a gentle, pinching motion to tease out any tangles or knots. Avoid pulling or stretching the roots, as this can cause damage and impede the seedling’s ability to absorb water and nutrients.
It’s also crucial to inspect the roots for any signs of circling or overgrowth. If you notice these issues, use a fork to gently loosen the soil around the roots before transplanting. By handling seedlings with care, you’ll set them up for optimal success in their new environment.
Watering and Aftercare Instructions
Once you’ve transplanted your seedlings into their new home, proper watering and aftercare are crucial for their continued growth. When watering, make sure the soil isn’t too wet or dry – seedlings can quickly become stressed if the conditions aren’t just right.
To avoid overwatering, check the soil moisture by sticking your finger into the soil up to the first knuckle. If it feels dry, give it a good soak. But be cautious not to let the pot sit in water, as this can cause root rot. A general rule of thumb is to provide about 1-2 inches of water per week for seedlings.
Monitor your seedlings’ response to their new environment and adjust your watering schedule accordingly. If you notice they’re struggling with dryness or moisture issues, tweak the frequency and amount of water supplied. Keep in mind that different types of plants have varying watering needs – research the specific requirements for your variety.
Also, don’t forget about sunlight and temperature control. Ensure your seedlings are receiving the right balance of light and warmth to promote healthy growth. By following these simple aftercare instructions, you’ll be well on your way to successful transplanting and a thriving garden.
Common Mistakes to Avoid When Transplanting Seedlings
When transplanting seedlings, it’s easy to make mistakes that can harm your young plants. In this critical phase, avoiding common errors will give your seedlings the best chance at thriving in their new home.
Overwatering: A Silent Killer of Young Plants
Overwatering is one of the most common mistakes gardeners make when transplanting seedlings. It’s often referred to as a “silent killer” because it can cause damage to young plants before you even notice anything out of the ordinary. When seedlings are overwatered, their roots rot due to excessive moisture, leading to a decline in overall health and eventually, death.
To avoid this common mistake, make checking soil moisture your new habit. Stick your finger into the soil up to the first knuckle, and if it feels wet or damp, wait another day before watering. Adjust your watering schedule according to the season and weather conditions. For example, during hot summer days, seedlings may need more frequent watering, but in cooler months, they require less.
It’s also essential to inspect your seedlings for signs of overwatering, such as yellowing leaves, soft stems, or a foul odor from the soil. If you notice any of these symptoms, take immediate action by repotting the seedling in well-draining soil and reducing watering frequency.
Underwatering: Another Threat to Young Seedlings
Underwatering is another common pitfall that can prove disastrous for young seedlings. When seedlings are not receiving enough water, their growth slows down, and they may eventually wither away. This can be especially damaging to delicate seedlings that have just been transplanted from a greenhouse or indoor growing environment.
One of the key indicators of underwatering is a droopy or wilted appearance. If you notice your seedlings are not perking up after watering, it’s likely due to a lack of moisture in the soil. Another sign is when the leaves turn a pale yellow color, which can be a sign that the plant is struggling to absorb essential nutrients.
To prevent underwatering, monitor your seedling’s growth closely and adjust your watering schedule accordingly. Keep an eye out for environmental factors like changes in temperature, humidity, or wind speed that can affect water loss from the soil. Use a moisture meter to gauge the soil’s water levels, and don’t be afraid to water more frequently if you notice the seedlings’ needs are increasing. By staying vigilant and adapting your watering routine as needed, you’ll give your young seedlings the best chance at thriving during this critical stage of development.
Shock, Stress, and Other Transplantation Issues
When transplanting seedlings, it’s essential to be aware of potential issues that can arise during this delicate process. Shock and stress are two common concerns that can impact the health and survival of your newly transplanted seedlings.
Seedling shock occurs when a young plant is suddenly exposed to different environmental conditions such as sunlight, temperature, and soil quality after being potted in a controlled nursery or indoor environment. This can be particularly problematic if the seedling has become accustomed to high humidity levels indoors but then faces harsh outdoor conditions without proper acclimation.
In addition to shock, stress caused by transplanting can also occur due to factors like root disturbance, sudden changes in temperature, and inadequate watering. To minimize these risks, make sure to:
• Gradually acclimate your seedlings to outdoor conditions over the course of 7-10 days before transplanting
• Handle the roots gently when planting and avoid exposing them to air for extended periods
• Maintain consistent soil moisture levels during the transition period
By taking these precautions, you can significantly reduce the likelihood of shock and stress affecting your newly transplanted seedlings.
Monitoring and Caring for Transplanted Seedlings
Once you’ve successfully transplanted your seedlings, it’s time to ensure they continue thriving. This section will cover essential tips on monitoring and caring for your newly transplanted babies.
Signs of Successful Transplantation: What to Look For
As you care for your transplanted seedlings, it’s essential to keep an eye out for signs of successful transplantation. These indicators will tell you whether your efforts are yielding the desired results and if your seedlings are adapting well to their new environment.
One of the first signs of a successful transplant is new leaf growth. Within 7-10 days after transplanting, you should start seeing new leaves emerge from the plant’s stem. This indicates that the roots have adjusted to their new surroundings and the plant is receiving adequate nutrients.
Increased root development is another sign of success. Check for white or light-colored roots growing out of the drainage holes in your pot. Healthy roots are an excellent indication that your seedling has adapted to its new home.
Finally, improved overall plant health is a clear indicator that transplantation was successful. Look for vibrant green leaves, sturdy stems, and a robust root system. If your seedlings exhibit these traits, you can breathe easy knowing they’re on the right path to becoming thriving plants.
Common Problems and Solutions for Transplanted Seedlings
When transplanting seedlings, it’s not uncommon to encounter some issues. One of the most common problems is fungal diseases, such as powdery mildew or root rot. These can be caused by excess moisture, poor air circulation, or contaminated soil.
To prevent fungal diseases, ensure your seedlings are getting enough light and air circulation after transplanting. Avoid overwatering, and if you notice any signs of disease, treat with a fungicide specifically designed for seedlings.
Another common issue is pests like aphids, whiteflies, or spider mites. These can be controlled by introducing beneficial insects, such as ladybugs or lacewings, into your garden. You can also use neem oil or insecticidal soap to repel pests.
Nutrient deficiencies are another problem that may arise after transplanting. Seedlings often require a balanced diet of nitrogen, phosphorus, and potassium. Use a fertilizer specifically formulated for seedlings to provide essential nutrients. Regularly check your seedlings’ soil pH levels to ensure they’re within the optimal range for their specific needs.
By being aware of these potential issues and taking proactive steps to prevent them, you can help your transplanted seedlings thrive.
Maintaining Optimal Growing Conditions
As you’ve successfully transplanted your seedlings into their new home, it’s essential to maintain optimal growing conditions to ensure they continue thriving. This involves providing the right environment for healthy growth and development.
Lighting is a crucial factor to consider when transplanting seedlings. Most seedlings require bright, indirect light but avoid direct sunlight, especially during hot summer months. You can place them near an east- or west-facing window or use grow lights to supplement natural light. For example, if you’re growing leafy greens like lettuce or spinach, they’ll need 12-14 hours of light per day.
Temperature is also vital for seedlings’ growth. Most seedlings prefer daytime temperatures between 65°F and 75°F (18°C and 24°C) and nighttime temperatures around 55°F to 65°F (13°C to 18°C). Keep the soil consistently moist but not waterlogged, as this can lead to root rot and other issues.
Watering is another critical aspect of maintaining optimal growing conditions. Check the soil daily by sticking your finger into it up to the knuckle. If the soil feels dry, it’s time to water your seedlings. Use room-temperature water to avoid shocking the roots.
By controlling lighting, temperature, and watering, you’ll create an environment conducive to healthy growth and development for your transplanted seedlings.
Conclusion: Tips for a Smooth Transition
Now that you’ve successfully transplanted your seedlings, let’s wrap up with some valuable tips to ensure a smooth transition and optimal growth in their new home.
Recap of Key Takeaways
Before you put down your tools and head to the garden, let’s review what we’ve covered. To transplant seedlings like a pro, it all starts with preparing the new soil and container. This means loosening the soil, removing any debris, and adding organic matter like compost or well-rotted manure.
When it’s time to handle the actual transplanting process, be gentle but firm when digging up the roots of your seedling. Make clean cuts just above a node, taking care not to damage the plant’s delicate stem. Water thoroughly before and after the move to prevent shock.
Timing is also crucial – spring or fall are ideal times for transplanting, as they offer milder temperatures and increased moisture. Consider hardening off your seedlings beforehand to acclimate them to outdoor conditions. And don’t forget to label those containers so you can keep track of what’s growing in each one!
By following these steps and tips, you’ll be well on your way to successfully transplanting seedlings into their new homes. Remember to revisit this guide if you need a refresher – happy planting!
Final Advice for Successful Seedling Transplantation
When transplanting seedlings, it’s essential to keep some final considerations in mind. First and foremost, inspect the soil moisture of both the original container and the new one. Avoid transplanting seedlings with wet roots as this can lead to root rot or other diseases.
Also, consider the timing of your transplant. Try to do it early in the day when the sun isn’t too intense. This will reduce stress on the seedling and minimize the risk of scorching its delicate leaves.
When handling seedlings during the transplant process, be gentle. Touch the roots as little as possible and avoid washing them with water, which can cause further stress.
Finally, don’t forget to harden off your transplanted seedlings before moving them outdoors permanently. This process should take around 7-10 days and involves gradually exposing the seedling to outdoor conditions.
By following these final tips, you’ll be well on your way to successfully transplanting your seedlings like a pro!
Frequently Asked Questions
Can I transplant seedlings outdoors during extreme weather conditions?
Be cautious when transplanting seedlings during extremely hot or cold weather, as this can cause shock to the plant. It’s best to wait for a calm and stable period with suitable temperatures (around 60-70°F) to minimize stress on your seedlings.
How do I handle seedlings that have developed root bound conditions?
Seedlings that have become root-bound may require more care during transplantation. To prevent shocking the roots, gently tease out any circling or tangled roots before transplanting into a new container with fresh soil and adequate space for growth.
What if my seedlings start to show signs of shock after transplantation?
Yes, it’s normal for seedlings to experience shock after being transplanted. Keep them in a shaded area for a few days to help them recover from the trauma. Water them regularly, but avoid overwatering, as this can exacerbate the problem.
Can I use regular potting soil for seedlings, or do I need a specialized mix?
While regular potting soil may work for some seedlings, it’s generally recommended to use a high-quality seed starting mix specifically designed for young plants. These mixes usually have a more neutral pH and better drainage properties that promote healthy growth.
How often should I fertilize my transplanted seedlings?
Seedlings typically require light fertilization about 1-2 weeks after transplantation, depending on their age and soil quality. Start with a balanced, water-soluble fertilizer at half the recommended strength to avoid burning the roots or promoting excessive vegetative growth.