Starting a honey bee hive can be a rewarding experience, but it requires careful planning and attention to detail. As bees become increasingly vital for our ecosystem, many enthusiasts are looking to establish their own colonies. However, knowing where to begin can be daunting. Choosing the right location is crucial for a healthy colony, taking into account factors such as sunlight, wind direction, and distance from water sources.
This comprehensive guide will walk you through the essential steps of establishing a thriving honey bee colony. We’ll cover everything from selecting the perfect equipment to routine maintenance tasks that ensure your bees stay happy and productive. By following our step-by-step instructions, you’ll be well on your way to creating a healthy hive and harvesting fresh honey in no time.
Choosing the Right Location and Climate
When it comes to starting a thriving honey bee hive, selecting the right location and climate is crucial. In this next part of our guide, we’ll explore how to ensure your bees will be happy and healthy in their new home.
Assessing Your Yard’s Suitability
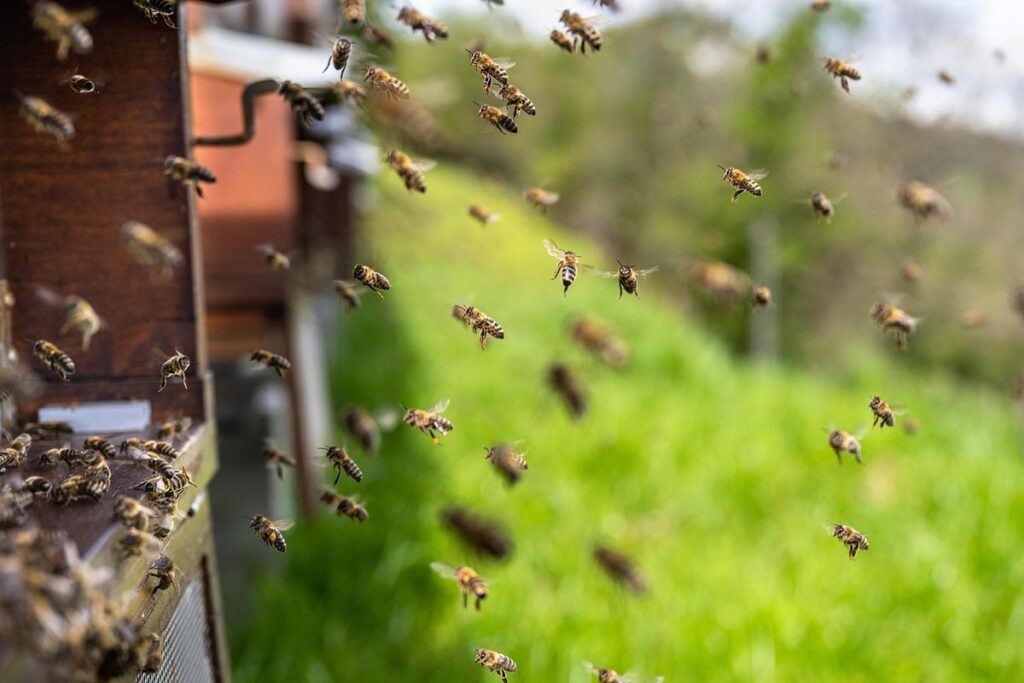
When it comes to starting a honey bee hive, choosing the right location is crucial for their health and well-being. Before you begin building your hive, take some time to assess your yard’s suitability.
Start by evaluating the sunlight in your yard. Honey bees need direct sunlight to collect nectar and pollen from flowers, so choose a spot that receives at least 6 hours of direct sunlight per day. Consider the orientation of your yard, too – south-facing spots receive more sunlight than north-facing ones.
Next, think about wind direction. Bees can get disoriented in strong winds, which can lead to colony loss and even escape from their hive. Look for a spot with some natural windbreaks, like trees or hedges, that will provide protection for your bees.
Proximity to water sources is also essential. Bees need access to clean water for drinking and cooling their hive, so choose a location near a source of fresh water, such as a birdbath or rain barrel. Just be sure the water source isn’t too close – you want to avoid attracting other pests that might compete with your bees.
When evaluating these factors, keep an eye out for existing wildlife habitats in your yard. If you have existing bee hotels, bat boxes, or birdhouses, these can provide valuable shelter and resources for your bees.
By considering sunlight, wind direction, and proximity to water sources, you’ll be well on your way to creating a thriving environment for your honey bees.
Understanding Local Climate Conditions
When it comes to starting a honey bee hive, understanding local climate conditions is crucial for success. Climate plays a significant role in beekeeping, as bees are sensitive to temperature fluctuations and humidity levels. In regions with extreme temperatures or high humidity, managing pests and diseases can be more challenging.
For example, areas with cold winters like the Northeast US require hives that are specifically designed for wintering, such as using insulated boxes or cluster hives. On the other hand, tropical climates like Florida have a year-round nectar flow, but beekeepers must contend with heat stress during summer months.
Temperature ranges also vary significantly across regions. Bees typically thrive in temperatures between 40°F and 90°F (4°C and 32°C), while extreme heat above 100°F (38°C) or prolonged cold snaps below 0°F (-18°C) can be detrimental to the colony’s health.
To determine if a location is suitable for beekeeping, research local temperature and humidity patterns. Check with experienced beekeepers in your area to gain insight into climate-specific challenges and best practices. By considering these factors, you’ll be better equipped to create a thriving environment for your bees.
Preparing Your Yard for the Hive
Before bringing home your new honey bee friends, it’s essential to prepare your yard for their arrival. A beehive requires a safe and healthy environment to thrive, and this starts with clearing the area of debris and unwanted plants. Begin by removing any weeds, twigs, or branches that could attract pests or provide shelter for predators. Keep in mind that honey bees are most vulnerable during the first few weeks after installation, so it’s crucial to create a protective barrier around your beehive.
To do this, consider planting a mix of flowers and herbs that repel common bee pests like mites and aphids. Lavender, rosemary, and mint are all excellent choices for a bee-friendly garden. You can also install a 3-foot high fence or screen around the hive to keep larger predators like raccoons and bears out. This will give your bees a safe space to build their colony without worrying about external threats.
Finally, inspect your yard’s drainage and make sure water doesn’t accumulate near the hive. Honey bees need clean water for drinking, but standing water can attract mosquitoes and other pests that might harm them.
Gathering Essential Equipment and Supplies
Before you start building your honey bee hive, it’s essential to gather all the necessary equipment and supplies to ensure a safe and successful operation for both you and your bees. This section will guide you through what you need to acquire.
Beehive Types and Materials
When it comes to choosing the right beehive for your honey bee colony, you’ll find that there are several types available, each with its unique characteristics and advantages. The Langstroth hive is one of the most popular options, known for its ease of use and efficient design. It features movable frames made of wood or plastic, which allow for easy inspection and harvesting. However, it may be more expensive than other types.
Another option is the Top-bar hive, a more traditional choice that uses bars instead of frames to hold the comb. This type is often preferred by hobbyists due to its simplicity and low cost. However, it can be more difficult to inspect and harvest from.
The Warre hive is another popular choice, known for its vertical design and high honey production. It features a series of boxes stacked on top of each other, with the brood nest at the bottom and supers above. When building your hive, make sure to choose frames, foundation, and supers that are compatible with the type you’ve chosen.
It’s also essential to consider the materials used for the hive, such as wood, plastic, or bamboo. Some hives may require additional equipment like smokers, extractors, or protective clothing. Be sure to research and invest in high-quality materials to ensure the health and success of your colony.
Protective Gear and Tools
When it comes to beekeeping, safety should always be your top priority. To protect yourself and others from potential stings, you’ll need to invest in the right protective gear and tools. A good quality bee suit is essential – look for one that covers your entire body, including your neck and ankles. Don’t skimp on gloves either; thick, sturdy ones will help prevent painful stings.
You can’t keep a hive without smoke, so a reliable smoker is a must-have tool. It helps calm the bees by producing a soothing vapor that masks alarm pheromones. This makes it easier to inspect or manipulate the frames without getting attacked.
In addition to these essentials, you’ll also need a good hive tool. This handy device is used for various tasks like opening the hive’s entrance, scraping propolis from frames, and even marking the queen bee‘s location. Invest in a sturdy one that can withstand frequent use.
Initial Hive Setup and Inspection
When setting up your new hive, it’s essential to follow proper procedures to ensure a healthy start for your bees. Begin by assembling and arranging the frames according to the manufacturer’s instructions. Typically, this involves attaching the frame spacers to the ends of the frames, ensuring they are evenly spaced within the hive body.
Next, add either foundation or comb to each frame. Foundation is a thin sheet of beeswax-coated paper that serves as a guide for the bees to build their comb. Comb, on the other hand, is pre-built wax that’s usually more expensive but provides an immediate structure for the bees. Once you’ve added your chosen option, carefully place the frames into the hive body, making sure they’re securely seated and even.
Before closing up the hive, perform an initial inspection to look for any signs of pests or diseases. Check for cracks in the wax cappings on the cells, which can indicate the presence of small hive beetles. Also, inspect the brood pattern for any irregularities that may suggest disease issues. This early detection will help you address potential problems before they become more severe.
Obtaining Healthy Bees and Establishing the Colony
Acquiring healthy bees is a crucial step, as the success of your colony depends on them. This section will walk you through obtaining and caring for these vital assets.
Selecting the Right Bee Strain
When selecting the right bee strain for your honey bee hive, you’ll want to consider several factors, including your climate and local conditions. There are many different strains of bees available, each with its own unique characteristics.
The Italian bee, for example, is known for its high productivity and gentleness. They’re a popular choice among beekeepers due to their ability to thrive in a variety of environments. However, they may not perform as well in cooler climates or areas with limited nectar flows.
On the other hand, Carniolan bees are more tolerant of cold temperatures and can be a good choice for beekeepers in northern regions. They’re also known for their high honey production and ability to adapt to changing conditions.
Before making a decision, research the different strains available and consider factors such as your climate, local flora, and pest management strategies. You may also want to talk to other beekeepers in your area to get a sense of which strain performs well in your region.
Acquiring Bees from a Reputable Source
When it comes to acquiring bees for your hive, it’s essential to source them from a reputable supplier or breeder. A reliable supplier can provide you with healthy, disease-free bees that are better equipped to thrive in their new environment. Consider the following factors when selecting a reputable supplier:
* Disease-free status: Ensure the supplier can guarantee the bees are free from diseases such as Varroa mites, American Foulbrood, and Nosema. This is crucial for maintaining the health of your colony.
* Genetic diversity: A diverse gene pool helps prevent inbreeding, which can lead to weakened immunity and reduced fertility. Look for suppliers that offer a variety of bee strains or breeds.
* Colony strength: Assess the supplier’s evaluation process for assessing colony strength. A strong colony should have an adequate queen, sufficient brood (eggs and larvae), and stores of honey and pollen.
When selecting a supplier, research their reputation online, read reviews from other beekeepers, and ask about their breeding and testing protocols. This will help you make an informed decision and ensure the health and success of your new colony.
Introducing the Bees to Their New Home
Now that you’ve obtained your new bees and prepared their hive, it’s time to introduce them to their new home. This process is crucial for the health and well-being of your colony. Begin by carefully transferring the bees from their shipping container into the hive. You’ll want to do this on a calm day when there’s minimal wind or other distractions.
As you place the bees in their new home, make sure to position them near the entrance so they can easily establish communication with each other. Next, add food and water sources by placing frames of honeycomb and a shallow dish of sugar water within easy reach. Monitor your bees closely for signs of stress or conflict, such as aggressive behavior or an excessive number of dead bees.
Keep in mind that it may take some time for the bees to adjust to their new surroundings. Be patient and observe from a safe distance. With proper care and attention, your colony should thrive. Make sure to check on them frequently and provide any necessary adjustments to ensure their comfort and well-being.
Establishing a Routine and Monitoring Hive Health
Now that you have your bees settled, it’s essential to establish a routine for daily inspections and monitoring of hive health to ensure their well-being. This includes regular checks on food supplies, brood patterns, and disease indicators.
Creating a Beekeeping Schedule
When it comes to maintaining a healthy and thriving honey bee hive, consistency is key. That’s why creating a beekeeping schedule is essential for every beekeeper. By outlining regular tasks and sticking to them, you’ll be able to monitor your colony’s health, identify potential issues before they become major problems, and ensure that your bees stay happy and productive.
Here are some of the essential tasks you should include in your schedule: weekly inspections to check on brood patterns, pest and disease management, and monitoring for signs of nutritional deficiencies. You’ll also need to plan regular feeding sessions to supplement your bees’ nectar flow during periods of scarcity. Finally, don’t forget to mark down harvest dates for your honey and wax production.
To make this process easier, consider breaking down your tasks into seasonal categories. For example, spring may be the time for queen rearing and colony expansion, while summer is when you’ll focus on harvesting honey and managing for pests like small hive beetles. By mapping out these tasks in advance, you’ll be able to stay on top of your responsibilities and enjoy a successful beekeeping season.
Recognizing Signs of Disease and Pests
As you monitor your hive’s health, it’s essential to recognize early warning signs of disease and pests. Common afflictions like American Foulbrood (AFB) can be devastating if left unchecked. AFB is a bacterial infection that affects the bee larvae, causing them to turn yellow or white before dying. Look for discolored or dead brood, and take immediate action if you notice any unusual mortality rates.
Another concern is varroa mites, tiny parasites that feed on bee hemolymph (similar to blood). These mites can weaken your colony’s immune system, making it more susceptible to disease. Check your bees regularly for signs of infestation, such as:
• Excessive shaking or fanning behavior
• Mites attached to the bees’ bodies or in the honeycomb cells
To control these pests and prevent disease, implement integrated pest management strategies. This includes using a combination of methods, like:
• Chemical treatments (e.g., ApiLife VarroMite)
• Heat treatment to control mite populations
• Sanitizing equipment with soap and water
• Replacing queen bees or introducing new genetics to boost colony health
Best Practices for Harvesting Honey and Beeswax
When it’s time to harvest honey and beeswax from your hive, it’s essential to do so efficiently and effectively. Typically, honey is ready for harvesting when the nectar flow slows down in late summer or early fall. Check the hive regularly during this period, looking for signs of honeycomb filled with a rich, golden liquid.
To extract nectar, carefully remove frames from the hive and brush off excess bees. Next, use an extractor to spin the frames, separating the honey from the wax. Be careful not to damage the delicate combs or crush the honey cells.
For best results, store harvested honey in clean, sterilized containers, ideally with airtight lids. This will prevent moisture and pests from spoiling the product. Beeswax can be melted down and molded into blocks for candle-making or other crafts. Make sure to label both products clearly, noting the date of harvesting and any relevant processing details.
Regularly inspect your hive and honey stores to ensure optimal quality and avoid spoilage. This includes monitoring temperature, humidity levels, and pest activity. By following these best practices, you’ll enjoy a bountiful harvest while maintaining healthy, thriving bees.
Troubleshooting Common Issues and Expanding Your Hive
Now that you’ve got your new hive up and running, we’ll tackle common problems and help you expand your operation to its full potential. We’ll cover everything from swarm management to splitting hives.
Managing Swarming Behavior
Swarming is one of the most common challenges faced by beekeepers. It’s a natural behavior for honey bees to swarm when their colony becomes too large and needs to reproduce. A swarm typically consists of 10,000-30,000 bees led by a new queen, which leaves the original hive in search of a new home.
To prevent swarming, it’s essential to split your colony before it gets too big. You can do this by separating a strong nectar flow from the rest of the hive and placing it in an empty box or nuc (nucleus) with its own queen excluder. This will give you a smaller, more manageable colony that won’t be prone to swarming.
Another strategy is re-queening your hive. If your current queen is old or failing, it can trigger the colony to swarm. Replacing her with a new, vigorous queen will often prevent this behavior. You can also use split-top hives, which allow you to manage multiple colonies within one box. This setup allows for more control over swarming and makes it easier to inspect and maintain your bees.
In terms of timing, it’s best to perform these interventions in the spring or early summer, when new nectar flows are abundant and the colony is most active.
Addressing Pests and Diseases
When it comes to managing pests and diseases in your hive, it’s essential to act quickly and effectively to prevent infestations from taking over. One of the most common pests you’ll encounter is small hive beetles (Aethina tumida), which can cause significant damage to your honey stores and even kill your bees if left unchecked.
To control these pesky critters, you can use a combination of chemical treatments and natural remedies. For example, you can apply a pyrethrin-based dust or spray directly into the affected area, being careful not to harm your bees in the process. Alternatively, you can try using diatomaceous earth, a non-toxic powder that dehydrates the beetles, making it difficult for them to survive.
To prevent future infestations, make sure to clean and disinfect any equipment or frames before reintroducing them into the hive. Regularly inspect your hive for signs of pests or diseases, such as excessive honey consumption or unusual odors. By staying vigilant and taking prompt action when issues arise, you can protect your bees and ensure a healthy, thriving colony.
Expanding Your Hive through Splitting
When you’ve reached the peak of strength with your thriving colony, it’s natural to wonder: when should I split my hive? The decision to divide and create new colonies is a crucial one, but understanding the benefits and challenges can make all the difference.
Splitting a strong colony allows you to multiply your honey production, expand your apiary, and even sell or donate excess bees to fellow beekeepers. By dividing a robust colony, you’ll also be helping to promote genetic diversity within your overall operation – an essential aspect of maintaining healthy, resilient colonies.
However, there are some factors to consider before splitting: timing is everything. Be cautious not to split during periods of stress or when the colony is undergoing significant growth spurts. Wait for a lull in the season, ideally after peak summer nectar flows have slowed down and your colony has had time to recover.
In terms of actual process, you’ll want to start by preparing a new hive with fresh equipment, then carefully extract a frame from the mother colony, taking care not to disrupt the delicate social balance. Once split, both hives will need regular monitoring to ensure they’re establishing themselves successfully – but the payoff can be substantial, and well worth the effort!
Frequently Asked Questions
What if I already have a small garden or orchard? Can I still establish a bee hive nearby?
If you already have a small garden or orchard, establishing a bee hive nearby can be beneficial for both your plants and the bees. However, it’s essential to consider potential conflicts between the bees’ activities and your garden’s productivity. You may need to take measures such as protecting specific flowers from the bees or ensuring there is enough space around your garden to accommodate the bees.
How often should I inspect my bee hive for signs of disease and pests?
Regular inspections are crucial in maintaining a healthy bee colony. We recommend inspecting your hive every 7-10 days during peak season, paying close attention to signs of disease and pest infestation. Keep an eye out for symptoms like abnormal brood patterns, unusual odors, or visible parasites.
Can I keep bees if I live in an area with cold winters? What are the necessary precautions?
Yes, you can still keep bees in areas with cold winters, but it requires extra care to ensure their survival. Bees need access to food and water during winter months, so make sure your hive is protected from harsh winds and snowfall. Consider using insulation materials like foam board or straw bales to shield the hive.
What are some common mistakes beginners make when setting up a bee hive, and how can I avoid them?
One common mistake new beekeepers make is not preparing their yard adequately before setting up the hive. Ensure your yard is free of obstacles, has sufficient sunlight, and is protected from strong winds. Also, be cautious when selecting equipment; investing in high-quality supplies will save you time and hassle in the long run.
Can I establish a single queen bee for my colony, or do I need to start with multiple queens?
You can start your colony with a single queen bee, but it’s essential to understand that establishing a strong colony often requires a nuc (nucleus) containing 3-5 frames of brood and bees. This will help the new colony develop faster and reduce the risk of losing your queen. If you decide to start with a single queen, make sure she is disease-tested and suitable for your local climate.