Are you excited to grow your own juicy tomatoes, but don’t know where to start? Planting tomatoes in grow bags is a fantastic way to enjoy fresh produce without breaking your back or taking up too much space. With the right techniques and care, you can harvest delicious tomatoes all season long.
In this article, we’ll show you how to choose the perfect tomato variety for your grow bag, prepare the soil, plant the seeds, and provide the necessary care for them to thrive. We’ll also address common challenges like disease, pests, and lack of sunlight, so you can confidently tend to your tomato plants and enjoy a bountiful harvest. By following our simple steps, you’ll be on your way to growing mouthwatering tomatoes in no time!
Choosing the Right Tomato Variety and Grow Bag
When it comes to growing tomatoes in a grow bag, selecting the right variety is crucial for optimal flavor and performance. Choose from compact, bush-type varieties that thrive in containers.
Selecting the Perfect Tomato Variety for Your Climate
When selecting the perfect tomato variety for your climate, there are several key factors to consider. First and foremost, think about the amount of sunlight your grow bag will receive on a daily basis. Some tomato varieties require full sun (at least 6 hours of direct sunlight) while others can tolerate partial shade.
Next, consider the temperature tolerance of the variety you choose. If you live in an area with hot summers, look for heat-tolerant or disease-resistant varieties that can handle temperatures above 90°F (32°C). Conversely, if you’re growing in a cooler climate, opt for cold-hardy varieties that can thrive in temperatures as low as 50°F (10°C).
Disease resistance is also crucial when selecting a tomato variety. Check the seed packet for resistant codes or consult with local nurseries to determine which varieties are less susceptible to common diseases like blight and fusarium wilt.
When in doubt, always check the seed packet or consult with local nurseries for advice. They’ll be able to recommend varieties that are specifically bred for your region’s climate and conditions.
Understanding the Size and Type of Grow Bag Needed
When it comes to choosing a grow bag for your tomato plants, the type and size of the bag are crucial factors to consider. There are several types of grow bags available on the market, each with its own set of pros and cons.
Fabric grow bags, made from breathable materials like cotton or polyester, allow for excellent airflow and drainage, which is essential for healthy root growth. They’re also eco-friendly and can be reused multiple times. However, they may require more maintenance to prevent moisture buildup.
On the other hand, plastic grow bags are lightweight, inexpensive, and easy to set up. But they can retain heat and moisture, leading to fungal diseases and root rot. Biodegradable grow bags are a more sustainable option, made from materials like jute or bamboo that break down naturally in soil.
Regardless of the type, it’s essential to choose a grow bag with a minimum capacity of 5-7 gallons to accommodate your tomato plants’ extensive root systems. A larger bag will give your plant room to spread out and absorb nutrients, promoting healthy growth and fruiting. When selecting a grow bag, consider the mature size of your tomato variety and choose a bag that’s slightly larger to ensure optimal growing conditions.
Preparing the Soil for Tomato Planting
Before you start planting your tomato seeds, let’s talk about preparing the soil to give them a healthy foundation and ensure a bountiful harvest. This essential step sets up your tomatoes for success in their new grow bag home.
Mixing the Right Compost and Fertilizer Blend
When it comes to growing tomatoes in grow bags, creating a nutrient-rich soil blend is crucial for their health and productivity. A well-balanced potting mix will provide the necessary nutrients, structure, and moisture retention for your tomato plants to thrive.
To create an optimal compost and fertilizer blend, you can follow these recipes:
* For a general-purpose mix, combine 20% compost, 30% peat moss or coconut coir, and 50% perlite or vermiculite.
* For acidic-loving tomatoes (such as cherry or patio varieties), add more peat moss and reduce the amount of compost to 15%.
* For high-fruiting tomato varieties, increase the compost content to 30% and add a balanced fertilizer at a rate of 10-10-10 NPK.
Remember to repot your grow bag every 1-2 months to refresh the soil blend. This will prevent nutrient depletion and maintain optimal growing conditions for your tomato plants. Additionally, you can supplement with organic matter like worm castings or fish bone meal to provide an extra boost of nutrients.
Sterilizing the Grow Bag and Potting Mix
When it comes to growing tomatoes in a grow bag, sterilizing the bag and potting mix is crucial to prevent fungal diseases from taking hold. Fungal diseases can spread quickly through contaminated soil and equipment, causing your tomato plants to suffer.
One method for sterilizing your grow bag is by using heat. You can place the grow bag in a hot oven at 200°F (90°C) for 30 minutes to an hour to kill any existing pathogens. Alternatively, you can use a steam cleaner or a pressure cooker to reach high temperatures and sanitize the bag.
Another method involves using light to sterilize your grow bag. UV-C light is effective against many types of fungal spores. You can place the bag in a UV-C light chamber for 30 minutes to an hour, making sure not to exceed the recommended exposure time to avoid damaging the bag.
Chemical treatments are also available for sterilizing grow bags. These usually contain fungicides or bactericides that kill pathogens on contact. However, always follow the manufacturer’s instructions and take necessary precautions when handling these chemicals.
It’s essential to sterilize your potting mix as well. You can use a pasteurization process by heating the mix in the oven at 140°F (60°C) for an hour or use a fungicide specifically designed for potting mixes.
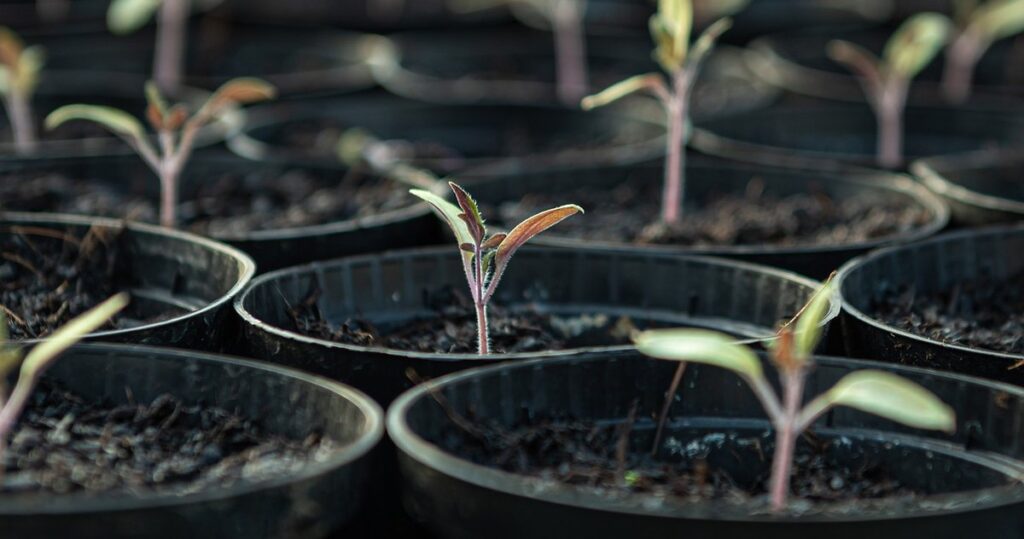
Planting Tomatoes in the Grow Bag
Now that you have your grow bag ready, let’s move on to the fun part: planting tomatoes! In this step, we’ll cover how to prepare the soil and carefully place your tomato seedling.
Sowing Tomato Seeds or Transplanting Seedlings
When it comes to planting tomatoes in a grow bag, you have two options: sowing seeds directly into the bag or transplanting seedlings from smaller containers. Both methods have their advantages and disadvantages, which we’ll explore below.
Sowing seeds directly into the grow bag is a popular method for growing tomatoes, especially for beginners. To do this, simply fill the grow bag with a well-draining potting mix, leaving about 1-2 inches at the top for watering. Plant the seeds about ¼ inch deep and 2-3 inches apart from each other. Keep in mind that seedlings will take around 6-8 weeks to mature before they’re ready for harvesting.
Transplanting seedlings is another option, which can give your tomatoes a head start on growth. When transplanting, make sure the seedling’s roots are not disturbed and place it in the grow bag at the same depth as it was previously growing. Space them about 2-3 inches apart from each other to ensure proper air circulation.
Whether you choose to sow seeds or transplant seedlings, remember that providing adequate light and water is crucial for optimal growth.
Watering and Establishing a Soil Moisture Routine
Maintaining consistent soil moisture levels is crucial for optimal tomato growth in a grow bag. Since tomatoes are heavy feeders and require adequate water to produce fruit, it’s essential to ensure the soil never dries out completely. However, overwatering can lead to root rot and other problems.
To monitor water intake effectively, start by checking daily water loss through simple techniques like feeling the soil or using a moisture meter. For the first week after planting, aim for a consistent watering schedule of about 1-2 inches per day in warmer temperatures.
Check the soil moisture at least once a day by inserting your finger into the top inch of soil. If it feels dry, it’s time to water. Also, keep an eye on weather forecasts and adjust your watering schedule accordingly. Remember that the frequency and amount of watering will vary depending on temperature, humidity, and wind conditions.
As tomatoes grow, you’ll notice their moisture needs increase. Be prepared to adapt your watering routine by observing changes in plant growth and color, as well as soil texture and appearance.
Providing Support and Pruning for Optimal Growth
To help your tomato plants thrive, it’s essential to provide support as they grow tall, and prune them regularly to encourage healthy growth and fruit production. Let’s explore how.
Training Tomatoes to Grow Up or Along Trellises
Training tomatoes to grow up or along trellises is an essential aspect of maximizing space and promoting healthy growth in your container garden. When using indeterminate varieties, you’ll want to encourage them to climb up a trellis or other support. Start by placing the tomato plant’s stem into a deep pot or directly into the grow bag, making sure the “eyes” (where the leaves meet the stem) are at soil level. Next, tie the main stem to the trellis using soft twine or clips, and gently guide it upwards as it grows.
For determinate varieties, you can simply place them alongside a trellis in your grow bag and let them naturally grow along its length. To encourage even growth, gently twine the stems around the trellis every few inches. This will not only save space but also make harvesting easier. When using grow bags, it’s essential to have a support system in place to prevent top-heavy plants from becoming unstable.
As your tomato plant grows, continue to provide support by gently twining the stems around the trellis or pruning them back to encourage bushy growth. This will not only promote healthy growth but also increase fruit production and make maintenance easier in the long run.
Pinching and Pruning Techniques for Maximized Yield
Pruning is an essential part of growing tomatoes in a grow bag, as it promotes healthy growth, prevents disease spread, and encourages fruiting. By removing weak or diseased branches, you allow the plant to channel its energy into producing more fruit.
When pruning tomato plants, look for any signs of stress, disease, or pests. Remove any damaged or discolored leaves or stems immediately to prevent the problem from spreading. For healthy growth, remove lower leaves that don’t receive sufficient light, as they can create an ideal environment for fungal diseases like septoria leaf spot.
To encourage fruiting, prune your tomato plant when it reaches about 12 inches tall. Remove any weak or spindly branches and focus on promoting a strong central stem. This will also help the plant to grow more upright, reducing the risk of disease and pests that thrive in low-lying areas.
Regular pruning throughout the growing season can lead to a significant increase in yield, often by up to 30%. It’s essential to remove any fruit or flowers from side shoots as they form, directing the plant’s energy towards producing larger, healthier fruit.
Common Challenges and Troubleshooting Tips
As you’re planting tomatoes in your grow bag, unexpected issues can arise – that’s why we’ve gathered common problems and practical solutions to get your harvest back on track. Let’s troubleshoot together!
Identifying and Addressing Pests, Diseases, and Nutrient Deficiencies
As you continue to care for your tomato plants in grow bags, you may encounter some common issues that can impact their health and productivity. Keep an eye out for pests like aphids, whiteflies, and hornworms, which can be detected by sticky honeydew droplets on leaves or actual insects on the plant. Regularly inspect your plants for signs of disease such as powdery mildew, leaf spot, or blossom end rot.
To prevent these issues, maintain good hygiene when handling your plants and ensure they receive adequate air circulation to reduce moisture buildup. Water wisely by avoiding overwatering, which can exacerbate problems like root rot. Fertilize regularly with a balanced fertilizer, but avoid overfertilizing as it can lead to nutrient deficiencies.
If you do notice any issues, address them promptly using organic or chemical treatments. For example, spray soapy water on aphids and whiteflies, while introducing beneficial insects like ladybugs or lacewings can help control pest populations naturally. Consult with local gardening experts or online resources for specific advice on tackling diseases like powdery mildew or blossom end rot.
Monitor your plants closely to catch any problems early, and don’t hesitate to seek professional help if issues persist. With proper care and attention, you can enjoy a bountiful harvest from your grow bag tomatoes!
Overcoming Environmental Stressors Like Extreme Weather
When planting tomatoes in a grow bag, extreme weather conditions can be a significant challenge. Tomatoes are sensitive to frost, and exposure to intense heat can cause them to become stressed, leading to reduced yields. To shield your tomatoes from these stressors, consider using shade cloth or other protective measures.
Shade cloth is an excellent option for providing partial shade during hot summer days. You can cover the grow bag with a 50% shade cloth to block out direct sunlight and prevent overheating. This will not only help maintain optimal temperatures but also reduce water loss through transpiration.
In regions prone to frost, you can use row covers or cold frames to protect your tomatoes from damage. Row covers are lightweight fabrics that allow light and air to reach the plants while keeping frost at bay. Cold frames, on the other hand, provide a physical barrier against frost and can be covered with a clear plastic sheet for added protection.
Remember, it’s essential to monitor weather forecasts and take necessary precautions to protect your tomato plants from extreme conditions. By taking these simple steps, you can ensure that your tomatoes thrive in their grow bag environment.
Harvesting Your Homegrown Tomatoes
Now that you’ve successfully grown and cared for your homegrown tomatoes, it’s time to harvest them at their peak ripeness. This section covers how to pluck perfect tomatoes from your grow bag.
Determining the Perfect Ripeness for Harvest
When harvesting your homegrown tomatoes, determining their perfect ripeness is crucial for optimal flavor and nutritional content. Unlike store-bought tomatoes, which are picked when unripe to ensure a longer shelf life, your grow bag tomatoes will be ready for harvest at different times. To assess their ripeness, check the color: a ripe tomato should have a uniform skin color, whether it’s red, yellow, orange, or purple.
In addition to color, gently squeeze the fruit – a ripe tomato will yield to pressure but still feel slightly firm. The texture of the tomato will also change as it ripens; a ripe one will be slightly soft and springy, while an unripe one will be hard. You can also check the stem end: if it comes off easily, the tomato is likely over-ripe.
Timing is everything when it comes to harvesting tomatoes. The flavor and nutritional content of your tomatoes peak at their optimal ripeness, so try to harvest them within a day or two of reaching this point.
Storage and Preservation Techniques for Longer Shelf Life
Once you’ve harvested your homegrown tomatoes from the grow bag, it’s essential to store them properly to maintain their quality and shelf life. Tomatoes are highly perishable, so it’s crucial to keep them cool and dry to slow down the ripening process.
Store harvested tomatoes in a single layer on a tray or plate, away from direct sunlight and heat sources. You can also use ventilated containers with paper towels to absorb excess moisture. Aim for temperatures between 55°F and 60°F (13°C and 15°C) to prolong their shelf life. Generally, you can expect to keep tomatoes at room temperature for up to five days.
If you want to preserve your harvest for longer periods, consider freezing or canning. To freeze, simply chop the tomatoes, place them in airtight containers or freezer bags, and store them in the freezer at 0°F (-18°C) or below. Alternatively, use a water bath canner to preserve whole or crushed tomatoes in jars, which can be stored for up to 12 months.
When freezing or canning, always follow safe food preservation guidelines to avoid spoilage and contamination.
Conclusion and Future Considerations
As you’ve successfully planted your tomatoes in a grow bag, it’s essential to remember that proper care is just as crucial as the planting process. Make sure to water your tomato plants regularly, but avoid overwatering which can lead to root rot and other issues. Keep an eye out for common pests like aphids and hornworms, and take action promptly if you notice any problems. In terms of future considerations, think about how you can reuse or recycle your grow bag after the harvest season is over. Consider repurposing it as a container for herbs or strawberries, or even using it as a planter for next year’s tomato crop.
Frequently Asked Questions
What if I don’t have a lot of space for my tomato plants to spread out?
You can still grow tomatoes in a small grow bag by choosing compact, bush-type varieties that thrive in containers. These types of tomatoes are designed to produce well in smaller spaces and won’t require as much pruning or support.
How often should I water my tomato plants in a grow bag?
The frequency of watering will depend on the weather conditions in your area. As a general rule, check the soil moisture by inserting your finger into the soil up to the first knuckle. If the soil feels dry, it’s time to water. Water deeply but avoid overwatering, which can lead to disease and root rot.
Can I grow cherry tomatoes in a grow bag with limited sunlight?
While cherry tomatoes are generally more adaptable to partial shade than larger tomato varieties, they still require at least 4-6 hours of direct sunlight per day to produce well. If your grow bag receives less than this amount of sunlight, consider choosing a variety that’s specifically bred for indoor or shaded conditions.
How do I prevent pests like hornworms and aphids from infesting my tomato plants?
To prevent pest infestations, make sure to sterilize your grow bag and potting mix before planting. Also, inspect your plants regularly for signs of pests and take action immediately if you notice any damage or unusual growth. Use organic pest control methods whenever possible, such as introducing beneficial insects like ladybugs or lacewings that prey on common tomato pests.
What’s the best way to support my indeterminate tomato variety in a grow bag?
Indeterminate tomatoes require staking or trellising to keep them upright and promote even fruiting. You can use a bamboo stake or a tomato cage, making sure it’s securely anchored in the soil to prevent wind damage. As the plant grows, gently tie the stems to the support using twine or clips, taking care not to constrict the growth of the plant.