Growing your own sage can be a game-changer for any herb enthusiast. Not only is sage a staple in many cuisines, but it’s also packed with health benefits and adds a unique flavor to dishes. However, growing sage can be a bit tricky, especially if you’re new to gardening. Choosing the right variety of sage, understanding its climate requirements, and providing optimal care for your plant are just some of the challenges that can make or break your harvest.
In this comprehensive guide, we’ll walk you through everything you need to know about growing sage like a pro. We’ll cover the best varieties to grow in different climates, how to prepare the perfect soil for your sage plants, and expert tips on watering, pruning, and harvesting techniques to maximize your yield. Whether you’re a seasoned gardener or just starting out, this article will equip you with the knowledge to grow delicious and healthy sage all year round.
Choosing the Right Variety and Conditions
With so many types of sage out there, choosing the right one for your garden can be a bit overwhelming. Let’s start by considering the specific needs and preferences that will guide our selection.
Understanding Sage Varieties
When it comes to growing sage, you’ll find that there are several varieties to choose from. Each type has its unique characteristics, which can affect the flavor, aroma, and appearance of your herb. Common sage (Salvia officinalis) is one of the most widely grown varieties, prized for its pungent flavor and fragrance. Garden sage, also known as broad-leaved sage, is a bit milder in taste and has broader leaves.
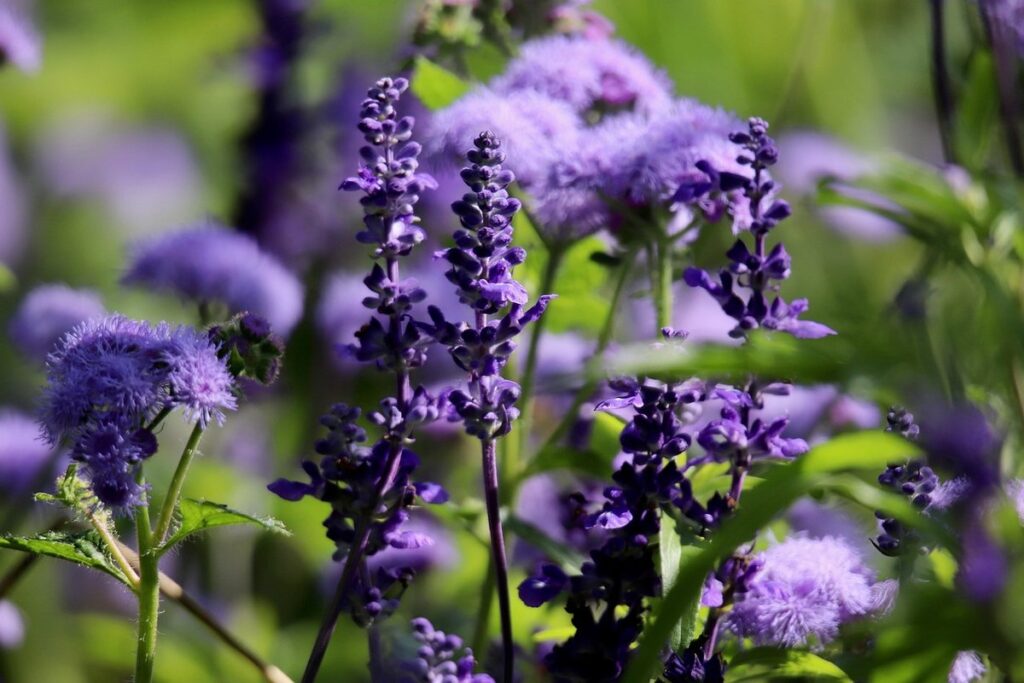
Purple sage (Salvia purpurea) is another popular variety, with deep purple flowers that add a striking touch to herb gardens. Burgundy sage is a compact variety, ideal for container growing, while Tri-color sage boasts three distinct colors: red, white, and green. When selecting a sage variety, consider the flavor profile you prefer and the space available in your garden.
Some sage varieties are more tolerant of heat and drought than others, so be sure to research the specific needs of your chosen variety. For example, common sage is relatively hardy, but purple sage requires more attention to maintain its delicate flowers. By understanding the unique characteristics of each type, you can choose the best sage for your garden and cooking needs.
Preparing the Soil and Climate for Sage Growth
To grow sage successfully, it’s essential to create an environment that mimics its native habitat. Sage is a Mediterranean plant, so it prefers well-draining soil and full sun to partial shade. In areas with high humidity or frequent rainfall, ensure the soil drains quickly to prevent waterlogged conditions that can lead to root rot.
When preparing the soil for sage growth, aim for a pH between 6.0 and 7.0, which is slightly alkaline. Mix in organic matter like compost or well-rotted manure to improve soil fertility and drainage. If your soil is heavy clay or prone to waterlogging, consider raised beds or containers with good drainage.
Sage requires at least six hours of direct sunlight per day but can tolerate partial shade. In areas with intense heat, provide some afternoon shade to prevent scorching. In cooler climates, plant sage in a sheltered spot protected from harsh winds and frost. By creating the right climate and soil conditions, you’ll be well on your way to growing healthy, fragrant sage for your kitchen and garden.
Selecting a Healthy Plant or Seeds
When selecting healthy plants or seeds for growing sage, it’s essential to choose from reputable sources. Start by visiting local nurseries or gardening stores that specialize in herbs. These retailers often carry a wide selection of high-quality seedlings and are knowledgeable about the specific needs of their products.
Alternatively, you can shop online from trusted vendors who focus on selling herb seeds and plants. Look for websites that provide detailed information about their products, including growing instructions and customer reviews. Some popular online options include Burpee, Seed Savers Exchange, and Pine Island Gardens.
When purchasing online, be sure to check the seed packet or plant label for any certifications like USDA Organic or Non-GMO. This ensures you’re buying from a vendor that adheres to strict quality control measures. Always inspect the plants or seeds before making a purchase, looking for signs of disease, pests, or damage. By choosing healthy plants or seeds, you’ll set yourself up for success in growing robust and flavorful sage.
Sowing and Transplanting Sage
When it comes to growing sage, sowing seeds directly into the ground or transplanting seedlings is a crucial step that requires some finesse. Let’s dive into the details of getting your sage off to a strong start.
Starting Sage from Seed
Starting sage from seed can be a rewarding experience for gardeners of all levels. To begin, you’ll need to prepare your soil and obtain high-quality sage seeds that are specifically bred for their flavor and fragrance.
When starting seeds indoors, fill small pots or seed trays with a well-draining seed starting mix. Moisten the soil with water, then sow the seeds about 1/4 inch deep and 6-8 inches apart. Cover the seeds with a thin layer of soil to maintain humidity. Keep the soil consistently moist but not waterlogged.
For direct sowing in the garden, choose a location with full sun and well-draining soil. Sow seeds 1/4 inch deep and 12-18 inches apart as soon as the last frost date has passed. You can also start sage from seed directly into larger pots or containers, which is ideal for indoor growing.
Keep the soil temperature between 65-75°F (18-24°C) for optimal germination. It may take 7-14 days for seeds to sprout, depending on factors like soil quality and moisture. Once seedlings have two sets of leaves, you can transplant them into larger containers or directly into the garden, taking care not to disturb their roots.
Transplanting Sage Seedlings
When it’s time to transplant young sage seedlings into larger containers or directly into the ground, handle them with care to avoid shocking the delicate roots. Start by gently removing the seedling from its original container, taking note of the root ball and any circling roots that may have formed.
To minimize stress on the roots, choose a new pot or location with a slightly larger size than the current one, rather than transplanting into an overly large space. Water thoroughly the day before transplanting to make the soil easier to work with. Place the seedling in its new location at the same depth as it was previously planted, firming the soil gently around the roots.
When transplanting multiple seedlings together, ensure they have enough space to grow and receive adequate air circulation. A general rule of thumb is to plant sage seedlings 12-18 inches apart for optimal growth and health. Water well after transplanting and keep the soil consistently moist during the first few weeks as the young plants establish themselves in their new environment.
Soil Care for Sage Plants
To keep your sage plants thriving, it’s essential to create a well-draining soil that mimics their native Mediterranean habitat. Let’s dive into the specifics of soil care for these lovely herbs.
Fertilizing Sage for Optimal Growth
When it comes to growing sage, fertilization is a crucial aspect that’s often overlooked. A well-fertilized sage plant will produce lush green leaves and vibrant purple flowers, but if neglected, it can lead to stunted growth and poor flavor. Organic fertilizers are an excellent option for sage plants, as they promote healthy soil microbiology without harming the environment.
For organic fertilization, consider using compost tea or worm castings, which are rich in nutrients and beneficial microbes. You can also use fish bone meal or alfalfa meal, which provide a slow release of nitrogen and other essential minerals. It’s essential to time your fertilizations correctly – during the growing season (spring-fall), apply fertilizer every 4-6 weeks for optimal growth.
For example, if you’re using compost tea, make sure to dilute it according to the manufacturer’s instructions before applying it directly to the soil. Start with a small amount and gradually increase as needed. By following these simple steps and choosing the right fertilizers, your sage plant will thrive and reward you with an abundance of fresh herbs for cooking and medicinal purposes.
Mulching Around Sage Plants
When mulching around sage plants, you’re creating a protective layer that shields them from extreme temperatures and retains moisture. This is especially beneficial for sage plants, which prefer well-drained soil but can still be sensitive to drying winds. Start by applying a 2-3 inch layer of organic mulch like wood chips, straw, or bark around the base of your sage plant.
As you spread the mulch, keep it about an inch away from the plant’s stem to prevent rot and other issues. You want the mulch to act as a buffer zone between the soil and the air, reducing water loss through evaporation. Aim for a thick enough layer that it covers at least half of the soil surface, but avoid over-mulching which can lead to an anaerobic environment.
By mulching around your sage plants, you’ll not only retain moisture in the soil but also reduce weed growth and maintain a consistent soil temperature. As an added benefit, mulch will help suppress pests like slugs and snails that might otherwise damage your sage leaves. Regularly replenish the mulch layer to ensure it remains effective throughout the growing season.
Avoiding Common Pests and Diseases in Sage
When growing sage, it’s essential to be aware of common pests and diseases that can harm your plants. One of the most prevalent pests is aphids, which are small, soft-bodied insects that feed on sap. They can cause curled or distorted leaves and stunted growth. To prevent aphid infestations, make sure to inspect your plants regularly for signs of aphids, such as sticky honeydew droplets or white, waxy eggs.
Another common pest is spider mites, which are tiny, spider-like insects that feed on plant sap. They can cause yellowing leaves and fine webbing on the underside of leaves. To control spider mite infestations, use a mild soap solution or neem oil to repel them.
When it comes to diseases, root rot is a common issue in sage plants. It’s usually caused by overwatering or poor drainage. Symptoms include yellowing leaves and soft, mushy stems. To prevent root rot, ensure good air circulation around your plants and avoid overwatering.
Regularly inspect your plants for signs of pests and diseases, and take action promptly to prevent infestations from spreading.
Watering and Pruning Techniques
To keep your sage plant thriving, you’ll want to learn how to properly water it, as well as when to prune back its stems for optimal growth. Let’s dive into the details of each technique.
Understanding Sage’s Water Requirements
Growing sage requires a delicate balance between water and soil conditions. To determine the right amount of water for your sage plant, consider its climate and soil environment. Sage is drought-tolerant but still needs regular watering, especially during its first year of growth.
In warm climates with well-draining soils, you can get away with watering your sage every 3-4 days during hot weather. However, in cooler or wetter climates, it’s best to water only when the soil feels dry to the touch, usually about once a week. If you’re unsure, check the soil moisture by inserting a finger into the soil up to the first knuckle.
In terms of specific watering tips, aim to provide your sage with about 1-2 inches of water per week. You can achieve this through either regular irrigation or infrequent but deep watering sessions. Avoid overwatering, as this can lead to root rot and other problems that may kill your plant. Monitor your sage’s response to these guidelines and adjust accordingly based on its individual needs and the local climate conditions.
Pinching and Pruning for Bushy Growth
Pinching and pruning are essential techniques to promote healthy growth in sage plants. When left unpruned, sage can become leggy and focus its energy on producing flowers rather than foliage. To prevent flowering and encourage bushy development, pinch off the growing tips of the stems about one-third from the top.
This will help redirect the plant’s energy towards producing more lateral branches, resulting in a fuller and more compact plant. For optimal results, repeat this process every 1-2 weeks during the spring and summer months when sage is actively growing.
By regularly pinching and pruning your sage plant, you’ll be able to control its shape and promote healthy growth. This will also help prevent the plant from becoming too woody or fibrous, which can reduce its overall yield. Remember to always use clean, sharp tools when pruning to avoid spreading disease and encourage a smooth recovery for the plant. With regular pinching and pruning, you’ll be rewarded with a lush, bushy sage plant that’s perfect for cooking and ornamental purposes alike.
Tips for Harvesting Fresh Sage
To get the most out of your sage harvest, it’s essential to know when and how to cut back your plants at the right time, ensuring a bountiful crop. This is where proper harvesting techniques come in.
Identifying the Right Time to Harvest
When it comes to harvesting fresh sage, timing is everything. You want to pick your leaves at just the right moment to ensure they’re flavorful and aromatic. One of the easiest ways to determine if your sage is ready for harvest is by looking at its color. Fresh sage leaves are typically a deep green color with a silvery sheen on top. As the plant matures, the leaves may start to turn a light yellowish-green or even brown around the edges.
Another indicator of readiness is texture. Sage leaves should be firm and slightly velvety to the touch. Avoid picking leaves that feel wilted or limp, as they won’t have the same flavor and aroma as fresh ones. You can also check the aroma by gently bruising a leaf between your fingers. Fresh sage has a distinctive piney or camphorous scent, which should be noticeable when you harvest.
If you’re still unsure, wait a few more days to see if the leaves develop these characteristics. The ideal time for harvesting is usually in the morning after the plant has had a chance to dry out slightly overnight.
Techniques for Cutting and Drying Sage
When it’s time to harvest fresh sage leaves from your garden, use sharp gardening scissors or pinch off individual leaves with your fingers. For larger quantities of foliage, cut the stems just above a node using a slanted cut to promote healthy regrowth. To preserve the herb and extend its shelf life, tie small bunches of leaves together and hang them upside down in a warm, dry location, away from direct sunlight.
If you prefer a more compact dried form, spread out individual leaves on paper towels or wire racks and allow air circulation around each leaf. This method helps prevent mold growth while promoting even drying. Alternatively, use a food dehydrator set to its lowest temperature setting (usually around 95°F) for faster results.
Regardless of the drying technique used, monitor your sage closely during the process, ensuring it remains dry and crumbly rather than brittle or discolored. Properly dried sage will retain its flavor and aroma for months when stored in an airtight container. Regular harvesting and drying helps maintain plant health, encouraging new growth and preventing over-maturation of the leaves.
Pest Control Methods and Organic Solutions
When pests threaten your sage plants, don’t resort to harsh chemicals – we’ll explore natural methods for controlling common issues. This includes using neem oil and introducing beneficial insects.
Natural Deterrents for Pests
When it comes to growing sage, you’ll inevitably encounter pests that can damage your plants. However, relying on chemical pesticides isn’t necessary and may even harm the environment and your garden’s ecosystem. Instead, consider using natural deterrence methods to keep those pesky critters at bay.
One of the most effective organic pest control methods is neem oil. Derived from the seeds of the neem tree, this natural insecticide disrupts the life cycle of insects, preventing them from reproducing and ultimately killing them off. Mix neem oil with water according to the product’s instructions and spray it directly on your sage plants to repel aphids, whiteflies, and spider mites.
Another great option is garlic spray. Believe it or not, garlic has natural insect-repelling properties that can keep pests from feasting on your sage leaves. Simply blend minced garlic with water and let the mixture sit for a few hours to allow the active compounds to infuse. Strain the liquid before spraying it on your plants.
You can also try using diatomaceous earth, a natural powder made from fossilized algae that dehydrates and kills insects upon contact. Sprinkle it around the base of your sage plants to deter slugs, snails, and caterpillars.
Companion Planting to Support Sage Health
Companion planting is a game-changer for sage enthusiasts. By strategically pairing sage with other beneficial herbs, you can enhance its growth, improve its health, and even reduce the need for pesticides. Two of the best companion plants for sage are rosemary and thyme.
These two herbs share similar growing conditions and require minimal maintenance, making them perfect companions for sage. Rosemary, in particular, has been shown to improve sage’s resistance to pests and diseases. By planting them together, you can create a mutually beneficial relationship that supports the overall health of your sage plant.
To reap the benefits of companion planting with rosemary and thyme, be sure to space them about 6-8 inches apart from each other. This will allow for proper air circulation and prevent overcrowding, which can lead to fungal diseases and pest infestations. With a little planning and some simple care, you can create a thriving herb garden that’s bursting with flavor and fragrance.
By incorporating companion planting into your sage-growing routine, you’ll not only reduce the risk of pests and diseases but also improve the overall quality and yield of your sage harvest.
Frequently Asked Questions
What if I accidentally overwater my sage plant, will it still be salvageable?
Yes, most sage plants are resilient and can recover from overwatering. However, to prevent root rot, stop watering immediately and allow the soil to dry out slightly between waterings. Remove any dead or rotting leaves, and prune the affected area to encourage healthy growth.
Can I grow sage indoors year-round, or is it best suited for outdoor conditions?
Sage can be grown indoors, but it prefers cooler temperatures and well-ventilated spaces to prevent moisture buildup. To replicate outdoor conditions, place your indoor sage plant near a sunny window with temperatures between 60-70°F (15-21°C). Be prepared to provide supplemental lighting during winter months when natural light is scarce.
How do I know if my sage plants are ready for harvesting, and what’s the best way to harvest them?
Sage leaves are typically ready to harvest when they reach 2-3 inches in length. Pinch or cut off individual stems just above a leaf node to encourage bushy growth and prevent the plant from flowering. Harvest your sage at any time of day, but avoid cutting during extreme temperatures.
What are some common pests that target sage plants, and how can I protect them?
Aphids, whiteflies, and spider mites often infest sage plants. To prevent these pests, inspect your plants regularly and treat any infestations promptly with neem oil or insecticidal soap. Companion planting with basil, mint, or lemongrass can also help deter pests.
Can I propagate my sage plant using cuttings, or is it best to start from seeds?
Yes, you can successfully propagate sage using stem cuttings in the spring or summer months. Cut 3-4 inch stems just above a leaf node and remove lower leaves. Dip the cut end in rooting hormone powder before planting it in well-draining soil. Keep the soil consistently moist until roots develop.