Growing your own peas can be a truly rewarding experience, providing you with an abundance of fresh, delicious pods right in your own backyard. However, many gardeners struggle to achieve bountiful yields, often due to factors like poor soil quality or inadequate care techniques. If you’re eager to grow healthy and thriving peas but don’t know where to start, this article is for you. Our comprehensive guide covers everything from variety selection and soil preparation to planting, caring, and harvesting techniques. We’ll also delve into common issues and provide expert advice on how to overcome them, ensuring your pea crop reaches its full potential. Whether you’re a seasoned gardener or just starting out, our tips and tricks will help you grow the perfect peas every time.
Choosing the Right Variety
When it comes to growing peas, selecting the right variety is crucial for a successful harvest. In this next step, we’ll walk you through how to choose a pea variety that suits your climate and gardening needs.
Understanding the Different Types of Peas
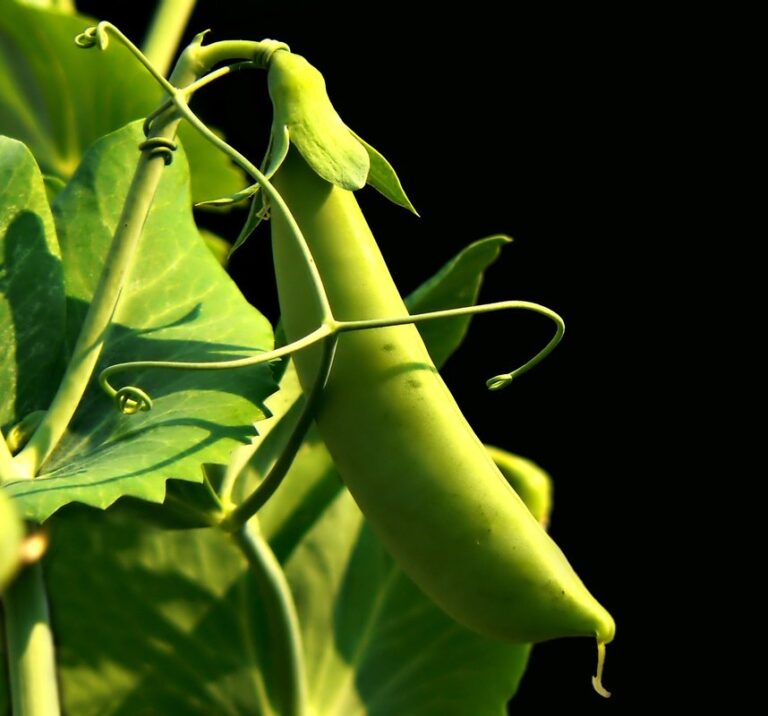
When it comes to growing peas, you’ll find that there are several types to choose from. The three main varieties are garden peas, snap peas, and snow peas, each with its own unique characteristics.
Garden peas, also known as shelling peas, produce large pods filled with tender, edible seeds. They’re a classic choice for many gardeners and can be harvested in as little as 50 days. To grow garden peas, look for varieties like ‘Kelvedon Wonder’ or ‘Tenda Poll’. These will produce high yields and have a sweet flavor.
Snap peas, on the other hand, have flat pods with a crunchy texture that’s perfect for snacking. They’re often eaten raw, but can also be cooked in stir-fries or sautéed as a side dish. Snap peas mature in about 60 days and are ideal for gardeners who want a longer harvest season.
Snow peas, also known as flat peas, have flat pods with a sweet and tender interior. They’re often used in Asian cuisine and can be harvested in about 50-60 days. Snow peas prefer cooler temperatures and well-draining soil to produce the best results.
When selecting a type of pea to grow, consider your personal preferences and cooking habits. Garden peas are great for those who want a traditional pea flavor, while snap peas offer a crunchy texture perfect for snacking. Snow peas provide a sweet and tender option that’s ideal for stir-fries and other dishes.
Selecting a Variety for Your Climate
When selecting a pea variety for your garden, it’s essential to consider the local climate and growing conditions. This will ensure that your plants thrive and produce an abundance of delicious peas.
Firstly, temperature tolerance is crucial. Some pea varieties are bred specifically for cooler climates, while others can handle warmer temperatures. For example, ‘Oregon Sugar Pod’ is a popular variety that thrives in temperatures between 60°F and 80°F (15°C to 27°C), making it ideal for regions with mild winters. On the other hand, ‘Alderman’ is a hardier variety that can tolerate temperatures as low as 40°F (4°C) and as high as 90°F (32°C).
Moisture requirements are also vital to consider. Some pea varieties require consistent moisture, while others can handle drought or flooding conditions. For instance, ‘Wando’ is a heat-tolerant variety that requires minimal watering, making it perfect for regions with low rainfall.
Lastly, disease resistance is another key factor when selecting a pea variety. Some varieties are bred to be resistant to powdery mildew, root rot, and other common diseases that can affect peas. By choosing a variety with built-in disease resistance, you’ll reduce the need for pesticides and ensure healthier plants.
When shopping for pea seeds, look for labels that indicate temperature tolerance, moisture requirements, and disease resistance. You can also consult with local nurseries or gardening experts to determine which varieties perform best in your area.
Preparing the Soil
Before planting peas, it’s essential to prepare the soil properly by loosening and aerating it to ensure healthy root development. This simple step makes all the difference in a bountiful harvest!
Testing and Amending the Soil
Before planting peas, it’s essential to test and amend your soil to ensure it provides the necessary nutrients for healthy growth. Soil testing is a straightforward process that can be done with a DIY kit or by sending a sample to a lab for analysis.
To collect a soil sample, dig a small hole about 6-8 inches deep in the area where you plan to plant peas. Scoop out a handful of soil and mix it well. Then, take a small cup or jar and fill it with the mixed soil. If sending the sample to a lab, be sure to follow their specific instructions for packaging and labeling.
When analyzing your soil test results, look for nutrient levels such as nitrogen (N), phosphorus (P), and potassium (K). Peas prefer well-balanced soil with moderate levels of these nutrients. Also, check the pH level; peas grow best in slightly acidic to neutral soil with a pH between 6.0 and 7.0.
Based on your test results, amend your soil as needed. If it’s too alkaline or acidic, add lime or sulfur accordingly. If nutrient levels are low, consider applying compost or balanced fertilizer according to the manufacturer’s instructions.
Creating a Pea-Friendly Soil Environment
To create a pea-friendly soil environment, you’ll want to focus on adding organic matter, adjusting the pH levels, and introducing beneficial microorganisms. Start by incorporating compost or well-rotted manure into your soil. This will not only improve its structure but also provide essential nutrients for healthy plant growth.
When it comes to pH, peas prefer a slightly acidic to neutral soil environment with a pH range of 6.0 to 7.0. If your soil is too alkaline or acidic, amend it with lime or sulfur accordingly. For example, if your soil test reveals a pH level of 8.5, adding a small amount of sulfur can help lower the pH and create an optimal environment for pea growth.
To introduce beneficial microorganisms, consider incorporating cover crops like clover or beans into your rotation plan. These plants attract beneficial insects and bacteria that will help to break down organic matter and improve soil fertility. Alternatively, you can add inoculants specifically designed for peas to boost their nitrogen fixation capabilities. By creating a balanced and diverse soil ecosystem, you’ll be well on your way to growing healthy and productive pea crops.
Planting Peas
Now that you’ve prepared your soil and seeds, let’s dive into planting peas. Here, we’ll cover the best methods for sowing pea seeds directly into the ground for a bountiful harvest.
Sowing Seeds at the Right Time
When it comes to growing peas, timing is everything. The optimal time for planting peas depends on your region and climate, as well as whether you’re starting seeds indoors or directly in the garden.
In most regions, spring is the best time to plant peas. In temperate climates, this typically means sowing seeds in late winter to early spring, about 4-6 weeks before the last frost date. This allows the seedlings to get a head start on the growing season and gives them enough time to mature before the heat of summer sets in.
In regions with mild winters, you can plant peas as soon as the soil can be worked in late winter or early spring. In areas with cold winters, it’s best to wait until the soil has warmed up and the danger of frost has passed.
If you’re starting seeds indoors, begin sowing 6-8 weeks before the last frost date. This will give your seedlings a jumpstart on the growing season and ensure they have enough time to mature once transplanted outdoors.
It’s also worth noting that some varieties of peas are specifically bred for cooler weather or can tolerate light frosts. These can be planted as soon as the soil can be worked in early spring, even if it’s still a bit chilly outside.
Proper Spacing and Support
When planting peas, it’s essential to get the spacing right to promote healthy growth and prevent overcrowding. A general rule of thumb is to plant seeds 2-3 inches apart in rows that are 18-36 inches apart. This allows each plant to receive adequate sunlight and air circulation.
As your pea plants grow, they’ll need support to keep them upright and encourage vertical growth. You can use trellises, stakes, or other structures to provide this support. For example, you can place a trellis near the seedlings as soon as they emerge from the soil. Alternatively, you can use individual stakes for each plant or create a pea teepee by attaching several plants together with twine.
It’s also crucial to choose the right type of support based on your specific variety of peas. Some types, like snow peas and snap peas, have weak stems and require more substantial support, while others, like shelling peas, can use less structure. By providing adequate spacing and support, you’ll be able to grow healthy, productive pea plants that will reward you with a bountiful harvest.
Caring for Peas
To ensure your peas thrive, it’s essential to provide them with the right care and attention, especially when they’re young and vulnerable. This is where regular watering and soil maintenance come into play.
Watering and Irrigation Strategies
When it comes to growing peas, maintaining consistent moisture levels is crucial. Peas need about 1-2 inches of water per week, either from rain or irrigation. To ensure this, you’ll want to develop a watering and irrigation strategy that avoids overwatering, which can lead to root rot and other issues.
Water your pea plants when the top inch of soil feels dry to the touch. You can check this by sticking your finger into the soil up to the first knuckle. If it’s dry, it’s time for a drink! Aim to water in the morning or early evening to give the plants time to absorb the moisture before nightfall.
To avoid overwatering, make sure not to waterlog the area around your pea plants. This can be done by creating a shallow trench around the plants and allowing excess water to flow away from the roots. You can also use a drip irrigation system or soaker hose to deliver water directly to the roots, reducing evaporation and runoff.
Remember to monitor weather forecasts and adjust your watering schedule accordingly. Peas are sensitive to drought, but they’re also susceptible to root rot if the soil is too wet for an extended period. By striking the right balance, you’ll be well on your way to growing healthy, thriving pea plants!
Managing Pests and Diseases
When growing peas, it’s essential to be aware of common pests and diseases that can damage your crop. Some of the most prevalent issues include aphids, powdery mildew, and root rot. Aphids are small, soft-bodied insects that feed on plant sap, causing curled or distorted leaves. To identify them, look for sticky honeydew droplets on nearby surfaces.
To prevent the spread of pests like aphids, ensure good air circulation around your pea plants by providing enough space between rows. You can also use neem oil or insecticidal soap to control infestations organically. For more severe cases, consider introducing natural predators like ladybugs or lacewings.
Powdery mildew is a fungal disease that appears as a white, powdery coating on leaves and stems. It thrives in humid conditions, so maintain good air circulation by pruning infected areas and providing adequate sunlight. To prevent root rot, avoid overwatering and ensure the soil drains well. Regularly inspect your plants for signs of stress or damage, and take action promptly to prevent infestations from spreading.
If you notice any issues, act quickly to control the problem before it’s too late. A healthy pea plant is better equipped to withstand minor attacks, so keep an eye out for pests and diseases from the moment you sow your seeds.
Harvesting Peas
Now that you’ve planted and tended to your pea crop, it’s time to think about when and how to harvest them for maximum flavor and nutrition. Learn our top tips for harvesting peas at the perfect stage of ripeness.
Determining When Peas are Ready
When harvesting peas, it’s essential to know when they’re ready to eat. Different types of peas have varying signs of readiness, but there are some common indicators you can look out for.
For shelling peas, check for a slight give when pressed between your thumb and index finger. This indicates that the pods are tender and ready to eat. Gently snap off the stem end of the pod, and if it comes away easily, the pea is ripe. For snow peas and snap peas, look for a bright green color and a plump, firm appearance. The peas should be sweet and tender when cooked.
To check the sweetness of your peas, simply taste one from each plant. If they’re not yet sweet, wait another day or two before checking again. This will ensure that you pick your peas at their peak flavor and tenderness.
In general, it’s best to harvest peas in the morning, after the dew has evaporated but before the heat of the day. This will help prevent the peas from becoming soggy and make them easier to handle.
Handling and Storing Fresh Peas
When you’ve harvested your fresh peas, it’s essential to handle and store them properly to preserve their flavor, texture, and nutritional value. Washing is the first step in this process. Simply submerge the peas in a bowl of cold water, gently swishing them around to dislodge any dirt or debris. Then, drain the peas and pat them dry with a clean towel to remove excess moisture.
Next, you can choose between refrigerating or freezing your peas. If you plan to use them within a few days, store them in an airtight container in the refrigerator. Keep them away from direct sunlight and heat sources. Frozen peas are just as nutritious as fresh ones, so don’t hesitate to freeze them if you won’t be using them immediately. To do this, blanch the peas for 2-3 minutes in boiling water, then plunge them into an ice bath to stop the cooking process.
When freezing, spread the cooled peas on a baking sheet and place it in the freezer until they’re frozen solid. Transfer the frozen peas to an airtight container or freezer bag for long-term storage. Proper handling and storage will help you enjoy your homegrown peas at their best.
Troubleshooting Common Issues
We’ve all been there – you’re excitedly tending to your pea plants, and suddenly something goes wrong. This section will help you identify and fix common issues that can affect your pea crop’s success.
Identifying and Addressing Nutrient Deficiencies
When growing peas, it’s not uncommon for nutrient deficiencies to arise. These can be caused by factors such as soil pH imbalance, inadequate fertilization, or poor drainage. To identify these issues, keep an eye out for telltale signs like yellowing leaves, stunted growth, and reduced yields.
Nitrogen deficiency is a common problem when growing peas. Symptoms include pale green to yellowish leaves with dark green veins. To address this, incorporate organic nitrogen-rich amendments like compost tea or fish emulsion into your soil preparation routine. You can also use cover crops like legumes or clover to fix atmospheric nitrogen.
Phosphorus deficiency often manifests as weak and spindly growth, stunted seedlings, and low yields. Soil pH that’s too high (above 7) can lead to phosphorus deficiencies. To correct this, apply a balanced fertilizer with an emphasis on phosphorus, like bone meal or rock phosphate, according to the product instructions.
Maintaining optimal soil moisture is also crucial. Waterlogged soils deprive peas of essential oxygen, leading to root rot and nutrient deficiencies. Aim for a balance between adequate moisture and good drainage. This can be achieved by incorporating organic matter like peat moss or coconut coir into your potting mix. Regularly check soil pH levels using an accurate meter, and adjust accordingly to prevent potential deficiencies.
Managing Stress Factors and Environmental Conditions
Growing peas can be a delightful experience, but it’s not without its challenges. One of the most significant factors affecting pea yields and quality is stress caused by extreme temperatures, droughts, and floods. To mitigate these stressors, you’ll want to take proactive measures to create an ideal growing environment for your peas.
Start by choosing a location that receives full sun to partial shade and has well-draining soil. Avoid areas prone to waterlogging or where standing water tends to collect. If you’re planting in a region with extreme temperature fluctuations, consider using row covers or other frost protection methods to safeguard your pea crop.
In regions prone to droughts, make sure to water your peas regularly, but avoid overwatering, which can lead to fungal diseases and root rot. For areas susceptible to flooding, elevate your garden bed or use raised beds with good drainage to prevent waterlogged soil conditions. By being mindful of these environmental stressors, you’ll be well on your way to growing healthy, thriving pea plants.
Frequently Asked Questions
What if I live in an area with poor soil quality? How can I still grow healthy peas?
Poor soil quality can be a significant challenge when growing peas. To overcome this, focus on creating a pea-friendly soil environment by adding organic matter such as compost or well-rotted manure to improve drainage and fertility. You can also consider raised beds or container gardening to give your plants optimal conditions.
Can I grow peas in partial shade? What are the consequences if they don’t receive full sun?
While peas generally require full sun to produce an abundance of pods, some varieties can tolerate partial shade. However, keep in mind that reduced sunlight may impact yields and flavor. If you must plant in a shaded area, choose varieties specifically bred for shade tolerance and provide supplemental lighting if possible.
How often should I water my pea plants? What are the signs of overwatering or underwatering?
Proper watering is essential for healthy peas. Aim to provide about 1-2 inches of water per week through rainfall or irrigation. Check your soil regularly by inserting a finger into the soil up to the knuckle. If the soil feels dry, it’s time to water. Overwatering can lead to root rot and other problems.
Can I grow peas in succession, or should I wait until the previous crop is fully harvested?
Succession planting involves growing multiple crops of the same plant type over a single season. Yes, you can grow peas in succession by sowing new seeds every 1-2 weeks after harvesting the previous crop. This allows for continuous production throughout the growing season.
How long do I need to wait between planting and harvesting peas? Can I enjoy them sooner if I choose an earlier-maturing variety?
Typically, it takes around 50-60 days from sowing seeds to harvest for most pea varieties. However, some early-maturing varieties can be ready in as little as 40-45 days. By choosing a fast-growing variety and providing optimal growing conditions, you may be able to enjoy your first peas sooner than expected.