Okra is one of those hidden gems in the vegetable garden, offering a wealth of nutritional benefits and versatility in cooking. However, many gardeners struggle to coax this finicky crop into production. To grow okra successfully, it’s essential to understand its specific climate requirements – temperature and humidity play a crucial role in determining whether your plants thrive or wither away.
In this comprehensive guide, we’ll walk you through the steps necessary to grow delicious okra at home. We’ll cover the basics of soil preparation, including pH levels and nutrient-rich amendments that will set your okra up for success. But growing okra isn’t without its challenges – common issues like pests, diseases, and poor pollination can quickly derail even the most enthusiastic gardener’s plans.
Understanding Okra Requirements
To successfully grow okra, it’s essential to understand its specific requirements for temperature, soil, and sunlight. Let’s dive into these crucial needs next.
Climate and Temperature Requirements
Okra thrives in warm and humid climates, making it an ideal crop for regions with mild winters and hot summers. When deciding whether to grow okra, the first thing to consider is the temperature range. Okra prefers temperatures between 65°F (18°C) and 95°F (35°C), with optimal growth occurring between 75°F (24°C) and 85°F (29°C). Temperatures above 100°F (38°C) can lead to stress, while prolonged exposure to temperatures below 55°F (13°C) can cause the plant to become dormant.
To determine if your area is suitable for growing okra, check the average temperature and humidity levels in your region. Okra requires a long growing season with at least 120 frost-free days. If you live in an area with short summers or frequent frosts, it may be challenging to grow okra successfully. In such cases, consider using row covers or other protection methods to extend the growing season.
Some regions with suitable climate conditions for growing okra include the Southern United States, parts of Central and South America, Africa, and Southeast Asia.
Soil Preparation
When preparing the soil for okra growth, it’s essential to prioritize well-draining properties. Okra plants don’t thrive in waterlogged conditions and are susceptible to root rot if the soil is too saturated. Test your soil pH levels to ensure they fall within the ideal range of 6.0 to 7.0. This slightly acidic to neutral range provides optimal nutrient availability for okra growth.
To create a conducive environment, add organic matter like compost or well-rotted manure to improve soil structure and fertility. Aim to incorporate at least 2-3 inches of this rich material into the top 6-8 inches of soil. This will enhance water retention, suppress weeds, and provide essential nutrients for healthy growth.
For example, if you’re using a compost mix with a pH level slightly below 7.0, adjust your application rate to avoid over-acidifying the soil.
Choosing the Right Okra Variety
When selecting okra varieties, it’s essential to consider factors such as climate, growth habits, and desired yield. Let’s explore some popular options suitable for home gardeners.
Determining the Best Variety for Your Region
When selecting an okra variety for your garden, it’s essential to consider the specific needs of your region. Okra comes in many types, each with its unique characteristics and growing requirements. For example, Clemson Spineless is a popular choice for warmer climates due to its heat tolerance and high yield production. On the other hand, Lady Finger okra excels in cooler temperatures and requires less moisture.
To determine the best variety for your region, consider your local climate and pest conditions. If you live in an area with frequent frosts or cold snaps, opt for a more cold-tolerant variety like ‘Clemson Spineless’ or ‘Red Burgundy’. Conversely, if you’re in a scorching hot climate, choose heat-resistant varieties like ‘Dwarf Red’ or ‘Emerald’.
Additionally, think about the pests prevalent in your area. If you’re dealing with powdery mildew or root rot, look for okra varieties bred to be resistant to these diseases, such as ‘Red Burgundy’. By selecting an okra variety that suits your region’s specific conditions, you’ll set yourself up for a bountiful harvest and minimize the need for pesticides and other chemicals.
Considerations for Small-Space Gardening
When growing okra in small spaces, it’s essential to choose compact or dwarf varieties that thrive in containers or limited plots. These mini okras are bred specifically for their bushy growth habit and space-saving design. Some popular options include ‘Clemson Spineless’, ‘Red Burgundy’, and ‘Dwarf Emerald’. When selecting a variety, consider factors like maturity days (shorter is better for small spaces), plant size, and disease resistance.
In container gardens, ensure the pot is at least 12-18 inches deep to accommodate okra’s taproot. Use a well-draining potting mix and fertilize regularly to promote healthy growth. Compact varieties can be spaced as close as 6-8 inches apart, making them perfect for small plots or raised beds.
When growing in limited spaces, keep an eye out for common issues like waterlogged soil and nutrient deficiencies. Regularly inspect your plants for signs of pests or diseases and take action promptly to prevent damage.
Preparing the Soil and Seedbed
Before you start planting okra seeds, it’s essential to prepare your soil by loosening and aerating it to ensure optimal drainage and root growth. This step is crucial for a healthy and thriving okra plant.
Testing and Amending Your Soil
Testing and amending your soil is an essential step in growing healthy and productive okra plants. Before you start sowing your seeds, it’s crucial to assess the fertility of your soil and make necessary adjustments.
Soil testing will reveal its pH level, nutrient content, and structure. Based on the results, you may need to add organic amendments like compost or well-rotted manure to enrich the soil. Compost is an excellent choice as it not only adds nutrients but also improves soil’s water-holding capacity and aeration.
Other techniques to improve soil fertility include incorporating green manure crops like clover or rye, which are high in nitrogen-fixing bacteria. You can also mix in worm castings, a rich source of micronutrients, into the top 6-8 inches of soil. By doing so, you’ll create an optimal growing environment for your okra plants to thrive.
It’s recommended to test and amend your soil at least once a year to maintain its fertility and structure. This simple step will reward you with bountiful harvests of delicious okra pods.
Creating a Smooth Seedbed
Creating a smooth seedbed is crucial for okra growth. Before sowing okra seeds, it’s essential to prepare the soil by tilling it to a depth of about 8-10 inches. This loosens compacted soil and brings up nutrients from deeper layers, promoting healthy root development.
After tilling, rake the soil gently to remove any debris or clods that may have formed during the process. This ensures an even seedbed and prevents damage to young okra roots.
Next, level the seedbed to create a flat surface. Okra plants prefer well-drained soil and full sun, so ensure the seedbed is slightly sloped to prevent water from collecting around the base of the plants.
Finally, smooth out the seedbed using a rake or a garden hose to remove any remaining lumps or bumps. This will give your okra seeds the best possible chance at germinating evenly and growing strong, healthy stalks.
Sowing Okra Seeds
When it comes to growing okra, sowing the seeds is one of the most critical steps. In this crucial part of our guide, we’ll walk you through the process carefully.
Planting at the Right Time
When planting okra seeds, timing is everything. The ideal time to sow depends on your region’s climate and last frost date. In areas with a mild winter, you can start sowing as early as 4-6 weeks before the last frost. This allows the seedlings to get a head start on the growing season.
In regions with a cooler spring, wait until the soil has warmed up to at least 65°F (18°C). Okra seeds can be direct-sown or started indoors 2-3 weeks prior to transplanting outside. Make sure to check the average frost date for your area and plan accordingly.
For example, in zones 8-10, you can start sowing okra seeds as early as February or March. In zones 4-7, it’s best to wait until late spring to early summer when the soil has warmed up. Keep in mind that okra is a warm-season crop and won’t tolerate frost well.
To ensure success, choose a variety of okra that is suitable for your region’s climate and planting time. Some popular varieties include ‘Clemson Spineless’, ‘Red Burgundy’, and ‘Dwarf Green’. By paying attention to the timing and selecting the right variety, you’ll be on your way to growing delicious and bountiful okra in no time.
Spacing and Depth Guidelines
When sowing okra seeds, it’s essential to get the spacing and depth just right. Okra plants require a good deal of room to grow, so make sure to plant them at least 12-18 inches apart in rows that are about 3 feet apart. This will give them enough space to develop their taproots without competing with each other for water and nutrients.
Sow the seeds about 1 inch deep and 2-3 inches from the center of where you want the plant to grow. If you’re using a seed starting mix, make sure it’s moist but not waterlogged before sowing. Water gently after sowing, and keep the soil consistently moist during the first few weeks.
Overcrowding can lead to reduced yields and weakened plants, so be mindful of how many seeds you sow per square foot. Aim for 2-3 seedlings per square foot for optimal growth. Remember that okra is a warm-season crop, so wait until the danger of frost has passed before transplanting or direct sowing in your garden. By following these spacing and depth guidelines, you’ll be well on your way to growing healthy, thriving okra plants.
Caring for Your Okra Plants
To ensure your okra plants thrive, you’ll need to provide them with regular care and attention, including watering, pruning, and pest control. This section will walk you through these essential steps.
Watering and Irrigation Techniques
Okra plants require consistent moisture, especially during their fruiting stage. Water stress can significantly impact yields and plant health. To ensure proper hydration, use efficient irrigation methods like drip irrigation, which delivers water directly to the roots while minimizing evaporation and runoff.
Check for signs of water stress by observing your okra plants’ leaves. If they’re wilted or developing brown edges, it’s likely a sign that they need more water. Conversely, if you notice excessive moisture on the leaves or soil, reduce watering frequency.
Aim to provide about 1-2 inches of water per week, either through rainfall or irrigation. Mulching around plants also helps retain moisture in the soil and suppress weeds. Be cautious not to overwater, as this can lead to root rot and other problems. Check the top inch of soil daily by inserting your finger; if it feels dry, it’s time to water.
Watering at night is generally a good practice for okra plants, allowing them to absorb moisture throughout the night and reducing transpiration during hot afternoons.
Pest and Disease Management
Okra plants are susceptible to various pests and diseases that can significantly impact their yield and overall health. Some common pests that attack okra plants include aphids, whiteflies, and squash bugs. These insects feed on the plant’s sap, causing curled or distorted leaves and stunted growth.
To control these pests, use neem oil or insecticidal soap sprays to directly target them. You can also introduce beneficial insects like ladybugs or lacewings to your garden, which prey on aphids and other pests. For severe infestations, consider using diatomaceous earth, a natural substance that dehydrates insects.
Common diseases affecting okra plants include powdery mildew, fungal infections, and bacterial leaf spot. These conditions often arise from excessive moisture, poor air circulation, or contaminated soil. To prevent these diseases, maintain good garden hygiene by disposing of infected plant material and ensuring adequate spacing between plants for airflow. Regularly inspect your plants for signs of disease and treat promptly with organic fungicides like copper-based products or sulfur.
Harvesting Okra for Optimal Flavor and Texture
When it comes time to harvest your okra, timing is everything. Learn how to pick okra at just the right moment for the best flavor and texture in this next step of our guide.
When to Harvest for Best Results
When it comes to harvesting okra for optimal flavor and texture, timing is everything. To ensure you’re picking your pods at the right moment, look for these key indicators: size, color, and tenderness.
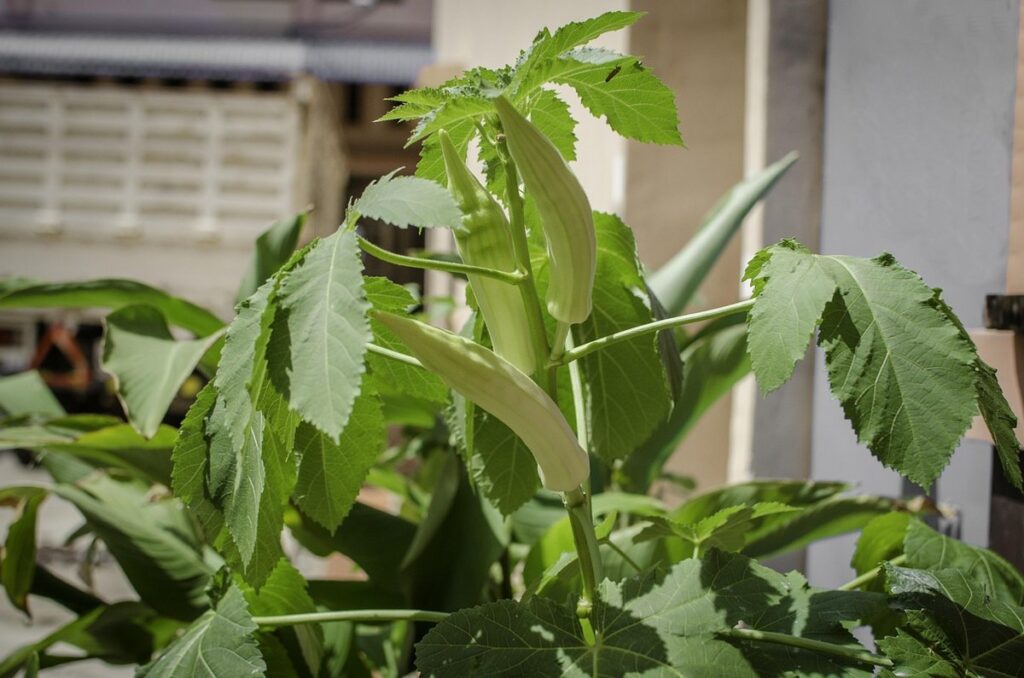
Okra pods typically take around 60-70 days to mature from sowing seeds. As they grow, they’ll start to change color – usually from a bright green to a more muted, almost brownish hue. This is a clear sign that the pod is ready for harvest.
But how can you tell if an okra pod is tender enough? Simply grasp the pod gently in your fingers and twist it back and forth. If it comes off easily, it’s probably at its peak tenderness. You want to aim for pods that are between 3-4 inches long – any longer and they may become fibrous.
Remember, regular harvesting will encourage the plant to produce more pods, so try to pick your okra every other day or two to keep production going strong.
Tips for Hand-Harvesting and Storage
When harvesting okra for optimal flavor and texture, it’s essential to handle the delicate pods with care. To gently harvest okra pods, use a pair of scissors to snip them off from the stem just above the node where they meet the plant. This method helps prevent bruising and damage, which can lead to spoilage.
For larger quantities, you can also use a gentle “twist-and-pull” motion to release the pods from the stem. However, be cautious not to pull too hard, as this can cause damage to the tender okra skin.
After harvesting, store okra in a breathable container or bag to maintain humidity and prevent moisture buildup. You can also wrap individual pods in paper towels or cloth to absorb excess moisture. Store them in the refrigerator at a consistent temperature below 40°F (4°C) to slow down ripening.
When handling fresh okra, avoid washing it before storing, as excess moisture can lead to spoilage. Instead, gently brush off any dirt or debris with a soft-bristled brush. By following these simple storage techniques, you’ll be able to enjoy your homegrown okra for several days longer.
Troubleshooting Common Okra Growing Issues
Growing okra can be a bit finicky, and problems can arise even when you follow all the right steps. Don’t worry, we’ve got some common issues covered to get your okra plants back on track.
Identifying and Addressing Root Problems
When it comes to growing okra, you may encounter some common issues that can hinder its growth. One of the most critical steps in troubleshooting these problems is identifying and addressing their root causes.
Poor germination rates are a common issue with okra seeds. This could be due to overwatering, which causes the seeds to rot before they even have a chance to sprout. Alternatively, it might be because the soil temperature is too low or too high for optimal seed germination. To resolve this issue, ensure you’re planting your seeds at the right depth and in an area that receives adequate sunlight.
Another problem you may encounter is fungal infections affecting the roots of your okra plant. This can be caused by excessive moisture in the soil, which creates a perfect breeding ground for fungi. To combat root rot, make sure to provide good air circulation around your plants and avoid overwatering. Regularly inspect your plants’ roots to catch any potential issues early on.
It’s essential to address these problems promptly to prevent them from spreading and causing further damage to your okra crop.
Solutions for Leafy Diseases and Pests
Leafy diseases and pests can quickly decimate an okra crop, but there are effective ways to prevent and treat them. Powdery mildew is a common issue that appears as a white powdery coating on leaves, while aphids can spread plant viruses and suck sap from the plant.
To control these issues organically, begin by introducing beneficial insects like ladybugs or lacewings into your garden. These natural predators feed on pests, reducing their populations without harming your okra plants. Another effective method is to use neem oil or insecticidal soap to repel aphids and other soft-bodied insects.
Crop rotation can also help prevent leaf diseases. By rotating crops from one area of the garden each season, you reduce soil-borne pathogens that may be present in the soil where your okra was previously grown.
Some additional measures include ensuring good air circulation around plants by providing sufficient space between rows and practicing integrated pest management (IPM) strategies. Regularly inspecting your crop for signs of disease or pests will enable prompt action to prevent damage before it gets out of hand.
Frequently Asked Questions
What is the best way to determine if my soil pH is suitable for growing okra?
Before planting, test your soil pH using a DIY kit or send a sample to a laboratory for analysis. Okra prefers a slightly acidic to neutral soil pH between 6.0 and 7.0. If your pH is too high (alkaline), amend the soil with sulfur-based fertilizers to lower the pH. Yes, it’s crucial to check your soil pH before planting.
Can I grow okra in containers or do I need a large garden bed?
Okra can thrive in containers, making it an excellent choice for small-space gardening. Use a minimum of 5-gallon pots with good drainage and well-draining potting mix. Be sure to provide at least six hours of direct sunlight per day. This will help your okra plants grow strong and healthy.
How do I prevent pests from damaging my okra crop?
Pests like aphids, whiteflies, and spider mites can quickly infest okra plants. Regularly inspect your plants for signs of infestation and use neem oil or insecticidal soap to control outbreaks. Additionally, introduce beneficial insects like ladybugs or lacewings to your garden to naturally control pest populations.
Can I grow okra from saved seeds or do I need to purchase new seeds each season?
Okra is a self-pollinating crop, but seed quality can degrade over time due to natural genetic mutations. To ensure high-quality seeds and optimal yields, consider purchasing fresh seeds each season from reputable suppliers. This will also help you select disease-resistant and heat-tolerant varieties.
How long does it take for okra plants to mature after sowing seeds?
Okra germinates within 7-14 days of sowing seeds, and the seedlings should be ready to transplant into individual pots or directly into the garden bed after about two weeks. From sowing to harvest, expect a total growth period of around 60-90 days for okra varieties.