Growing Canterbury bells in your garden can be a delightful experience, not just for their vibrant colors but also for their intoxicating fragrance. If you’re new to growing this beautiful flower or want to revive your existing patch, knowing the right conditions and care tips is essential. These lovely blooms thrive best in well-draining soil with full sun to partial shade, requiring minimal maintenance once established. They can tolerate a range of temperatures but do require some specific planting conditions to flourish. In this article, we’ll cover everything you need to know about growing Canterbury bells in your garden, from choosing the right location and preparing the soil to providing optimal light and care for these stunning flowers.
Understanding Canterbury Bells
Canterbury bells can be a bit tricky to grow, but understanding their specific needs is key to enjoying these beautiful, bell-shaped flowers. Let’s dive into what makes them tick and how you can provide the best conditions for success.
What are Canterbury Bells?
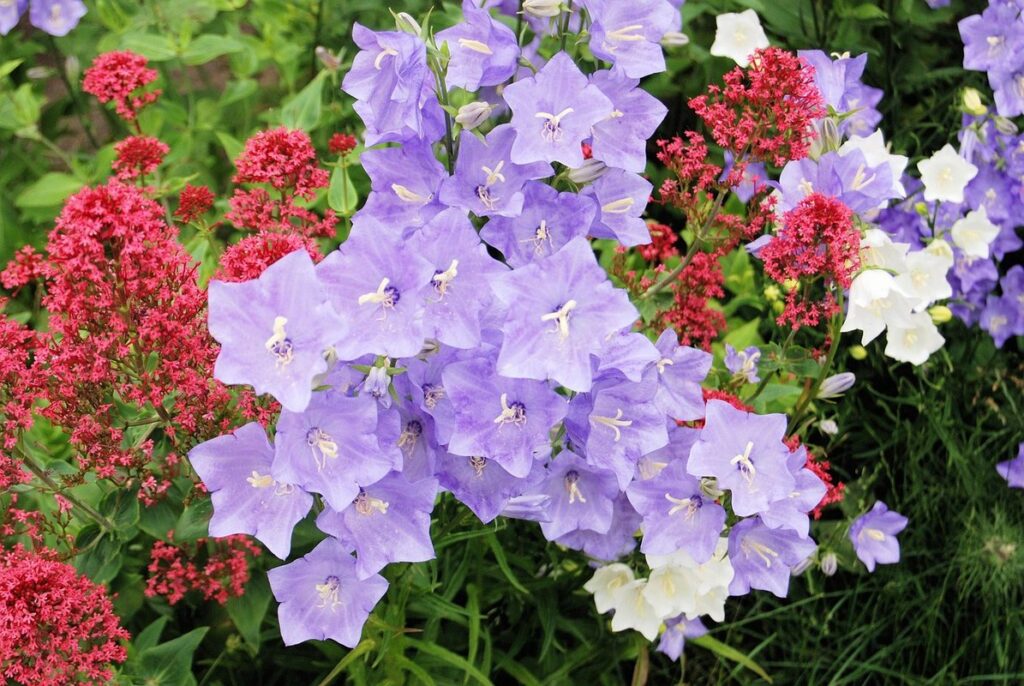
Canterbury bells are a charming and delicate flowering plant that has been delighting gardeners for centuries. But what exactly are they? Botanically speaking, Canterbury bells belong to the Campanula genus, with their specific name being Campanula medium. This lovely flower is native to Europe, specifically in the mountainous regions of Italy, France, and Greece.
Their origin story dates back to medieval times when the flowers were commonly grown in English gardens, particularly around Canterbury Cathedral, hence the name ‘Canterbury bells’. The plant’s striking bell-shaped flowers are a true marvel of nature, with delicate petals that range in color from pure white to soft shades of pink and blue. These enchanting blooms typically bloom in mid-to-late summer, creating a whimsical charm that attracts pollinators and adds visual interest to any garden bed.
If you’re new to gardening or simply looking to add some old-world charm to your outdoor space, growing Canterbury bells is an excellent choice. Not only do they require minimal maintenance, but their low-growing habit makes them perfect for container gardens or edging along pathways. With proper care and attention, these lovely flowers will bloom year after year, providing a nostalgic touch to your garden.
Benefits and Uses of Canterbury Bells
Canterbury bells offer numerous benefits and uses that make them an excellent addition to any garden. One of their most significant advantages is their ornamental value. These delicate, bell-shaped flowers come in a range of colors, including white, pink, purple, and blue, adding a touch of elegance and sophistication to any garden bed or border.
Beyond their visual appeal, Canterbury bells also attract pollinators, such as bees and butterflies, which can be beneficial for the overall health of your garden. To maximize their attractiveness to these beneficial insects, plant them in a location that receives full sun and has well-draining soil.
In addition to their ornamental value and ability to attract pollinators, Canterbury bells also have potential uses as cut flowers or dried specimens. They can be used in floral arrangements or as a dried decoration for wreaths and other crafts. With proper care and maintenance, these versatile flowers can provide enjoyment and benefits throughout the growing season.
Consider planting multiple varieties of Canterbury bells together to create a stunning display of colors and attract a variety of pollinators to your garden.
Choosing the Right Conditions
When growing Canterbury bells, it’s essential to provide them with the right conditions for optimal growth and blooming. This section will walk you through selecting a suitable location for your flowers.
Light Requirements
Canterbury bells thrive in well-lit conditions, but they also require some protection from intense sunlight. Ideally, these delicate flowers need at least 4-6 hours of direct sunlight per day to produce plenty of blooms. However, if you live in a region with extremely hot summers, it’s best to provide your Canterbury bells with morning sun and dappled shade during the hottest part of the day.
When it comes to the amount of shade, Canterbury bells can tolerate partial shade, especially in warmer climates. In fact, providing some afternoon shade can help prevent scorching and promote healthy growth. To give you a better idea, here’s a rough guideline: for every hour of direct sunlight, provide an additional 30 minutes to 1 hour of dappled shade.
If you’re growing Canterbury bells indoors, consider placing them near a south-facing window that receives plenty of natural light. You can also use grow lights to supplement the natural light and ensure your plants receive the right amount of illumination. Remember, consistency is key when it comes to providing light for your Canterbury bells – they’ll appreciate a predictable routine.
Soil Preferences
Canterbury bells are adaptable to a wide range of soil conditions, but they thrive best in well-draining soil with a slightly acidic pH. Aim for a pH between 6.0 and 7.0, as this allows the plant’s roots to absorb essential nutrients efficiently.
In terms of nutrient requirements, Canterbury bells benefit from rich organic matter. Mix compost or well-rotted manure into the soil before planting to provide a slow release of nutrients throughout the growing season. A balanced fertilizer can also be applied in spring, following the manufacturer’s instructions.
It’s worth noting that heavy clay soils and dense subsoil can hinder root growth and reduce flowering. If your garden has such conditions, consider raised beds or containers with good drainage to ensure your Canterbury bells receive the right environment for optimal growth. Regular soil checks will help you maintain the best conditions for these charming flowers to flourish.
Temperature Tolerance
When it comes to growing Canterbury bells, one of the most important factors to consider is temperature tolerance. These lovely flowers are surprisingly hardy and can thrive in a range of conditions, but they do have their limits.
Canterbury bells typically fall within USDA Hardiness Zones 3-9, which means they can tolerate temperatures as low as -40°F (-40°C) and as high as 90°F (32°C). However, it’s worth noting that extreme temperatures outside this range can affect their growth and flowering. For example, if you live in an area with very hot summers, your Canterbury bells may need extra care to prevent scorching.
Frost is also something to consider when growing Canterbury bells. While they can tolerate light frosts, prolonged exposure to frost or repeated freezing and thawing can damage the plants. To protect your Canterbury bells from frost, you can either bring them under cover or use a layer of mulch to insulate the soil. With proper care and attention, however, these beautiful flowers will continue to bloom even in areas with occasional frosts.
Planting and Sowing Seeds
To grow Canterbury bells successfully, it all starts with careful planning and precise planting of seeds. In this next step, we’ll guide you through sowing your seeds for optimal results.
When to Plant
When to Plant Canterbury Bells: A Region-by-Region Guide
In most regions, it’s best to plant Canterbury bell seeds indoors 6-8 weeks before the last frost date. This will give the seedlings a head start on the growing season and ensure they’re strong enough to withstand cooler temperatures. In areas with mild winters, you can direct sow seeds in late fall or early spring, about 1-2 weeks after the last frost.
In regions with cold winters (USDA zones 3-5), plant Canterbury bell seedlings outdoors when the soil has warmed up and the danger of frost has passed. This is usually around late May to early June, depending on your location.
For warmer climates (USDA zones 6-10), you can direct sow seeds in late winter or early spring, about 1 inch deep and 12 inches apart. Make sure to choose a variety that’s resistant to heat stress and drought tolerance.
Keep in mind that Canterbury bells are a cool-season crop, so they’ll thrive in temperatures between 60°F and 70°F (15°C and 21°C). Avoid planting in areas with standing water or where water tends to collect, as this can lead to root rot.
Seed Starting
When starting Canterbury bell seeds, it’s essential to begin with proper soil preparation. You can use a seed starting mix for indoor sowing or prepare the garden bed by loosening the soil to a depth of about 8-10 inches. Add a balanced fertilizer according to the manufacturer’s instructions to provide necessary nutrients.
To sow seeds indoors, fill small pots or cell trays with seed starting mix and plant the seeds about ¼ inch deep. Cover them lightly with a thin layer of the mix. Keep the soil consistently moist but not waterlogged. For direct sowing in the garden, create shallow furrows about 1-2 inches apart, drop one seed into each furrow, and cover it lightly.
Maintain an optimal temperature of around 65°F to 70°F (18°C to 21°C) for indoor sowing or sow seeds directly when the soil can be worked in your area. Keep the soil consistently moist during the germination period, which typically lasts about 7-10 days. Once seedlings emerge, gradually reduce watering as they develop their root systems.
Transplanting
Transplanting Canterbury bell seedlings requires care and attention to ensure their successful transition into larger containers or directly into the garden. When handling seedlings, avoid touching the delicate leaves and stems as oils from your skin can cause damage. Instead, gently grasp the leaves near the base of the stem or the pot itself.
To transplant seedlings, wait until they have at least two sets of true leaves to ensure a healthy root system. Water the seedling thoroughly the night before to make it easier to handle and reduce transplant shock. Use a gentle digging motion with your finger or a blunt instrument to loosen the roots without damaging them.
When transplanting into larger containers, choose a pot that is at least 6-8 inches deep to accommodate the plant’s taproot. If planting directly into the garden, select an area with full sun and well-draining soil rich in organic matter. After transplanting, water gently but thoroughly and provide adequate support as needed.
Care and Maintenance
To keep your Canterbury bells looking their best, it’s essential to follow some basic care and maintenance tips to ensure they thrive throughout the growing season.
Watering Requirements
When it comes to watering Canterbury bells, consistency is key. These beautiful flowers thrive in well-draining soil and require moderate watering throughout their growing season. Aim to water your plants when the top 1-2 inches of soil feel dry to the touch, usually every 3-4 days during hot summer months.
Overwatering can be just as detrimental as underwatering for Canterbury bells. Look out for signs such as yellowing leaves, droopy stems, and a softened or mushy texture. If you notice any of these symptoms, reduce watering frequency immediately to prevent root rot.
Conversely, underwatered plants may exhibit wilted leaves, reduced flowering, and brittle stems. To avoid this, ensure your Canterbury bells receive about 1 inch of water per week, either from rain or irrigation.
To gauge the perfect watering schedule for your specific climate, observe how quickly the soil dries out between waterings. Adjust as needed to strike a balance that meets your plants’ needs. With a little practice and attention, you’ll develop an intuitive sense of when to water these lovely flowers.
Fertilization
When it comes to fertilizing Canterbury bells, you want to provide them with just the right amount of nutrients to promote healthy growth and blooming. These annuals are heavy feeders, so they’ll appreciate a good dose of fertilizer once or twice during their growing season.
As a general rule, you can start fertilizing your Canterbury bells when they’re about 6-8 inches tall. You can use a balanced, water-soluble fertilizer that contains equal amounts of nitrogen (N), phosphorus (P), and potassium (K). This type of fertilizer will provide your plants with the necessary nutrients for growth and blooming.
Some good options include Miracle-Gro or Scotts Osmocote 14-14-14. You can also use a slow-release fertilizer that contains a slightly higher concentration of phosphorus, such as 10-20-10. This type of fertilizer will provide your plants with a steady supply of nutrients over time.
When to fertilize is just as important as what type of fertilizer to use. For best results, fertilize your Canterbury bells when the soil temperature reaches around 60°F (15°C). You can also give them an extra boost of phosphorus when they’re about to bloom, which will help promote more flowers and a longer blooming season.
As with any fertilizer application, be sure to follow the instructions on the label carefully. Don’t overdo it, as too much fertilizer can actually harm your plants. A general rule of thumb is to start with half the recommended dosage and adjust as needed based on the condition of your plants.
Pruning and Deadheading
Pruning and deadheading are essential tasks to maintain the health and appearance of Canterbury bells. Regular pruning helps control the plant’s height, promotes bushy growth, and encourages blooming. Start by removing any weak or damaged stems in late winter or early spring, making clean cuts just above a leaf node.
Deadheading is crucial for encouraging repeat blooming. Remove spent flowers as soon as they fade to prevent seed production and direct the plant’s energy towards producing new blooms. Cut off the entire stem just above a leaf node, using scissors or pruning shears to avoid damaging surrounding foliage.
By removing spent flowers regularly, you’ll encourage Canterbury bells to produce multiple blooms throughout the growing season. This also helps maintain the plant’s appearance, preventing seed stalks from forming and making it look unkempt. Prune back leggy stems in mid-summer to maintain shape and promote new growth. With regular pruning and deadheading, your Canterbury bells will continue to thrive and provide a beautiful display of bell-shaped flowers throughout the growing season.
Common Pests and Diseases
When growing Canterbury bells, it’s not uncommon for gardeners to encounter some unwanted visitors – pests and diseases that can harm your plants. Let’s take a look at some common ones to watch out for.
Identifying Problems
Canterbury bells are delicate and beautiful flowers that require attention to maintain their health. As you care for your plants, it’s essential to be aware of the common pests and diseases that can affect them.
Aphids are a significant threat to Canterbury bells, as they can suck the sap from the leaves and stems, causing damage and stunted growth. To identify aphids, look for small, soft-bodied insects on the undersides of leaves or on the stems. They may also leave behind a sticky substance called honeydew.
Slugs are another pest that can harm your Canterbury bells by feeding on the leaves and flowers at night. Check for slugs in the evening when they’re most active, and use copper tape around the planters to deter them.
Powdery mildew is a fungal disease that can cause white powdery patches on the leaves of your Canterbury bells. To prevent it, make sure to provide good air circulation around the plants, and avoid overhead watering, which can create a humid environment conducive to the growth of fungi.
Regularly inspecting your plants for signs of pests or diseases is crucial to preventing damage and ensuring their health. By being vigilant and taking prompt action when necessary, you can enjoy healthy and thriving Canterbury bells all season long.
Organic and Chemical Controls
When it comes to managing pests and diseases on Canterbury bells, integrated pest management (IPM) strategies are essential for a healthy and thriving plant. Organic controls are an excellent way to start, as they promote a balanced ecosystem and reduce the risk of chemical residues on your blooms.
Organic methods include introducing beneficial insects like ladybugs or lacewings to prey on aphids and whiteflies, while using neem oil or insecticidal soap to control other pests. You can also use physical barriers, such as fine mesh or fine netting, to keep flying pests at bay. For diseases like powdery mildew or leaf spot, remove any infected leaves or stems, and treat the plant with a fungicide made from natural ingredients.
Chemical controls may be necessary in severe cases, but it’s crucial to use them judiciously and follow the recommended application rates. A combination of organic and chemical controls can provide effective IPM strategies for managing pests and diseases on Canterbury bells. Monitor your plants regularly, and take action promptly when you spot any issues – this will help prevent infestations from getting out of hand.
Tips and Variations
Want to get creative with your Canterbury bells? This section shares some fun variations on the classic flowers, plus expert tips for taking them to the next level.
Container Gardening
Growing Canterbury bells in containers is a fantastic way to add some color and charm to your outdoor space without taking up too much room. When it comes to container gardening, the right potting mix can make all the difference in ensuring your plants thrive.
Look for a high-quality potting mix that’s specifically designed for containers. Avoid using regular garden soil as it can be too dense and may not drain properly in containers. A good potting mix should have excellent water retention properties to keep your roots hydrated, yet also allow for air circulation to prevent waterlogged soil.
For Canterbury bells, a container size of at least 6-8 inches deep is recommended. This will provide enough room for the taproot to grow without becoming pot-bound. Make sure your container has drainage holes to prevent water from accumulating and causing root rot.
In terms of selection, choose containers that are at least one to two sizes larger than the potting mix’s recommendation. This will give you some flexibility in adjusting the soil level as needed. Don’t forget to fertilize regularly using a balanced fertilizer to promote healthy growth and blooming.
Companion Planting
When it comes to growing Canterbury bells, companion planting is an excellent way to create a harmonious garden ecosystem. By strategically placing certain plants alongside your Canterbury bells, you can enhance growth, promote healthy development, and even deter pests.
Some beneficial companions for Canterbury bells include marigolds, which repel nematodes that can harm the plant’s roots. Radishes are another great option, as they improve soil quality and deter cucumber beetles, which can spread bacterial wilt to your Canterbury bells. Legumes like beans or peas also make excellent companions, as they fix nitrogen in the soil and create a nutrient-rich environment for your plants.
To try companion planting with your Canterbury bells, simply interplant these beneficial friends around the base of your flowers. For example, plant marigolds around the perimeter of your bed to keep nematodes at bay. Remember to space them correctly, leaving enough room for all plants to grow and receive adequate sunlight. With a little planning, you can create a thriving garden where every plant works together in harmony.
Season Extension Techniques
If you’re looking to prolong the blooming period of your Canterbury bells, consider implementing some season extension techniques. One effective method is using row covers, lightweight fabrics that allow sunlight and water to reach your plants while protecting them from frost and cold temperatures.
When choosing a row cover, opt for a breathable material like polyester or cotton, which will prevent moisture buildup and ensure good air circulation around the plants. Simply drape the fabric over the bed or individual plants, securing it with stones or soil to keep it in place.
Another option is building or using a cold frame, a structure that captures heat from the sun during the day and releases it at night, maintaining a warmer temperature than the surrounding environment. You can use an existing cold frame or build one using reclaimed wood and glass panels.
For optimal results, place your row covers or cold frames in a location with good sunlight exposure to maximize their effectiveness. By extending the blooming period of your Canterbury bells, you’ll be able to enjoy these beautiful flowers for a longer duration, adding color and vibrancy to your garden throughout the growing season.
Frequently Asked Questions
Can I grow Canterbury bells in containers or do they require a lot of space?
You can definitely grow Canterbury bells in containers, which is ideal for small gardens or spaces with limited room to spare. Choose a container that’s at least 6-8 inches deep and has good drainage holes to prevent waterlogged soil. Use a well-draining potting mix and follow the same care tips as for in-ground plants.
How often should I fertilize my Canterbury bells, and what type of fertilizer is best?
Fertilize your Canterbury bells once a month during the growing season (spring-fall) with a balanced, water-soluble fertilizer. You can also use compost tea or worm castings as a natural alternative to promote healthy growth and blooming. Avoid overfertilizing, as this can lead to weak and leggy stems.
What are some common pests that might affect my Canterbury bells, and how do I control them?
Aphids, slugs, and snails are common pests that might target your Canterbury bells. To prevent infestations, keep your plants clean, remove weeds, and introduce beneficial insects like ladybugs or lacewings. For severe infestations, use neem oil or insecticidal soap to control the pest population.
Can I propagate my Canterbury bells through division, and how often should I do it?
Yes, you can propagate your Canterbury bells through division in the spring or fall when the plant is dormant. Gently separate the roots and replant them in a new location with fresh soil. This method helps to maintain the plant’s health and promote new growth. Aim to divide every 3-4 years for optimal results.
How do I store Canterbury bell seeds for future planting, and what’s the best way to store them?
To store Canterbury bell seeds, place them in an airtight container or envelope with silica gel or desiccant packets to maintain humidity levels below 30%. Store the container in a cool, dark location like a basement or cupboard. This will help preserve seed viability for up to 5 years.