Germinating lupin seeds can be a bit tricky, but with the right guidance, you’ll be growing your own lupins in no time. If you’re new to gardening or looking to add some variety to your existing collection, learning how to germinate lupin seeds correctly is essential. Not only do lupins come in a range of colors and types, but they also provide a valuable source of protein-rich food for both humans and wildlife.
In this comprehensive guide, we’ll walk you through the process of choosing the right variety of lupin seeds, preparing them for germination, and monitoring their progress until they sprout. We’ll also cover common issues that can arise during the germination period and provide expert tips on how to address them. By the end of this article, you’ll have a clear understanding of how to successfully germinate lupin seeds and start growing your own lupins at home.
Choosing the Right Lupin Variety
With so many lupin varieties to choose from, it can be overwhelming to decide which one is right for you. This section will walk you through the key factors to consider when selecting a lupin variety.
Selecting a Suitable Species for Your Region
When it comes to growing lupins, selecting the right species for your region is crucial. With over 200 species of lupins, each with its unique characteristics, choosing the correct one can be overwhelming. However, understanding the climate and soil conditions in your area will help narrow down the options.
In temperate climates, Lupinus x hybrida is a popular choice due to its high yields and disease resistance. On the other hand, in regions with hot summers and mild winters, Lupinus angustifolius is better suited as it can tolerate heat stress. For areas with cool and wet winters, Lupinus albus is an excellent option as it prefers cooler temperatures.
Consider your region’s temperature range, soil type, and moisture levels when making a selection. Research local nurseries or gardening clubs to see which species are thriving in your area. You can also consult with experts at your local extension office for guidance on selecting the best lupin species for your specific climate.
Considering Factors Like Soil Type and Moisture Requirements
When selecting a lupin variety, it’s essential to consider the soil type and moisture requirements to ensure successful germination. Different lupin varieties have adapted to specific environments, so choosing the right one can significantly impact your chances of success.
For example, some lupin varieties thrive in well-drained soils with high pH levels, while others prefer acidic soils or wet conditions. If you’re planning to grow lupins in a region with poor drainage, look for varieties that are tolerant of waterlogged soil, such as ‘Lupinus x hybridus’ or ‘Lupinus angustifolius’. On the other hand, if your soil is highly alkaline, opt for a variety like ‘Lupinus mutabilis’, which can tolerate high pH levels.
Moisture requirements are also crucial to consider. Some lupin varieties can survive with minimal watering, while others require consistent moisture throughout their growth cycle. Check the specific needs of each variety you’re considering and plan your irrigation schedule accordingly. Be aware that overwatering can be just as detrimental as underwatering, so it’s essential to strike a balance.
When in doubt, consult local nurseries or gardening experts for advice on which lupin varieties perform best in your area. They can provide valuable insights into the specific conditions and challenges you’ll face, helping you make an informed decision about which variety to choose.
Preparation is Key: Preparing Your Lupin Seeds
Before you can plant your lupin seeds, it’s essential to prepare them correctly to ensure optimal germination rates. This includes cleaning and treating your seeds specifically for lupins.
Cleaning and Sterilizing the Seeds
Cleaning and sterilizing lupin seeds is an often-overlooked step that can make all the difference in achieving successful germination. Dirty or contaminated seeds can be a major hindrance to growth, as they may harbor fungal diseases or bacteria that can spread quickly through the soil. By cleaning and sterilizing your lupin seeds, you’re ensuring that each seed has the best possible chance of sprouting.
To clean your seeds, start by gently rinsing them in a fine-mesh strainer under running water to remove any loose debris. Next, soak the seeds in a bowl of warm water (around 90°F) for about 24 hours. This will help loosen up any dirt or fungal spores that may be stuck on the surface.
After soaking, drain the seeds and transfer them to a sterile container filled with 70% ethanol (such as isopropyl alcohol). Let the seeds soak in this solution for at least two hours. This will effectively sterilize the seeds, killing off any remaining bacteria or fungal spores. Once complete, rinse the seeds thoroughly with water and allow them to air dry before sowing.
Soaking or Scarifying the Seeds (Optional)
Soaking or scarifying lupin seeds is an optional step that can potentially improve germination rates. Some gardeners swear by these techniques, while others find them unnecessary. Let’s explore when and if these methods might be beneficial.
If you’re struggling with low germination rates or have noticed your lupin seeds taking longer than expected to sprout, soaking or scarifying might be worth trying. Soaking involves submerging the seeds in water for 24-48 hours before planting. This can help rehydrate the seed coat and encourage it to break open, allowing the embryo inside to begin growing.
Scarifying, on the other hand, involves lightly scratching the surface of the seed with a nail file or sandpaper. This helps to weaken the seed coat, making it easier for water to penetrate and initiate germination. If your lupin seeds are particularly hard or old, this method might be more effective than soaking.
Try these methods if you’re experiencing difficulty getting your lupin seeds to germinate. However, keep in mind that both techniques have varying degrees of success, and results may vary depending on the specific seed batch and growing conditions.
Creating a Conducive Environment for Germination
To successfully germinate lupin seeds, it’s essential to create an environment that mimics their natural conditions, which we’ll explore in more detail below. Let’s start by setting up a perfect spot for germination.
Providing Adequate Light, Temperature, and Humidity
When it comes to germinating lupin seeds, providing adequate light, temperature, and humidity is crucial for successful germination. Lupins require a specific set of conditions to break dormancy and initiate growth.
Light exposure plays a significant role in germination. Lupin seeds can be sensitive to intense light, which can inhibit germination. To promote healthy germination, it’s essential to provide indirect light or partial shade, especially for delicate varieties. Place the seed tray or pot near an east- or west-facing window, or use grow lights with a low intensity setting.
Temperature is another critical factor in lupin seed germination. Lupins typically require temperatures between 15°C and 20°C (59°F to 68°F) during the day and no lower than 10°C (50°F) at night. Avoid placing seeds near heating vents or radiators, as this can cause temperature fluctuations.
Maintaining optimal humidity levels is also vital for germination. Covering the seed tray with a clear plastic bag or cloche helps retain moisture and maintains a humid microclimate around the seeds. Check on the seeds daily to ensure they’re not waterlogged, which can lead to fungal growth.
Using Seed Starting Mix or Potting Soil
When it comes to germinating lupin seeds, using high-quality seed starting mix or potting soil is crucial for their growth and development. These soils are specifically designed to provide the necessary nutrients and support for young plants during the early stages of growth.
Choose a seed starting mix that is well-draining and contains a balanced blend of fertilizers. Avoid regular potting soils, as they can be too dense and may retain excess moisture, leading to root rot and other issues. Look for a mix specifically labeled as “seed starting” or “germination mix”.
Some good options include Pro-Mix Seed Starting Mix or Miracle-Gro Seed Starting Mix. These mixes are designed to promote healthy root development and provide essential nutrients for young plants.
When filling your seed trays, gently moisten the soil with water before adding the seeds. This will help settle the soil and prevent air pockets from forming around the seeds. By using a high-quality seed starting mix or potting soil, you’ll be giving your lupin seeds the best chance to germinate successfully.
Sowing and Planting Lupin Seeds
When sowing lupin seeds, it’s essential to prepare the soil correctly and handle the tiny seeds gently to ensure successful germination and a strong start for your plants. Let’s dive into the specific steps you need to take.
Sowing Depth and Spacing Considerations
When sowing lupin seeds, it’s essential to consider both depth and spacing to ensure optimal germination rates and healthy plant growth. A general rule of thumb is to sow lupin seeds 2-3 times deeper than their width, which typically ranges from 1/8 inch to 1/4 inch (3-6 mm). Sowing too shallow can lead to poor establishment, while planting too deep may delay germination.
The spacing between individual plants also plays a crucial role in the overall health and productivity of your lupin crop. Most lupin varieties require about 12-18 inches (30-45 cm) between plants, although some dwarf or compact varieties can be spaced as close as 6-8 inches (15-20 cm). Keep in mind that these spacing guidelines are general recommendations and may vary depending on the specific lupin variety you’re growing.
To optimize growth habits and prevent overcrowding, consider sowing seeds in rows with a minimum of 18-24 inches (45-60 cm) between rows. This will also facilitate better air circulation, reducing the risk of fungal diseases and other issues that can arise from dense planting.
Watering and Maintaining a Consistent Moisture Level
Proper watering and maintaining consistent moisture levels are crucial for lupin seed germination. Lupins require consistent moisture to break down their tough outer coat, allowing the radicle (primary root) to emerge. To water lupin seeds properly, start by gently soaking the seeds in a cup of warm water for 24 hours before sowing. This will help soften the outer coat and initiate germination.
When planting, ensure the soil is consistently moist but not waterlogged. Keep the soil surface damp during the first few weeks after sowing, then gradually reduce watering as the seedlings grow. Overwatering can lead to rot and fungal infections, while underwatering may prevent germination.
Maintain a consistent moisture level by checking the soil daily and providing enough water to keep it damp but not soggy. Aim for a moderate watering schedule – about 1-2 inches of water per week – during the first month after sowing. Reduce watering as the plants grow, taking into account temperature fluctuations and weather conditions that may impact soil moisture levels.
Monitoring Progress and Addressing Common Issues
Now that you’ve got your lupin seeds sown, it’s time to keep an eye on their progress and troubleshoot any potential issues that might arise. Let’s take a closer look at how to ensure a successful germination process.
Recognizing Signs of Successful Germination
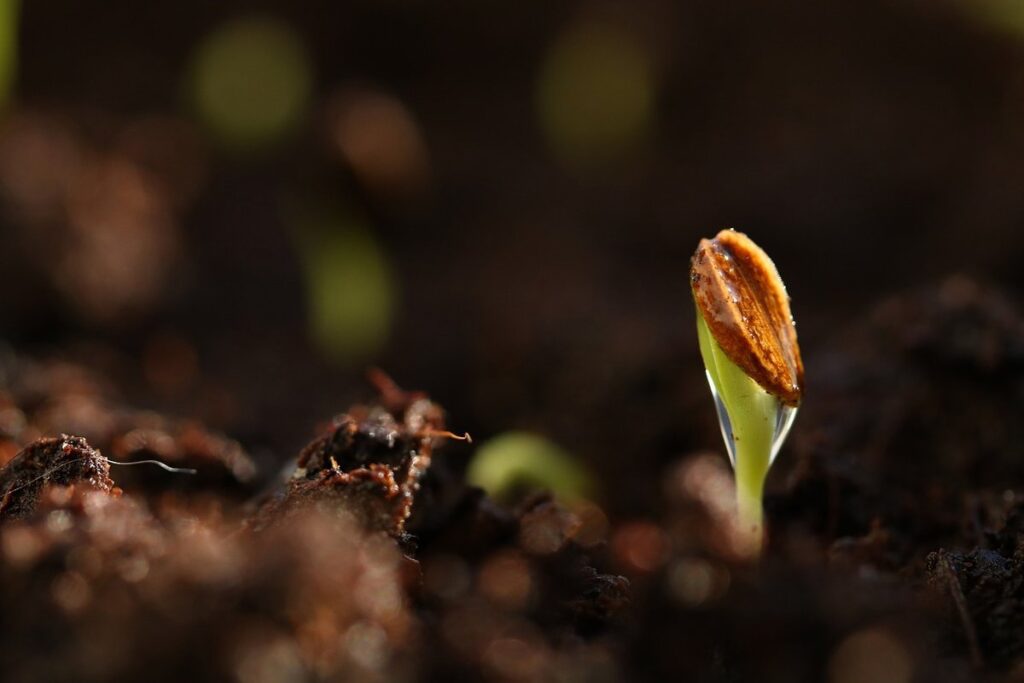
Recognizing signs of successful germination is crucial to ensure that your lupin seeds are on the right track. One of the earliest indicators of successful germination is seedling emergence. This occurs when the radicle (primary root) breaks through the soil surface, and the cotyledon (seed leaf) begins to unfurl. You’ll start noticing this around 7-14 days after sowing, depending on factors like temperature, moisture, and seed quality.
Another key sign is root growth. As your lupin seedling grows, you’ll notice the development of a taproot, which anchors the plant in the soil. This usually happens concurrently with seedling emergence. Keep an eye out for roots growing at least 1-2 cm deep into the soil – this indicates healthy establishment.
As the seedling develops further, look for leaf growth, particularly the formation of true leaves (not the initial cotyledon). These will be larger and more complex in structure. By around 14-21 days post-sowing, your lupin should display a robust root system and a set of developing leaves – this is a good sign that germination has been successful.
Keep an eye on these signs and adjust your care accordingly to give your seedlings the best chance at thriving.
Troubleshooting Common Problems Like Poor Germination Rates or Damping Off
Germinating lupin seeds can be a delicate process, and sometimes things don’t go as planned. One common issue is poor germination rates, which can be caused by various factors such as incorrect sowing depth, inadequate moisture, or temperature fluctuations.
Damping off is another problem that can affect lupin seedlings. This fungal disease thrives in humid environments and can quickly kill young seedlings by collapsing their stems at soil level. If you notice your seedlings developing yellowing leaves or leaning over, it may be a sign of damping off.
To diagnose these issues, check the temperature of your germination area. Lupin seeds typically require a consistent temperature between 15-20°C (59-68°F) to germinate successfully. Make sure your environment is not too hot or cold for optimal growth.
In cases of poor germination rates, try adjusting the sowing depth or ensuring the soil remains consistently moist but not waterlogged. To combat damping off, use sterile seed starting mix and maintain good air circulation around your seedlings to prevent fungal growth.
Monitor your seedlings closely and take action quickly if you notice any signs of distress. With these troubleshooting tips and a bit of TLC, you can help your lupin seeds germinate successfully.
Frequently Asked Questions
Can I still germinate lupin seeds that are past their expiration date?
Yes, but be aware that older seeds may have lower viability rates. If you’re unsure about the age of your seeds or want to ensure optimal results, it’s best to use fresh seeds specifically labeled for germination.
How do I store lupin seeds after they’ve been cleaned and sterilized?
Store them in an airtight container at room temperature (around 60-70°F/15-21°C) or refrigerate them if you won’t be using them within six months. Keep the container away from direct sunlight to prevent degradation.
What’s the best way to maintain humidity during germination, especially for regions with low humidity?
To maintain optimal humidity levels, use a plastic bag or cloche to cover your seed starting mix or potting soil. You can also place the setup on a tray filled with water and pebbles to create a mini-greenhouse effect.
Can I reuse the same lupin seed starting mix for multiple batches of seeds?
Yes, but make sure to thoroughly sterilize the mix between uses by baking it in a 300°F (150°C) oven for an hour or microwaving it according to the manufacturer’s instructions. This will help prevent the spread of diseases.
How do I know when lupin seeds are ready for transplanting?
Wait until the seedlings have at least two sets of leaves and the roots have developed sufficiently to handle soil transfer without being damaged. Harden off your seedlings before transplanting them outdoors to minimize shock.