Are you ready to grow one of the tallest and most stunning flowers in your garden? Hollyhocks are a favorite among gardeners, but they can be finicky. That’s why we’ve put together this comprehensive guide on how to grow hollyhocks like a pro! With expert tips and tricks, you’ll learn everything you need to know about promoting blooming and extending the growing season. From soil requirements to care and maintenance, we’ve got it all covered. Whether you’re a seasoned gardener or just starting out, this guide is perfect for anyone looking to add some dramatic height and color to their garden. In this article, we’ll dive into the details of growing hollyhocks, so grab your gloves and let’s get started!
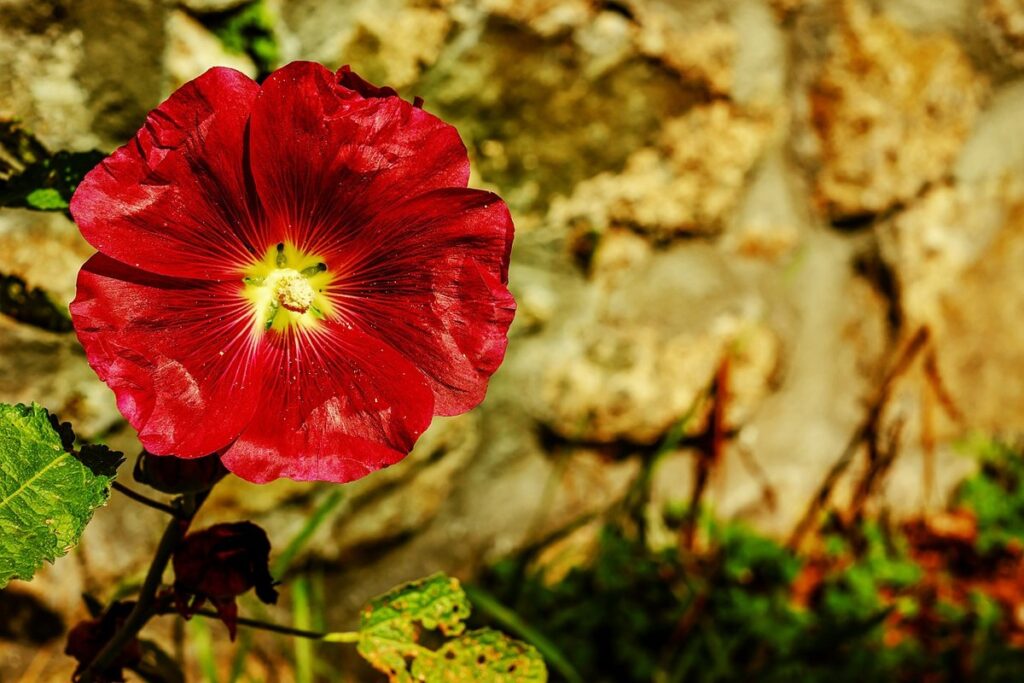
Choosing the Right Location for Your Hollyhocks
When it comes to growing hollyhocks, selecting a suitable location is crucial to their success. Let’s explore the essential factors to consider when choosing where to plant your hollyhock stems.
Understanding Hollyhock Soil Requirements
When it comes to growing hollyhocks, understanding their soil requirements is crucial for a bountiful harvest. Hollyhocks thrive in well-draining soils with a pH between 6.0 and 7.0, slightly acidic to neutral. Avoid planting in heavy clay or sandy soils, as they can cause waterlogging or dehydration.
To ensure optimal growth, aim for a mix of compost-rich topsoil and humus, which will provide essential nutrients and improve soil structure. Add a balanced fertilizer once a month during the growing season to supplement any nutrient deficiencies. Aim for a slightly acidic pH between 6.0-6.5 for best results.
In terms of specific nutrient requirements, hollyhocks love potassium (K) and phosphorus (P), but can tolerate low levels of nitrogen (N). A general rule of thumb is to provide a 10-10-10 NPK ratio fertilizer. Be cautious not to over-fertilize, as this can lead to weak stalks and fewer blooms.
To test your soil pH and nutrient levels, consider getting a soil analysis kit or consulting with a local nursery expert. With the right soil conditions in place, you’ll be well on your way to growing robust, healthy hollyhocks that will bring joy to your garden for years to come.
Selecting a Sunny Spot with Good Air Circulation
When selecting a spot to plant your hollyhocks, it’s essential to consider not only sunlight and soil quality but also air circulation. Good air flow can make all the difference in preventing fungal diseases that often plague these beautiful flowers. Fungal diseases thrive in humid environments with poor air circulation, which is why choosing a location with adequate airflow is crucial.
To ensure optimal air circulation, look for a spot that gets at least 6 hours of direct sunlight per day. Avoid planting hollyhocks in low-lying areas or depressions where water may collect and create a humid microclimate. Instead, opt for a slightly raised bed or a location with good slope to allow excess moisture to drain away.
In addition to air circulation, it’s also vital to ensure that your hollyhocks receive consistent moisture levels without being overwatered. Aim for about 1-2 inches of water per week, either from rain or irrigation. By striking this balance and providing adequate sunlight and air circulation, you’ll be well on your way to growing robust, disease-free hollyhocks.
Planting Hollyhock Seeds or Seedlings: A Step-by-Step Guide
To get your hollyhocks off to a strong start, you’ll want to learn how to successfully plant either seeds or seedlings in this step-by-step guide. Let’s dive into the process together!
Preparing the Soil for Planting
When preparing the soil for planting hollyhocks, it’s essential to loosen the earth to a depth of about 12-18 inches. This allows the roots to grow freely and absorb necessary nutrients. Use a garden fork or spade to gently break up clods and aerate the soil.
Adding organic matter is also crucial at this stage. Mix in compost, well-rotted manure, or peat moss to improve soil structure and fertility. A 2-inch layer of these amendments will suffice, but you can add more if your soil is particularly poor.
Ensure proper drainage by testing your soil’s water-holding capacity. Hollyhocks don’t like soggy feet, so avoid planting in areas prone to waterlogging. If your soil is heavy clay or prone to retaining moisture, consider raising the bed or adding perlite or sand to improve drainage. This will prevent root rot and ensure a healthy start for your hollyhock plants.
Remember, good soil preparation sets the stage for robust growth and a bountiful harvest. Take the time to get it right, and you’ll be rewarded with towering stalks of colorful blooms.
Sowing Seeds vs. Transplanting Seedlings
When it comes to planting hollyhocks, you have two main options: direct sowing seeds or transplanting seedlings. Both methods have their advantages and disadvantages, which we’ll explore below.
Direct sowing seeds allows for a head start on the growing season, as seeds can be planted as soon as the soil has warmed up in early spring. This method also reduces the risk of over-handling the delicate roots of young seedlings. However, direct-sown seeds may have a lower success rate due to factors like poor soil quality or pests and diseases.
On the other hand, transplanting seedlings gives you more control over the growing conditions and can lead to healthier plants with a stronger root system. Seedlings are typically started indoors 4-6 weeks before the last frost date, then hardened off and transplanted outside when the weather warms up. This method requires more time and effort upfront but can result in more robust and vibrant hollyhocks.
Ultimately, both methods have their merits, and the best choice for you will depend on your specific climate, schedule, and preferences.
Hollyhock Care and Maintenance: Watering, Fertilizing, and Pruning
To ensure your hollyhocks thrive all season long, it’s essential to develop a regular watering routine, along with a fertilization schedule and pruning plan.
Watering Techniques for Healthy Growth
When it comes to keeping your hollyhocks healthy and thriving, consistent moisture is key. But overwatering can be just as detrimental as underwatering. Hollyhocks prefer well-drained soil and can tolerate some drought once established, but they’ll perform best with regular watering.
Aim to provide about 1-2 inches of water per week, either from rainfall or irrigation. Avoid frequent shallow watering, which encourages weak root growth and makes your plants more susceptible to disease. Instead, water deeply to encourage deep root development. Mulching around the base of your hollyhocks can help retain moisture in the soil and reduce evaporation.
During periods of drought, avoid watering just before flowering, as this can cause buds to drop or become distorted. Watering during the cooler parts of the day, such as early morning or evening, also helps prevent moisture loss through transpiration. By finding a balance between consistent moisture and avoiding overwatering, you’ll be well on your way to growing robust, healthy hollyhocks that will provide a bountiful harvest season after season.
Fertilizing Your Hollyhocks: Organic vs. Synthetic Options
When it comes to fertilizing your hollyhocks, you have two main options: organic and synthetic fertilizers. While both can provide essential nutrients for healthy growth, they differ significantly in terms of benefits and drawbacks.
Organic fertilizers, such as compost or manure, offer a natural way to nourish your plants. They release their nutrients slowly, promoting healthy root development and disease resistance. However, they may not be as readily available or cost-effective as synthetic options. For example, you can create your own compost by collecting kitchen scraps and yard waste, but it requires time and effort.
Synthetic fertilizers, on the other hand, provide a quick boost of nutrients that promote rapid growth. They are widely available and often less expensive than organic alternatives. However, they can also pollute soil and water if overused or misapplied. For instance, over-reliance on synthetic fertilizers has led to the depletion of soil nutrients in some regions.
Ultimately, the choice between organic and synthetic fertilizers depends on your specific growing conditions and needs. If you want a more sustainable and long-term approach, consider using organic options. However, if you need a quick fix or are dealing with nutrient-deficient soil, synthetic fertilizers may be a suitable choice.
Common Hollyhock Problems and Solutions
As you work towards growing a lush and thriving hollyhock garden, it’s inevitable that you’ll encounter some common challenges. Let’s tackle these issues together with practical solutions to get your plants back on track.
Identifying Pests and Diseases
Hollyhocks are susceptible to various pests and diseases that can cause significant damage if left unchecked. As a hollyhock grower, it’s essential to be aware of these common issues and know how to identify them.
Aphids and whiteflies are tiny insects that feed on the sap of hollyhock leaves, causing curled or distorted growth. Slugs and snails also target hollyhocks, especially at night, leaving behind silvery trails as they feed on the foliage. Spider mites, on the other hand, are microscopic arachnids that spin fine webs on the undersides of leaves, sucking out nutrients.
Powdery mildew is a common fungal disease that appears as a white powdery coating on hollyhock leaves and stems. Root rot, caused by overwatering or poor drainage, can lead to yellowing leaves, blackened roots, and ultimately plant death. To prevent these issues, inspect your plants regularly for signs of pests and diseases, and take prompt action with organic control methods whenever necessary.
Keep in mind that prevention is key: maintain good garden hygiene, use physical barriers to deter pests, and provide optimal growing conditions for your hollyhocks. Regular monitoring will help you catch problems early on and prevent them from spreading.
Natural Remedies for Pest Control and Disease Prevention
When it comes to growing hollyhocks, managing pests and diseases is an essential part of ensuring a healthy and thriving plant. Rather than relying on harsh chemicals, there are several eco-friendly solutions you can use to keep your hollyhock plants pest-free and disease-resistant.
To control common pests like aphids, whiteflies, and spider mites, try using neem oil or insecticidal soap. These natural alternatives can be applied directly to the leaves and stems of your plant, providing a safe and effective way to deter these unwanted visitors. You can also introduce beneficial insects like ladybugs and lacewings into your garden, which feed on pests that might harm your hollyhocks.
For disease prevention, practice good gardening hygiene by removing any infected or damaged leaves from your plant. Water your hollyhocks in the morning to allow excess moisture to evaporate before nightfall, reducing the risk of fungal diseases. Additionally, sprinkle a barrier of wood ash or copper powder around the base of your plants to prevent powdery mildew and other fungal infections.
Encouraging Blooms and Extending the Growing Season
Want to coax even more blooms from your hollyhocks? In this crucial part of our growing guide, we’ll share tips for extending the season and promoting healthy flowering.
Tips for Promoting Healthy Flowering
To encourage healthy flowering in hollyhocks, it’s essential to consider the factors that influence blooming. One of the most significant factors is temperature. Hollyhocks typically thrive in temperatures between 65°F and 75°F (18°C and 24°C), but they can tolerate cooler temperatures as well. However, prolonged exposure to extreme heat or cold can impact flowering.
Another critical factor is sunlight. Hollyhocks require full sun to partial shade, meaning they need at least six hours of direct sunlight per day. Adequate sunlight not only promotes healthy growth but also encourages blooming. Make sure your hollyhock plants receive sufficient sunlight by planting them in a spot that receives direct sunlight for most of the day.
Nutrient availability is also crucial for promoting healthy flowering. Hollyhocks are heavy feeders and require a balanced fertilizer to produce an abundance of blooms. Apply a high-phosphorus fertilizer in early spring, following the manufacturer’s instructions, to promote blooming. Additionally, ensure your soil has adequate potassium levels, as this nutrient is essential for flower production.
Remember that consistent moisture, especially during flowering, will also help encourage healthy blooms.
Strategies for Extending the Growing Season
When it comes to growing hollyhocks, one of the biggest challenges is extending their limited growing season. Hollyhocks typically bloom from mid-summer to early fall, but with the right strategies, you can coax them into blooming for an extra week or two. Mulching is a great way to start. By applying a thick layer of organic mulch around your hollyhock stalks in late spring, you’ll help retain moisture and suppress weeds that compete with your plants for water and nutrients.
Companion planting is another technique worth exploring. Planting marigolds or nasturtiums nearby can help repel pests like aphids and whiteflies, which can spread disease to hollyhocks. Additionally, these flowers will attract beneficial insects that pollinate your hollyhock blooms. Row covers are a simple yet effective solution for protecting your plants from frost damage and prolonging the growing season. By draping lightweight row covers over your plants on chilly evenings, you’ll trap warmth and prevent damage to delicate foliage. With these techniques in place, you can enjoy an extended blooming period and harvest more blooms than ever before.
Harvesting and Storing Hollyhock Seeds: A Guide for Gardeners
Now that your hollyhocks have bloomed, it’s time to harvest their seeds for future growth. Learn how to dry and store them properly in this essential guide.
Identifying Mature Pods and Collecting Seeds
Identifying mature pods is crucial to ensure that you’re collecting viable seeds. Look for pods that have turned a dry brown color and have split open naturally, releasing their seeds. This usually occurs about 10-14 days after the blooms have faded. Gently twist or pull off the pod from the stalk, taking care not to damage it further.
Once you’ve collected several mature pods, spread them out in a single layer on a paper bag or a dry sheet of newspaper. Allow them to dry completely, which may take 7-10 days depending on the humidity and temperature. This helps prevent mold growth and ensures that the seeds are thoroughly dry.
As you’re drying the pods, inspect each one for any signs of damage or rot. Discard any pods that show visible symptoms. After the pods have dried completely, remove the seeds from the pod by gently shaking them out into a container. Store the seeds in an airtight container, such as a glass jar or envelope, to preserve their viability until you’re ready to sow them in your garden. Be sure to label the container with the seed variety and date harvested for accurate tracking.
Proper Storage and Handling Techniques
Storing hollyhock seeds properly is crucial to maintaining their viability. When saving seeds from this year’s harvest, make sure to dry them completely before storing. Remove any excess moisture by spreading the seeds on a paper towel and letting them air dry for 24-48 hours.
Once dry, place the seeds in an envelope or airtight container, such as a glass jar with a tight-fitting lid. Label the container with the date and variety of hollyhock seeds it contains. Store this container in a cool, dry place like a cupboard or drawer. Avoid storing seeds near heat sources, direct sunlight, or moisture-prone areas.
For longer-term storage, consider placing the container in the refrigerator to keep the seeds at a consistent temperature between 32°F and 50°F (0°C and 10°C). Check on the seeds periodically to ensure they remain dry and uninfested with pests. By following these simple steps, you can maintain the viability of your hollyhock seeds for future planting seasons.
It’s worth noting that hollyhock seeds typically retain their viability for 5-7 years if stored properly. This allows you to replant your favorite varieties year after year, ensuring a bountiful harvest every time.
Frequently Asked Questions
What happens if I accidentally plant my hollyhocks in a spot with heavy clay or sandy soil?
Yes, this can cause significant issues for your plants. Heavy clay soils can lead to waterlogging and dehydration, while sandy soils may result in root damage from excessive drying out. Consider replanting them in well-draining soil or mixing organic matter to improve the structure.
How often should I water my hollyhocks during a drought?
Water your hollyhocks regularly during dry spells, especially when they’re in bloom. Aim for about 1-2 inches of water per week, either from rainfall or irrigation. Keep the soil consistently moist but not waterlogged to prevent root rot.
Can I grow hollyhocks in containers if I don’t have space in my garden?
Yes, you can successfully grow hollyhocks in large containers with good drainage. Use a well-draining potting mix and provide support for the tall stems as needed. Keep in mind that container-grown hollyhocks may require more frequent watering.
How long does it take to see blooms on my newly planted hollyhocks?
It can take 2-3 years from sowing seeds or transplanting seedlings for your hollyhocks to produce flowers. However, this timeframe can vary depending on factors such as soil quality, climate, and care practices.
Can I propagate hollyhocks using stem cuttings?
No, it’s generally more difficult to propagate hollyhocks from stem cuttings compared to other methods. The seeds are a better option for propagation or purchase seedlings that have already been started in the nursery.