Hollyhocks are one of the most stunning additions to any garden, their towering spikes of vibrant blooms commanding attention from passersby. However, growing these beautiful flowers can be a challenge for even the most experienced gardeners. Whether you’re a seasoned green thumb or just starting out, achieving a bountiful hollyhock bloom is a coveted goal that requires careful planning and attention to detail.
In this comprehensive guide, we’ll delve into the secrets of growing stunning hollyhocks in your garden, from preparing the perfect soil conditions to troubleshooting common issues and preserving those precious blooms beyond the season. We’ll cover everything you need to know to coax these magnificent flowers into full bloom, including tips on choosing the right varieties, optimizing sunlight and water conditions, and extending their blooming period through proper care and maintenance.
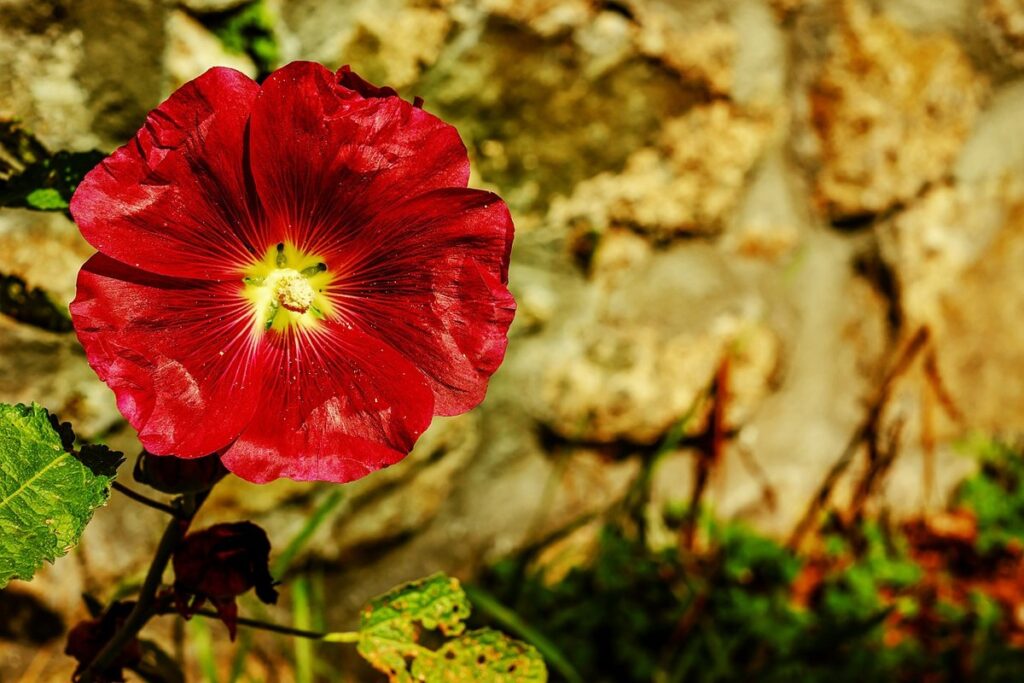
Understanding Hollyhocks and Their Growth Habits
Hollyhocks can be a bit tricky to care for, so let’s dive into their unique growth habits and what you need to know to keep them thriving.
What are Hollyhocks and Why are They Popular?
Hollyhocks are a beloved favorite among gardeners due to their stunning appearance and unique growth habits. These tall, stately flowers can grow up to 12 feet high, making them a striking addition to any garden. Their distinctive height allows them to serve as a natural backdrop for smaller flowers and shrubs, creating a visually appealing layered effect.
One of the main reasons gardeners adore hollyhocks is their ability to produce an abundance of large, showy flowers in shades of pink, red, yellow, and white. These blooms typically start at the base of the stem and work their way up, often resulting in a riot of color that’s sure to turn heads. Some varieties even display bi-colored or tri-colored petals, adding an extra layer of visual interest.
To make the most of your hollyhock’s unique growth habits, consider planting them towards the back of your garden bed or against a fence for maximum impact. This will also help minimize any potential support issues as the plants grow taller. With proper care and attention, these statuesque beauties can add drama, texture, and vibrancy to even the most mundane garden spaces.
Preparing the Soil for Hollyhock Growth
Preparing the soil for hollyhock growth is an essential step to ensure these towering flowers thrive in your garden. The right pH levels and nutrient requirements can make all the difference between a healthy, blooming plant and one that struggles to survive.
Hollyhocks prefer slightly acidic to neutral soil with a pH range of 6.0-7.0. If your soil is too alkaline or too acidic, it can hinder the plant’s ability to absorb essential nutrients. To check your soil pH, you can purchase a DIY testing kit or send a sample to a lab for analysis.
In terms of nutrient requirements, hollyhocks need a well-balanced diet of nitrogen, phosphorus, and potassium (NPK). A general-purpose fertilizer with an NPK ratio of 10-10-10 is a good starting point. However, be cautious not to over-fertilize, as this can lead to weak growth and reduced blooming.
Improving drainage in your garden bed is also crucial for hollyhock success. These plants don’t like wet feet, so ensure the soil drains quickly after watering. Add organic matter such as compost or well-rotted manure to help break up clay soils and improve water penetration.
Choosing the Right Variety for Your Garden
When planning a hollyhock garden, selecting the right variety is crucial to ensure you get the exact look and feel you want. This decision involves considering factors like flower color, size, and growth habit.
Selecting Hollyhock Varieties Based on Climate and Region
When selecting hollyhock varieties for your garden, it’s essential to consider the climate and region you’re in. Different types of hollyhocks thrive under varying conditions, so choosing the right one will ensure they receive the best care possible. In cooler climates with moderate summers, look for varieties like ‘Nigra’ or ‘Hansel’, which are known to perform well in temperatures between 65-75°F (18-24°C). These types typically bloom from mid-to-late summer and come in a range of colors including pink, purple, and white.
In warmer climates with hot summers, opt for varieties that are heat-tolerant like ‘Mont Blanc’ or ‘Mars Magic’. These types can handle temperatures up to 90°F (32°C) and often bloom earlier than cooler-climate varieties. Consider your region’s soil type as well – hollyhocks prefer well-draining soil with a pH between 6-7. If you’re unsure about the specific growing conditions in your area, consult with local nurseries or gardening experts for advice. By selecting a variety that suits your climate and region, you’ll be able to enjoy a vibrant display of hollyhock blooms all summer long.
Compact vs. Tall: What’s Best for Small Gardens?
When choosing hollyhock varieties for small gardens, it’s essential to consider compact options that won’t overwhelm the space. Compact hollyhocks, typically growing between 2-4 feet tall, are perfect for smaller beds or containers. These varieties, such as ‘Nigra’ and ‘Alba’, produce fewer but still vibrant flowers and require less maintenance.
On the other hand, taller hollyhock options are ideal for larger gardens with more space to spare. Some popular varieties include ‘Halo Giant’ and ‘Mars Magic’, which can grow up to 8 feet tall. These towering plants provide a dramatic focal point in the garden but may require staking to prevent them from toppling over.
When deciding between compact and tall hollyhocks, think about your garden’s unique conditions. If you have limited space or prefer low-maintenance gardening, opt for compact varieties. For larger gardens with more room to maneuver, taller hollyhocks can be a stunning addition.
Planting Hollyhocks: Tips and Techniques
To ensure a thriving hollyhock bloom, learn expert tips on preparing the soil, selecting the right variety, and planting techniques to set your garden up for success. This guide will walk you through it step by step.
When to Plant Hollyhocks and How to Sow Seeds Correctly
When planting hollyhocks, timing is everything. The ideal time to plant these stunning flowers depends on your location and climate. In general, spring is the best season for planting hollyhocks. In regions with a mild winter, you can plant in early spring, about 4-6 weeks before the last frost date.
If you live in an area with a shorter growing season or experience harsh winters, it’s better to start hollyhock seeds indoors 8-10 weeks before the last frost date. This will give them a head start on the growing season and increase their chances of survival. Sow seeds about 1/4 inch deep in seed trays filled with a well-draining potting mix. Keep the soil moist but not waterlogged, and provide adequate light.
When sowing seeds directly into the garden bed, choose a location with full sun and well-drained soil. Space seeds about 12-18 inches apart to prevent overcrowding. Water the soil gently but thoroughly after planting, and keep it consistently moist during the first few weeks after germination.
Spacing and Support: Essential for Healthy Growth
Proper spacing between hollyhock plants is crucial for healthy growth and prevents overcrowding. Hollyhocks can grow quite tall, sometimes reaching heights of over 8 feet, so it’s essential to provide enough space between each plant to allow them to breathe and receive adequate sunlight. A general rule of thumb is to space hollyhock plants at least 18-24 inches apart in a row. However, if you’re growing shorter varieties or want to create a more compact display, you can place them as close as 12-15 inches apart.
To prevent these statuesque flowers from toppling over in the wind, provide sturdy support using stakes, trellises, or other methods. You can drive wooden stakes into the ground about 2-3 feet deep and tie the hollyhock stems to them with twine or wire. Alternatively, you can use a trellis or obelisk to support the plants, which not only adds visual interest but also helps keep the blooms upright. For added stability, you can also prune any weak or spindly growth on the stem. By following these simple steps, you’ll be able to enjoy your hollyhock blooms without worrying about them toppling over in the wind.
Care and Maintenance for Optimal Blooms
To enjoy vibrant hollyhock blooms all season, it’s crucial to establish a regular care routine that includes pruning, staking, and providing proper soil conditions.
Watering and Mulching: The Key to Healthy Hollyhocks
Hollyhocks need consistent moisture to produce their large, showy blooms. Aim to provide about 1-2 inches of water per week, either through rainfall or irrigation. Make sure the soil is moist but not waterlogged, as this can lead to root rot and other problems. Water them deeply once or twice a week during hot dry spells, and avoid getting water on the leaves to prevent fungal diseases.
Mulching around the base of your hollyhocks has numerous benefits. It helps retain moisture in the soil, reducing the need for frequent watering. Organic mulch also suppresses weeds that compete with your plants for resources. Choose a thick layer (3-4 inches) of wood chips, bark, or straw to achieve these effects. As an added bonus, mulching can help regulate soil temperature and keep the area around the plant looking tidy.
By combining regular watering with a good layer of mulch, you’ll be well on your way to creating an ideal environment for your hollyhocks to thrive.
Deadheading and Fertilization: Maximizing Flower Production
Deadheading and fertilization are two crucial aspects of hollyhock care that can significantly impact flower production. By removing spent blooms, you’re encouraging the plant to focus its energy on producing new flowers rather than seed pods. This process is called “deadheading,” and it’s essential for maximizing blooms.
To deadhead your hollyhocks effectively:
* Remove the entire bloom stalk after the flowers have faded
* Cut off any seed heads that form, as they can divert energy from flowering
When it comes to fertilizing hollyhocks, you’ll want to provide a balanced diet of nutrients to promote healthy growth and blooming. Organic options include compost or manure tea, which release slow-release nutrients into the soil. You can also use synthetic fertilizers like 10-10-10 NPK (nitrogen-phosphorus-potassium) formulas, but be sure to follow the instructions carefully to avoid over-fertilizing.
Aim to fertilize your hollyhocks in early spring and again after they’ve finished blooming. This will give them a boost of energy for next year’s flowers. Remember to also mulch around the base of the plants to retain moisture and suppress weeds, which can compete with your hollyhocks for nutrients.
Common Issues and Troubleshooting in Hollyhock Gardens
Even experienced gardeners can run into problems when growing hollyhocks, so let’s tackle some common issues and troubleshoot together. We’ll cover solutions to get your blooms back on track.
Dealing with Pests and Diseases That Affect Hollyhocks
Hollyhocks are generally low-maintenance plants, but they can still be susceptible to certain pests and diseases that can affect their growth and flowering. One of the most common pests that infest hollyhocks is aphids. These tiny insects feed on plant sap, causing curled or distorted leaves, stunted growth, and reduced blooming. To identify aphids early, check for sticky honeydew droplets on leaves and stems.
Another problem you might encounter is powdery mildew, a fungal disease that appears as a white, powdery coating on leaves. This can weaken the plant and reduce flowering. To prevent powdery mildew, ensure good air circulation around your hollyhocks and avoid overhead watering. If you notice symptoms, treat with fungicides specifically designed for powdery mildew.
Regularly inspecting your plants for signs of pests or diseases is essential for effective treatment. Check the undersides of leaves, where aphids often hide, and look for white spots or patches that could indicate fungal growth. By catching these issues early, you can prevent them from spreading and enjoy a healthy, thriving hollyhock bloom in your garden.
Troubleshooting Common Growth Issues in Hollyhock Plants
If you’re struggling with weak growth, premature wilting, or failure to bloom in your hollyhock plants, don’t worry – it’s more common than you think. These issues can be caused by a variety of factors, including inadequate watering, poor soil quality, and insufficient sunlight.
One of the most common problems is weak growth, which can be addressed by providing your hollyhocks with full sun to partial shade and well-draining soil rich in organic matter. Make sure to water them regularly, but avoid overwatering, which can lead to root rot and other issues. Mulching around the base of the plants can also help retain moisture and suppress weeds.
Premature wilting is often a sign of underwatering or nutrient deficiencies. Check your soil pH and adjust it if necessary. Add a balanced fertilizer in spring to provide essential nutrients for healthy growth.
Failure to bloom, on the other hand, might be due to late planting or poor pollination. Plant hollyhocks at least 8-10 weeks before the last frost date to ensure they have enough time to establish themselves and produce blooms. Consider adding a pollinator-friendly plant nearby to attract bees and other beneficial insects.
By addressing these common growth issues and providing your hollyhocks with the right conditions, you’ll be on your way to enjoying vibrant blooms in no time!
Bringing the Best Out of Your Hollyhock Blooms
To get the most out of your hollyhocks, let’s focus on techniques to enhance their stunning blooms and encourage a long-lasting display in your garden. We’ll explore some expert tips to help you achieve this!
Tips for Extending the Blooming Period and Encouraging Repeat Flowers
To make the most of your hollyhock blooms, it’s essential to extend their blooming period and encourage repeat flowers in subsequent years. One strategy is to plant multiple varieties with staggered bloom times. This will create a constant display of color throughout the summer months.
Another approach is to provide support for your hollyhocks using stakes or a trellis. This not only helps maintain upright growth but also keeps the blooms at eye level, making them more accessible and visible. Additionally, deadheading spent flowers can encourage repeat blooms by redirecting energy away from seed production towards further flowering.
Regular watering and fertilization are crucial for healthy hollyhock plants. Aim to provide about 1 inch of water per week through rainfall or irrigation. Fertilize in the spring with a balanced fertilizer, and again after blooming has finished to promote root growth.
For repeat blooms, it’s best to cut back spent stems to about 3-4 inches from ground level in late summer or early fall. This will allow the plant to conserve energy for next year’s bloom.
Preserving Cut Hollyhocks: Drying, Pressing, and Arranging
As you enjoy the vibrant blooms of your hollyhock plants during the growing season, you might be wondering how to preserve their beauty beyond summer’s end. Fortunately, there are several creative ways to dry, press, and arrange these stunning flowers to enjoy them year-round.
To dry hollyhocks, tie clusters of stems together in small bunches and hang them upside down in a warm, dry area. You can also use silica gel or desiccant packets to speed up the drying process. This will help preserve the delicate petals and maintain their color. Once dry, you can use the dried blooms in potpourri, wreaths, or as decorative accents for your home.
For pressing hollyhocks, gently place individual flowers between sheets of paper towels or blotting paper, and weight them down under a heavy book or press. This method helps flatten the petals and retain their color, making them perfect for collage-making or framing. When arranging dried or pressed hollyhocks in floral arrangements, combine them with other seasonal elements like pinecones, berries, or eucalyptus for a beautiful and unique display.
Some gardeners also experiment with using honey to preserve the delicate petals of their hollyhock blooms. This method involves coating the flowers in a thin layer of honey and letting them air-dry completely before arranging them in a decorative piece. Whichever preservation method you choose, enjoy your preserved hollyhocks as a lasting reminder of summer’s beauty.
Frequently Asked Questions
Can I grow hollyhocks in containers or do they require a lot of space?
Yes, it is possible to grow hollyhocks in containers, but keep in mind that these plants can grow quite tall and may need staking for support. Choose compact varieties or prune them regularly to control their size. Make sure the container has good drainage holes and use a well-draining potting mix to prevent waterlogged soil.
What’s the best way to preserve hollyhock blooms after they’ve faded?
To preserve your hollyhock blooms, you can dry them by tying stems in small bunches and hanging them upside down in a warm, dry place. Alternatively, press them between sheets of paper towel or blotting paper to flatten out the petals. You can also use silica gel to desiccate the flowers and maintain their color.
How do I prevent hollyhocks from becoming leggy or developing weak stems?
To promote healthy growth and prevent legginess in hollyhocks, make sure they receive full sun and have adequate space for air circulation. Provide support with stakes or a trellis to keep the stems upright and encourage bushy growth. Regular deadheading and fertilization can also help maintain the plant’s vigor.
Can I grow hollyhocks in zones with extreme weather conditions?
While hollyhocks prefer well-draining soil and full sun, they are relatively adaptable to different climates. In areas with hot summers or cold winters, choose varieties that are tolerant of these conditions. For example, ‘Nigra’ is a good choice for cooler climates, while ‘Halo’ is more suitable for warmer zones.
How often should I water hollyhocks during the blooming season?
During the blooming season, hollyhocks require consistent moisture but can be sensitive to overwatering. Water them deeply once or twice a week, depending on weather conditions. Mulch around the base of the plants to retain moisture and suppress weeds, which can help reduce the need for frequent watering.