Growing your own herbs can be incredibly rewarding, but some plants are notoriously tricky to cultivate. Yarrow is one such herb that often intimidates novice gardeners due to its finicky growth habits and specific needs. However, with the right knowledge and techniques, you can successfully grow yarrow from seeds and enjoy its medicinal properties in your very own garden. In this comprehensive guide, we’ll walk you through everything you need to know about growing yarrow from seeds, including soil preparation, sowing, and harvesting tips. By the end of this article, you’ll be well-equipped to coax even the most reluctant yarrow seed into a thriving plant that will provide you with an abundance of fresh medicinal herb for years to come.
Understanding Yarrow and Its Benefits
Let’s dive into the fascinating world of yarrow, where we’ll explore its impressive list of benefits for your garden, health, and well-being. You’ll discover why this versatile herb is a must-have in every gardener’s collection!
What is Yarrow?
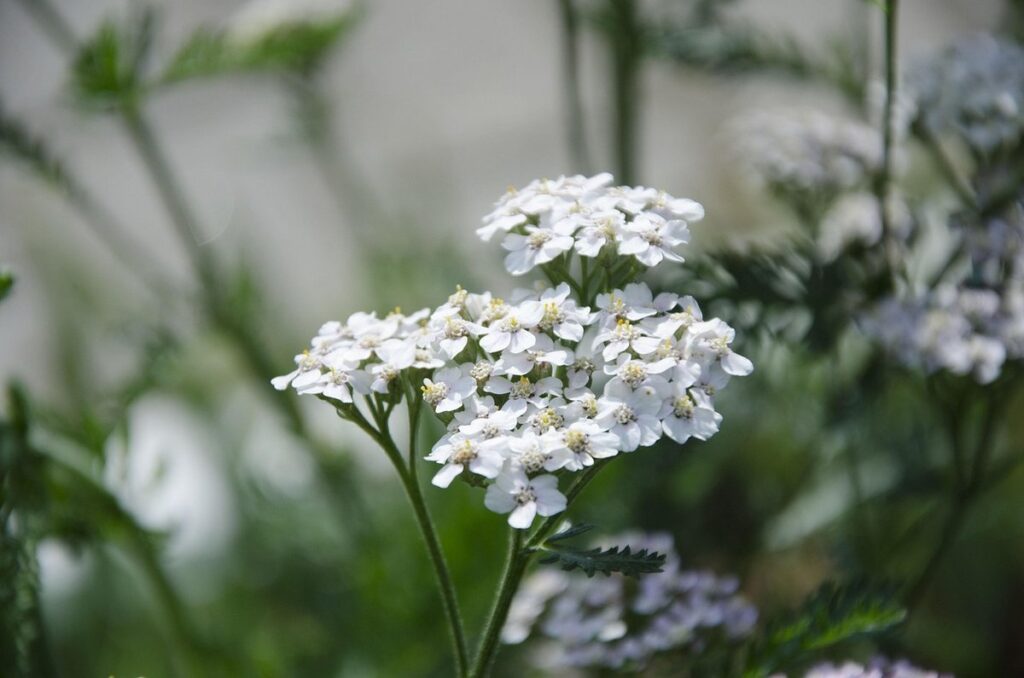
Yarrow is an age-old herb that has been prized for its versatility and medicinal properties for centuries. Its botanical name is Achillea millefolium, which is derived from Greek mythology – the hero Achilles was said to have used yarrow to stop bleeding on the battlefield. This hardy perennial has a rich history of use in traditional medicine, with records dating back to ancient Greece and Rome.
In fact, yarrow has been used for everything from treating wounds and reducing fever to easing digestive issues and even repelling mosquitoes. Its uses are as varied as they are impressive. One of the most significant benefits of yarrow is its ability to promote clotting and stop bleeding – a property that made it an essential ingredient in many traditional remedies.
If you’re new to growing your own herbs, don’t be discouraged if you find yarrow a bit tricky to start from seed. With patience and proper care, however, you can cultivate this valuable herb in your very own garden. Not only will you have access to its medicinal benefits, but you’ll also appreciate the attractive foliage and delicate white or yellow flowers that bloom throughout the summer months.
Health Benefits of Yarrow
Yarrow has been a cornerstone of natural medicine for centuries, and its health benefits are nothing short of impressive. This versatile herb boasts an array of medicinal properties that make it a valuable addition to any garden or medicine cabinet.
At the heart of yarrow’s healing powers lies its potent anti-inflammatory effects. When applied topically, yarrow’s essential oils can soothe irritated skin, reducing redness and swelling in conditions like eczema, acne, and rosacea. In fact, studies have shown that yarrow’s flavonoids exhibit comparable efficacy to commercial anti-inflammatory medications.
Beyond its anti-inflammatory properties, yarrow also possesses remarkable antiseptic effects. Its essential oils contain compounds like thymol and borneol, which work synergistically to inhibit the growth of bacteria, fungi, and viruses. This makes yarrow an excellent natural remedy for minor cuts and scrapes, as well as a soothing after-bath treatment for sensitive skin.
Whether you’re using fresh yarrow leaves in a salve or infusing dried flowers into a tea, this incredible herb is sure to become a trusted ally on your path to wellness.
Culinary Uses of Yarrow
Yarrow is a versatile herb that can add depth and complexity to a variety of dishes. When used in cooking, yarrow has a bitter, earthy flavor profile that pairs well with rich flavors like lamb, beef, and mushrooms. It’s also commonly paired with vegetables like carrots and parsnips.
In traditional European cuisine, yarrow is often used in soups, stews, and braises to add depth and warmth. Try adding fresh yarrow leaves to a hearty beef stew or using dried yarrow flowers to infuse into a lamb stock. Yarrow also pairs well with herbs like thyme and rosemary, making it a great addition to roasted vegetables.
If you’re looking for a unique twist on traditional recipes, try incorporating yarrow into your cooking. Start by substituting some of the herbs in your favorite recipes with fresh or dried yarrow. You can also use yarrow as a garnish or add it to sauces and marinades for added flavor. Experiment with different preparations and find the ways that work best for you.
Preparing the Soil for Yarrow Seeds
Before sowing yarrow seeds, it’s crucial to prepare the soil properly to ensure healthy germination and growth. In this next step, we’ll walk you through how to create a fertile foundation for your yarrow plants.
Choosing the Right Location
When selecting a location for growing yarrow from seeds, it’s essential to consider the plant’s specific needs. Yarrow requires full sun to thrive, so choose a spot that receives direct sunlight for at least six hours a day. Avoid planting in areas with dense tree canopies or under power lines, as these can cast shade and potentially damage the plant.
In terms of soil type, yarrow prefers well-draining soil that is rich in organic matter. It can tolerate a wide range of pH levels but will perform best in slightly alkaline to neutral soils (pH 6.0-7.5). If your soil is heavy clay or sandy, mix in compost or other organic amendments to improve its structure and fertility.
Moisture requirements are also crucial for yarrow growth. The plant prefers dry to medium moisture levels, but it will not tolerate standing water or prolonged droughts. Water the seedlings regularly during their first growing season, but avoid overwatering, which can lead to root rot and other problems. Keep in mind that established yarrow plants are relatively drought-tolerant and may require less watering once they’re mature.
Soil pH and Nutrient Requirements
When it comes to growing yarrow from seeds, understanding the optimal soil pH range and nutrient requirements is crucial for successful seedling development. Yarrow prefers slightly acidic to neutral soil conditions, with a pH between 6.0 and 7.5 being ideal. If your soil pH falls outside of this range, you may need to take corrective action.
In terms of nutrients, yarrow requires a balanced mix of essential micronutrients like nitrogen, phosphorus, and potassium (NPK). However, it’s worth noting that excessive fertilization can lead to weak, leggy growth. A general-purpose fertilizer with an NPK ratio of 10-10-10 is suitable for yarrow seedlings. To promote healthy root development, make sure your soil has adequate calcium and magnesium levels.
If you’re starting seeds indoors or in a container, use a well-draining potting mix to prevent waterlogged soil conditions. For outdoor seed sowing, test your soil pH regularly to ensure it remains within the optimal range. This will help prevent nutrient deficiencies and promote robust yarrow growth.
Amending the Soil for Better Growth
When sowing yarrow seeds, it’s essential to prepare the soil for optimal growth. One crucial step is amending the soil to improve its fertility and structure. Yarrow prefers well-draining, fertile soil with a pH between 6.0 and 7.0.
Start by testing your soil pH and nutrient levels to determine what amendments are needed. If your soil is too acidic or alkaline, add lime to raise the pH or sulfur to lower it. Based on the test results, apply organic matter like compost or well-rotted manure to enrich the soil with nutrients.
To improve soil structure, mix in a 2-inch layer of perlite or vermiculite. These materials help prevent waterlogging and retain moisture, ensuring consistent growth. Another option is to add 1 cup of dolomitic limestone per square foot, which will not only raise the pH but also provide calcium and magnesium.
For a more natural approach, you can use green sand, a slow-release fertilizer made from glauconite. This amendment improves soil fertility while reducing the need for synthetic fertilizers. By following these tips, you’ll create an ideal environment for your yarrow seeds to germinate and thrive.
Sowing Yarrow Seeds
To get started growing yarrow from seeds, begin by sowing them directly into well-draining soil, where they can receive full sun and minimal watering. Make sure to plant them thinly for optimal growth.
When to Sow Yarrow Seeds
When it comes to sowing yarrow seeds, timing is everything. The best time to sow yarrow seeds depends on your climate and the season you’re planting in. In general, yarrow seeds can be sown directly into the ground in early spring or late summer/early fall.
In regions with mild winters, you can sow yarrow seeds as soon as the soil can be worked in the spring, typically around 2-4 weeks before the last frost date. This allows the plants to get a head start on the growing season and produces a robust harvest by mid-summer.
For areas with cold winters, it’s best to sow yarrow seeds in late summer or early fall, about 8-10 weeks before the first frost date. This allows the plants to establish themselves before the winter chill sets in, ensuring they come back strong and healthy in the spring.
Remember to check your local climate and frost dates before sowing, as this will help you determine the best time for planting yarrow seeds in your specific area. With proper timing, you’ll be enjoying a beautiful display of white or yellow blooms in no time!
Seed Depth and Spacing Guidelines
When sowing yarrow seeds, it’s essential to pay attention to seed depth and spacing for optimal germination and growth. Generally, yarrow seeds are tiny and require a relatively shallow sowing depth.
For optimal results, sow yarrow seeds about 1/8 inch deep in well-draining soil. This allows the seeds to maintain moisture without becoming waterlogged, which can hinder germination. You can also use a light dusting of fine sand or vermiculite on top of the seeds for extra protection and moisture retention.
In terms of spacing, yarrow plants grow quite densely, so it’s better to sow seeds 6-12 inches apart in rows that are spaced 18-24 inches apart. This allows each plant to have enough room to mature without overcrowding or promoting disease.
If you’re sowing multiple packets of seeds, make sure to keep the soil consistently moist during the germination period, which can take anywhere from 7-14 days depending on weather conditions. With proper seed depth and spacing, you should be able to achieve a successful germination rate and enjoy healthy yarrow plants for years to come.
Covering the Seeds: Mulching or Row Covers
When it comes to growing yarrow from seeds, maintaining soil moisture and suppressing weeds during germination is crucial for successful establishment. Two popular methods for achieving this are mulching and row covers.
Mulching involves applying a layer of organic material, such as straw or wood chips, directly over the sown seeds. This helps retain moisture in the soil, suppresses weed growth by blocking light, and regulates soil temperature. A 2-3 inch thick layer is usually sufficient, but make sure to keep it loose to allow for proper drainage.
Row covers, on the other hand, are lightweight fabrics that let in sunlight while keeping weeds out. They can be draped over individual rows or entire beds, and come in various materials such as polyester or nylon. Row covers also help retain moisture, reduce soil temperature fluctuations, and prevent birds from eating the seeds.
When choosing between mulching and row covers, consider the specific needs of your garden and climate. If you live in an area with high rainfall or intense sunlight, row covers might be a better option. However, if you’re dealing with dry spells or want to add extra organic matter to your soil, mulching could be the way to go.
Germination and Seedling Care
Now that you’ve sown your yarrow seeds, it’s time to focus on getting them off to a healthy start through germination and seedling care. Proper handling of young plants will ensure they thrive later on.
Monitoring for Germination
Monitoring for Germination: The Wait is Worth It
As you wait for your yarrow seeds to germinate, it’s essential to monitor their progress closely. This might seem like a no-brainer, but trust me, it makes all the difference in ensuring healthy seedlings. So, how do you know when and if your seeds are actually germinating? Let’s dive into that.
First things first, make sure you’re keeping an eye on your seed tray or container at least once a day. Check for any visible signs of sprouting, such as tiny white roots breaking through the surface of the soil or a small green shoot emerging from the top. If you’ve started seeds indoors, place the tray near a sunny window or under grow lights to encourage germination.
Some common signs of germination include:
• A small, whitish root appearing at the base of the seed
• The seed starting to swell and become softer to the touch
• A tiny green leaf poking out from the top of the seed
Keep in mind that yarrow seeds can take anywhere from 7-21 days to germinate. Be patient and persistent – your efforts will pay off when you see those first signs of life!
Common Challenges During Germination
When growing yarrow from seeds, several common challenges can arise during germination. Poor soil quality is one of the main issues that might hinder seed growth. Yarrow seeds require well-draining, loose soil to sprout properly. Heavy clay or compacted soil can cause the seeds to rot, leading to a lower germination rate.
Inadequate watering is another common problem that can affect yarrow seedlings. Overwatering can be detrimental, as it may cause fungal diseases and root rot. On the other hand, underwatering can lead to weakened seedlings that are more susceptible to pests and diseases.
Proper watering techniques should include providing seeds with consistent moisture during the germination period. The ideal water level is when the top inch of soil feels moist but not soggy. To achieve this balance, start by keeping the soil consistently damp for the first few days after sowing. Then, gradually reduce watering to once or twice a week as seedlings develop.
Nurturing Seedlings: Pruning and Support
As your yarrow seedlings begin to grow, it’s essential to provide them with proper support and pruning techniques to encourage healthy growth. Pruning not only helps control the plant’s shape but also promotes a robust root system.
To prune your yarrow seedlings effectively, start by removing any weak or spindly stems that are below the main foliage. This will allow more sunlight to reach the remaining leaves and promote even growth. Cut just above a node using a pair of clean, sharp scissors or pruning shears. Make sure not to damage the surrounding tissue.
Next, provide your seedlings with support by gently staking them near the base. Use soft plant ties or twine that won’t cause any damage to the delicate stems. This will help prevent wind and water damage while the plants establish a strong root system.
Regular pruning sessions every 1-2 weeks will encourage bushy growth, allowing your yarrow plants to reach their full potential.
Pest and Disease Management for Yarrow Plants
Yarrow plants can be susceptible to pests and diseases, especially when grown from seeds, so it’s essential to know how to prevent common issues. Let’s dive into managing these problems effectively.
Identifying Common Pests
Yarrow plants can be susceptible to various pests that can cause significant damage if left unchecked. Some of the most common pests that target yarrow plants include aphids, whiteflies, spider mites, and root-knot nematodes.
Aphids are small, soft-bodied insects that feed on plant sap, causing curled or distorted leaves. They reproduce quickly, with some species able to complete their life cycle in as little as 7-10 days. To control aphid infestations, use a strong spray of water to dislodge them from the plants, followed by an insecticidal soap or neem oil treatment.
Whiteflies are also sap-sucking insects that can spread diseases like aster yellows and tomato spotted wilt virus. They lay eggs on the undersides of leaves, which hatch into nymphs after 3-4 days. To manage whitefly populations, introduce natural predators like lacewings or parasitic wasps, and use yellow sticky traps to capture adults.
Spider mites are tiny, eight-legged arachnids that feed on plant sap, causing fine webbing and bronzing of leaves. They thrive in dry conditions, so ensure plants receive adequate moisture and humidity. To control spider mite infestations, use a miticide or horticultural oil treatment.
Root-knot nematodes are microscopic worms that infect roots, causing galls to form and stunt plant growth. They can be present in soil for years, making it essential to test for their presence before planting yarrow. To manage root-knot nematode infestations, use resistant varieties or solarization techniques to kill the nematodes in the soil.
Recognizing Diseases in Yarrow
As you nurture your yarrow plants from seeds, it’s essential to be aware of potential diseases that can affect them. Yarrow is generally a hardy plant, but it can still fall victim to various diseases caused by fungi, bacteria, and viruses.
Some common diseases affecting yarrow include powdery mildew, leaf spot, and root rot. Powdery mildew appears as a white, powdery coating on leaves, while leaf spot causes dark spots or patches on the foliage. Root rot occurs when the roots become infected with fungi, leading to yellowing or wilting of the plant.
To prevent these diseases, maintain good air circulation around your plants by providing adequate space between them and ensuring proper drainage. Water your yarrow plants carefully, avoiding overwatering, which can create an ideal environment for fungal growth. Regularly inspect your plants for signs of disease, and treat promptly if you notice any issues. For existing infections, remove affected areas to prevent the spread and apply a fungicide according to the product’s instructions.
Monitoring the health of your yarrow plants regularly will help you catch potential problems early on and take necessary action to ensure their continued growth and well-being.
Integrated Pest Management (IPM) Strategies
When growing yarrow from seeds, it’s essential to consider Integrated Pest Management (IPM) strategies to maintain a balanced and healthy ecosystem. This holistic approach focuses on managing pest populations using a combination of techniques that reduce chemical use.
To start, monitor your plants regularly for signs of pests like aphids, whiteflies, or spider mites. Early detection is key to preventing infestations from getting out of hand. For example, you can inspect the undersides of leaves and stems for eggs or actual pests.
Instead of reaching for chemical pesticides, try introducing beneficial insects like ladybugs or lacewings that feed on these pests. You can also use physical barriers like fine mesh to keep flying pests away from your plants. Additionally, maintain good garden hygiene by removing weeds, debris, and infested plant material to prevent pest migration.
Some effective non-chemical controls include using neem oil, insecticidal soap, or horticultural oil to control soft-bodied pests. Always read the labels carefully and follow instructions for safe application rates.
Harvesting and Storing Yarrow Leaves and Roots
Once you’ve harvested your yarrow, it’s essential to store the leaves and roots properly to maintain their potency and longevity. We’ll cover how to dry, preserve, and store these valuable plant parts for future use.
Determining the Right Time for Harvest
When it comes to harvesting yarrow leaves and roots, timing is everything. You’ll know it’s time when your plants have reached full maturity, which typically takes around 90-120 days after sowing seeds. Check for the following signs: a robust stem with multiple branches, fully developed flower heads (but don’t harvest those just yet!), and a vibrant green color.
For leaf harvesting, look for plants that are at least 6-8 inches tall and have reached their peak growth stage. Pinch or cut off individual leaves or stems as needed to encourage new growth and prevent the plant from flowering prematurely. This will also promote a bushy shape and more foliage production.
As for roots, you can harvest them after about 120 days when the plants are at least 12-18 inches tall. Gently dig around the root ball with a fork, taking care not to damage the delicate taproot. Harvest only what you need, leaving some of the root system intact to ensure the plant’s survival.
Remember to check on your yarrow regularly for signs of readiness – and don’t hesitate to ask questions if you’re unsure!
Methods for Drying and Storing Herbs
When it comes to preserving yarrow’s potency, proper drying and storage are crucial. One popular method is air-drying, where you tie yarrow stalks in small bunches and hang them upside down in a warm, dry, dark place with good airflow. This process can take 1-2 weeks, depending on the humidity level.
Another option is oven drying, which involves setting your oven to its lowest temperature setting (usually around 150°F) and placing yarrow stalks on a baking sheet. Monitor the temperature closely to prevent overheating, as this can damage the herb’s oils. This method typically takes 1-3 hours.
For longer-term storage, consider using glass jars or containers with tight-fitting lids. Store dried yarrow in an airtight container to preserve its fragrance and potency. You can also freeze yarrow in airtight bags or containers for up to 6 months. When storing, keep the containers away from direct sunlight and heat sources.
Remember that moisture is the enemy of dried herbs, so store them in a cool, dry place. If you notice any mold or mildew, discard the affected herb immediately to maintain the quality of your stored yarrow.
Preparing Yarrow for Medicinal Use
Before using yarrow for medicinal purposes, it’s essential to prepare it properly. This involves drying and cleaning the leaves and roots to remove any impurities or contaminants that may affect its potency and efficacy.
Start by rinsing the yarrow leaves and roots with clean water to remove any dirt or debris. Next, gently pat them dry with a paper towel to remove excess moisture. You can then air-dry the yarrow by tying it in small bunches and hanging them upside down in a warm, dry place with good airflow. This process typically takes 1-2 weeks, depending on the humidity level.
Once the yarrow is completely dry, you can store it in airtight containers to preserve its medicinal properties. When using dried yarrow for teas or infusions, be sure to crumble it into smaller pieces to facilitate even infusion and flavor release. You can also grind dried yarrow roots into powder form for use in capsules or other herbal preparations.
It’s worth noting that yarrow can be quite potent, so start with small amounts and adjust to taste. This will help you avoid any adverse reactions or interactions with medications. By following these simple steps, you’ll be able to harness the full potential of yarrow for medicinal use while minimizing any risks associated with its preparation.
Frequently Asked Questions
Can I grow yarrow from seeds indoors, or do I need to wait until spring?
Yes, you can start growing yarrow from seeds indoors about 6-8 weeks before the last frost date in your area. Use a seed starting mix and keep the soil consistently moist but not waterlogged.
How long does it take for yarrow seeds to germinate, and what are some common challenges during this process?
Yarrow seeds can take anywhere from 7-21 days to germinate, depending on factors like temperature and moisture levels. Common challenges include uneven germination rates, fungal infections, or pests attacking the seedlings.
Can I use regular potting soil for growing yarrow, or do I need a specific type of soil?
While you can start with regular potting soil, it’s best to amend it with organic matter like compost or well-rotted manure to improve drainage and fertility. This will help your yarrow plants thrive in the long run.
How often should I water my yarrow seedlings after sowing, and what are some signs of overwatering?
Water your yarrow seedlings lightly but frequently until they’re about 6 inches tall. Avoid overwatering by checking the soil moisture regularly – if it feels consistently damp or dry to the touch.
Can I harvest yarrow leaves at any time, or do I need to wait for them to reach a certain size?
Yes, you can start harvesting individual yarrow leaves as soon as they’re about 2-3 inches long. However, for medicinal purposes, it’s best to allow the plants to mature fully and harvest them in the fall when the foliage is at its most potent.