Are you fascinated by the unique beauty and medicinal properties of witch hazel? If so, you’re not alone! Growing your own witch hazel from seed can be a rewarding experience, but it requires some knowledge and planning. With its fragrant flowers and rich in antioxidants, witch hazel is a popular choice for gardeners and herbal enthusiasts alike.
In this article, we’ll guide you through the process of growing witch hazel, from choosing the right variety to harvesting your own bounty. We’ll cover essential tips on preparing soil, managing pests and diseases, and even provide expert advice on selecting the best variety for your climate and needs. Whether you’re a seasoned gardener or just starting out, this article will give you the tools and confidence to grow your own thriving witch hazel garden.
Choosing the Right Variety
When it comes to growing witch hazel, selecting the right variety for your climate and space needs is crucial. Let’s explore the key factors to consider in making this important decision.
Introduction to Witch Hazel Species
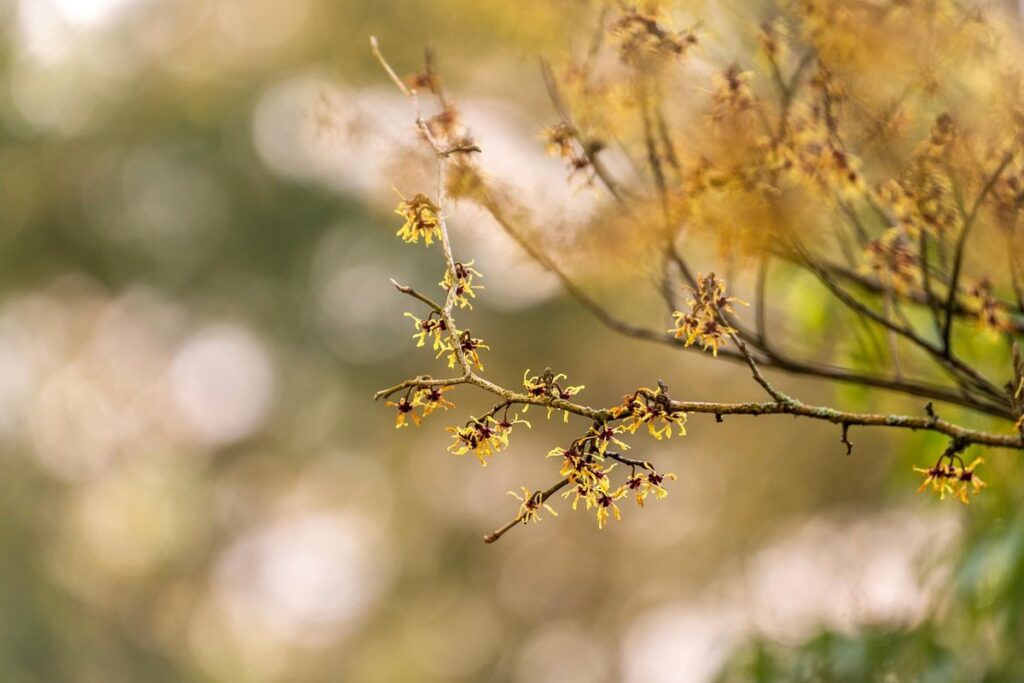
When it comes to growing witch hazel, you’ll discover that there are several species to choose from. The most commonly grown varieties are Hamamelis virginiana and Hamamelis vernalis, but other species like Hamamelis mollis, Hamamelis japonica, and Hamamelis nitida also have their own unique characteristics.
Hamamelis virginiana, often referred to as the American witch hazel, is a deciduous shrub that’s native to eastern North America. It produces small, fragrant flowers in shades of yellow, orange, and red, typically from September to November. This species grows up to 20 feet tall and 15 feet wide, making it an ideal choice for hedges or borders.
In contrast, Hamamelis vernalis, also known as the Ozark witch hazel, is a smaller shrub that’s native to eastern North America. It produces more robust flowers in shades of yellow, orange, and red from February to April, often before other plants have even begun to bloom. This species grows up to 15 feet tall and 10 feet wide, making it perfect for smaller gardens.
When choosing a witch hazel species, consider factors like growth habits, flower colors, and mature sizes to ensure you select the right fit for your garden’s unique conditions.
Factors to Consider When Selecting a Variety
When selecting a witch hazel variety for growth, there are several key factors to consider. Climate is one of the most crucial considerations, as different varieties thrive in various temperature and humidity conditions. For instance, Hamamelis x intermedia ‘Dutch Master’ excels in cooler climates with temperatures between 25-35°C (77-95°F), while Hamamelis vernalis prefers warmer temperatures above 20°C (68°F). If you live in an area with mild winters and hot summers, choose a variety that can tolerate these conditions.
Soil type is another essential factor to consider. Witch hazels generally prefer well-drained acidic soils, but some varieties are more adaptable than others. For example, Hamamelis x intermedia ‘Arnold Promise’ can thrive in a range of soil types, from acidic to slightly alkaline. However, if you have heavy clay or poorly draining soil, choose a variety that’s specifically tolerant of these conditions.
Ultimately, the intended use of your witch hazel will also influence your choice of variety. If you’re growing for ornamental purposes, consider varieties with striking flowers, like Hamamelis x intermedia ‘Vesuvius’. For medicinal uses, look for varieties with high concentrations of gallic acid, such as Hamamelis virginiana.
Preparing the Soil
Before planting your witch hazel, it’s essential to prepare the soil by loosening and aerating it to a depth of about 12-18 inches. This will ensure healthy root growth and prevent waterlogged roots.
Understanding Witch Hazel’s Soil Preferences
When growing witch hazel, it’s essential to understand its specific soil requirements. This will ensure that your plants receive the optimal conditions for growth and development.
Witch hazel prefers well-draining acidic soils with a pH between 5.5 and 6.5. If your soil is too alkaline or clay-based, it can lead to nutrient deficiencies and poor root growth. To test your soil’s pH level, you can purchase a DIY kit or consult with a local nursery expert.
Witch hazel also requires a balanced mix of nutrients, including nitrogen, phosphorus, and potassium (NPK). A general-purpose fertilizer with an NPK ratio of 10-10-10 will provide the necessary support for healthy growth. However, avoid over-fertilizing, as this can lead to weak roots and poor plant establishment.
In addition to proper pH levels and nutrient balance, witch hazel thrives in soils rich in organic matter, such as compost or leaf mold. This helps retain moisture, suppress weeds, and provide essential micronutrients for optimal growth. If your soil lacks these beneficial components, consider incorporating them into your growing mix to create a welcoming environment for your witch hazel plants.
How to Test and Prepare Your Soil
Testing and preparing the soil is a crucial step in growing witch hazel successfully. You’ll want to start by testing the pH level of your soil, as witch hazel prefers slightly acidic to neutral soil with a pH between 6.0 and 7.0. You can purchase a DIY soil testing kit or send a sample to a lab for analysis.
If your soil is too alkaline or acidic, you’ll need to adjust it before planting. To lower the pH, add elemental sulfur or peat moss to the soil. To raise the pH, mix in some lime. It’s essential to make gradual adjustments, as sudden changes can harm the plant.
Once you’ve adjusted the pH, prepare the soil by loosening it with a fork or spade to a depth of about 12-18 inches. Remove any debris, rocks, and weeds that could compete with your witch hazel for water and nutrients. You can also add organic matter like compost or well-rotted manure to improve soil structure and fertility.
Finally, mix in a balanced fertilizer at the recommended rate according to the package instructions. This will provide your witch hazel with essential nutrients to support healthy growth. With these simple steps, you’ll be ready to plant your witch hazel and give it the best chance to thrive.
Planting and Care
To grow a thriving witch hazel, you’ll want to pay close attention to planting it in well-draining soil and watering it regularly throughout its first growing season.
Planting Witch Hazel from Seed or Nursery Stock
When planting witch hazel from either seeds or nursery stock, it’s essential to consider spacing and aftercare instructions to ensure a healthy start. If you’re using nursery stock, choose plants with at least two sets of leaves, as this indicates they are more robust and better equipped for transplanting.
Space your witch hazels between 6-8 feet apart in well-draining soil to prevent waterlogged conditions that can lead to root rot. When planting seeds, sow them about 1/4 inch deep directly into the ground in early spring or fall, as this allows them time to germinate before the heat of summer or cold of winter.
For both seedlings and nursery stock, water thoroughly after planting and maintain consistent moisture levels until established. Fertilize lightly during the first growing season, as witch hazels prefer well-drained soil with minimal nutrient addition. Keep your witch hazel plants away from extreme temperatures and provide them with partial shade during the hottest part of the day to prevent scorching.
Tips for Watering and Mulching
When it comes to watering and mulching your witch hazel plants, getting it right is crucial for their healthy growth. Over-watering can lead to root rot, while under-watering causes the leaves to turn yellow and drop off.
Water your witch hazels when the top inch of soil feels dry to the touch. This usually means once a week during the spring and summer months when they’re actively growing, but less often in autumn and winter when they’re dormant. To prevent overwatering, make sure not to water them too deeply – witch hazel roots are sensitive to excessive moisture.
Mulching around your witch hazels is also essential for maintaining soil health and preventing weeds from competing with the plants for nutrients. Use a thick layer of organic mulch like bark chips or pine straw, keeping it at least 3-4 inches away from the plant’s stem. This will help retain moisture in the soil, suppress weeds, and regulate soil temperature.
Remember to keep the mulch layer refreshed regularly to ensure its effectiveness – typically every few months during the growing season.
Fertilizing and Pruning
Now that you have your witch hazel planted, it’s time to think about fertilizing and pruning to keep your shrub healthy and thriving throughout its growing season. Regular care will also encourage plenty of blooms in years to come.
Understanding Witch Hazel’s Nutrient Needs
Witch hazel is a nutrient-hungry plant that requires regular fertilization to maintain its vibrant foliage and promote healthy growth. When selecting a fertilizer for your witch hazel, choose a balanced, water-soluble formula that contains equal amounts of nitrogen (N), phosphorus (P), and potassium (K). You can also opt for an organic fertilizer like fish emulsion or compost tea, which provide slow-release nutrients and beneficial microbes.
For best results, apply fertilizer in the spring when new growth begins to emerge. Follow the manufacturer’s instructions for application rates, but as a general rule, dilute the recommended concentration by half to avoid burning your plant’s roots. Repeat fertilization every 4-6 weeks during the growing season, providing an extra boost of nitrogen-rich fertilizer around bloom time to promote vibrant flowers.
Monitor your witch hazel’s response to fertilization, adjusting application rates and frequency as needed based on its growth rate and leaf color. Remember that over-fertilization can be detrimental to your plant’s health, so it’s better to err on the side of caution and start with a conservative approach.
When and How to Prune Your Witch Hazel Plant
Pruning is an essential part of maintaining a healthy and thriving witch hazel plant. It’s not just about cutting back branches to keep the plant looking neat; it also plays a crucial role in promoting healthy growth, encouraging flowering, and maintaining the desired shape.
When to Prune: The best time for pruning a witch hazel plant is immediately after it has finished blooming, typically in late winter or early spring. This allows you to assess the plant’s structure while the branches are still bare, making it easier to identify any dead, diseased, or damaged wood that needs removal.
Pruning Techniques: To maintain shape and promote healthy growth, remove about one-third of the previous year’s growth each year. Cut back branches to just above a leaf node, as this will encourage new growth from that point. For young plants, prune more heavily to control their height and width. When pruning for flowering, cut back individual branches to about two-thirds of their length after they have finished blooming.
Pruning shears or loppers are the best tools to use when cutting through thicker stems. Make clean cuts just above a node, at a 45-degree angle, and avoid tearing the bark. Regular pruning will not only keep your witch hazel looking its best but also encourage it to produce more vibrant flowers year after year.
Pest and Disease Management
To keep your witch hazel plants thriving, it’s essential to learn how to manage common pests and diseases that can damage their leaves and stems. We’ll cover prevention tips and treatment options in this section.
Common Pests and Diseases Affecting Witch Hazel
Witch hazel plants are susceptible to various pests and diseases that can damage their foliage, flowers, and overall health. Some common pests that affect witch hazel include aphids, spider mites, and scale insects. These tiny creatures feed on the plant’s sap, causing curled or distorted leaves, sticky honeydew droplets, and a white powdery coating.
Powdery mildew is another prevalent disease that infects witch hazel plants, particularly in warm and humid climates. It appears as a white or grayish powder on the leaves, stems, and flowers. Fungal diseases like root rot can also affect witch hazel, especially if the soil is waterlogged. To prevent these issues, ensure good air circulation around your plant, avoid overwatering, and maintain clean pruning tools to prevent the spread of fungal spores.
Regularly inspect your witch hazel for signs of pests or disease, and take action promptly if you notice any problems. Use neem oil or insecticidal soap to control aphids and spider mites, and treat powdery mildew with a fungicide specifically designed for outdoor use. By being aware of these potential issues and taking preventative measures, you can keep your witch hazel plant healthy and thriving.
Organic and Chemical Controls for Pest and Disease Management
When it comes to managing pests and diseases on your witch hazel plants, you have two primary options: organic and chemical controls. While chemical methods can provide quick relief from infestations, they also pose potential risks to the environment, human health, and the plants themselves.
Organic control methods, on the other hand, are generally safer and more sustainable in the long run. These include using neem oil, insecticidal soap, or garlic spray to deter pests like aphids, whiteflies, and spider mites. You can also use beneficial insects such as ladybugs and lacewings to prey on these pests.
Integrated Pest Management (IPM) strategies involve combining organic and chemical controls in a way that minimizes the use of chemicals. For example, you might use neem oil to repel pests initially, then switch to insecticidal soap for targeted treatments. Another approach is to adopt cultural practices like pruning diseased areas, improving air circulation, and maintaining good soil health.
To implement IPM on your witch hazel plants, start by monitoring them regularly for signs of infestation or disease. Identify the type of pest or disease you’re dealing with, then choose a combination of controls that will effectively manage the issue while minimizing harm to the environment and human health.
Harvesting Witch Hazel Leaves or Bark
When harvesting witch hazel, it’s essential to know when and how to gather leaves or bark without damaging the plant. You’ll want to follow specific guidelines to ensure a healthy harvest for medicinal purposes.
How to Identify Mature Witch Hazel Plants
When it comes to harvesting witch hazel leaves or bark, identifying mature plants is crucial for ensuring quality and sustainability. A mature witch hazel plant typically takes around 5-7 years to reach its full potential, so look for specimens that have reached this stage.
To identify a mature witch hazel plant, consider the following factors: age, size, and health. Mature plants will usually be between 3-6 feet tall, with a spread of around 4-8 feet. They should also have a well-established root system, evident from a sturdy trunk and a canopy that’s dense with leaves.
Check for signs of decay or disease, such as yellowing leaves, black spots, or soft patches on the bark. Avoid plants that appear stressed or struggling to thrive, as these may produce lower-quality harvests. Additionally, inspect the plant’s surroundings: mature witch hazel prefers well-drained soil and partial shade, so look for signs of suitable growing conditions.
When in doubt, it’s always best to consult with an experienced gardener or botanist who can assess the plant’s maturity and health. By taking the time to identify a mature witch hazel plant, you’ll ensure that your harvest is not only sustainable but also of the highest quality.
Techniques for Harvesting and Drying Witch Hazel Leaves or Bark
Harvesting witch hazel leaves and bark requires some skill and attention to detail. To avoid damaging the plant and ensure a high-quality harvest, follow these steps:
When harvesting leaves, choose ones that are at least 50% developed, as this will ensure they retain their potency. Select healthy leaves with no signs of disease or pests. Cut them from the stem using scissors or pruning shears, making sure not to damage the plant’s structure.
For bark harvests, wait until the winter months when the sap has slowed down, making it easier to remove the outer layer without harming the plant. Use a sharp knife or specialized tool to carefully scrape off the bark in long strips, working from the base of the stem upwards.
Once harvested, hang the leaves or bark in small bunches upside down in a warm, dry place with good air circulation to speed up drying. Alternatively, you can use a food dehydrator or your oven on its lowest setting to dry the materials quickly and evenly. Store the dried witch hazel in airtight containers, away from direct sunlight and moisture, to preserve its medicinal properties for later use.
Frequently Asked Questions
How do I determine the best time to plant witch hazel in my area?
The ideal time to plant witch hazel depends on your climate and region. In general, fall or early spring is considered the best time for planting, as the weather is cooler and there’s ample moisture in the soil. However, if you’re in a warmer climate, you can plant during the winter months. Be sure to check the specific growing conditions for your area and choose a time that works best for your witch hazel variety.
Can I grow witch hazel in containers or does it require deep root space?
Witch hazel can be grown in containers, but it prefers well-draining soil and full sun to partial shade. A large container with at least 12-18 inches of depth is recommended, as witch hazel has a deep taproot that requires ample room to grow.
How often should I water my newly planted witch hazel, especially during its first year?
During the first year after planting, it’s essential to keep the soil consistently moist but not waterlogged. Water your witch hazel every 2-3 days during hot summer months and reduce watering to once a week during cooler periods.
What are some common mistakes to avoid when growing witch hazel from seed?
When growing witch hazel from seed, be careful not to overwater or underwater the soil. Also, make sure to provide sufficient light, as witch hazel seeds require 12-14 hours of daylight to germinate properly.
Can I use regular garden fertilizer on my witch hazel plants, or do they require specialized fertilizers?
While regular garden fertilizer can be used on witch hazel plants, it’s essential to choose a balanced, water-soluble fertilizer that is low in phosphorus (e.g., 10-5-10 N-P-K). Witch hazel prefers acidic to neutral soil pH and requires regular feeding during the growing season.