If you’re looking to cultivate your own roses from scratch, growing rose seeds can be a rewarding experience. With patience and proper care, you’ll be able to grow healthy, thriving plants that bring beauty and fragrance to your garden. However, it’s not always easy – many beginners struggle with the process due to lack of knowledge or incorrect techniques.
In this article, we’ll guide you through every step of growing roses from seed, from preparation and sowing to transplanting and caring for established plants. We’ll share expert tips on overcoming common challenges such as low germination rates and weak seedlings, helping you achieve success in your rose-growing endeavors. By following our advice, you’ll be well on your way to cultivating stunning roses that will delight your senses for years to come.
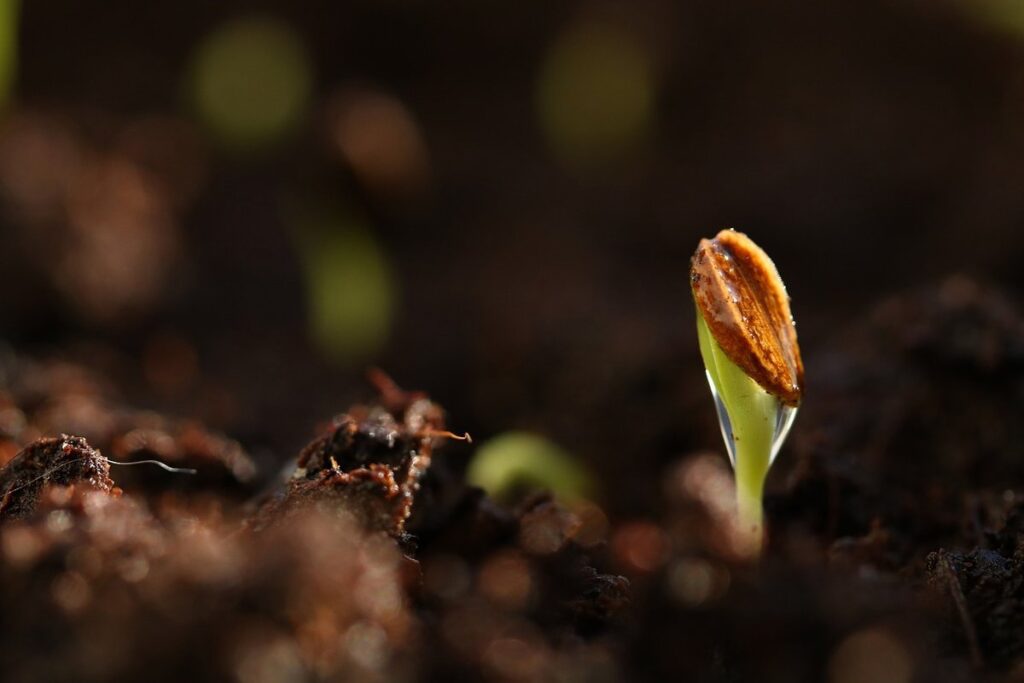
Preparing the Seedlings
To give your rose seedlings the best chance at success, it’s essential to prepare them properly for transplanting into larger pots or directly into the garden. Next, we’ll walk you through this crucial step in the process.
Choosing the Right Rose Variety
When growing rose seeds, it’s essential to choose a variety that thrives in your specific climate and growing conditions. With so many types of roses available, selecting the right one can be overwhelming. Let’s break down some popular varieties to help you make an informed decision.
Hybrid Tea roses are known for their large, repeat-flowering blooms and are often grown for cut flower arrangements. They require full sun, well-drained soil, and regular watering. Floribunda roses, on the other hand, produce clusters of smaller flowers and are more resistant to disease. They prefer similar growing conditions to Hybrid Teas but can tolerate a bit more shade.
Wild roses, also known as species roses, are a great option for gardeners who want to grow a truly native rose. They’re often compact, fragrant, and low-maintenance, making them perfect for smaller spaces or areas with poor soil. When choosing a variety, consider the temperature range in your area and select a rose that’s tolerant of extreme temperatures.
It’s also essential to check the specific growing requirements for each variety, such as sunlight, watering, and fertilization needs. This will help ensure your rose seedlings get off to a strong start and thrive in their new home. By selecting a suitable variety, you’ll be well on your way to enjoying beautiful blooms from your homegrown roses.
Sowing Rose Seeds Indoors
Sowing rose seeds indoors 6-8 weeks before the last frost date in your area is a crucial step in growing healthy seedlings. To do this successfully, you’ll need some basic materials such as seed trays, good quality potting soil, and grow lights. It’s essential to choose a seed tray that allows for proper drainage, as rose seeds are prone to rot if the soil is too moist.
To sow the seeds, place them about 1/8 inch deep in the soil and cover with a thin layer of soil. The ideal spacing for rose seeds is about 1-2 inches apart. Water gently but thoroughly after sowing, making sure not to overwater which can cause the seeds to rot.
It’s also crucial to provide adequate light for your seedlings. Use grow lights that are specifically designed for seed starting, and keep them about 6-8 inches above the seed tray. Keep the soil consistently moist during this period but avoid overwatering, as this can lead to fungal diseases.
Soil and Lighting Requirements
To successfully grow rose seeds, it’s essential that you provide them with a suitable environment, which starts with selecting the right soil and adequate lighting conditions. This is where things can get tricky for beginners.
Creating a Well-Draining Seedling Mix
When it comes to growing rose seeds, providing them with a well-draining seedling mix is crucial to prevent waterlogged soil and root rot. Waterlogged soil can be detrimental to young seedlings as it can cause the roots to suffocate, leading to their demise. A well-draining seedling mix ensures that excess water drains out quickly, preventing the seeds from being constantly saturated.
To make your own seedling mix, combine a blend of peat moss or coconut coir with perlite or vermiculite in a 2:1 ratio. This mixture allows for excellent drainage while retaining moisture. You can also add some dolomitic limestone to provide essential nutrients and adjust the pH level. If you prefer to purchase a seedling mix, look for one specifically designed for seedlings, as it will already contain the necessary ingredients.
It’s worth noting that using tap water may not be ideal for seedlings, as it often contains high levels of chloride and other minerals that can harm young roots. Consider using filtered or rainwater instead to give your rose seeds the best chance at thriving.
Providing Adequate Light for Seedlings
When it comes to growing rose seeds, providing adequate light is crucial for their development. Rose seedlings require bright, indirect light to undergo photosynthesis and grow strong roots. Direct sunlight can be too intense, causing the delicate leaves to scorch or become discolored.
If you’re unable to provide a south-facing window with filtered light, consider using grow lights. These artificial sources of light can supplement natural light and ensure your seedlings receive the necessary illumination. When choosing grow lights, opt for ones that emit a balanced spectrum, including blue, red, and green light.
To create an optimal growing environment, place your rose seedlings 6-8 inches away from the grow lights. This distance allows for intense light without causing damage to the leaves. Monitor your seedlings’ response to the lighting conditions and adjust the placement or intensity of the grow lights as needed. By providing bright, indirect light or using grow lights in low-light conditions, you’ll be giving your rose seedlings the best chance to thrive and develop into healthy plants.
Transplanting Seedlings Outdoors
Once you’ve got some healthy seedling growth going, it’s time to move them outside into their permanent home where they can thrive in our great outdoors. This section will walk you through that process step by step.
Hardening Off Seedlings
Before transplanting rose seedlings outdoors, it’s essential to harden them off. This process gradually exposes the seedlings to outdoor conditions, reducing transplant shock and promoting healthy root growth. Start by moving the seedlings to a shaded area outdoors for 1-2 hours a day, increasing the duration by 1-2 hours every few days. Be cautious not to expose them to direct sunlight during this period.
As you harden off your rose seedlings, keep in mind that they’ll need time to adjust to wind, temperature fluctuations, and increased light intensity. To minimize transplant shock, avoid watering them immediately before transferring them outdoors. Instead, water them well the night before or early morning to prevent scorching their roots during the transition.
During the hardening off process, monitor your seedlings for signs of stress, such as yellowing leaves or droopy stems. If you notice any issues, reduce the amount of time they spend outdoors and gradually increase it again once they’ve recovered. By following this step-by-step approach to hardening off, you’ll give your rose seedlings a strong foundation for successful outdoor growth.
Choosing a Suitable Location for Your Rose Bed
When transplanting seedlings outdoors, choosing a suitable location for your rose bed is crucial for their growth and success. As you begin to think about where to plant your rose seeds, consider the factors that will impact their health and productivity.
First and foremost, sunlight is essential for roses. They need at least 6 hours of direct sunlight per day to thrive, so choose a location that receives plenty of morning sun or afternoon sun. However, be mindful of extreme heat and intense sunlight during peak summer months, which can cause scorching and damage to the delicate petals.
Soil quality is another critical factor to consider when selecting a location for your rose bed. Roses prefer well-draining soil with a pH between 6.0 and 7.0. If your soil lacks these characteristics, you may need to amend it before planting.
Wind protection is also essential for roses, as strong gusts can damage the delicate blooms and disrupt growth. Consider planting your rose bed near a fence or wall that provides some shelter from the wind. With careful consideration of these factors, you’ll be well on your way to creating an ideal environment for your rose seeds to flourish.
Caring for Established Roses
Once you’ve successfully grown a new rose from seed, it’s time to focus on caring for your established blooms. Learn how to keep them healthy and thriving in this next step.
Watering and Fertilizing Established Roses
Proper watering and fertilization are crucial for the continued health and vigor of established roses. When it comes to determining water needs, weather conditions play a significant role. Check the soil moisture by inserting your finger into the soil up to the knuckle; if it feels dry, it’s time to water. Aim to provide about 1 inch of water per week through either rainfall or irrigation.
In hot and dry spells, roses may require more frequent watering, while in cooler months, they can tolerate drought conditions. Be mindful of overwatering, which can lead to root rot and other issues. Fertilization is also essential for optimal growth. A balanced fertilizer containing nitrogen, phosphorus, and potassium should be applied once a month during the growing season.
Consider using organic fertilizers like compost or manure tea for a more natural approach. Be sure to follow the manufacturer’s instructions for application rates and timing. Additionally, consider pruning your roses after fertilizing to promote new growth and encourage bushy development.
Pruning and Training Roses
When it comes to established roses, pruning and training are essential tasks that not only promote healthy growth but also encourage blooming. Pruning is the process of cutting back branches to control the plant’s size, shape, and direction, as well as remove diseased or damaged areas.
The purpose of pruning is multifaceted: it stimulates new growth, promotes air circulation to prevent disease, and encourages flower production. Techniques for shaping and rejuvenating plants include:
• Removing dead, diseased, or damaged branches
• Cutting back canes to about 12-18 inches from the ground to encourage bushy growth
• Thinning out stems to allow more sunlight to reach inner buds
To prune your roses effectively, you’ll need a few basic tools: sharp pruning shears (or loppers for thicker branches), gloves to protect your hands, and a pair of clean garden scissors. When cutting, make the incision at a 45-degree angle just above a bud eye (the small swelling on the stem from which new growth emerges). This helps direct new growth in the desired direction. Prune in late winter or early spring before new growth begins.
Common Problems and Solutions
Growing rose seeds can be a bit tricky, so let’s address some common issues that may arise and explore practical solutions to overcome them.
Dealing with Pests and Diseases
Growing rose seeds can be a rewarding experience, but it’s not without its challenges. One of the most common issues you’ll face is dealing with pests and diseases that can quickly ruin your plants. As a rose grower, it’s essential to be aware of the common culprits that affect rose seedlings and established roses.
Aphids, whiteflies, and mealybugs are some of the most notorious pests that target rose seedlings. These tiny insects feed on sap, causing curled or distorted leaves, stunted growth, and reduced flowering. To prevent infestations, use neem oil or insecticidal soap to coat your plants regularly. Inspect your seedlings daily for signs of pests and treat promptly if you spot any.
Diseases like powdery mildew, black spot, and root rot can also devastate your rose collection. These fungal infections often spread through overhead watering, humid environments, or contaminated soil. To prevent disease outbreaks, water at the base of your plants, remove infected leaves, and maintain good air circulation around your roses. Regularly inspect your plants for signs of infection, such as yellowing leaves, black spots, or soft, mushy stems.
When treating infestations or infections, use fungicides or insecticides specifically labeled for rose care. Always follow the instructions carefully to avoid harming your plants further.
Troubleshooting Seedling Issues
Growing rose seeds from scratch can be a rewarding experience, but it’s not without its challenges. One common issue you may encounter is poor germination rates. This could be due to factors such as old or low-quality seeds, inadequate moisture levels, or insufficient warmth.
To overcome this problem, ensure that your seeds are fresh and of good quality. Store them in a cool, dry place until you’re ready to sow them. Provide the right amount of moisture by keeping the soil consistently damp but not waterlogged. Maintain a temperature between 65-75°F (18-24°C) for optimal germination.
Weak seedlings can also be a problem if they don’t receive enough light or nutrients. Make sure your rose seedlings are getting at least 4-6 hours of direct sunlight per day, and consider supplementing with a balanced fertilizer. Transplant them into larger pots once they have 2 sets of true leaves to give them more room to grow.
Regularly inspect your seedlings for signs of pests or diseases such as aphids, whiteflies, or powdery mildew. Take action promptly if you notice any issues to prevent further damage and ensure a healthy start to your rose plants.
Conclusion
As you’ve successfully sowed your rose seeds and watched them grow into beautiful plants, it’s essential to remember that patience is key. Many people get discouraged when their seedlings don’t bloom right away, but with proper care and attention, they will eventually produce stunning roses. Don’t forget to provide your young plants with sufficient sunlight, water, and nutrients to support healthy growth.
Keep in mind that rose seeds can be quite finicky, so it’s crucial to monitor their progress closely and adjust your care routine as needed. For instance, if you notice any signs of pests or diseases, take action promptly to prevent the issue from spreading. With these simple tips and a bit of TLC, you’ll be enjoying gorgeous roses in no time. By following our step-by-step guide, you’ve set yourself up for success – now it’s just a matter of waiting for your hard work to pay off.
Frequently Asked Questions
How long does it take for rose seedlings to mature?
Rose seedlings typically take around 6-12 months to mature, but this can vary depending on factors like climate, soil quality, and the specific rose variety you’re growing. It’s essential to be patient and not rush the process, as premature transplanting or exposure to harsh weather conditions can harm your plants.
What are some common mistakes beginners make when growing roses from seed?
One common mistake is overwatering, which can lead to root rot and other problems. Another error is choosing rose varieties that aren’t suitable for your climate, resulting in poor germination rates or weak seedlings. Regularly monitoring soil moisture, providing adequate light, and selecting the right rose variety will help you avoid these pitfalls.
How do I know when my rose seedlings are ready to be transplanted outdoors?
Look for signs like sturdy stem growth, robust leaf development, and a well-established root system. Typically, this occurs around 4-6 weeks after germination, but it’s crucial to harden off your seedlings gradually before exposing them to direct sunlight and harsh weather conditions.
Can I grow roses from seed in containers, or do they require a specific soil type?
While rose seeds can be grown in containers, it’s essential to use a well-draining mix specifically designed for seed starting. Avoid using regular potting soil, as this can lead to waterlogged conditions and root rot. Also, ensure your container has sufficient drainage holes to prevent water from accumulating.
What are some signs of healthy rose growth after transplanting outdoors?
Healthy rose plants will display vigorous stem growth, plenty of new leaves, and an abundance of blooms throughout the growing season. Keep an eye out for signs like yellowing leaves, weak stems, or reduced flowering, which can indicate issues with watering, fertilization, or pest/disease management.