Growing your own potatoes can be a fun and rewarding experience, but have you ever considered taking it to the next level by trying your hand at growing them in a bucket? Not only does this space-saving method allow you to cultivate multiple plants in a small area, but it’s also perfect for urban gardeners or those with limited outdoor space. In this article, we’ll share expert tips on how to successfully grow potatoes in a bucket, from selecting the right variety and tools to harvesting your fresh crop. We’ll cover everything from soil selection and watering to fertilizing and pest management, so you can enjoy a bountiful harvest of delicious homegrown potatoes. Whether you’re a seasoned gardener or just starting out, we’ve got you covered!
Choosing the Right Variety and Tools
Now that you’ve decided on growing potatoes in a bucket, let’s dive into selecting the right variety for your climate and choosing the essential tools needed to get started.
Selecting the Perfect Potato Variety for Your Climate
When selecting a potato variety for growing in a bucket, it’s essential to consider your region’s climate. Different types of potatoes thrive in various conditions, and choosing the right one can make all the difference between a bountiful harvest and a disappointing crop.
There are over 4,000 known potato varieties worldwide, but not all will perform well in every climate. For instance, ‘Russet’ and ‘Yukon Gold’ potatoes prefer cooler temperatures and well-drained soil, making them ideal for temperate climates with moderate summers. On the other hand, ‘New Potatoes’ and ‘French Fingerlings’ are more heat-tolerant and suited to warmer regions.
To choose the right variety, research the specific growing conditions in your area. Check the average temperature, precipitation levels, and sunlight hours in your region. Then, match these conditions with a potato variety that’s known to thrive in similar environments. For example, if you live in an area with hot summers and mild winters, ‘New Potatoes’ might be an excellent choice.
Essential Tools for Growing Potatoes in Containers
To grow potatoes in a bucket successfully, you’ll need some essential tools and equipment. First and foremost, you’ll need a container that’s at least 12-14 inches deep to allow for proper root growth. A food-grade plastic or metal bucket with drainage holes is ideal.
Next, you’ll need good quality seed potatoes. You can purchase these from a garden center or online supplier. Make sure they’re suitable for container growing and the right variety for your climate.
Soil is another crucial element. Use a well-draining potting mix specifically designed for root vegetables. A balanced fertilizer will also help promote healthy growth. Consider using an organic option to avoid burning your potatoes’ roots.
Don’t forget about irrigation! You’ll need a watering can or a hose with a fine spray nozzle to keep the soil consistently moist during the growing season. A moisture meter can also be helpful in monitoring the soil’s water levels.
Preparing Your Bucket: Soil and Container Selection
To successfully grow potatoes in a bucket, you’ll need to choose a container that’s specifically designed for root vegetables and select the right type of soil to ensure optimal growth.
The Importance of Good Drainage in Potato Buckets
Good drainage is crucial when growing potatoes in a bucket. If water accumulates in the container, it can lead to rot and spoilage of the tubers, as well as root disease. To ensure proper drainage, you’ll want to add a layer of small rocks or broken pottery at the bottom of your bucket before adding soil.
This will allow excess water to flow out freely, preventing saturation of the soil. You can also consider using a self-watering planter or a pot with built-in drainage holes. Make sure the bucket is placed on a tray or saucer to catch any overflow and prevent damage to surfaces.
The ideal ratio for soil to compost in your potato bucket is 2:1, but keep in mind that you’ll want to adjust this depending on the specific needs of your plants. A mix of topsoil, compost, and perlite will help with drainage while retaining moisture.
By prioritizing good drainage, you can minimize the risk of common problems like rot and disease, giving your potato crop a healthier start from day one.
Selecting the Right Potting Mix for Your Potatoes
When selecting a potting mix for growing potatoes in a bucket, it’s essential to consider its composition, pH level, and nutrient content. A good quality potting mix should be well-balanced and specifically designed for container gardens. Look for a mix that contains a combination of peat moss, vermiculite, or perlite, as these components will help retain moisture, improve drainage, and provide structure to the soil.
Ideally, the pH level of your potting mix should be slightly acidic to neutral, ranging from 6.0 to 7.0. This will ensure that the potatoes grow healthily and avoid common issues like scab or other nutrient deficiencies. As for nutrient content, a balanced fertilizer with equal amounts of nitrogen (N), phosphorus (P), and potassium (K) is suitable for potato growth.
When choosing your potting mix, also consider factors such as water retention capacity, aeration, and resistance to compaction. A mix that holds moisture but doesn’t become waterlogged will be ideal for potatoes’ needs.
Container Options: Choosing Between Plastic and Wooden Buckets
When it comes to growing potatoes in a bucket, one of the most important decisions you’ll make is choosing between plastic and wooden buckets. Both types have their advantages and disadvantages that can impact the health and yield of your potato crop.
Plastic buckets are a popular choice for growing potatoes because they’re lightweight, easy to clean, and often inexpensive. They also retain moisture well, which can help reduce soil drying out during hot weather. However, plastic buckets can harbor diseases and pests if not sanitized properly, and their chemical makeup may leach into the soil.
Wooden buckets, on the other hand, are a great choice for gardeners who prefer an eco-friendly option. They’re biodegradable, non-toxic, and can even help improve soil health over time as they break down. However, wooden buckets can be more expensive than plastic ones, and they may require additional maintenance to prevent rotting.
Ultimately, the decision between a plastic or wooden bucket comes down to your personal preference and gardening needs. If you’re looking for an easy, low-maintenance option, plastic might be the way to go. But if you prioritize sustainability and are willing to do some extra upkeep, a wooden bucket could be a great choice for growing potatoes in your backyard.
Planting Your Potato Seeds or Tubers
Start by planting 2-3 seed potatoes or tubers, making sure each one has at least two ‘eyes’ facing upwards to encourage new growth. Cut a hole in the bucket’s bottom for drainage.
How to Prepare Your Seedlings or Tubers for Planting
When preparing your seed potatoes or tubers for planting, it’s essential to follow some specific steps. First, choose healthy seed potatoes with at least one ‘eye’ each. Avoid using sprouted potatoes from the grocery store as they may be treated with growth inhibitors.
To enhance germination and reduce disease risk, you can treat your seed potatoes with a fungicide specifically designed for seed potatoes. Follow the product’s instructions for application and safety precautions. Another option is to soak the seed potatoes in water for 24-48 hours to help them sprout before planting.
Once treated or soaked, gently scrub the seed potatoes with a soft-bristled brush under cold running water to remove any dirt or debris. Allow the seed potatoes to air dry for about an hour, ensuring they’re not too wet when planted. This will help prevent rot and ensure successful establishment in your bucket garden.
Make sure to handle your seed potatoes carefully to avoid damaging their eyes or causing them to crack, as this can lead to reduced yields or plant failures. By following these preparation steps, you’ll be well on your way to growing healthy potato plants in your bucket.
The Best Time to Plant Potatoes in a Bucket: Seasonal Considerations
When it comes to planting potatoes in a bucket, timing is everything. The ideal time to plant will depend on your region’s climate and weather conditions. In general, spring and fall are the best times to plant potatoes, as they allow for optimal growth without extreme temperatures.
In temperate climates with mild winters, such as those found in USDA zones 4-8, you can plant potatoes in early spring as soon as the soil can be worked. This is usually around late March or early April, when the soil has warmed up to at least 40°F (4°C). If you live in a cooler climate, consider planting in mid-to-late summer for a fall harvest.
In regions with hot summers, such as USDA zones 9-11, it’s best to plant potatoes in late winter or early spring. This allows the tubers to mature before the heat sets in and reduces the risk of disease.
Before planting, check your local frost dates to ensure you’re not planting too early. You can also consult with your local nursery or gardening extension for more specific advice on planting times in your area.
Caring for Your Potato Plants
Now that your potato plants are growing, it’s essential to provide them with proper care to prevent disease and promote healthy growth, including regular watering and monitoring for pests.
Watering and Irrigation Strategies for Healthy Growth
When it comes to watering and irrigation for your potato plants growing in a bucket, getting it just right can be a challenge. But don’t worry, with these simple strategies, you’ll be well on your way to healthy growth.
To start, water your potatoes when the top inch of soil feels dry to the touch. This is usually every 2-3 days during the first few weeks after planting, and more frequently as they grow. The key is to make sure the soil isn’t too wet or too dry – either can be detrimental to your spuds.
To monitor soil moisture, use your finger to check the soil daily, or invest in a moisture meter for a more accurate reading. You can also observe your plants’ behavior: if the leaves are droopy, it’s likely due to insufficient water, while wilting leaves may indicate overwatering.
Aim to provide about 1-2 inches of water per week, either from rain or irrigation. For small buckets like ours, this means watering thoroughly once a day during hot weather and every other day in cooler conditions. Remember, consistency is key – stick to your routine, and your potatoes will reward you with healthy growth and bountiful harvests!
Fertilizing Your Potatoes: Timing and Amounts
Fertilizing your potato plants at the right time and with the correct amount of fertilizer is crucial for their growth and productivity. As potatoes are heavy feeders, they require a significant amount of nutrients to produce a bountiful harvest.
To determine the right type of fertilizer, consider using a balanced fertilizer that contains nitrogen (N), phosphorus (P), and potassium (K) in equal proportions. You can also use an organic fertilizer like compost or well-rotted manure as it provides essential micronutrients and improves soil structure.
The ideal time to fertilize your potato plants is when the plants are around 6-8 inches tall, which is usually about two weeks after they have started growing. Apply a balanced fertilizer at this stage, following the manufacturer’s instructions for the correct amount to apply. As a general rule of thumb, mix 1-2 tablespoons of fertilizer into the soil per bucket.
It’s essential to avoid over-fertilizing your potato plants as it can lead to weak and spindly growth. Instead, focus on providing them with regular waterings and maintain good drainage to promote healthy root development.
Troubleshooting Common Issues
We’ve covered the basics of growing potatoes in a bucket, but now it’s time to tackle some common issues you might encounter along the way. Let’s troubleshoot together and get your potato crop back on track!
Dealing with Pests and Diseases in Your Potato Bucket
One of the most frustrating aspects of growing potatoes in a bucket is dealing with pests and diseases. These unwanted visitors can quickly spread and destroy your entire crop, leaving you feeling defeated and discouraged.
First, let’s identify some common pests that target potato plants. Aphids, whiteflies, and spider mites are often found on potato leaves, while slugs and snails love to feast on the tubers themselves. To prevent infestations, make sure to keep your bucket clean and free of debris, and inspect your plants regularly for signs of pests.
Common diseases that affect potatoes include powdery scab, blackleg, and late blight. These can be caused by poor soil quality, inadequate light, or excessive moisture. To prevent disease, ensure good air circulation around the bucket, avoid overwatering, and use a balanced fertilizer to promote healthy plant growth.
If you do encounter pests or diseases, don’t panic! Here are some simple treatment options: for aphids and whiteflies, try spraying with soapy water; for slugs and snails, set traps using crushed eggshells or copper tape. For diseases, remove affected areas, improve air circulation, and apply a fungicide specifically designed for potatoes.
Some additional tips to keep in mind: avoid planting potatoes in areas with poor drainage, as this can lead to root rot and other issues. Keep your bucket at least 6 inches off the ground to reduce slug and snail damage. By being proactive and taking these simple precautions, you’ll be well on your way to growing a healthy, pest- and disease-free crop of delicious potatoes in your bucket!
Overcoming Challenges Like Limited Space or Poor Weather
When growing potatoes in a bucket, you’re likely to encounter challenges like limited space or poor weather. Don’t let these obstacles discourage you from achieving success with your harvest. One way to overcome limited space is to use a tiered bucket system, where each level is dedicated to a specific stage of potato growth.
For example, the top level can be used for seed potatoes, while the middle and bottom levels are for foliage and tuber development respectively. This system not only maximizes space but also reduces the risk of disease spread.
In areas with poor weather, focus on providing protection for your potato plants. Use a breathable cloth or mesh to cover the bucket and weigh it down with rocks to prevent wind damage. You can also bring potted potatoes under a shaded area during extreme heatwaves. Regularly check the soil moisture levels and adjust watering schedules accordingly.
Additionally, choose disease-resistant seed potato varieties that are less susceptible to common diseases such as late blight or scab.
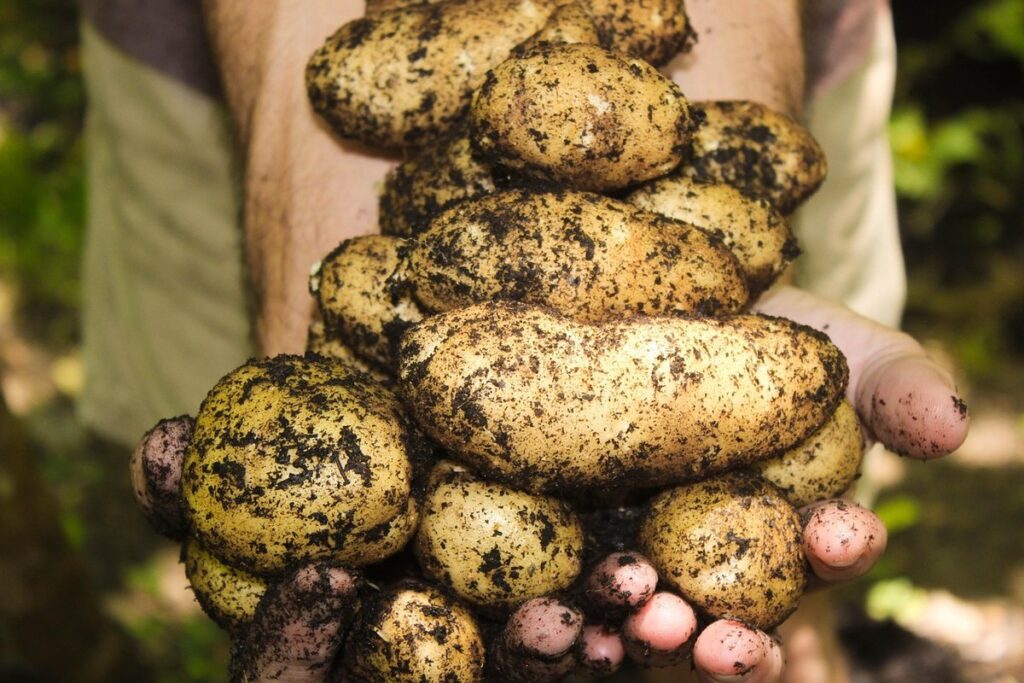
Harvesting Your Potatoes
Now that your potatoes have matured, it’s time to dig them up – but how do you know when they’re ready? Learn the signs of a ripe potato harvest.
Timing Your Harvest: Signs of Readiness and Expectations
When it comes time to harvest your bucket-grown potatoes, timing is everything. You’ll want to check for signs of readiness before digging in, as over- or under-harvesting can impact the quality and yield of your crop.
Start by gently digging around the plants with a fork, being careful not to damage the tubers. Check the size: mature potatoes should be at least 1-2 inches in diameter, but don’t wait too long – larger ones can become unpalatable if left in the ground for too long. Color is also an indicator; look for a dull, rough skin that’s less reflective than when the potatoes were younger.
As you dig, pay attention to texture: mature tubers will be firm and slightly yielding to pressure. If they’re soft or mushy, it may be a sign that they’ve begun to rot. Finally, check the plants themselves – if the tops are beginning to yellow or die back, it’s likely time to harvest before further decay sets in.
Keep in mind that bucket-grown potatoes can mature more quickly than those grown in the ground due to their warmer soil temperature. Harvesting at the right moment will ensure you get the best flavor and texture out of your crop.
Tips for Harvesting and Storing Your Fresh Potatoes
When it’s time to harvest your potatoes, carefully remove the bucket from its location and gently wash away some of the soil to inspect the tubers. Use a fork to gently loosen the spuds without damaging them. For smaller varieties, you can simply lift the bucket and let the potatoes fall into a container or tray.
For larger varieties, you may need to dig around the edges with your fork to carefully release the tubers from the surrounding soil mass. As you harvest, make sure not to pull too hard on the stems as this can cause damage to the remaining tubers below.
Once harvested, let the potatoes air dry for a day or two in a cool place to help form a protective layer of skin. This will also allow any excess moisture to evaporate, reducing the risk of rotting. Store them in a dark place at a consistent temperature between 40-50°F (4-10°C) with good ventilation. Avoid storing potatoes near fruits and vegetables that release ethylene gas, such as apples and bananas, as this can cause them to spoil more quickly.
Conclusion and Next Steps
Now that you’ve successfully grown potatoes in your bucket, it’s time to enjoy the fruits of your labor. Harvesting is usually done when the plants start to yellow and die back, which indicates that the tubers are mature. To avoid damaging the tubers, carefully dig around the base of the plant with a fork, being careful not to puncture any of the spuds. Gently lift the bucket out of its container or bag, taking care not to disturb the soil.
You can now transfer your harvested potatoes to a cool, dark place like a pantry or cellar to store them for several months. Make sure they’re kept dry and away from direct sunlight. With proper storage, you should be able to enjoy your homegrown potatoes throughout the year. Consider experimenting with different potato varieties next season to expand your repertoire of flavors and textures.
Frequently Asked Questions
Can I use a self-watering bucket to grow potatoes?
Yes, self-watering buckets can be an excellent choice for growing potatoes, as they provide consistent moisture levels and reduce the need for frequent watering. This feature is particularly beneficial during periods of drought or when you’re away from your garden.
How often should I inspect my potato plants for signs of pests or diseases?
Regular inspection is crucial to prevent pest and disease issues in your potato bucket. Check your plants at least once a week, looking for signs of aphids, whiteflies, or powdery mildew. Take prompt action by applying organic pest control methods or fungicides if necessary.
What’s the ideal depth for my potato bucket, considering the variety I’ve chosen?
The ideal depth will depend on the specific potato variety you’re growing and its growth habits. Generally, a 12-18 inch deep bucket is suitable for most varieties, but some compact varieties can thrive in as little as 6-8 inches of soil.
Can I reuse my potato bucket for multiple harvests?
Yes, with proper care, your potato bucket can be reused multiple times. After each harvest, disinfect the container with a solution of bleach and water to prevent disease buildup. Replace the potting mix completely, and ensure good drainage is maintained for the next planting cycle.
How do I handle limited space in my urban garden while growing potatoes in a bucket?
To maximize space efficiency when growing potatoes in a bucket, consider using vertical or stackable containers. You can also choose compact or dwarf potato varieties that require less space to grow. Make sure to provide adequate sunlight and air circulation for optimal growth in your specific conditions.