Growing your own poppies from seed can be a truly rewarding experience, but it requires some finesse. With so many varieties to choose from, selecting the right type of poppy for your garden can be overwhelming. From delicate Himalayan poppies to vibrant California poppies, each has its unique characteristics and needs. But with the right guidance, you’ll be well on your way to successfully growing these stunning flowers from seed.
In this article, we’ll take a step-by-step approach to help you grow poppies from seed, covering everything from choosing the perfect variety to harvesting seeds for future planting. We’ll also share tips on encouraging healthy growth and promoting those beautiful blooms that make poppy gardening so special. Whether you’re a seasoned gardener or just starting out, our expert advice will have you growing gorgeous poppies in no time.
Understanding Poppy Seeds and Their Requirements
To grow poppies successfully from seed, it’s essential to understand their specific needs, including temperature, light, and soil requirements that will help them thrive. Let’s dive into these crucial details next.
Choosing the Right Variety
When it comes to growing poppies from seed, choosing the right variety is crucial for success. With over 100 species and countless hybrids, selecting a suitable type can be overwhelming. Start by considering the specific characteristics you need: bloom time, flower color, plant size, and hardiness zone. Some popular varieties include ‘Shirley Hughes’, a classic English poppy with vibrant red flowers, and ‘Papaver paeoniflorum’, a delicate pink or white variety.
When selecting fresh seeds, ensure they are less than two years old for optimal germination rates. You can purchase seeds from reputable suppliers, such as seed banks or online retailers specializing in heirloom varieties. Keep in mind that some poppy species are sterile and won’t produce viable seeds, so choose carefully if you plan to harvest your own seeds.
Consider your climate and growing conditions when choosing a variety. Some poppies thrive in full sun, while others prefer partial shade. Also, be aware of the mature plant size to ensure enough space for growth. By taking these factors into account, you can select a suitable variety that will flourish under your care.
Preparing the Soil
When it comes to growing poppy from seed, having well-prepared soil is essential for their success. Poppy seeds thrive in a slightly alkaline environment with a pH range of 7-8. If you’re unsure about the pH level of your soil, you can purchase a DIY soil testing kit or send a sample to a lab for analysis.
Before planting poppy seeds, it’s crucial to assess your soil’s nutrient levels. Poppy plants require a balanced diet of nitrogen, phosphorus, and potassium (NPK) – 10-10-10 is an ideal ratio. You can use a fertilizer with this NPK ratio or add compost to enrich the soil naturally.
To prepare your soil for poppy growth, start by loosening it to a depth of about 8-10 inches. This will allow the seeds to germinate and develop their root system easily. Next, mix in some organic matter like well-rotted manure or compost to improve drainage and fertility. Finally, rake the soil gently to create a smooth surface for sowing poppy seeds.
Sowing Poppy Seeds: Tips and Techniques
When sowing poppy seeds, it’s essential to prepare your soil properly and choose the right time of year for planting. Let’s dive into the specifics of sowing poppy seeds like a pro!
Correct Sowing Depth and Spacing
When sowing poppy seeds, it’s essential to get the depth and spacing just right. The optimal sowing depth for poppy seeds varies between 1/8 inch (3-4 mm) to 1/4 inch (6-8 mm), depending on the specific variety. For most types of poppies, a good starting point is to sow them about 1/8 inch deep.
As for spacing, poppies need room to grow and spread out their delicate petals. A general rule of thumb is to plant seeds 12-18 inches (30-45 cm) apart in a single row, or 6-9 inches (15-22.5 cm) apart if planting multiple rows close together. However, some varieties like the Shirley Poppy require more space and should be planted 24-36 inches (60-90 cm) apart.
When planting, make sure to firm the soil gently but firmly over the seeds to ensure good contact. This will help prevent washing away and promote even germination. Remember that poppies can grow quite tall, so allow enough space between plants for mature growth without overcrowding. By following these guidelines, you’ll set your poppy seedlings up for success from the start.
Sowing Methods: Direct Sowing vs. Indoor Start
When it comes to sowing poppy seeds, you have two main options: direct sowing outdoors and starting seeds indoors. Both methods have their pros and cons, and the right choice for you will depend on your specific climate, schedule, and preferences.
Direct sowing is a simple and low-maintenance approach that involves scattering seeds directly into the garden bed in late spring or early summer, when the soil has warmed up to at least 60°F (15°C). This method allows poppy plants to establish themselves in their natural environment, which can lead to stronger, more robust growth. However, direct sowing is also more susceptible to weather extremes and pests.
Starting seeds indoors involves germinating seeds in pots or seed trays several weeks before the last frost date in your area. This method gives young seedlings a head start on the growing season and allows you to control factors like temperature and light exposure. Indoor starting requires more equipment and attention, but it can be especially useful for gardeners living in cooler climates where outdoor planting may not be possible until late spring. If you do choose to start seeds indoors, be sure to harden off your seedlings before transplanting them outside.
Some poppy varieties are better suited to direct sowing than others. For example, Oriental poppies (Papaver orientale) and Shirley poppies (Papaver rhoeas) tend to do well with direct sowing in zones 4-8. On the other hand, California poppies (Eschscholzia californica) and Himalayan meconopsis (Meconopsis betonicifolia) typically require indoor starting due to their sensitive seeds.
To determine whether you should sow poppy seeds directly into the garden or start them indoors, consider your specific climate and growing conditions. If you have a long growing season with warm temperatures, direct sowing might be the way to go. But if you live in an area with cooler springs or limited outdoor planting time, starting seeds indoors will give your poppies a much-needed boost.
Providing Optimal Growing Conditions
To grow poppy from seed successfully, you’ll want to focus on providing optimal growing conditions, including light, temperature, and soil requirements. Let’s dive into the details of what your poppies need to thrive.
Light and Temperature Requirements
When it comes to providing optimal growing conditions for poppies, light and temperature play crucial roles. Poppies require full sun to partial shade, depending on the climate and region you’re growing in.
In areas with mild winters and cool summers, such as the Northern Hemisphere, poppies can thrive in full sun (at least 6 hours of direct sunlight) and temperatures between 65°F to 75°F (18°C to 24°C). However, in warmer climates like the Southern Hemisphere, partial shade is recommended to prevent scorching. In regions with extremely cold winters or hot summers, it’s essential to provide protection from extreme temperatures.
In general, poppies prefer well-draining soil and can tolerate some drought but will perform better with consistent moisture. Aim for a temperature range between 70°F to 80°F (21°C to 27°C) during the day and no lower than 55°F (13°C) at night. By providing the right balance of light and temperature, you’ll be well on your way to growing healthy and vibrant poppies from seed.
Watering and Humidity Needs
When growing poppies from seed, it’s essential to get their watering and humidity needs just right. Poppies are drought-tolerant plants but require consistent moisture levels, especially during the germination period. Water your poppy seeds about 1/4 inch deep once a day for the first week after sowing. As the seedlings develop, reduce watering to once or twice a week, depending on weather conditions.
To prevent overwatering, check the soil moisture by inserting your finger into the soil up to the knuckle. If it feels dry, it’s time to water. Avoid getting water on the leaves or crown of the plant to prevent fungal diseases. A humid environment can also encourage healthy growth in poppies. Aim for a relative humidity level between 40% and 60%. You can achieve this by placing the pot on a tray filled with water and pebbles or using a humidifier nearby.
Monitor your plants’ response to these conditions, and adjust accordingly.
Common Challenges and Solutions
Growing poppies from seed can be a bit tricky, so let’s tackle some of the common challenges you may face along the way and find practical solutions. We’ll address the issues that might hold you back.
Dealing with Pests and Diseases
As you carefully tend to your poppy plants, it’s essential to stay vigilant for signs of pests and diseases that can damage your delicate flowers. Poppies are susceptible to several common issues, including aphids, powdery mildew, and root rot.
Aphids, tiny sap-sucking insects, can be identified by their white, cottony residue on the leaves or stems. To control infestations, use neem oil or insecticidal soap as a natural pesticide. Mix the solution according to the label instructions and spray it thoroughly, making sure to cover all areas where aphids may be hiding.
Powdery mildew, a fungal disease that appears as white, powdery patches on leaves, can be treated with baking soda-based solutions or sulfur-based fungicides. Regularly inspect your plants for early signs of the disease and remove any infected foliage to prevent its spread.
Root rot, often caused by overwatering or poor drainage, can be prevented by ensuring good air circulation around your plants and avoiding waterlogged soil conditions. If you notice yellowing leaves or a soft, mushy stem, it may be too late to save the plant. In such cases, remove the affected roots to prevent the disease from spreading to other parts of the plant.
To prevent these issues from arising in the first place, maintain good hygiene by removing weeds and debris around your poppy plants. This will reduce the risk of pests and diseases spreading to your flowers. Regularly inspect your plants for early signs of problems, and take action promptly to prevent damage from occurring.
Overcoming Germination Issues
One of the most frustrating challenges when growing poppies from seed is poor germination rates. This can be due to a variety of factors, including old seeds or inadequate sowing conditions.
Firstly, it’s essential to check the age and quality of your seeds. Old seeds may have lost their viability, making them less likely to germinate. Make sure to purchase fresh seeds from a reputable supplier, and store them in an airtight container in a cool, dry place until you’re ready to sow.
Another common issue is sowing conditions. Poppy seeds require a moist but not waterlogged environment to germinate. Ensure that the soil isn’t too dense or compacted, as this can prevent roots from developing properly. Sow your seeds on the surface of the soil and gently firm it down with your fingers. Keep the soil consistently moist during the first few weeks after sowing.
If you’ve checked the age and quality of your seeds and provided suitable sowing conditions, but still experience poor germination rates, try experimenting with a different temperature range or growing medium. Some growers have reported success by using a heated propagator or seed starting mix specifically designed for germinating seeds.
Encouraging Healthy Growth and Blooms
To encourage healthy growth and blooms, it’s essential to provide your poppy seedlings with the right conditions and care, including sufficient light and moisture.
Fertilization and Pruning Techniques
As your poppy plants grow, it’s essential to provide them with the right nutrients for optimal health and blooming. Fertilizing is a critical aspect of their growth, but it’s easy to overdo it, which can harm your plants. To fertilize effectively, use a balanced fertilizer that contains nitrogen (N), phosphorus (P), and potassium (K). Follow the manufacturer’s instructions for application rates and timing.
For poppies, a general rule is to apply a starter fertilizer when the seedlings have 2-3 sets of leaves. This will give them a boost of energy to establish themselves. As they grow, you can switch to a bloom-promoting fertilizer rich in phosphorus. Avoid overfertilizing, as this can lead to weak stems and fewer blooms.
Pruning is another crucial aspect of maintaining healthy growth and promoting blooming. Remove any seed pods after they’ve dried and split open to direct the plant’s energy towards producing new flowers. Cut back tall varieties by one-third in late spring to encourage bushy growth and more blooms.
Managing Poppy Care After Blooms
After your poppies have finished blooming, it’s essential to continue caring for them to ensure they come back healthy and strong. This is often the most crucial time for their care, as it sets the stage for next year’s blooms.
Deadheading is a critical step after blooming. Remove spent flowers (called deadheading) to encourage your poppies to focus energy on seed production rather than re-blooming. This process can also help extend the flowering season. Cut off the flower stalk at the base, just above a leaf node, using scissors or pinch off the bloom with your fingers.
Post-bloom care involves maintaining soil moisture and fertilizing. Poppy plants require less water after blooming, but ensure the soil doesn’t dry out completely. Avoid over-fertilizing, as this can lead to weak growth and fewer blooms. Instead, apply a balanced fertilizer at half the recommended strength once a month to promote healthy root development.
To extend the flowering season, consider planting multiple varieties that bloom at different times or choose varieties with prolonged blooming periods.
Harvesting Poppy Seeds: Timing and Tips
Timing is everything when harvesting poppy seeds, so make sure you know when to expect them to be ripe for picking. Let’s dive into the key timing and tips.
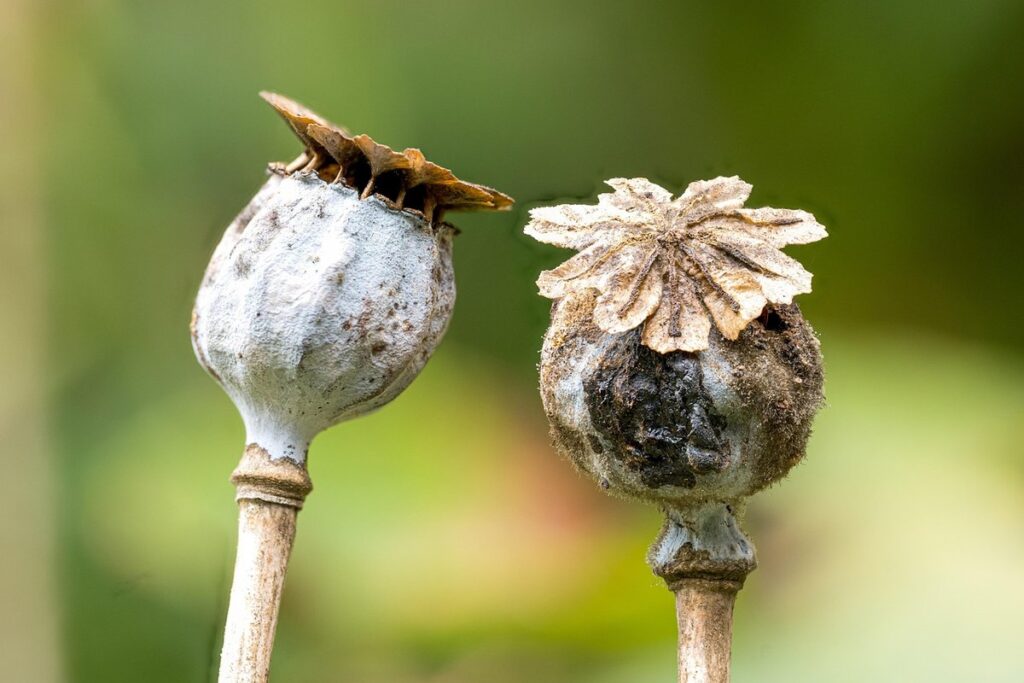
Determining Seed Maturity
When determining seed maturity, it’s essential to observe changes in the poppy plant’s appearance. One of the most reliable indicators is a change in color. As the seeds mature, the capsules will turn from green to brown or grayish-brown. This color shift can occur anywhere on the plant but is often most noticeable towards the top.
Another sign of seed maturity is dryness. Check for this by gently pinching one of the capsules. If it crumbles easily and the seeds inside rattle, it’s ready for harvest. Be careful not to squeeze too hard, as this can damage the delicate pods.
To determine when poppy seeds are ready for harvest, inspect the plants regularly over a period of 7-10 days. This allows you to catch the precise moment when the capsules have fully matured and dried out. Harvesting at this stage ensures the highest quality seeds with optimal germination rates.
Dry and Store Poppy Seeds Properly
Properly drying and storing poppy seeds is crucial to maintain their viability and ensure optimal germination rates for future plantings. After harvesting, remove the seed pods from the stem and allow them to dry completely in a warm, well-ventilated area. You can speed up the process by spreading them out in a single layer on paper bags or newspaper. It’s essential to avoid drying seeds near direct sunlight or heat sources, as this can cause damage.
Once the seeds are fully dry, store them in an airtight container in a cool, dark place. A glass jar with a tight-fitting lid is ideal for storing poppy seeds. Avoid plastic containers, as they can absorb moisture and damage the seeds. Store the seeds away from strong-smelling items, as poppy seeds can absorb odors easily.
Label the container with the date and contents, and consider dividing the seeds into smaller portions to maintain optimal viability. Regularly check on the stored seeds for signs of spoilage or damage.
Frequently Asked Questions
How Do I Know If My Poppy Seeds Have Matured?
A mature poppy seed is ready to harvest when the seed pods are dry and brittle, usually around 90-120 days after sowing. Check for a papery sheath that has split open, releasing the seeds. Yes, you can check by gently touching the pods; if they crumble easily, it’s time to harvest.
Can I Grow Poppies Indoors as Microgreens?
Yes, poppy microgreens are edible and can be grown indoors in shallow trays. However, direct sowing is still recommended for optimal growth. If growing indoors, ensure proper light, temperature (around 70-80°F), and watering conditions to promote healthy germination.
How Do I Prevent Pests Like Aphids from Damaging My Poppy Plants?
To prevent aphid infestations, maintain cleanliness in your garden by removing weeds that might harbor pests. Regularly inspect your plants for signs of aphids (sooty mold, curled leaves) and treat with neem oil or insecticidal soap if necessary.
Can I Direct Sow Poppies in Areas With Poor Soil?
While poppies prefer well-draining soil, they can still be direct sown in areas with poor soil. However, it’s essential to improve the soil quality by adding organic matter like compost before planting. This will help prevent waterlogging and promote healthy growth.
How Do I Store Poppy Seeds for Future Planting?
To store poppy seeds properly, dry them completely in a paper bag or envelope, then seal them in an airtight container to maintain freshness. Store the container in a cool, dark place (like a pantry) until you’re ready to sow again.