Growing your own microgreens can be a fun and rewarding experience, not to mention a great way to add some fresh flavor to your meals. But with so many types of microgreens out there, it’s easy to get overwhelmed by all the options. That’s why we’ve put together this comprehensive guide on growing microgreens – to take the mystery out of seed selection, soil preparation, and harvesting. In this article, you’ll learn everything from choosing the right seeds for your climate and taste preferences, to setting up a mini indoor garden that will produce a steady supply of healthy greens. Whether you’re a seasoned gardener or just starting out, our microgreens growing guide has got you covered – so get ready to grow your own delicious, nutritious microgreens at home!
Understanding Microgreens Basics
Let’s start with the basics! This section will cover everything you need to know about microgreens, including their definition, benefits, and ideal growing conditions.
What Are Microgreens?
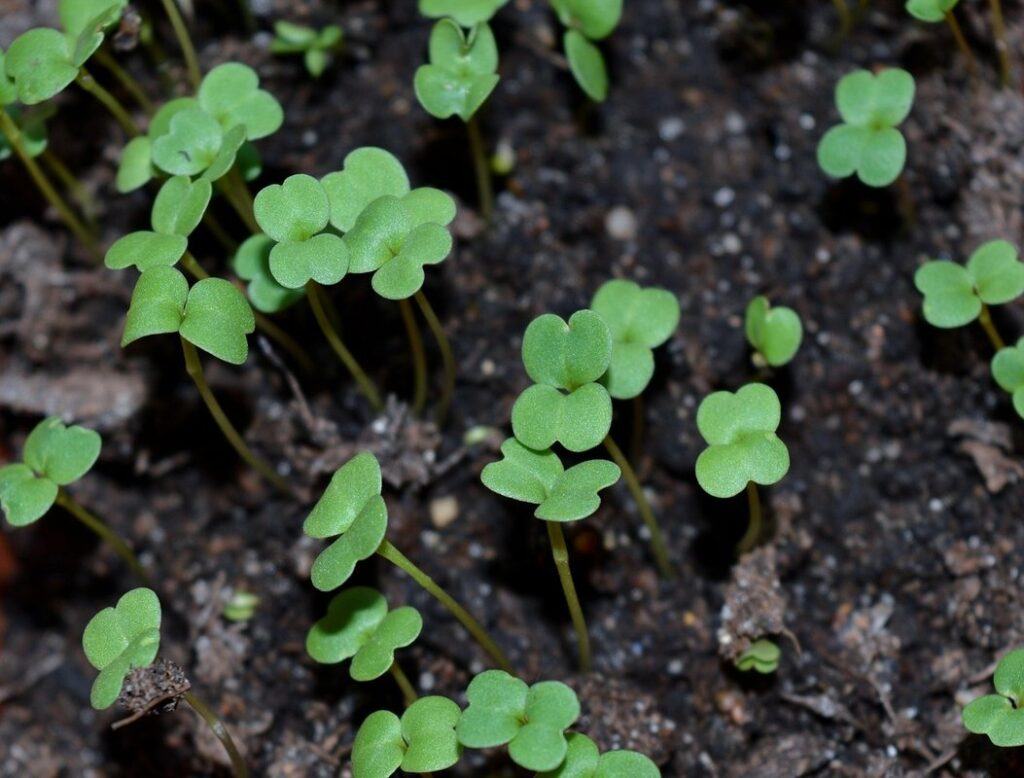
Microgreens are young versions of leafy greens and other vegetables that are harvested within 1-3 weeks of germination. They’re essentially baby plants, but they pack a punch when it comes to flavor, nutrition, and texture. Microgreens are not just limited to lettuce and kale; you can grow an array of herbs like basil, cilantro, and parsley, as well as other varieties like broccoli, arugula, and radish.
One of the primary benefits of microgreens is their rapid growth rate. They require minimal space and can be harvested in as little as 7-10 days, making them perfect for urban gardeners or those with limited growing space. Additionally, microgreens are incredibly nutritious, boasting higher levels of vitamins and minerals compared to their mature counterparts.
There are many types of microgreens available, including:
• Leafy greens (lettuce, kale, spinach)
• Herbs (basil, cilantro, parsley)
• Brassicas (broccoli, arugula, radish)
• Flowering microgreens (sunflower, violas)
These tiny greens can be added to salads, smoothies, and sandwiches for a burst of flavor and nutrition. They’re also great for garnishes or as a topping for soups and entrees. With their ease of growth and versatility in cooking, it’s no wonder microgreens have become a popular choice among gardeners and chefs alike!
History and Benefits of Microgreens
Microgreens have a rich history that dates back to the 1980s when they were first introduced as a crop by a California farmer named Lewis Sarett. Initially called “vegetable cress,” these young greens quickly gained popularity due to their high nutritional value and versatility in cooking. Today, microgreens are grown worldwide for both commercial and personal use.
One of the most significant benefits of microgreens is their impressive nutritional profile. According to a study published by the Journal of Food Science, microgreens contain up to 40 times more vitamins and minerals than their mature counterparts (1). This is due to the high concentration of phytochemicals present in the young leaves. For instance, pea shoots have been found to contain higher levels of antioxidants than spinach (2).
In addition to their health benefits, microgreens are also a favorite among chefs for their unique flavors and textures. They can be used as garnishes or added to salads, smoothies, and sandwiches. Some popular varieties include salad mix, radish greens, and mustard greens. When using microgreens in cooking, it’s essential to note that they have a more delicate flavor than mature leaves and should be harvested at the optimal stage for maximum flavor.
When growing microgreens, it’s crucial to use clean equipment and follow proper sanitation techniques to prevent contamination. This is particularly important when handling microgreens, as they are highly susceptible to bacterial growth due to their high water content.
Note: References (1) Journal of Food Science, “Nutritional Comparison of Microgreens and Mature Greens” and (2) Science Daily, “Pea Shoots Found to Have Higher Levels of Antioxidants than Spinach.”
Preparing for Microgreens Success
To ensure a bountiful harvest, start by preparing your growing space and supplies, as well as selecting the perfect varieties of microgreens to grow. Let’s dive in!
Choosing the Right Seeds
Choosing the right seeds is a crucial step in growing healthy microgreens. With so many types of seeds available, it can be overwhelming to decide which ones to use. But don’t worry, we’ve got you covered.
When selecting seeds for microgreens, consider the type of crop you want to grow. Leafy greens like lettuce and kale are popular choices, while herbs like basil and cilantro also thrive in a microgreen environment. Consider factors like climate, seasonality, and your personal preferences when choosing varieties.
Seed quality is paramount when growing microgreens. Look for seeds that are specifically labeled as “microgreen” or “salad mix.” These seeds have been bred for optimal growth and flavor in the short time frame of microgreens production. Be wary of seeds that are labeled as “beyond prime” or “seconds,” as they may not germinate well.
To ensure success, choose seeds from reputable suppliers and follow proper storage guidelines to maintain seed viability. A good rule of thumb is to store seeds in an airtight container in the refrigerator at 40°F (4°C) or below.
Equipment and Materials Needed
To get started with growing microgreens, you’ll need some essential equipment and materials. For indoor growing, you can use a variety of containers such as plastic trays, cell packs, or even old yogurt cups. Make sure they have drainage holes to prevent waterlogged soil.
For outdoor growing, you can use a mix of containers and directly sowing seeds in the ground. You’ll need high-quality potting mix specifically designed for microgreens. Some popular options include coconut coir or peat moss-based mixes.
Lighting is also crucial for microgreens growth. For indoor setups, LED grow lights are an excellent choice as they’re energy-efficient and produce minimal heat. For outdoor growing, natural sunlight will suffice, but consider using row covers to protect from pests and harsh weather conditions.
When it comes to water, use a watering can or spray bottle with a fine nozzle to avoid washing away delicate seeds. As for fertilizer, you can start with a balanced, water-soluble fertilizer (20-20-20) at half the recommended strength.
Soil and Growing Medium Options
When it comes to growing microgreens, choosing the right soil and growing medium is crucial for their health and flavor. We’ll explore your options in this next part of our guide.
Types of Soils Suitable for Microgreens
When it comes to growing microgreens, selecting the right soil is crucial for their optimal growth. A well-draining growing medium ensures that excess water doesn’t accumulate, reducing the risk of root rot and other issues.
Potting mix is a popular choice for microgreen growers due to its excellent drainage properties and ability to retain moisture. However, it can be too dense for some varieties, so it’s essential to choose a mix specifically designed for leafy greens or herbs. Look for potting mixes with perlite or vermiculite added, as these improve drainage and aeration.
Hydroponic systems are another option for microgreen growers who want to ensure precise control over nutrient delivery. These systems use a water-based solution rather than soil, which reduces the risk of overwatering and root rot. However, they can be more expensive and require more maintenance than traditional soil methods.
Living soil is a growing trend in hydroponics that mimics natural soil ecosystems. It’s composed of a mixture of beneficial microorganisms, organic matter, and nutrient-rich amendments. This type of soil offers improved water retention and supports the growth of beneficial microbes, creating a healthier environment for microgreens to thrive.
Preparing the Growing Medium
When it comes to growing microgreens, the quality of your growing medium is just as important as the seeds themselves. A well-prepared and conditioned growing medium will help your microgreens grow strong and healthy, while a poor-quality medium can lead to disease, pests, and reduced yields.
To prepare your growing medium for optimal microgreens growth, start by choosing a high-quality mix that’s specifically designed for hydroponics or soilless cultivation. You can also use a sterile potting mix, but be sure to follow the manufacturer’s instructions for sterilization and handling.
Before using your chosen medium, make sure it’s properly sterilized. You can do this by microwaving or autoclaving the medium to kill any potential pests or diseases. Alternatively, you can soak the medium in a solution of 1 part bleach to 10 parts water for at least 30 minutes before rinsing thoroughly.
It’s also essential to check the pH balance of your growing medium. Most microgreens prefer a slightly acidic to neutral soil pH, ranging from 5.5 to 7.0. You can use pH test kits or strips to measure the pH level and adjust it accordingly by adding lime to raise the pH or sulfuric acid to lower it.
Remember that over-acidification can be just as detrimental as under-acidification, so monitor your medium’s pH regularly to ensure optimal conditions for microgreen growth.
Watering and Humidity Requirements
To grow healthy microgreens, it’s crucial to understand how much water they need and what humidity levels are optimal for their growth, as this will directly impact their yield.
Importance of Consistent Moisture Levels
Consistent moisture levels play a vital role in promoting healthy microgreens growth. When the soil has the right amount of water, it can hold onto that moisture and provide it to the roots as needed, reducing the risk of overwatering and underwatering.
A key factor to consider is the soil’s water retention capacity. Different types of soils have varying levels of porosity, which affects how well they retain water. For example, sandy soils tend to drain quickly, while clay soils can hold onto excess moisture. To determine your soil’s water retention capacity, start by watering your microgreens as you normally would, then observe the top 1-2 inches of soil for signs of dryness.
The frequency of watering will also impact the moisture levels in your microgreen bed. Generally, it’s best to water microgreens when the top 1/4 inch of soil feels slightly damp but not soggy. If you’re unsure whether your microgreens need water, check their leaves for drooping or discoloration – these are often signs that they need a drink.
Watering at the right time is just as important as watering frequency. Watering during the hottest part of the day can cause rapid evaporation and lead to inconsistent moisture levels. Instead, try watering in the early morning or evening when temperatures are lower.
Maintaining Optimal Humidity
Maintaining optimal humidity levels is crucial for healthy microgreen growth. If the environment is too dry, leaves will wilt and become brittle, while excessive moisture can lead to fungal diseases and root rot. To achieve the right balance, you can use a humidifier specifically designed for indoor gardens. These devices release a gentle mist into the air, maintaining a consistent humidity level between 40-60%. Alternatively, covering your growing area with a clear plastic lid or sheet will trap moisture, but ensure good airflow to prevent condensation buildup.
When using either method, monitor your microgreens closely and adjust as needed to avoid overwatering. Overwatered leaves may appear yellow or develop soft spots, while underwatered plants will display wilted tips. To check the soil’s moisture level, stick your finger into the growing medium up to the first knuckle; if it feels dry, it’s time to water. Be cautious not to waterlog the soil, as this can lead to root damage and slow growth.
By maintaining optimal humidity levels, you’ll minimize the risk of disease and promote healthy, vigorous microgreen growth. Regular checks on your plants will help you fine-tune the environment, ensuring your crop thrives in its ideal conditions.
Lighting Requirements for Microgreens
When it comes to growing microgreens, lighting is a crucial factor that can make all the difference. In this section, we’ll cover the specific lighting requirements your microgreens need to thrive.
Understanding Light Spectrums and Intensity
When it comes to growing microgreens, light is one of the most critical factors for their growth and development. Microgreens require a specific spectrum and intensity of light to thrive, which can be achieved using LED grow lights or natural sunlight exposure.
To understand the lighting requirements for microgreens, let’s break down the importance of different light spectrums:
* Blue light (400-500nm): promotes healthy root growth and helps control mold development
* Red light (600-700nm): enhances photosynthesis and leaf growth
* Green light (520-560nm): aids in chlorophyll production and overall plant health
When choosing between LED grow lights or natural sunlight exposure, consider the intensity of light required. Most microgreens require 12-14 hours of light per day, with an intensity of around 20,000-40,000 lux. To put this into perspective, a sunny windowsill can provide anywhere from 5,000 to 10,000 lux.
When selecting LED grow lights, look for ones that emit a balanced spectrum and are specifically designed for microgreens growth. This will help you achieve the right intensity and spectrum required for optimal plant growth.
Positioning and Adjusting Lights
Positioning and adjusting lights is crucial for optimal microgreens growth. When placing your grow light, consider the distance between the light source and the growing medium. A general rule of thumb is to maintain a distance of 6-12 inches (15-30 cm) between the light and the greens. However, this may vary depending on the type of light you’re using and the specific microgreens variety.
Avoid placing lights too close to your microgreens, as this can cause scorching or “light burn,” which can be detrimental to their growth. To prevent this, ensure that the light is not shining directly onto the leaves but rather from a 45-degree angle. This will provide even distribution of light and promote healthy growth.
Regularly inspect your microgreens for signs of over-exposure to light. If you notice discoloration or bleaching of the leaves, adjust the position of the lights accordingly. Keep in mind that some varieties, like red cabbage or radish greens, are more sensitive to light than others. Be prepared to make adjustments based on the specific needs of your microgreens.
Pest Management and Troubleshooting
As you progress through growing microgreens, pests can become a nuisance. Here we’ll tackle common issues and share expert advice on managing pest populations effectively.
Identifying Common Pests and Diseases
As you begin to grow microgreens, it’s essential to be aware of common pests and diseases that can affect their growth. Regular monitoring is crucial to catch issues early on, preventing them from spreading and causing significant damage.
Aphids are one of the most common pests affecting microgreens. These small, soft-bodied insects feed on plant sap, weakening the plant and potentially transmitting diseases. To control aphid infestations, inspect your plants daily for signs of aphids, such as white cottony patches or curled leaves. Use neem oil or insecticidal soap to treat affected areas.
Spider mites are another prevalent pest that can be challenging to detect. These tiny arachnids feed on plant sap, causing yellowing or bronzing of the leaves. Regular misting with water can help prevent spider mite infestations, but if you do notice them, use a mild insecticidal soap.
Regularly inspect your microgreens for signs of disease such as powdery mildew, bacterial leaf spot, and downy mildew. Monitor temperature and humidity levels to prevent these conditions from developing in the first place.
Preventative Measures and Treatment Options
Maintaining a healthy growing environment is crucial for successful microgreens cultivation. To prevent pest and disease issues, it’s essential to implement preventative measures from the beginning. One effective method is using neem oil or insecticidal soap to deter pests such as aphids, whiteflies, and spider mites. These products work by disrupting the life cycle of insects, preventing them from reproducing.
For example, neem oil can be applied at a 2-3% concentration, while insecticidal soap should be used at a 1-2% solution. It’s vital to follow the product instructions and start treatment early, as pests can quickly spread.
If pest issues arise despite preventative measures, it’s time to address them directly. Isolate infested plants to prevent further damage, and remove any severely affected areas. Use a mild soap solution (1 tablespoon of liquid dish soap per gallon of water) or neem oil to gently scrub the affected areas.
Regularly inspect your microgreens for signs of disease like powdery mildew, downy mildew, or leaf spot. Remove any diseased plants and treat surrounding areas with a fungicide specifically designed for microgreens. By staying vigilant and taking prompt action when issues arise, you can minimize damage and maintain a healthy growing environment.
Harvesting and Storage
Once you’ve harvested your microgreens, it’s essential to store them properly to maintain their freshness and flavor. Learn how to dry, freeze, and preserve your greens for maximum enjoyment.
Timing and Methods for Harvesting Microgreens
When it comes to harvesting microgreens, timing is everything. You want to pick them at the optimal stage of growth to ensure maximum flavor and nutrition. Harvesting too early can result in a weak, bland taste, while waiting too long can cause the leaves to become tough and fibrous.
As a general rule, most microgreen varieties are ready for harvest within 7-21 days after germination, depending on the type and desired level of maturity. Some popular varieties like salad mix, kale, and arugula typically take around 10-14 days to reach their peak flavor and texture.
To harvest your microgreens, you can use one of two methods: scissors or pinch-and-harvest. For leafy greens like lettuce and kale, simply snip off the leaves at the base with a pair of scissors, leaving about 1/4 inch of stem intact. For smaller varieties like radish and cilantro, use your fingers to gently pinch off individual leaves.
Remember, harvesting too much of the plant can stress it out, leading to reduced growth and flavor in subsequent harvests. Start with small batches and gradually increase your yield as you become more comfortable with the timing and methods of harvesting microgreens.
Storing Freshly Harvested Microgreens
Proper storage of freshly harvested microgreens is crucial to maintaining their quality and flavor. When you bring home your just-picked microgreens, it’s essential to store them correctly to prolong their freshness.
Before storing, gently brush off excess moisture from the leaves with a soft-bristled brush or a clean cloth. This helps prevent mold growth and keeps the greens fresh for longer. Next, wrap the microgreens in paper towels to absorb any remaining moisture. You can also use clean cloths or even newspaper to achieve the same effect.
For longer storage, consider using airtight containers with lids or ziplock bags. Place the wrapped microgreens in the container, leaving about 1 inch of space for air circulation. Store them in the refrigerator at a consistent temperature between 32°F and 50°F (0°C and 10°C). Be sure to label the container with the date you harvested the microgreens.
For optimal flavor and texture, use your stored microgreens within 3-5 days. If you don’t plan on using them immediately, consider freezing or dehydrating for later use. Remember, proper storage is key to maintaining the quality of your freshly harvested microgreens.
Frequently Asked Questions
How do I know when my microgreens are ready to harvest?
The ideal time for harvesting microgreens varies depending on the type of green, but generally, they’re ready within 1-3 weeks of germination. Check your seedlings daily and gently grasp a few leaves at the base to determine if they’ve reached the desired size. Harvesting at the right stage ensures optimal flavor, texture, and nutrition.
What’s the best way to store freshly harvested microgreens?
To maintain their freshness, store harvested microgreens in a sealed container or plastic bag with some air pockets. Keep them away from direct sunlight and refrigerate between 32°F (0°C) and 40°F (4°C). You can also blanch your microgreens briefly before storing to preserve color and texture.
Can I grow microgreens in water instead of soil?
Yes, you can grow microgreens in a hydroponic system using a nutrient-rich solution. This method is ideal for small spaces or if you want to avoid soil contamination risks. However, ensure the solution’s pH level is between 5.5 and 6.5, and change it regularly to prevent bacterial growth.
How do I troubleshoot common pests like aphids and spider mites?
To identify and address pest issues, inspect your microgreens daily for signs of infestation. For aphids, use neem oil or insecticidal soap as a preventative measure. Spider mites can be treated with a strong jet of water or miticide specifically designed for indoor gardens.
Can I grow microgreens year-round in my region?
Yes, you can grow microgreens indoors throughout the year, regardless of your climate. Since they don’t require direct sunlight, you can use LED grow lights to supplement natural light and create a controlled environment. This allows you to harvest fresh greens during any season or weather condition.