Growing your own lentils from seed can be a rewarding experience, especially for gardeners looking to expand their repertoire of edible legumes. Lentils are an excellent crop choice due to their high nutritional value and relatively low maintenance requirements. However, successfully growing lentils requires proper planning and attention to detail. In this article, we’ll walk you through the essential steps to grow lentils from seed, covering crucial aspects like soil preparation, sowing techniques, and caring for your plants. We’ll explore how to select the right variety for your climate, ensure optimal growth conditions, and troubleshoot common issues that may arise during cultivation. Whether you’re a seasoned gardener or just starting out, our comprehensive guide will equip you with the knowledge needed to successfully grow lentils from seed.
Understanding Lentil Basics
To get started, let’s cover the fundamentals of lentils, including their unique growing requirements and characteristics that set them apart from other legumes. This is essential for a successful harvest.
Lentil Types and Varieties
There are several types of lentils, each with its unique characteristics and uses in cooking. Green lentils, for instance, are one of the most widely consumed varieties due to their mild flavor and firm texture. They’re an excellent choice for soups, stews, and curries.
Red lentils, on the other hand, have a slightly sweet taste and break down during cooking, making them ideal for dishes like dal makhani or Indian-style stews. Yellow lentils, also known as split yellow lentils, are another popular variety that’s commonly used in Indian cuisine to make dishes like khichdi.
Beluga lentils, with their small black size, have a robust, earthy flavor and firm texture. They’re often used in salads or cooked with aromatic spices for added depth of flavor. Brown lentils are similar to green lentils but have a slightly sweeter taste. They work well in stews, soups, and vegetarian dishes.
When growing your own lentils from seed, it’s essential to choose varieties that suit your local climate and available space. Consider the specific needs and characteristics of each type when deciding which ones to plant in your garden or container garden.
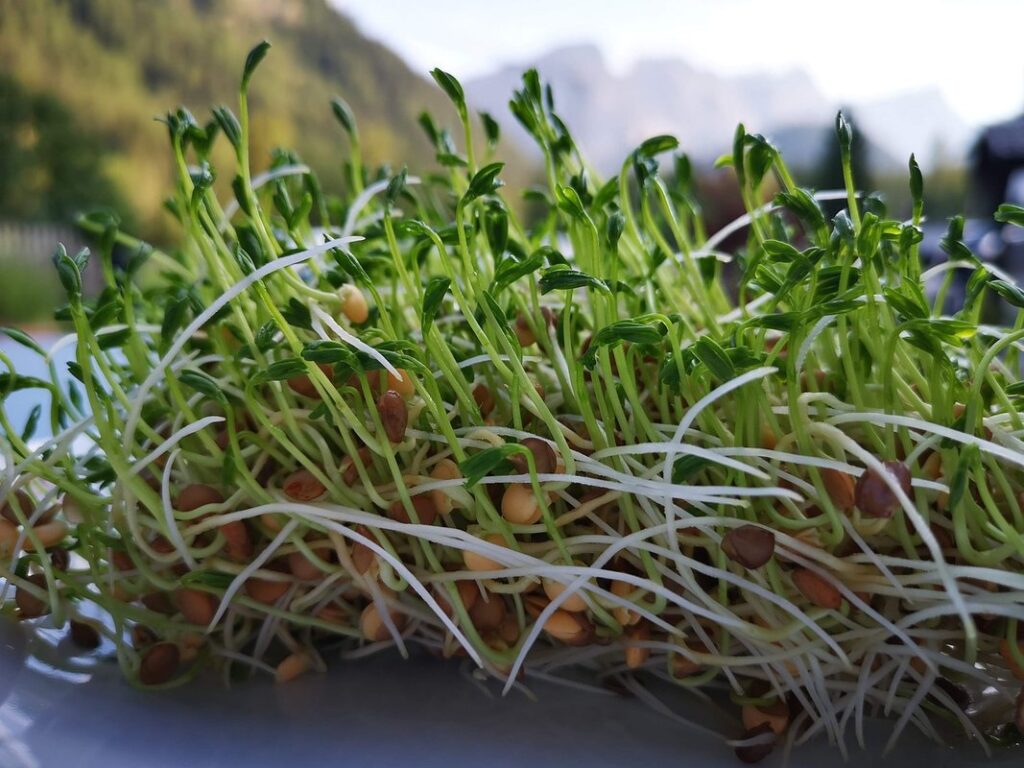
Lentil Germination and Sprouting
Lentil germination and sprouting is a crucial process that sets the stage for healthy lentil growth. To understand this process, it’s essential to know that lentils need specific conditions to break dormancy and initiate growth. Moisture is the primary catalyst for germination, with optimal temperatures ranging from 20°C to 25°C (68°F to 77°F). Lentils typically take 7-10 days to germinate, during which they absorb water and begin to swell.
However, factors like temperature fluctuations, inadequate moisture, or poor soil quality can impede this process. For instance, extreme temperatures above 30°C (86°F) can cause lentil seeds to dry out and fail to germinate. Similarly, overwatering can lead to rot and kill the seedlings. To ensure successful germination, sow lentil seeds about 2-3 cm deep in well-draining soil with consistent moisture levels.
Keep in mind that different lentil varieties have varying germination rates. Some popular varieties like Red Chief and Pardina take slightly longer than others to germinate. By understanding these factors and providing optimal growing conditions, you can increase the chances of successful lentil germination and sprouting.
Preparing for Planting
Before you start sowing those lentil seeds, there are a few essential steps to take that’ll give your crop a strong foundation for success. Let’s get started on preparing the perfect conditions.
Soil Preparation and Selection
When preparing the soil for growing lentils, it’s essential to create an environment that is conducive to their growth. Lentils prefer a slightly acidic to neutral soil pH, ranging from 6.0 to 7.0. This is because they require readily available phosphorus and potassium, which are more soluble in acidic soils.
To optimize nutrient uptake, incorporate organic matter like compost or well-rotted manure into the soil before planting. Aim for a balanced fertilizer mix with a ratio of 10:10:10 (nitrogen-phosphorus-potassium) to promote healthy growth.
Be cautious of potential challenges such as poor drainage and waterlogging, which can lead to root rot and other issues. Well-draining sandy-loam or clay-loam soils are ideal for lentil cultivation. Test your soil pH regularly to ensure it remains within the optimal range.
Before planting, allow the top 8-10 inches of soil to settle after tilling to prevent compacting the seedbed.
Choosing the Right Location
When choosing the right location for growing lentils, climate and environmental conditions play a crucial role. Lentils are cool-season crops, thriving in temperatures between 40°F (4°C) and 75°F (24°C). Ideally, they require full sun to partial shade, with direct sunlight of at least six hours a day.
In terms of moisture, lentils need consistent moisture levels throughout their growth cycle. Aim for well-draining soil with an optimal water-holding capacity. Avoid areas prone to waterlogging or flooding, which can lead to root rot and other diseases.
Regional considerations also come into play. In regions with high humidity, such as tropical or subtropical climates, it’s essential to plant lentils in well-ventilated areas to prevent moisture-related issues. Conversely, in arid environments, provide adequate irrigation to ensure consistent moisture levels.
When selecting a location, take note of your area’s temperature fluctuations and frost patterns. Plant lentils in early spring or late summer/early fall when temperatures are mild, allowing the crop to mature before extreme weather sets in. By choosing a suitable location, you’ll set yourself up for success and increase the chances of a bountiful lentil harvest.
Sowing Lentil Seeds
When sowing lentil seeds, it’s crucial to get them started off right. This section will walk you through the process of planting and caring for your new seedlings until they’re ready to transplant outside.
Seed Selection and Storage
When selecting high-quality lentil seeds for sowing, it’s essential to consider factors such as seed variety, purity, and germination rate. Look for reputable seed suppliers that offer disease-free and high-yielding varieties suitable for your region’s climate and growing conditions.
To ensure the seeds remain viable, store them in a cool, dry place away from direct sunlight. A temperature range of 40-50°F (4-10°C) is ideal for long-term storage. You can also consider storing seeds in an airtight container or plastic bag to maintain humidity control and prevent moisture damage.
When choosing a storage location, avoid areas with high temperatures, moisture levels, or exposure to pests. For example, a basement or cupboard near the kitchen might not be the best choice due to potential temperature fluctuations and pest infestations. Instead, opt for a cool, dark space like a garage or shed. Regularly check on your seed stock to ensure they remain viable and free from mold or mildew.
It’s also crucial to keep seeds away from chemicals, pesticides, and fertilizers that can damage them. By following these storage guidelines, you’ll help maintain the quality and viability of your lentil seeds until sowing time.
Sowing Techniques and Spacing
When sowing lentil seeds, it’s essential to consider both direct sowing and seed tray methods. Direct sowing involves planting seeds directly into the ground, while seed trays provide a controlled environment for germination before transplanting.
For direct sowing, create shallow furrows about 1-2 inches deep in well-draining soil with a pH between 6.0 and 7.0. Sow 1-2 lentil seeds per inch, spaced at least 3-4 inches apart to allow for proper root development. Water gently but thoroughly after sowing.
Seed trays offer more flexibility, as you can start seeds indoors 2-3 weeks before the last frost date. Fill seed trays with a good quality potting mix, and sow 1-2 lentil seeds per cell about ¼ inch deep. Keep the soil consistently moist but not waterlogged. Once seedlings have two sets of leaves, transplant them into larger containers or directly into the ground.
Regardless of method, ensure adequate spacing to prevent overcrowding, which can lead to reduced yields and increased disease susceptibility.
Caring for Lentil Plants
Now that your lentil seeds have germinated, it’s essential to provide them with the right care to ensure they thrive and produce a healthy crop. In this section, we’ll cover everything you need to know about caring for your lentil plants.
Watering and Irrigation Strategies
When it comes to watering and irrigation strategies for lentil plants, it’s essential to strike the right balance. Lentils are drought-tolerant but require consistent moisture levels during the initial stages of growth.
Water your lentil seeds gently but thoroughly after sowing, keeping the soil consistently moist until they emerge. Once germinated, reduce watering to about 1-2 inches per week, depending on weather conditions and soil type. Avoid overwatering, which can lead to fungal diseases and root rot.
To avoid underwatering, monitor your lentil plants’ growth stages closely. During peak growth periods (around 4-6 weeks after sowing), increase watering frequency to maintain optimal moisture levels. Drip irrigation systems are ideal for lentils as they deliver water directly to the roots while minimizing evaporation losses.
Keep an eye out for signs of drought stress, such as yellowing leaves or stunted growth. Adjust your watering schedule accordingly. In regions with low rainfall, consider implementing a mulch layer around plants to retain soil moisture and reduce evaporation.
By adopting these targeted irrigation strategies, you’ll promote healthy lentil plant development while minimizing the risk of water-related issues.
Fertilization and Pest Management
Fertilizing lentil plants is essential for optimal growth and yields. These plants are legumes, meaning they have a symbiotic relationship with nitrogen-fixing bacteria that live in their roots. However, to support this process and promote overall health, regular fertilization is necessary. A balanced fertilizer that provides equal amounts of nitrogen (N), phosphorus (P), and potassium (K) should be applied at planting time.
As the plants grow, side-dressing with a high-phosphorus fertilizer can help boost fruiting and flowering. This typically occurs when the plants are around 6-8 inches tall. It’s essential to follow the recommended application rates on the fertilizer packaging to avoid over-fertilizing, which can damage the plants.
Common pests like aphids, whiteflies, and spider mites can be managed using neem oil or insecticidal soap. Regularly inspecting your plants for signs of infestation is crucial. To minimize disease risks, maintain good air circulation around the plants, remove any debris, and ensure that the soil is well-draining.
For more severe pest issues, consider introducing natural predators like ladybugs or lacewings to your garden. By implementing these strategies, you’ll be better equipped to manage common pests and diseases that can impact lentil yields.
Monitoring and Harvesting Lentil Crops
As your lentil plants mature, it’s crucial to monitor their progress closely and know when to harvest for optimal flavor and nutritional value. We’ll walk you through the key steps to monitoring and harvesting your crop successfully.
Identifying Key Growth Stages
As you watch your lentil crop grow, it’s essential to identify key growth stages that will help you monitor its progress and take necessary actions for optimal yield. The critical growth stages of lentils are germination, seedling emergence, flowering, and pod formation.
Germination typically occurs within 7-10 days after sowing, where the seeds absorb water and break dormancy. During this stage, ensure consistent moisture levels and a temperature between 60°F to 75°F (15°C to 24°C). Be cautious of overwatering, which can lead to seed rot.
Seedling emergence follows germination, usually within 10-14 days. At this stage, the first set of leaves appear, and the seedlings become more robust. Maintain adequate soil moisture and provide a balanced fertilizer application to promote healthy growth.
Flowering typically begins around 30-40 days after sowing, where small white or pink flowers emerge on the stems. This is an essential growth stage, as it signals the start of pod formation. Ensure that your lentil crop receives sufficient water and nutrients during this period to support reproductive growth.
Pod formation occurs shortly after flowering, usually within a week or two. Be careful not to overwater, as this can lead to reduced yields due to seed rot and increased susceptibility to disease. Keep an eye out for pests and diseases, which can compromise the crop’s overall health and productivity.
Timing and Techniques for Harvesting
Determining when to harvest lentil crops is crucial for optimal yields and quality. As a lentil grower, you’ll want to look for signs of maturity, which typically occur around 90-120 days after sowing, depending on the variety. Check for pods that have dried completely, turning brown or light tan in color, and seeds that are fully formed and dry. You can also check for seed size, as mature lentils should be plump and filling out their pods.
To determine if your crop is ready to harvest, perform a simple scratch test: gently scratch the seed with your fingernail; if it’s hard and dry, it’s ready. For mechanical harvesting, use a combine harvester set at the optimal height for your lentil variety. When cutting, aim for a consistent height to avoid leaving behind any immature or mature pods.
Timing is also critical; ideally, harvest when there is minimal moisture in the soil and air, usually early morning or late afternoon, to minimize water content. This will help reduce drying time post-harvest and prevent spoilage.
Frequently Asked Questions
How can I store lentil seeds for long-term use?
Lentil seeds have a relatively short shelf life, typically lasting between 1 to 2 years when stored properly. To extend their shelf life, keep them cool (around 40°F/4°C), dry (relative humidity below 60%), and dark. Store them in an airtight container, such as a glass jar or envelope, to prevent moisture and light exposure.
Can I grow lentils from seeds that have been stored for over a year?
Yes, but the germination rate may be lower than seeds that are fresh. Before sowing, inspect the seeds for any signs of mold or damage. If they appear healthy, proceed with sowing as usual. However, keep in mind that older seeds might require more time to sprout and may not perform optimally.
How do I deal with lentil seed rot during germination?
Lentil seed rot is a common issue caused by overwatering or poor soil drainage. To prevent it, ensure good air circulation around the seedlings and avoid wateringlogged soils. If you notice seed rot, remove affected seeds immediately to prevent further spread.
Can I grow multiple varieties of lentils together in the same bed?
Yes, but be aware that different lentil varieties have varying growth habits and space requirements. Plant them at the right spacing for each variety to prevent overcrowding, which can lead to reduced yields or disease susceptibility.
How do I know when my lentil plants are ready for harvest?
Lentil plants typically mature 90-120 days after sowing, depending on the specific variety and weather conditions. Check for fully formed pods with seeds that rattle inside (indicating dryness). Harvest when most of the pods are fully ripe to ensure maximum seed quality.