Growing your own lemon balm can be a game-changer for cooking, baking, and even making herbal remedies. Not only does it add a bright and citrusy flavor to dishes, but it’s also packed with antioxidants and has numerous health benefits. However, growing lemon balm can be a bit tricky if you don’t know what you’re doing.
In this in-depth guide, we’ll walk you through the process of selecting the right variety for your needs, planting and caring for your lemon balm, and troubleshooting common issues that might come up along the way. From understanding how to plant lemon balm in a variety of conditions to tips on maintaining its flavor and potency throughout the growing season, this article aims to cover everything you need to know to harvest fresh lemon balm leaves all year round. With these expert tips, you’ll be well on your way to enjoying the best-tasting lemon balm ever.
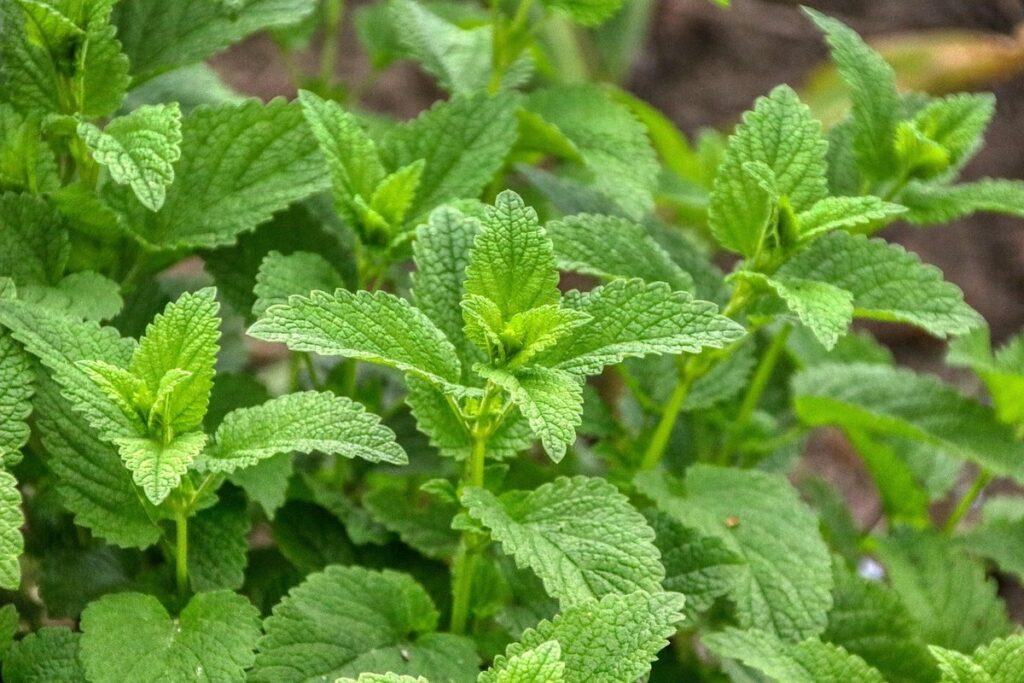
Choosing the Right Variety and Planting Conditions
To grow lemon balm successfully, you need to choose a variety that thrives in your climate and plant it in conditions that suit its needs. Let’s dive into the details of selecting the right variety and planting spot.
Selecting a Suitable Lemon Balm Variety
When it comes to selecting a suitable lemon balm variety, you’ll want to consider factors like flavor profile, growth habits, and disease resistance. With over 20 varieties of lemon balm to choose from, the decision can be overwhelming.
Some popular varieties include ‘Aureus’, which has golden leaves and a milder flavor, while ‘Pallida’ is known for its pale yellow flowers and slightly sweeter taste. Then there’s ‘Blue Muffin’, which boasts vibrant blue leaves and a stronger citrus scent.
To choose the best variety for your needs, think about how you plan to use lemon balm in your cooking or herbal remedies. If you’re looking for a more subtle flavor, opt for a milder variety like ‘Aureus’. On the other hand, if you want a bold citrus taste, ‘Blue Muffin’ might be the way to go.
Also consider the growth habits of each variety – some are more compact and suitable for container gardens, while others can spread quite far. Be sure to check the disease resistance of your chosen variety as well, as lemon balm can be prone to root rot and other issues if not properly cared for.
Optimizing Planting Site and Soil Requirements
When it comes to growing lemon balm, selecting an ideal planting site is crucial for its success. Lemon balm prefers well-drained soil and full sun to partial shade, making a spot with at least 4-6 hours of direct sunlight perfect. If you live in a hot climate, consider providing some afternoon shade to prevent scorching.
When preparing the planting site, start by removing any weeds that might compete for nutrients and water. Loosen the soil to a depth of about 8-10 inches to allow lemon balm’s roots to grow deep. If your soil is heavy clay or prone to waterlogging, mix in some organic matter like compost or well-rotted manure to improve drainage.
In terms of soil type, lemon balm thrives in slightly acidic to neutral soils with a pH between 6.0 and 7.0. Test your soil before planting to ensure it falls within this range. Adding a balanced fertilizer at the time of planting will provide a boost to your lemon balm’s growth. By creating an optimal growing environment, you’ll be well on your way to harvesting a fragrant and healthy crop of lemon balm.
Planting Lemon Balm Seeds or Seedlings
To get started with growing lemon balm, you’ll need to know how to plant either seeds or seedlings successfully. In this section, we’ll walk through each step of the process.
Starting Lemon Balm from Seeds
Starting lemon balm from seeds can be a rewarding experience, especially for those who enjoy the process of nurturing plants from scratch. To begin, you’ll need to obtain fresh lemon balm seeds, which can be purchased online or sourced from mature plants.
When sowing seeds indoors, start by filling small pots or seed trays with a well-draining potting mix. Plant the seeds about 1/8 inch deep and 6-8 inches apart. Keep the soil consistently moist but not waterlogged, as this can lead to rot and poor germination rates. In ideal conditions, lemon balm seeds should germinate within 7-14 days.
Direct sowing in the garden is also an option, typically done when the weather warms up and the threat of frost has passed. Plant the seeds about 1/8 inch deep and 12-18 inches apart, allowing for adequate space to grow. Keep in mind that direct sowing may lead to variable germination rates due to factors like soil quality and moisture levels.
It’s worth noting that starting lemon balm from seeds can be more challenging than using seedlings, as the process requires patience and careful monitoring. However, with proper care and attention, you can enjoy a bountiful harvest of fragrant leaves in no time.
Transplanting Seedlings into Individual Pots or Directly into Garden Beds
When transplanting seedlings into individual pots or directly into garden beds, timing is crucial to ensure their continued growth and success. Typically, this occurs 1-2 weeks after germination, when the seedlings have 2-3 sets of leaves.
Before transplanting, prepare the soil by loosening it to a depth of about 6-8 inches. Mix in some organic matter like compost or well-rotted manure to improve drainage and fertility. If planting directly into garden beds, create shallow trenches for the seedlings to ensure their roots grow downwards and not upwards.
When transplanting individual seedlings, gently remove them from their containers, taking care not to disturb their delicate root systems. Place them in their new pots or garden bed location, firming the soil around the roots. Water thoroughly after transplanting, keeping the soil consistently moist during the first few weeks.
Avoid over-handling the seedlings during this process, as it can cause shock and lead to reduced growth.
Care and Maintenance for Optimal Growth
To keep your lemon balm thriving, regular care and maintenance are crucial. This includes tasks such as pruning, watering, and fertilizing to ensure optimal growth.
Watering and Irrigation Strategies
Maintaining consistent moisture levels is crucial for lemon balm’s optimal growth. Unlike other herbs, it thrives in moist soil but can be susceptible to root rot if the waterlogged. To avoid this, focus on providing a balanced watering schedule.
Drip irrigation or soaker hoses are ideal for delivering targeted moisture directly to the roots without wasting water through evaporation. These methods also help prevent fungal diseases that spread through standing water.
Another approach is using a self-watering pot with a built-in reservoir, which can provide lemon balm with steady moisture levels.
Common watering mistakes include overwatering, underwatering, and erratic schedules. Overwatering causes root rot, while underwatering slows growth and makes the plant more susceptible to pests and diseases. To avoid these issues, stick to your schedule and water your lemon balm when the top 1-2 inches of soil feel dry.
When checking for moisture levels, gently dig into the soil with your finger or use a moisture meter. This will help you determine the right time to water.
Fertilization and Pruning Techniques
When it comes to promoting healthy growth and encouraging optimal production of lemon balm, fertilization plays a crucial role. As a nutrient-rich fertilizer is absorbed by the plant’s roots, it provides essential macronutrients like nitrogen, phosphorus, and potassium, as well as micronutrients such as iron and magnesium.
You can choose between organic and synthetic fertilizers for your lemon balm plants. Organic options include compost tea, fish emulsion, and bone meal. These are often preferred due to their environmentally friendly nature and potential benefits for soil health. On the other hand, synthetic fertilizers offer a quick fix but may lead to soil degradation if overused.
Regular pruning is vital for maintaining your lemon balm’s shape, encouraging new growth, and preventing disease spread. Pinch off flower buds when they form to direct energy towards leaf production. Remove any dead or dying leaves and stems to prevent the risk of fungal diseases. Prune back leggy stalks in the spring to promote bushy growth and prevent lodging. By following these fertilization and pruning techniques, you can create a healthy environment for your lemon balm plants to thrive.
Common Pests and Diseases Affecting Lemon Balm
As you tend to your lemon balm plants, be on the lookout for some common pests and diseases that can affect their health, such as aphids and powdery mildew. We’ll cover these issues in detail below.
Identifying and Managing Pest Infestations
When growing lemon balm, you’re likely to encounter common pests that can damage your plants and reduce their yields. Aphids, whiteflies, and spider mites are some of the most prevalent pests that infest lemon balm. These tiny insects feed on the sap of the plant, causing curled or distorted leaves, stunted growth, and a sticky honeydew substance that attracts ants.
To manage pest infestations, practice integrated pest management (IPM) strategies. Start by inspecting your plants regularly for signs of pests. Isolate infected areas to prevent the spread of infestation. Use physical barriers like fine mesh or row covers to keep whiteflies and aphids away from your lemon balm. Introduce natural predators like ladybugs, lacewings, or parasitic wasps that feed on these pests.
In severe cases, consider using insecticidal soap or neem oil to control infestations. However, use these products with caution and follow the manufacturer’s instructions carefully. Also, keep in mind that chemical controls may harm beneficial insects, so adopt a holistic approach to pest management. By combining physical barriers, natural predators, and targeted treatments, you can effectively manage pest infestations and ensure your lemon balm plants thrive.
Recognizing and Treating Fungal and Bacterial Diseases
Lemon balm is susceptible to various diseases caused by fungi and bacteria that can significantly impact its growth and yield. Fungal diseases such as root rot, leaf spot, and powdery mildew often occur due to overwatering or poor air circulation. These diseases manifest as white or gray patches on the leaves, yellowing of leaves, and a general decline in plant health.
Bacterial diseases like bacterial leaf spot also affect lemon balm, causing small, dark spots on the leaves that eventually lead to defoliation. These diseases can be caused by a range of factors including excessive moisture, high humidity, and poor soil quality.
To treat mild cases of fungal or bacterial disease, remove affected leaves or stems to prevent the spread of infection. Improve air circulation around the plants by pruning nearby vegetation or using trellises. Regularly inspect your plants for signs of disease, and apply fungicides or bactericides as needed.
In addition to treating existing diseases, take preventive measures such as watering carefully, maintaining good soil quality, and ensuring proper spacing between plants to prevent overcrowding.
Harvesting and Preserving Lemon Balm
Now that you’ve grown a thriving lemon balm crop, it’s time to harvest its fragrant leaves for use throughout the year. In this next step, we’ll explore how to dry and preserve lemon balm for later enjoyment.
Timing and Techniques for Optimized Harvests
When it comes to harvesting lemon balm, timing is everything. You’ll want to pluck those fragrant leaves at the right stage of growth for optimal flavor and potency. Here’s a general rule of thumb: harvest individual leaves or stems when they’re about 3-4 inches long, just as the buds are beginning to form.
If you’re looking to harvest larger quantities of lemon balm, wait until the plant has reached its peak foliage, usually around mid-to-late summer. Avoid picking too much at once, as this can weaken the plant and reduce future yields. Instead, harvest individual leaves or stems regularly to encourage new growth and prevent the plant from flowering.
To harvest without damaging the plant, use a sharp pair of scissors or pinch off individual leaves with your fingers. You can also gently twist and pull individual stems, taking care not to tear the surrounding foliage. This will help maintain the plant’s shape and promote healthy regrowth.
Timing-wise, morning is usually the best time for harvesting lemon balm, when the oils are most concentrated in the leaves.
Preserving Lemon Balm through Drying, Freezing, or Making Herbal Tea
Preserving lemon balm is essential to enjoy its flavor and fragrance year-round. There are three popular methods for preserving lemon balm: drying, freezing, and making herbal tea.
Drying lemon balm is a simple process that helps retain the herb’s oils and flavor. You can air-dry it by tying the stems together in small bunches or use a food dehydrator on a low setting. Store dried lemon balm in airtight containers to maintain its potency. Use 1-2 tablespoons of dried lemon balm per recipe.
Freezing is another effective way to preserve lemon balm. Chop the leaves and place them in airtight containers or freezer bags, making sure to press out as much air as possible before sealing. Frozen lemon balm can be used in recipes by adding it towards the end of cooking time. For an easy herbal tea recipe, combine 1 tablespoon of dried or frozen lemon balm with 1 cup of hot water and let steep for 5-7 minutes.
When making herbal tea, you can also add honey to taste and enjoy as a calming beverage. Consider infusing lemon balm in sugar or vinegar to create flavored sweeteners perfect for desserts and savory dishes.
Troubleshooting Common Issues and Encouraging Continuous Growth
Don’t let pests, diseases, or poor growth hold you back from enjoying your lemon balm – we’ll tackle common problems and offer tips for continuous improvement.
Addressing Common Growing Challenges
As you nurture your lemon balm plant, you may encounter some common growing challenges that can hinder its growth and flavor intensity. One potential issue is poor growth, which can be caused by insufficient light, inadequate watering, or extreme temperatures. To address this problem, ensure your lemon balm receives at least four hours of direct sunlight a day and maintain consistent moisture levels.
Another common challenge is leaf drop, which can be due to overwatering or underwatering. If you notice yellowing leaves, it’s likely a sign that the plant needs better drainage or reduced watering frequency. Conversely, if the leaves are falling off without any visible signs of disease, consider repotting your lemon balm in well-draining soil.
A lack of flavor intensity can also be an issue for some growers. To enhance the flavor of your lemon balm, make sure to harvest it regularly before the flowers bloom. You can also try growing different varieties that are known for their robust flavor profile. By troubleshooting and addressing these common challenges, you’ll be well on your way to cultivating a thriving and flavorful lemon balm plant.
Strategies for Continuously Harvesting and Renewing Lemon Balm
To extend the harvest season and ensure continuous growth, dividing and replanting established lemon balm plants is an excellent strategy. This technique not only promotes new growth but also regenerates the roots of the plant. To do this, wait until the plant has finished blooming in the summer months when it’s at its peak size. Use a sharp knife or pruning tool to carefully dig up the entire plant, making sure to include as much of the root system as possible.
Next, gently separate the clumps into smaller sections, each with its own roots and some leaves. This will encourage the development of new stems and roots in the replanted section. Replant these divisions in well-draining soil, making sure they’re at least 6-8 inches apart to prevent overcrowding. Water thoroughly and keep the soil consistently moist during the first few weeks after planting.
Regenerating roots through division is an effective way to promote continuous growth and ensure a bountiful harvest. By following this simple technique, you can enjoy fresh lemon balm leaves throughout the growing season and even into the fall months. With proper care, your newly divided plants will thrive, providing you with plenty of opportunities for harvesting and enjoying this wonderful herb.
Frequently Asked Questions
How do I ensure my lemon balm plants are continuously producing new growth throughout the growing season?
Make sure to harvest your lemon balm regularly, as this will encourage the plant to produce more leaves and prevent it from flowering and going to seed. Regular pruning also helps maintain the plant’s shape and promotes healthy growth.
Can I grow lemon balm indoors if I don’t have a suitable outdoor spot for it?
Yes, lemon balm can be grown indoors in containers with proper care. Use a well-draining potting mix and keep the soil consistently moist but not waterlogged. Choose a variety that thrives in indoor conditions and provide sufficient light, ideally a sunny windowsill or under grow lights.
How do I identify and manage common pests like aphids and spider mites on my lemon balm plants?
Monitor your plants regularly for signs of infestation, such as white cottony patches (spider mites) or sticky honeydew droplets (aphids). Use neem oil or insecticidal soap to control pest populations, and consider introducing beneficial insects like ladybugs or lacewings to naturally manage the pests.
Can I propagate lemon balm through division if I want to share plants with friends or expand my own garden?
Yes, lemon balm can be successfully propagated through division in the spring when new growth appears. Carefully separate established roots and replant divisions in a well-draining mix, water thoroughly, and keep the soil consistently moist until the plant is established.
How do I preserve lemon balm leaves for long-term use, such as making herbal tea or infusions?
To dry lemon balm leaves, tie them in small bunches and hang upside down in a warm, dark place. Alternatively, you can freeze the leaves or make herbal tea by steeping fresh or dried leaves in hot water.