Are you looking for a low-maintenance yet charming addition to your indoor space? Look no further than the humble clover plant. Not only is it easy to care for, but clover plants also offer a multitude of benefits that make them an excellent choice for indoor gardening. From purifying the air and promoting relaxation to being a natural attractant for beneficial insects, these tiny flowers pack a big punch.
In this comprehensive guide, we’ll walk you through everything you need to know about growing a healthy and thriving clover plant indoors. We’ll cover the different varieties of clover suitable for indoor planting, provide step-by-step instructions on how to plant and care for your clover, troubleshoot common issues, and explore the benefits of having these lovely plants in your home. Whether you’re a seasoned green thumb or just starting out, this article will have you growing happy and healthy clover plants in no time!
Choosing the Right Variety
When it comes to growing a thriving clover indoor plant, selecting the right variety is crucial. With numerous options available, you need to choose one that fits your lifestyle and space requirements.
Section Overview: Clover is a low-maintenance and adaptable plant that comes in various species. Understanding which variety suits your home best will ensure a healthy and thriving indoor clover.
When it comes to choosing the right clover variety for your indoor plant, you’ll want to consider factors like climate, light exposure, and maintenance habits. With over 300 species of clover to choose from, selecting the perfect one can seem daunting. But don’t worry, we’ve got you covered.
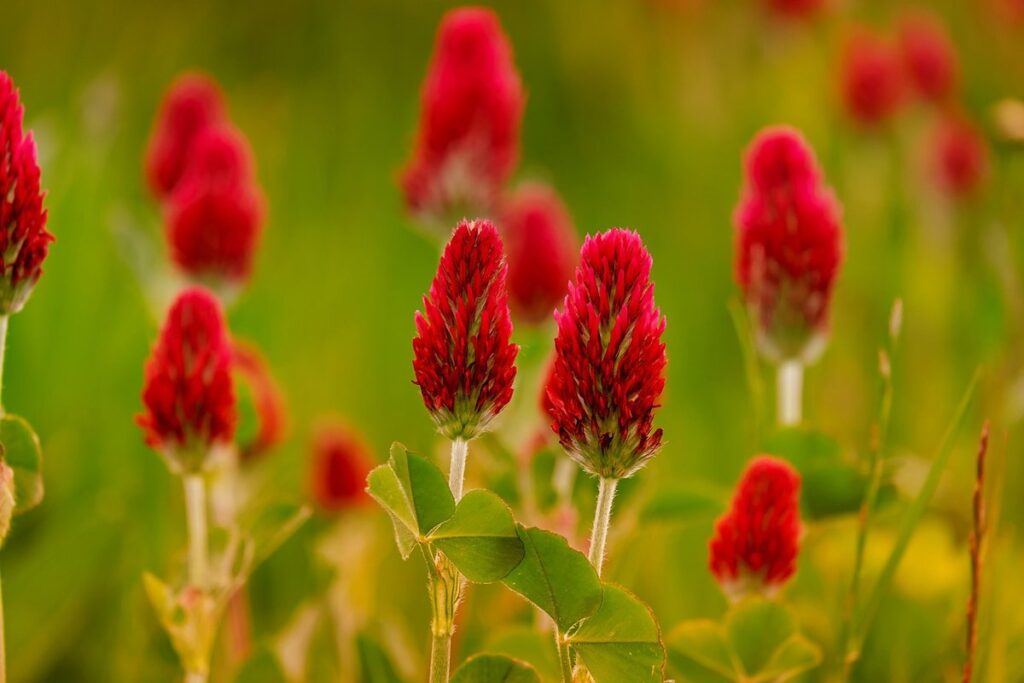
White clover (Trifolium repens) is a popular choice for indoor gardens due to its ability to thrive in low-light conditions. It’s also relatively small in size, making it an ideal option for compact spaces. Red clover (Trifolium pratense), on the other hand, requires more sunlight and can grow quite tall, but it’s known for its vibrant red flowers.
If you’re looking for a more drought-tolerant variety, sweet clover (Melilotus officinalis) might be the way to go. This species is perfect for busy plant parents who tend to forget to water their plants from time to time. Whatever your preferences or needs, understanding which clover variety suits your home best will ensure you end up with a healthy and thriving indoor clover.
Types of Clovers for Indoors
When it comes to choosing the right type of clover for indoor growing, you have several options. One popular variety is White Clover (Trifolium repens), a low-growing perennial that thrives in partial shade and well-draining soil. Its advantages include being relatively easy to care for and tolerating a range of temperatures. However, it may not be the best choice if you’re looking for a clover that can handle full sun.
Red Clover (Trifolium pratense), on the other hand, is a taller perennial that requires more maintenance but offers a lush, vibrant appearance. It’s also known to attract pollinators and fix nitrogen in the soil. However, it may require more frequent watering and pruning.
For indoor growing, Microclover (Trifolium microphyllum) is an excellent option due to its compact growth habit and ability to thrive in low-light conditions. Its advantages include being drought-tolerant and requiring less maintenance than other varieties.
Factors to Consider When Selecting a Variety
When selecting a clover variety for indoor growing, it’s essential to consider its specific needs and adaptability to your home environment. Light requirements are a critical factor to think about – some clovers thrive in bright, direct sunlight, while others prefer partial shade or even low-light conditions.
For example, the ‘Trifolium dubium’ (also known as Red Clover) variety is ideal for indoor growing because it tolerates low light levels and can even grow well under fluorescent lighting. On the other hand, the ‘Trifolium pratense’ (White Clover) variety prefers more direct sunlight to photosynthesize effectively.
Temperature tolerance is another crucial consideration – clovers generally thrive in temperatures between 65°F-75°F (18°C-24°C). Some varieties can tolerate warmer or cooler temperatures, but it’s vital to research the specific temperature range for your chosen variety. Growth habits are also essential to consider – some clovers spread quickly through stolons and can become invasive, while others remain compact and bushy.
By taking these factors into account, you’ll be able to choose a clover variety that thrives in your indoor environment and brings life and beauty to your space.
Planting and Care Instructions
Now that you’ve got your clover plant, it’s time to learn how to properly care for it. This section will walk you through the essential planting and care instructions for a healthy indoor clover plant.
Preparing the Soil
To grow a thriving clover indoor plant, you’ll want to start with a nutrient-rich potting mix specifically designed for indoor plants. This type of mix is formulated to provide the perfect balance of nutrients and moisture retention that clover needs to thrive.
When creating or selecting your potting mix, consider incorporating organic matter like compost or worm casting. These ingredients will not only add essential nutrients but also improve the overall structure of the soil. Compost, in particular, is an excellent choice because it’s rich in beneficial microorganisms that help break down toxins and make nutrients more accessible to your clover plant.
To make your own potting mix, combine 2-3 parts of a well-draining potting mix with 1 part compost or worm casting. You can also add other organic matter like peat moss or perlite for extra moisture retention and drainage. Avoid using regular garden soil, as it may be too dense and heavy for indoor plants.
By starting your clover plant in a nutrient-rich potting mix, you’ll set the stage for optimal growth and health throughout its lifespan.
Lighting Requirements for Optimal Growth
When it comes to growing a thriving clover indoor plant, lighting is one of the most crucial factors to consider. As a general rule, clover plants require bright, indirect light to photosynthesize and grow well. If you’re placing your clover plant near a sunny window, ensure that the direct sunlight isn’t too intense, as this can cause leaf scorch.
If natural light is not an option, or if you want to supplement it, consider using LED grow lights. These energy-efficient lights are specifically designed for indoor gardening and emit a broad spectrum of light that promotes healthy growth. When selecting LED grow lights for your clover plant, look for ones with a color temperature between 5,000-7,000 Kelvin, as this range is ideal for promoting photosynthesis.
Some common mistakes to avoid when it comes to lighting include placing the plant too close to artificial light sources, which can cause burning or discoloration. Also, be mindful of the duration and intensity of artificial lighting, as excessive exposure can lead to weakened roots and poor growth.
Watering Techniques for Indoor Clovers
When it comes to watering your indoor clover plant, getting it just right is crucial. Overwatering and underwatering can have devastating effects on the health of your plant. To start with, you’ll want to understand the ideal watering schedule for your clover.
A good rule of thumb is to water your clover about 1-2 times a week during the spring and summer months when it’s actively growing. However, during the fall and winter months, you can reduce this frequency to once every 10-14 days as the plant grows slower.
It’s also essential to consider using drip irrigation or a watering can with a long spout to water your clover plant directly at the roots, rather than pouring water on top of it. This helps prevent waterlogged soil and root rot. You should aim to provide about 1-2 cups of water each time you water.
To determine if your clover needs more or less water, stick your finger into the soil up to the first knuckle. If the soil feels dry, it’s time for another watering session.
Common Issues and Troubleshooting
If you’re experiencing problems with your indoor clover plant, don’t worry – we’ve got you covered. This section will walk you through common issues and provide troubleshooting tips to get your plant thriving again.
Pests and Diseases in Clover Plants
Pests and diseases can be a major issue for clover plants grown indoors. One of the most common pests that affect clover is spider mites. These tiny, eight-legged creatures are almost invisible to the naked eye but can cause significant damage by sucking sap from leaves.
To prevent infestations, it’s essential to maintain good air circulation around your clover plant and keep the environment clean. Regularly inspect your plant for any signs of pests, such as fine webbing or tiny eggs on stems. If you notice any issues, act quickly by misting the plant with water and then gently washing off any affected areas.
Other common pests that can infest clover include mealybugs and scale insects. Mealybugs secrete a sticky substance called honeydew, which attracts ants and promotes fungal growth. Scale insects, on the other hand, resemble small brown or white bumps on leaves. To eliminate these pests, use insecticidal soap or neem oil as directed, making sure to follow the product’s instructions carefully.
It’s also crucial to monitor your plant for signs of disease, such as yellowing leaves or black spots. Regularly inspect your clover plant and take action promptly if you notice any issues.
Nutritional Deficiencies in Indoor Clovers
As you tend to your indoor clover plant, it’s essential to be aware of potential nutritional deficiencies that can affect its health. One common sign is yellow leaves, which may indicate a lack of nitrogen, iron, magnesium, or potassium. Nitrogen deficiency often results in pale green or yellowish leaves with less chlorophyll.
To diagnose the issue, inspect your plant’s leaves and stems for discoloration or stunted growth. You can also check the soil pH level to ensure it falls within the optimal range of 6.0-7.0 for clover plants. If you’ve recently repotted your plant, consider waiting a few weeks before fertilizing.
To correct nutritional deficiencies, use a balanced, water-soluble fertilizer (20-20-20 N-P-K) and follow the manufacturer’s instructions. You can also mix a small amount of Epsom salt into the soil to provide magnesium and sulfur. Monitor your plant’s response to fertilization, and adjust as necessary.
Remember that over-fertilizing can be detrimental to your clover plant, so start with small amounts and gradually increase as needed. If you’re unsure about repotting or fertilizing, consult a local nursery or gardening expert for guidance.
Benefits and Uses for Clover Plants
Clover plants offer a multitude of benefits and uses, from air purification to edible applications. We’ll explore these advantages and show you how to put them to use in your home.
Health Benefits and Air Purification
Clovers have long been recognized for their incredible ability to purify the air we breathe. As indoor air pollution is a growing concern, having a clover plant in your home can be a valuable asset. These plants are capable of removing toxins and pollutants from the air, making them an excellent addition to any living space.
Studies have shown that clovers can absorb up to 90% of volatile organic compounds (VOCs) from the air within a short period. This is particularly important in homes with poor ventilation or those located near busy streets. By having a clover plant, you can reduce your exposure to pollutants and create a healthier indoor environment.
Some common air pollutants that clovers help remove include formaldehyde, benzene, and trichloroethylene. These chemicals are often found in household items such as cleaning products, paints, and plastics. By introducing a clover plant into your home, you can naturally filter the air and promote better health.
Aesthetic Value of Clover
Clover plants are not only beneficial for their ability to purify the air and improve soil quality, but they also add a touch of natural beauty to interior spaces. Their delicate white or pink flowers, heart-shaped leaves, and lush green foliage create a calming and serene ambiance, making them an excellent addition to any room.
To showcase clover’s aesthetic value, consider placing it in a stylish vase or container that complements its unique features. For example, a mercury glass vase or a clear glass container with a rustic wooden base would add a touch of elegance and sophistication. Alternatively, you can arrange the clover stems in a decorative terrarium or a hanging basket to create a whimsical and airy feel.
When choosing an arrangement for your clover plant, keep in mind its natural habitat and growth patterns. For instance, if you want to emphasize the delicate flowers, place them near a window with indirect sunlight to prevent scorching. By combining the plant’s beauty with a thoughtfully chosen container or arrangement, you can create a stunning focal point that brings a touch of nature indoors.
Tips for Continuous Growth and Maintenance
To keep your clover indoor plant thriving, you’ll need to focus on regular maintenance tasks that ensure it stays healthy and continues to grow. Let’s explore some essential tips together!
Pruning Techniques to Promote Healthiness
Regular pruning is an essential aspect of maintaining your indoor clover plant’s health and appearance. By controlling the growth of your clover plant, you can encourage it to produce lush leaves, maintain its shape, and promote healthy development.
Pruning techniques for clover plants typically involve pinching or cutting off tips to control stem length. To prevent your clover plant from becoming leggy, prune it every 1-2 weeks by removing the top inch of new growth. This will also encourage branching, which leads to a fuller appearance and more flowers. You can use scissors or pinch off the tips with your fingers for a more delicate touch.
When pruning, make clean cuts just above a node (the joint where a leaf meets the stem) using a sharp pair of garden shears or scissors. This will help prevent the plant from becoming stressed and encourage new growth from the nodes. Avoid over-pruning, as this can cause your clover plant to become weak and more susceptible to pests and diseases.
How to Propagate Clover
When it’s time to refresh your clover indoor plant’s look and extend its lifespan, propagation is key. You can achieve this by either dividing the established plant or sowing new seeds.
To propagate through division, carefully dig up the entire pot, gently separate the roots with a blunt instrument, and replant each section in a fresh pot filled with well-draining soil. This method helps maintain the original plant’s characteristics while introducing some diversity to its structure. For instance, if your clover has grown quite large or is showing signs of aging, dividing it will allow you to create multiple smaller plants that can thrive independently.
Sowing seeds, on the other hand, provides a chance to introduce new varieties and keep your collection diverse. Choose high-quality seeds from reputable sources, sow them in seed starting mix about 1/8 inch deep and 2-3 inches apart, and maintain optimal conditions until germination (usually within 7-14 days). Watering and providing sufficient light will help the seedlings grow into mature plants over time. This approach allows you to create a fresh start with each new plant, which can be especially beneficial if your original clover has outgrown its pot or is no longer healthy.
Conclusion and Final Tips
Now that you’ve mastered the art of growing a thriving clover indoor plant, let’s summarize our key takeaways and provide some final tips for continued success.
Recap of Key Points
As you’ve reached the end of this comprehensive guide to growing a thriving clover indoor plant, it’s time to recap the key points that will help you succeed. Let’s review the essential tips for selecting the right variety, providing optimal care conditions, addressing potential issues, and utilizing clovers as a decorative element.
When choosing the perfect clover variety for your indoor space, remember to consider factors such as growth habits, size, and color. White clover (Trifolium repens) is an excellent option for beginners, while microclover (Trifolium microphyllum) is ideal for smaller spaces due to its compact growth habit. Make sure to choose a variety that fits your specific needs and preferences.
To create the optimal care conditions for your clover plant, ensure it receives bright, indirect light – direct sunlight can cause scorching. Maintain temperatures between 60-75°F (15-24°C), and keep the soil consistently moist but not waterlogged. Fertilize sparingly during the growing season to promote healthy growth.
When addressing potential issues, be aware of common problems such as pests (aphids, spider mites) or diseases (root rot). Regularly inspect your plant for signs of infestation or infection, and take prompt action if necessary. Also, don’t hesitate to repot your clover when it becomes pot-bound – this will help maintain its vigor.
Lastly, remember that clovers can be a beautiful addition to your indoor space beyond just their functional benefits. Use them as a decorative element by placing them in hanging baskets or terrariums, allowing you to appreciate their unique charm and beauty.
Frequently Asked Questions
Can I grow clover indoors if my space has limited natural light?
You can still grow clover indoors with limited natural light, but you’ll need to consider using artificial lighting to supplement the lack of sunlight. LED grow lights are a great option for indoor plants like clover, as they provide the necessary spectrum and intensity for optimal growth.
How often should I water my indoor clover plant?
Water your indoor clover plant when the top inch of soil feels dry to the touch. Overwatering is common with indoor plants, so it’s essential to monitor the moisture levels in the soil and adjust your watering schedule accordingly.
Can I use regular potting soil for my indoor clover plant, or do I need a specific type?
While you can use regular potting soil for your indoor clover plant, using a well-draining mix specifically designed for indoors is recommended. This will help prevent waterlogged soil and root rot, which are common issues with clover plants.
How long does it take for a clover plant to start showing signs of growth?
Newly planted clover seeds can take anywhere from 7-14 days to germinate. After that, you should start seeing small leaves and stems emerge from the soil. Be patient, as slow growth is normal during this period.
Can I use clover plants for air purification in areas with high humidity levels?
Yes, clover plants are excellent at purifying the air, but they may require more frequent watering in humid environments. Keep an eye on your plant’s moisture levels and adjust its watering schedule accordingly to ensure optimal growth and effectiveness.