If you’re anything like me, there’s something truly magical about seeing a clematis plant burst into bloom. But let’s face it – these gorgeous flowers can be a bit finicky to grow. Whether you’re a seasoned gardener or just starting out, growing stunning clematis plants requires a little know-how and TLC. In this comprehensive guide, we’ll walk you through the essential steps for growing your own clematis, from selecting the perfect variety to mastering pruning techniques and keeping pests at bay. We’ll cover everything you need to know to coax optimal blooms from your clematis, so you can enjoy those gorgeous flowers in all their glory. So if you’re ready to learn how to grow stunning clematis plants that will make a statement in your garden, let’s get started!
Choosing the Right Clematis Variety
With so many varieties of clematis to choose from, it’s essential to select one that fits your garden’s unique conditions and style. This section will walk you through the key factors to consider when selecting a clematis variety.
Selecting Clematis for Climate and Soil Conditions
When selecting clematis for your garden, it’s essential to choose varieties that thrive in your local climate and soil conditions. A good place to start is by considering the hardiness zone you’re in. Clematis are typically hardy in zones 3-9, but some species can tolerate warmer or cooler temperatures. Check the specific hardiness zone for the variety you’re interested in to ensure it will survive the winter months.
Another crucial factor is sun exposure. Most clematis prefer full sun to partial shade, but some species like ‘Nelly Moser’ and ‘Huldine’ perform well in shadier conditions. Make sure to choose a variety that suits your garden’s sunlight levels. Soil pH also plays a significant role, with most clematis preferring slightly acidic to neutral soil (pH 6.0-7.0). ‘Snow Queen’, for example, thrives in alkaline soils, while ‘Crystal Fountain’ prefers more acidic conditions.
By considering these factors, you’ll be able to select the perfect clematis variety for your garden’s unique climate and soil conditions. Remember to also factor in your desired bloom time, as some varieties flower earlier or later than others. With a little research and planning, you’ll be well on your way to growing beautiful, thriving clematis.
Understanding Clematis Classification and Types
When it comes to choosing the right clematis variety for your garden, understanding their different types is crucial. Clematis are broadly classified into several categories based on their growth habits and flowering characteristics. One of the main distinctions lies between flowering and non-flowering varieties.
Flowering clematis are the most popular type, known for their stunning blooms that can range from delicate pastel shades to vibrant hues. These plants typically require regular pruning to maintain their shape and encourage new growth. They come in a wide array of bloom times, with some species blooming in early spring, while others produce flowers throughout the summer months.
Non-flowering clematis, on the other hand, are often used as foliage plants or for their attractive seed heads. These varieties tend to have more compact growth habits and require less maintenance than flowering types. They’re ideal for adding year-round interest to your garden without the need for regular pruning.
Herbaceous and evergreen clematis also exist within this broad classification system. Herbaceous varieties die back completely in winter, whereas evergreen ones retain some or all of their foliage throughout the cold months. This distinction is crucial when determining how often to water, fertilize, and prune your plant.
In terms of growth habits, clematis can be categorized into climbers, scramblers, and compact types. Climbing varieties require support to grow up a trellis or arbor, while scramblers tend to spread out more freely. Compact types are perfect for small gardens or containers where space is limited.
When choosing the right clematis variety, consider factors such as your climate, available sunlight, and desired bloom time. Some species thrive in partial shade, while others require full sun. Research specific care requirements for your chosen type to ensure it receives the best possible conditions to flourish.
By understanding these fundamental differences between various clematis types, you’ll be better equipped to select a variety that suits your garden’s unique needs and style.
Planting and Preparing the Soil
When growing clematis, proper soil preparation is key. This section will guide you through planting and preparing your soil to ensure a healthy foundation for your new blooms.
Preparing the Site for Clematis Growth
When preparing the site for clematis growth, it’s essential to select a location that provides the right conditions for optimal development. Clematis plants thrive in areas with full sun to partial shade, depending on the specific variety. Make sure to choose a spot that receives at least 6 hours of direct sunlight per day, as this will promote healthy flowering and growth.
In addition to sunlight, consider the wind protection your site offers. Clematis can be sensitive to strong winds, which may cause damage or breakage. If possible, plant them near a wall or fence for added support.
Drainage is also crucial when preparing the site. Clematis don’t like wet feet, and soggy soil can lead to root rot. Ensure that your planting area has good drainage by checking the slope of the land and avoiding low-lying areas where water tends to collect.
To prepare the soil, start by removing any debris or weeds from the area. Till the soil to a depth of 12-18 inches to loosen it and improve drainage. Finally, add organic matter such as compost or well-rotted manure to enrich the soil and provide nutrients for your clematis plants.
Choosing the Right Container or Location for Clematis
When it comes to growing clematis, one of the most important decisions you’ll make is whether to plant them in containers or directly in the ground. Both methods have their pros and cons, which we’ll explore below.
Growing clematis in containers offers flexibility and control over the soil quality and moisture levels. This is especially beneficial if your native soil is poor in drainage or fertility. Containers also allow you to move plants around to optimize sunlight exposure and protect them from harsh winds. However, container-grown clematis may require more frequent watering and fertilization.
On the other hand, planting clematis directly in the ground can be a more cost-effective option and allows for better root development. This method is also less prone to soil erosion and can provide natural wind protection. Nevertheless, poor soil conditions or inadequate sunlight can lead to stunted growth and reduced blooms.
When choosing containers, select ones with good drainage holes to prevent waterlogged soil. A minimum size of 12-14 inches deep and 18-24 inches wide is recommended for most clematis varieties. Consider using terracotta pots, as they are breathable and allow for healthy root growth. Position your container-grown clematis in a location that receives at least 6 hours of direct sunlight and is protected from strong winds.
In either case, make sure to locate your clematis near an accessible path or gate to facilitate regular watering, pruning, and harvesting. This will also allow you to enjoy the blooms without straining yourself.
Planting Clematis Seeds or Cuttings
When planting clematis seeds or cuttings, it’s essential to choose the right method for your specific situation and climate. Follow these steps to ensure successful germination and growth.
Starting Clematis from Seeds
Starting clematis from seeds can be a rewarding experience for seasoned gardeners and beginners alike. However, it’s essential to understand that seed viability and germination rates play a significant role in the process.
Before sowing, check the seed packet or consult with a reputable supplier to determine the average germination rate of your specific clematis variety. Typically, clematis seeds have a low germination rate of around 20-30%. This is because they require cold stratification and precise temperature conditions to break dormancy.
To sow clematis seeds indoors, start by filling seed trays or small pots with a well-draining seed starting mix. Plant the seeds about ¼ inch deep and 1-2 inches apart. Keep the soil consistently moist but not waterlogged. Provide a cold stratification period of around 6-8 weeks before the last frost date in your area, maintaining temperatures between 35°F to 45°F (2°C to 7°C). Once the seeds have germinated, transfer them into individual pots and continue to provide bright, indirect light.
After about 12-16 weeks, clematis seedlings will be ready for transplanting outdoors. Harden off the plants by gradually exposing them to outdoor conditions over a period of 7-10 days before planting in their final location.
Propagating Clematis through Cuttings
To propagate clematis through cuttings, start by selecting healthy stems from mature plants. Look for sections with at least two sets of leaves and a length of about 6-8 inches. Cut these stems just above a node using a sharp, clean knife or pruning tool. Remove lower leaves to prevent moisture loss and promote rooting.
Fill a propagation tray or small pots with a well-draining rooting medium, such as perlite or vermiculite. Dip the cut ends into a rooting hormone powder or liquid, if available, to enhance root development. Plant the stems 1-2 inches deep in the rooting medium, firming the soil gently around them.
Maintain high humidity and temperatures between 65-75°F (18-24°C) for successful propagation. Cover the tray or pots with a clear plastic bag or cloche to create a mini-greenhouse effect. Check on the cuttings daily and remove the covering when roots develop, usually within 3-6 weeks. Water carefully once new growth appears, gradually transitioning the plant to its permanent location.
Keep in mind that not all clematis varieties propagate well through cuttings; some may require more advanced techniques or seed starting. Be patient and observe your plants’ responses to different methods for optimal results.
Providing Optimal Care
To ensure your clematis plants thrive, it’s essential to provide them with optimal care, which includes regular watering and fertilization. This ensures they receive all the necessary nutrients for healthy growth.
Watering and Fertilizing Clematis
Consistent moisture levels are crucial for clematis during the growing season. Water your plants deeply once or twice a week, depending on weather conditions. Avoid overwatering, which can lead to root rot and other problems. Clematis prefers well-draining soil, so if your area experiences frequent rainfall, consider installing a French drain system.
Fertilization is also essential for healthy clematis growth. Apply a balanced fertilizer (10-10-10 N-P-K) in early spring when new growth begins. This will provide necessary nutrients for the first few months of the growing season. In mid-summer, switch to an acidic fertilizer (such as 10-5-5 N-P-K) to promote blooming and flower color.
As a rule of thumb, clematis benefits from high-potassium fertilizers in late summer or early fall. These fertilizers stimulate root development, preparing the plant for winter dormancy. Use a high-phosphorus fertilizer (such as 10-20-10 N-P-K) to promote blooming and flowering next season.
Monitor your clematis plants closely and adjust your watering and fertilization schedule accordingly. By providing consistent moisture levels and targeted fertilizers, you’ll be rewarded with vibrant blooms and healthy growth.
Pruning and Training Clematis for Maximum Growth
Pruning and training clematis is an essential part of promoting healthy growth, encouraging flowering, and preventing disease. Different types of clematis require unique pruning techniques to ensure optimal results.
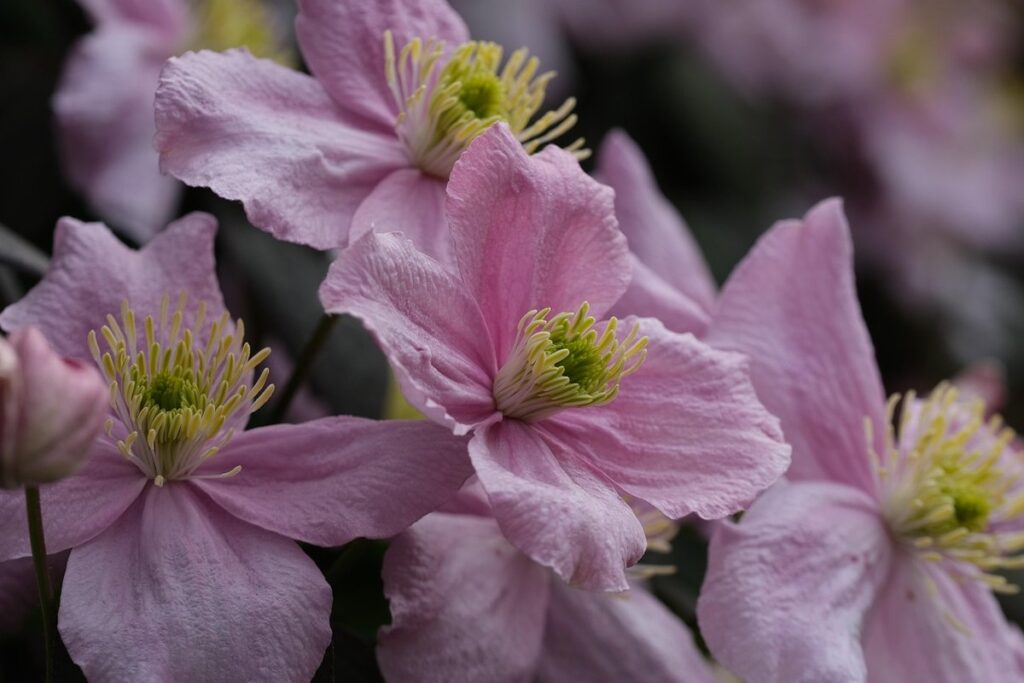
For flowering clematis, renewal pruning is the best approach. This involves cutting back stems to about 3-4 feet from the ground in late winter or early spring. This encourages new growth, leading to a profusion of blooms later in the season. For example, Clematis montana varieties benefit greatly from this technique.
Tip-cutting, on the other hand, is suitable for clematis that produce long stems with smaller flowers at the tip, like C. florida. Remove the top inch or two of new growth after blooming to encourage more blooms and a fuller plant.
Deadheading – removing spent flowers immediately after they fade – also plays a vital role in promoting repeat flowering. This technique is particularly effective for clematis varieties that bloom heavily, such as C. montana and C. jackmanii. By pruning regularly and using the right techniques for your specific variety, you’ll be rewarded with lush growth, vibrant blooms, and a long-lasting display of color throughout the growing season.
Common Pests and Diseases Affecting Clematis
As you nurture your clematis plants, it’s essential to keep an eye out for pests and diseases that can harm their delicate flowers and foliage. From aphids to powdery mildew, we’ll cover the most common threats to watch out for.
Identifying and Managing Common Clematis Pests
As you tend to your clematis plants, it’s not uncommon to encounter pests that can cause significant damage. Identifying and managing common clematis pests is crucial for maintaining the health of your plants. Among the most prevalent culprits are aphids and whiteflies, which feed on plant sap and secrete sticky honeydew residue that attracts other insects.
Slugs and snails, on the other hand, feed on leaves, stems, and flowers, leaving behind silvery trails of slime. To manage these pests effectively, consider adopting an integrated pest management (IPM) approach. This holistic method combines physical barriers, biological control methods, traps, and targeted chemical controls to minimize harm to your plants.
Biological control methods involve introducing natural predators or parasites that feed on the pests. For example, ladybugs are known to prey on aphids and whiteflies. Traps can be used to capture slugs and snails at night when they’re most active. Chemical controls should be used as a last resort, as they can harm beneficial insects and pollinators. Always follow product labels carefully and take necessary precautions to avoid exposure.
In addition to these methods, maintain cleanliness around your plants by removing weeds, debris, and infested plant parts. Also, ensure proper watering practices, as overwatering can exacerbate pest problems. By adopting a multi-faceted approach to managing clematis pests, you’ll be better equipped to protect your plants from damage and promote healthy growth.
Preventing and Treating Clematis Diseases
Clematis plants are susceptible to various diseases that can cause significant damage if left untreated. Among the most common diseases affecting clematis are powdery mildew and root rot.
Powdery mildew, characterized by a white powdery coating on leaves and stems, thrives in warm and humid conditions. To prevent this disease, ensure good air circulation around your plants and avoid watering them from above, which can splash water onto the foliage. Regularly inspect your clematis for signs of powdery mildew and treat it promptly with a fungicide.
Root rot, on the other hand, is caused by overwatering or poor drainage, leading to root decay. To prevent this disease, repot your clematis in well-draining soil and avoid watering them when the soil is already saturated. If you notice signs of root rot, carefully remove infected roots and treat the remaining roots with a fungicide.
It’s essential to implement preventive measures such as crop rotation, sanitation, and integrated pest management to minimize the risk of disease on your clematis plants.
Encouraging Repeat Blooms
To get multiple blooming seasons from your clematis, you’ll want to focus on encouraging a strong stem and cutting back the plant after it finishes flowering. This simple technique makes all the difference!
Deadheading and Disbudding for Maximum Bloom
Deadheading and disbudding are two essential techniques that will encourage your clematis to produce more blooms throughout the growing season. By removing spent flowers, you’re signaling to your plant that it’s time to focus its energy on producing new growth rather than seed production.
When deadheading, look for the wilted or dying blooms, usually towards the end of their cycle. Simply snip off the stem just above a set of leaves using clean pruning shears. Don’t pull the spent flowers off, as this can damage the stem and lead to disease issues. For clematis, it’s best to remove the entire flower head, rather than cutting off individual petals.
Disbudding involves removing smaller buds on the stem to allow energy to be directed towards producing larger, more robust blooms. This process is called “pinching out.” Simply pinch or snip off these smaller buds, usually a few days after new growth has begun. By disbudding and deadheading regularly, you’ll encourage your clematis to channel its resources into flowering rather than weak, leggy growth.
Providing Support and Training Clematis
As you watch your clematis plant grow and thrive, it’s essential to provide support as it grows. This is crucial for several reasons: Firstly, it helps maintain the plant’s shape, encouraging it to bloom more freely. Secondly, a sturdy framework will protect the stems from breaking under the weight of new flowers. Lastly, proper training will promote better air circulation, reducing the risk of disease.
There are various techniques you can employ to train your clematis’ stems: twining is one popular method, where you gently twist the stem around a trellis or arbor. Wiring is another technique that involves using specialized wire to guide the stems into place. Staking is also effective for young or weak growth, as it provides an extra layer of support.
For established plants, try twining the new shoots in and out of the existing structure. This will help integrate the new growth while maintaining a balanced appearance. To make training easier, choose a clematis with a naturally trailing habit, like Clematis ‘Crystal Fountain’, which cascades beautifully over a wall or arbor.
Frequently Asked Questions
How do I care for my clematis after the blooming season?
Yes, it’s essential to provide continued support and maintenance for your clematis plants even after they’ve finished blooming. Continue watering and fertilizing regularly, and remove any dead or dying flowers (deadheading) to encourage repeat blooms.
Can I grow clematis in containers?
Yes, you can grow clematis in containers if you choose a variety that is compact or dwarf, such as ‘Crystal Fountain’ or ‘Snow Queen’. Ensure the container has good drainage holes and use a high-quality potting mix specifically designed for climbing plants. Provide support for the vines to grow upwards.
What are some common pests and diseases I should watch out for?
Keep an eye out for aphids, mealybugs, and slugs, which can all harm your clematis. Regularly inspect your plants for signs of disease such as black spot, powdery mildew, or leaf blight. Use organic pest control methods whenever possible to minimize harm to beneficial insects.
Can I propagate clematis from seed?
Yes, you can start clematis from seeds, but this method is more challenging and time-consuming than propagating through cuttings. It’s essential to sow the seeds in a cold frame or indoor propagation tray under controlled conditions, as they require a period of cold stratification.
How often should I water my clematis during hot summer months?
Water your clematis plants regularly during hot summer months, providing about 1 inch of water per week. However, avoid overwatering, which can lead to root rot and other issues. Check the soil moisture by inserting your finger into the soil up to the knuckle; if it feels dry, it’s time for watering.