Growing clematis in your garden can be a true showstopper, adding a touch of elegance and beauty to any outdoor space. But with so many varieties to choose from, it’s easy to get overwhelmed by the prospect of growing these stunning flowers. Whether you’re a seasoned gardener or just starting out, selecting the right clematis for your garden can be a daunting task. That’s why we’ve put together this comprehensive guide to help you grow stunning clematis in your garden. In this article, we’ll cover everything from variety selection and soil preparation to pruning techniques and care tips. By the end of this guide, you’ll have all the knowledge you need to cultivate gorgeous clematis blooms that will make your garden stand out.
Understanding Clematis Basics
To grow stunning clematis, it’s essential to start with a solid understanding of these beautiful vines’ basic needs and characteristics. Let’s dive into the fundamental aspects of growing clematis.
Choosing the Right Clematis Variety
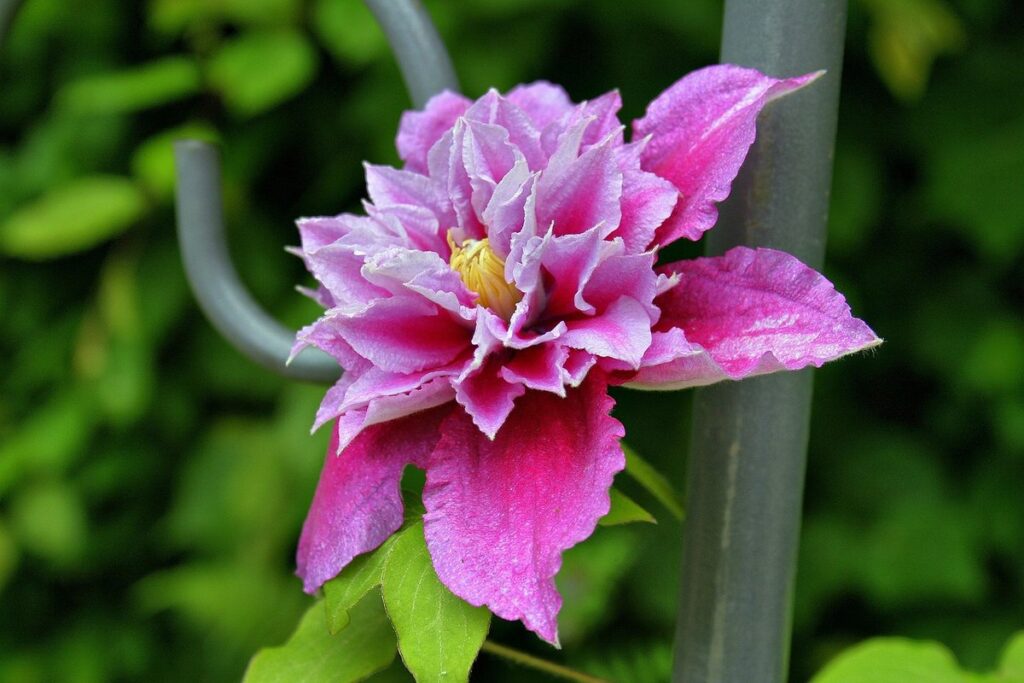
When selecting a clematis variety for your garden, it’s essential to consider the type of plant you want and its specific needs. Clematis comes in three main categories: vines, shrubs, and hybrids. Vines are ideal for covering arbors or trellises, with long stems that can grow up to 10 feet tall. Shrubs, on the other hand, produce smaller flowers but offer more structural support and can be pruned to maintain a specific shape.
Hybrids often combine the best traits of both vines and shrubs, offering stunning blooms and compact growth habits. When choosing a variety, consider factors such as sunlight, soil type, and desired bloom time. For example, if you want early spring blooms, look for varieties that produce flowers in late March or April. Make sure to also select clematis suitable for your climate zone and hardiness level.
It’s also crucial to note that some clematis varieties are more compact than others, making them perfect for smaller spaces. For instance, ‘Snow Queen’ is a compact variety with small white blooms, while ‘Nelly Moser’ has larger flowers but requires more support. By understanding the characteristics of different clematis types and selecting the right variety for your garden, you can ensure a stunning display of color and beauty every year.
Planting Location and Climate Considerations
When it comes to growing clematis, selecting the right location is crucial for their optimal growth. As a general rule, choose a spot that receives full sun to partial shade, depending on the specific variety you’re cultivating. Most clematis varieties require at least six hours of direct sunlight per day, but some can tolerate as little as four.
The soil type also plays a significant role in determining the success of your clematis. These plants prefer well-draining soil that’s rich in organic matter. Avoid areas with standing water or heavy clay soils, as they can lead to root rot and other issues. If you have poor soil conditions, consider amending it with compost or well-rotted manure.
When it comes to climate considerations, clematis generally thrive in USDA zones 3-9. They require a moderate temperature range of between 65°F (18°C) and 85°F (29°C). Avoid areas with extreme temperatures, as they can cause damage to the plant’s delicate tissues. Aim for humidity levels around 50-60%, but ensure good air circulation to prevent fungal diseases.
Preparing the Soil for Clematis
To give your clematis the best start, you’ll want to prepare the soil by loosening it and adding some organic matter, like compost. This will help roots grow deep and strong.
Testing and Amending the Soil
Before planting clematis, it’s essential to test your soil pH and nutrient levels to ensure you’re providing an optimal environment for growth. Clematis prefers well-draining, fertile soil with a slightly acidic to neutral pH (around 6.0-7.0). You can purchase a soil testing kit or send a sample to a lab for analysis.
The results will reveal whether your soil needs amendments to support clematis growth. For example, if your soil is too alkaline, you may need to add sulfur or peat moss to lower the pH. On the other hand, if it’s too acidic, adding lime can help neutralize it.
In addition to adjusting the pH, you’ll also want to address nutrient deficiencies. Clematis requires a balanced diet of nitrogen, phosphorus, and potassium (NPK). If your soil test reveals low levels of these nutrients, consider applying a slow-release fertilizer in the spring and again after flowering. This will provide a steady supply of nutrients throughout the growing season.
Remember to also incorporate organic matter like compost or well-rotted manure to improve soil structure and fertility.
Mulching and Composting Benefits
Mulching and composting are essential practices when it comes to growing clematis. Mulch acts as a protective barrier around the base of the plant, retaining moisture and regulating soil temperature. This helps prevent water loss through evaporation, reducing the risk of drying out during hot summer months. In addition, mulch suppresses weed growth, which can compete with your clematis for water and nutrients.
Compost enriches the soil by providing essential micronutrients that promote healthy plant growth. By incorporating compost into the soil, you’re essentially giving your clematis a boost of energy to thrive. When choosing a compost, look for one high in nitrogen content (around 20-30%) to fuel leafy growth and flowers.
To mulch around your clematis base, use a 2-inch layer of organic material like bark chips or wood shavings. Avoid piling it too high, as this can lead to rot and disease issues. As for composting, mix in about 10% compost into the top 6-8 inches of soil before planting. This will help establish a robust root system that’ll support your clematis throughout its growth cycle.
Planting Clematis: Tips and Tricks
To get started with planting clematis, you’ll want to follow some essential steps to ensure a healthy and thriving plant. Here’s where we dive into the details of how to properly plant your clematis.
Digging and Planting the Right Way
When digging and planting your clematis, it’s essential to handle the roots with care to ensure healthy growth and a strong start. Begin by selecting a spot that receives at least 6 hours of direct sunlight and has well-draining soil. To prepare the site, dig a hole that’s about twice as wide and just as deep as the plant’s root ball.
Gently remove the clematis from its container or burlap covering, taking care not to disturb the roots too much. If the roots are circling or tangled, use your fingers or a blunt instrument to gently tease them apart. Place the plant in the hole, making sure the crown (where the stem meets the roots) is level with the soil surface.
As you backfill, firm the soil around the roots to prevent settling and air pockets from forming. Water thoroughly to settle the soil and provide enough moisture for establishment. Keep the area around the clematis free of weeds to prevent competition for nutrients.
Supporting the Plant for Optimal Growth
When it comes to growing clematis, providing adequate support is crucial for optimal growth and blooming. As these beautiful vines can grow quite large, they need a sturdy structure to cling onto as they climb upwards. One of the most popular methods of supporting clematis is by using trellises.
A trellis provides not only support but also adds an aesthetic touch to your garden or yard. You can choose from a variety of materials such as wood, metal, or PVC, and select one that complements your garden’s style. When selecting a trellis, consider the size and shape of the clematis plant, as well as its mature height.
Stakes are another common method for supporting clematis, particularly when the plants are still young and tender. They help to keep the stems upright and prevent damage from strong winds or accidental kicks. To use stakes effectively, drive them into the ground at a 45-degree angle, making sure they’re secure enough to hold the weight of the plant.
Wire supports can also be used in conjunction with trellises or stakes for added stability. These are especially useful when training clematis plants along arbors, pergolas, or other types of garden structures. By combining these methods, you’ll create a sturdy framework that allows your clematis to grow and thrive.
Watering and Fertilizing Clematis
Proper watering and fertilization are crucial for healthy clematis growth, so let’s dive into the essential techniques you need to master. We’ll cover the best practices for keeping your clematis well-fed and hydrated.
Understanding Clematis Water Requirements
When it comes to watering your clematis, determining when to do so can be a bit tricky. But don’t worry, with a few simple checks, you’ll be able to give your plant the right amount of hydration.
First and foremost, take note of the weather conditions outside. If it’s been dry for an extended period or there’s no rain in sight, it’s time to water your clematis. On the other hand, if the soil is already damp and you live in a region with frequent rainfall, hold off on watering.
To check the soil moisture level, stick your finger into the soil about an inch deep. If the soil feels dry, it’s time to water. You can also use a moisture meter for more accuracy. As a general rule of thumb, water your clematis when the top 1-2 inches of soil feel dry to the touch.
Remember, overwatering is just as bad as underwatering, so make sure not to drown your plant. Water thoroughly, but let the excess water drain out before giving it another drink. With a little practice and patience, you’ll get the hang of determining when to water your clematis just right!
Providing Nutrients for Healthy Growth
Clematis relies heavily on nutrient-rich soil to produce vibrant blooms and strong growth. Fertilizing regularly is essential to ensure your plant receives all the necessary nutrients for healthy development. Without adequate fertilization, clematis may struggle with weak stems, sparse foliage, or reduced flowering.
When it comes to choosing a fertilizer, you have two main options: organic and synthetic. Organic fertilizers are derived from natural sources like compost, manure, or bone meal. These slow-release options promote long-term soil health without burning your plant’s roots. Synthetic fertilizers, on the other hand, provide an instant boost of nutrients but can be harsh if overused.
To apply fertilizer effectively, follow these steps: First, test your soil to determine its pH level and nutrient content. Based on the results, select a balanced fertilizer that meets your clematis’ specific needs. Follow the package instructions for application rates and timing, typically during the growing season (spring-fall) or after pruning in late winter.
Some examples of organic fertilizers include compost tea, fish emulsion, or alfalfa meal. For synthetic options, consider water-soluble fertilizers like 20-20-20 NPK formula. Remember to rotate between these types periodically to avoid depleting your soil’s natural resources and encourage a balanced nutrient intake for your clematis.
Pruning and Training Clematis
When it comes to keeping your clematis healthy and thriving, pruning and training is an essential part of the process. This section will walk you through how to prune and train your clematis for maximum blooming potential.
Basic Pruning Techniques for Clematis
When it comes to pruning clematis, understanding the basic techniques is crucial for maintaining its shape, promoting blooming, and controlling growth. To start, make sure you’re using clean and sharp pruning tools to prevent spreading diseases.
For new clematis plants, it’s essential to prune them back by about one-third after planting to encourage a strong root system. This will help the plant establish itself in the soil and promote healthy growth. For established plants, prune in late winter or early spring, removing any dead, diseased, or damaged stems.
When pruning clematis, focus on cutting just above a bud eye – the small swelling on the stem where leaves meet the twig. This will encourage new growth from that point. Cut back overgrown stems by one-third to half their length, and cut back weak or spindly growth to about 6-8 inches from the ground.
For blooming clematis, prune after they finish flowering, cutting back the stem to just above a bud eye. This will encourage new blooms on that stem in subsequent seasons. With regular pruning, you’ll be rewarded with a healthy and thriving clematis plant that produces beautiful blooms year after year.
Training Clematis for Climbing or Shrubs
Training clematis vines to climb trellises or other supports is an essential part of their care. To begin, choose a sturdy support that can accommodate the mature size of the plant. For large varieties, consider a 6-8 foot tall trellis or arbor, while smaller ones can do well on a shorter obelisk or stake.
Once your clematis is in place, gently twine its stems around the support, working from the bottom up to avoid tangling. You can also use twine or wire ties to secure the stems in place, taking care not to damage the bark. For shrub varieties, prune them back by about one-third in late winter to encourage bushy growth and prevent legginess.
As your clematis grows, continue to provide support by gently teasing out new stems and encouraging them to climb the trellis. This will also help maintain an even shape and promote flowering. Be patient, as it may take some time for the plant to adjust to its new surroundings. With proper training, you’ll be rewarded with a beautiful display of blooms that cascade down the trellis in no time.
Common Pests and Diseases Affecting Clematis
When growing clematis, you’ll inevitably encounter some unwanted visitors – pests like aphids and slugs can cause significant damage if left unchecked. We’ll walk you through common issues to watch out for.
Identifying and Managing Common Pests
As you nurture your clematis plants, it’s essential to be aware of common pests that can target them. Among the most prevalent culprits are aphids, slugs, and snails. These pests can cause significant damage if left unchecked.
Aphids, for instance, feed on plant sap, stunting growth and causing curled or distorted leaves. To manage an aphid infestation organically, try spraying your clematis with a forceful jet of water to dislodge the pests. You can also introduce natural predators like ladybugs or lacewings, which feed on aphids.
Slugs and snails are another pair of common pests that enjoy munching on clematis leaves and flowers at night. To deter them, place copper tape around plant stems – slugs don’t like to cross over it. You can also hand-pick these pests under the light of a full moon or use beer traps.
Additionally, keep your garden area clean by disposing of weeds where snails and slugs might hide. Make sure to water your clematis in the morning so that excess moisture dries up during the day, reducing the likelihood of slug and snail infestations. By taking these simple steps, you can protect your clematis from these common pests and ensure a healthy, thriving plant.
Recognizing and Treating Clematis Diseases
When it comes to growing clematis, diseases can be a significant problem if left unchecked. Powdery mildew and leaf spot are two of the most common issues you may encounter.
Powdery mildew is characterized by a white, powdery coating on the leaves and stems of your clematis plant. If you notice this symptom, inspect the area carefully to see if there’s any black mold underneath the powder. This will help you confirm that it’s indeed powdery mildew and not another issue.
Leaf spot is easily identifiable by dark spots or patches on the leaves. These may appear circular, irregularly shaped, or even withered.
To treat these diseases using organic methods, make sure to maintain good air circulation around your plant, remove any infected areas, and water it in the morning so the leaves have a chance to dry before nightfall.
For more severe cases, consider using fungicides specifically designed for clematis plants. These can be applied as a spray or powder according to the product’s instructions.
Troubleshooting and Common Mistakes
Growing clematis can be a bit tricky, so let’s go over some common pitfalls to watch out for, and how to fix them. Avoiding these mistakes will help you get the most out of your beautiful blooms.
Addressing Common Issues with Clematis Growth
Growing clematis can be a rewarding experience, but like any plant, it’s not immune to common issues. One of the most frustrating problems is poor blooming, which can be caused by inadequate sunlight, insufficient fertilization, or root damage from overwatering. To encourage more blooms, ensure your clematis receives at least six hours of direct sunlight and feed it with a balanced fertilizer in spring.
Weak growth can also be a concern, particularly if your clematis is not receiving enough nutrients or water. Make sure to provide support for tall varieties as they grow, and consider repotting into fresh compost every few years to refresh the soil.
Pest and disease issues are another common problem faced by gardeners growing clematis. Inspect your plants regularly for signs of aphids, mealybugs, or spider mites, and treat promptly with insecticidal soap or neem oil if necessary. Regularly inspect your plants for black spot, powdery mildew, or stem canker, and remove any infected areas to prevent the disease from spreading.
Regular pruning in late winter or early spring is essential for maintaining the health of your clematis plant. Prune dead or diseased wood first, then cut back stems that are crossing or growing inwards, which will help promote a more open shape and encourage new growth.
Avoiding Common Mistakes for a Healthy Plant
When growing clematis, it’s easy to get caught up in the excitement of watching these beautiful vines thrive. However, common mistakes can quickly lead to disappointment and frustration. To avoid these pitfalls, let’s examine some of the most frequent errors gardeners make when cultivating clematis.
Overwatering is one of the most common mistakes made when growing clematis. Clematis roots sit just below the surface of the soil, so excessive moisture can cause them to rot quickly. Check your plant daily during hot weather and reduce watering to once a week during cooler periods. Also, ensure good drainage by mixing in organic matter like compost or well-rotted manure.
Another mistake is providing too much direct sunlight. While clematis appreciate full sun, some varieties can suffer from scorched leaves if exposed for extended periods. East-facing walls and morning sun are ideal locations for many types of clematis.
Failing to prune correctly can also cause issues with your clematis plant. Prune dead, diseased, or damaged stems in late winter or early spring, cutting them back to about 30-40cm from the base. This will encourage new growth and prevent pests and diseases from spreading.
It’s essential to choose a location that provides good air circulation around your clematis plant. Vines can become compacted by adjacent plants, leading to moisture buildup and promoting disease. Space your clematis at least 30-60cm away from other plants to allow for sufficient airflow.
Frequently Asked Questions
Can I grow clematis in containers or must they be planted directly in the ground?
Yes, you can definitely grow clematis in containers! This is a great option for small gardens or those with limited space. Just make sure to choose a large enough container (at least 12-18 inches deep) and use well-draining potting mix specifically designed for vines. Clematis needs room to grow its roots, so be prepared to provide regular fertilization.
How often should I water my clematis, especially during hot summer months?
Clematis generally prefers moist soil but can tolerate some drought. Water your plant deeply once or twice a week, depending on weather conditions. Be cautious not to overwater, as this can lead to root rot and other problems. Check the soil moisture by sticking your finger into the soil up to the first knuckle.
Can I grow multiple clematis varieties together in the same garden bed?
While it’s possible to grow multiple clematis varieties together, it’s not always recommended. Some clematis can be aggressive spreaders and may overtake other plants or even damage nearby structures. Choose compatible varieties that have similar growing conditions and space requirements.
What are some common mistakes beginners make when pruning their clematis?
One of the most common mistakes is over-pruning, which can lead to reduced blooming or even plant death! Avoid cutting back more than one-third of the stem in a single session. Start with smaller, less dramatic cuts and gradually work your way up as needed.
How long does it take for clematis to bloom after planting?
Clematis typically takes around 1-3 years to mature and produce blooms after planting. However, this timeline can vary depending on factors like soil quality, climate, and the specific variety chosen. Be patient and enjoy watching your plant grow and develop over time!